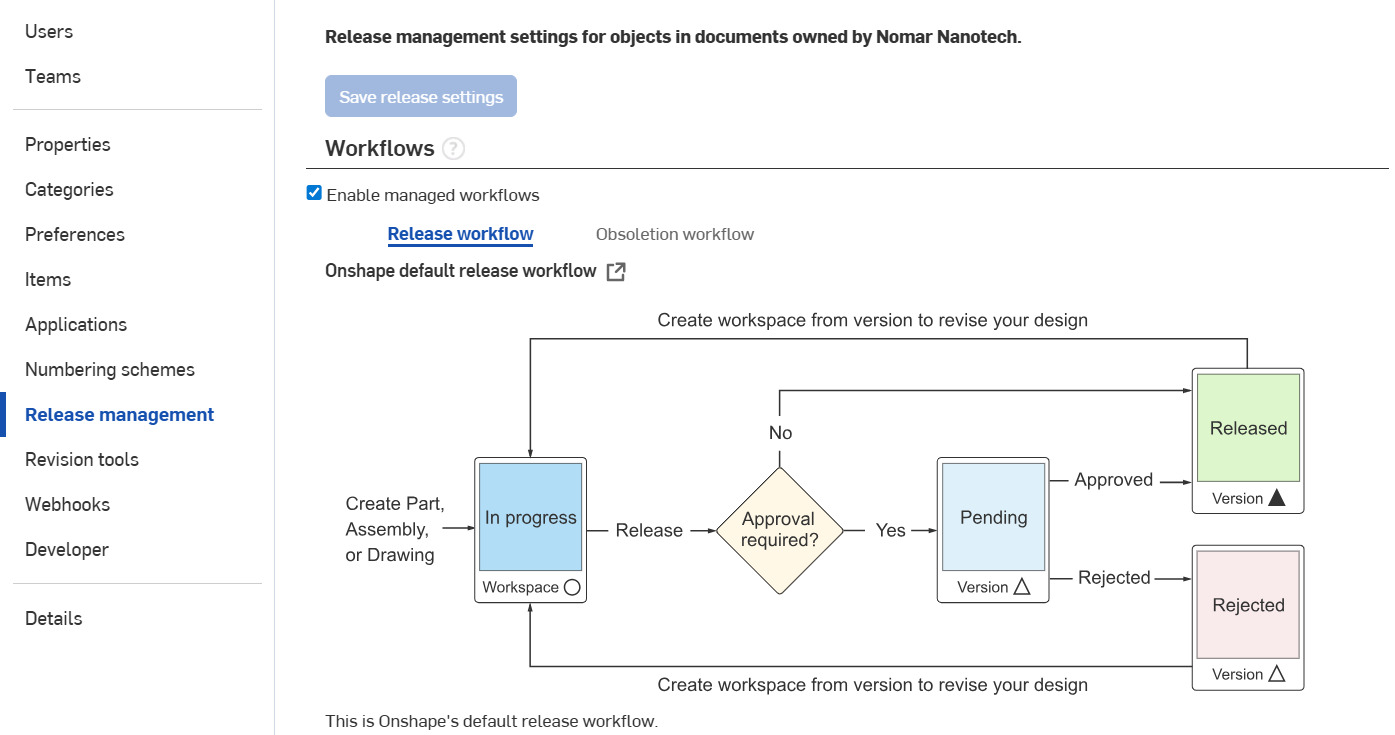
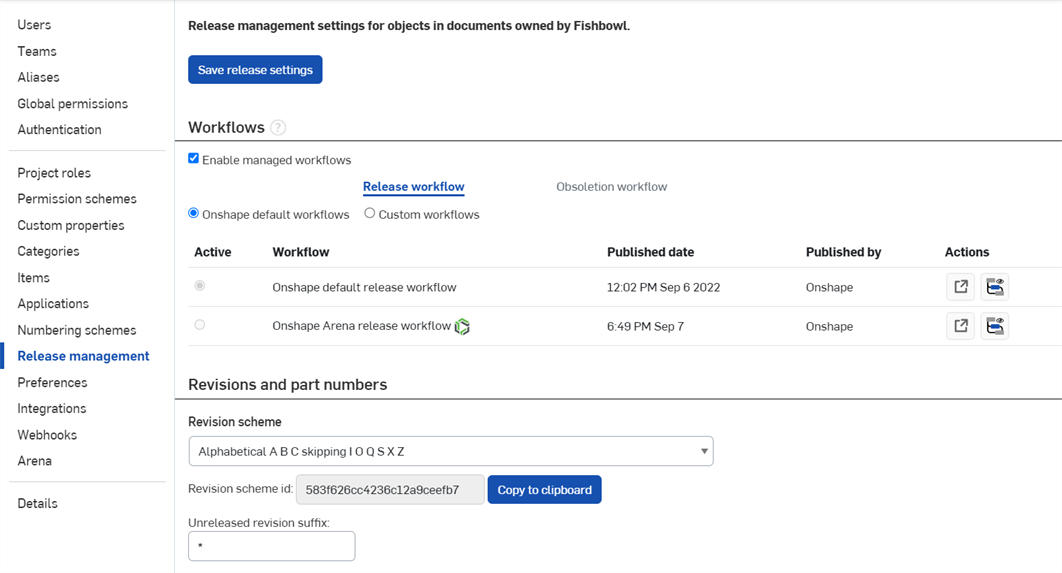
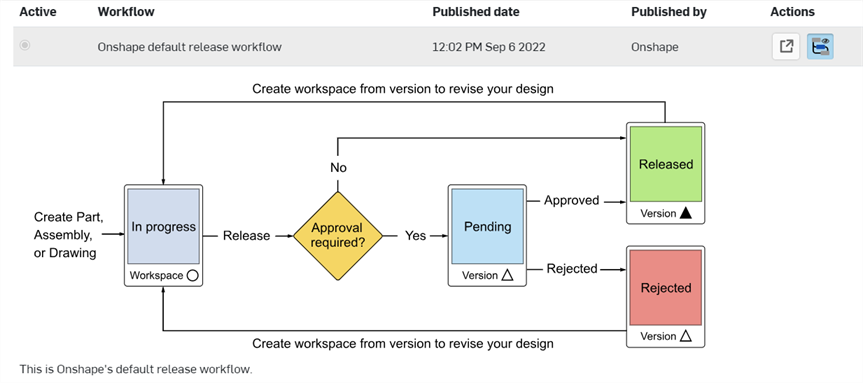
This functionality is currently available only on Onshape's browser platform.
Only a company or Enterprise administrator is able to set up the details of the Onshape Release management workflow for the company, but any user in the account is able to use these tools in the company documents as long as they have edit permissions on the document (or documents) containing the objects for release.
To set up Onshape Release management tools:
- In the User menu, select Company/Enterprise settings.
- Select the Release management tab in the left pane.
- To use the Onshape Release workflow and tools, select Enable managed workflows.
- Proceed through each of the next sections (below) to define the conditions that govern the release workflow and preferences that work for your company.
- When you have made your selections, click Save release settings (at either the top of the page or the bottom).
You have the option to choose to forgo using Onshape's Release management workflows and tools by not selecting Enable managed workflows. This turns Release management tools off and you use your own procedures and processes to manually change revision properties and other properties. To learn more about manual release workflows, see the technical briefing titled Release Workflow & Data Management.
The Onshape Release management workflow is illustrated by the diagram on the Company/Enterprise settings > Release management page:
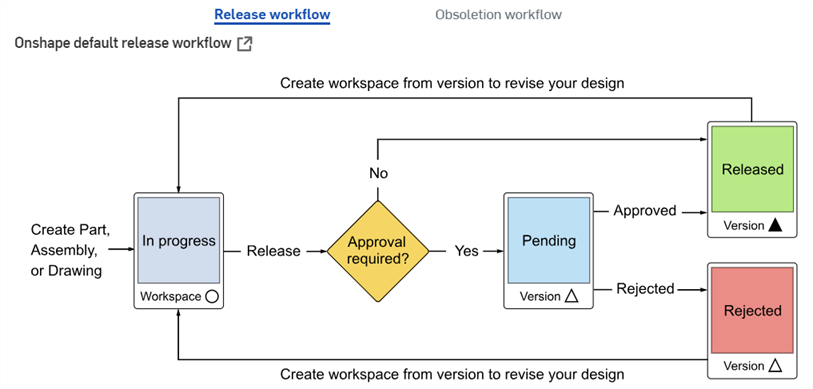
See Viewing Revision History and Obsoleting Parts for an explanation of using Onshape's workflow for obsoleting parts.

Under Revision Scheme, select the automatic revision labeling scheme that suits your company's needs:
- Alphabetical - Use the alphabet, sequentially, starting at A and omitting I, O, Q, S, X, Z
- Numerical - Use numerals, sequentially, starting at 1
- New custom revision scheme - Use a text file containing your own revision scheme. The text file must list one revision per line and contain a minimum of 50 lines. Once you specify a file, it is maintained in this list and is selectable as a custom revision scheme until you delete it. Selecting a custom revision scheme marks the beginning of the use of the scheme and no previously-used revision scheme is replaced. No previously-marked revisions are ever changed, despite selection of a different or new revision scheme.
Note that when using the alphabetical scheme, certain letters are skipped automatically, and prohibited from use, because they can be confused with some numerals.
-
Revision scheme id is the identifier of the revision scheme. This becomes important when creating your own release management workflows. See Creating a Customized Release Workflow for more information.
-
Unreleased revision suffix is the character or characters that follow the current revision in the Drawing Revision table. The default character is an asterisk (*) and you can specify any character or set of characters. See Revision Table for more information about revision tables in drawings.
Edit the default Revision table template for all users:
-
Onshape provides a default table that you can customize.
-
To customize the table, click Edit.
-
You can rename the template, add and remove columns, and require all uppercase letters in drawings for the table.
-
To save your changes, click Create.
Select the preferred method of part number generation:
- Manual entry - Manually enter your own part numbers.
- Onshape automatically prevents duplicate revision labels or part numbers and displays an error message if you try to use an existing part number of a previously released revision. For example, if you release Revision A for part number 01, you cannot then release a Revision A for part number 01 for that part or any other part.
- Onshape does not track the sequence of numbers for this scheme and allows you to skip numerals.
- Sequential part number generation - Onshape generates part numbers on request.
- Use the fields in the flow chart to define prefixes for each object type, minimum length, and the next numeral in the starting sequence.
- The Next field indicates the next part number to be generated, with successive part numbers increasing in the series, never decreasing even if numbers have been skipped or releases have been discarded or rejected.
- A preview of the generated part number is shown according to the specified parameters:
- Upon selecting this option, no previously manually entered part numbers in the system change. Changes apply only to newly created part numbers.
- Selecting this option does not prohibit you from manually entering part numbers if you wish to do so.
- Once this option is selected, automatic part number generation is available in all properties dialogs for objects that can have a part number.
- The Prefix field is optional.
- Part number uniqueness - Select whether or not to allow the use of duplicate part numbers for drawings (duplicates of the part or assembly represented in the drawing)
- All part numbers in a release must be unique - Do not allow any part number of a part or assembly to be used as the part number of a drawing.
- Drawing can reuse part number from an assembly or part in the release - Allow the part number of a part or assembly to be used as the part number of its drawing.
- Part number propagation - Select whether to propagate part numbers from a released item in a version to a corresponding item in an associated workspace. Select:
- Never - To never propagate the released item's part number to a corresponding item in a workspace
- One workspace - To propagate the released item's part number to a corresponding item in a workspace when the version the item was released in has only one corresponding workspace. If the version has more than one corresponding workspace, then do not propagate the part number.
- All workspaces - To propagate the released item's part number to a corresponding item in all workspaces when the version the item was released in has one or more corresponding workspaces.
How and when part numbers are applied:
For items that aren’t configured assemblies, the part number is applied to the items with the same internal id in the workspace, if it exists.
For parts, the part number is only applied if the part is found in the workspace as exactly one part.
For configured Part Studio and Assemblies, the part numbers are applied only if the configuration parameters are the same between the version and the workspace. If any parameters have been added or removed, the part number is not applied.
Part number propagation occurs on the first transition of a release package, that is, the Submit action.

Administrators may apply rules governing who has access and permissions to objects and data during the release process. You can select more than one:
- Only administrators can edit the properties of released objects, see Editing properties of objects.
- Only administrators can mark objects as not revision-managed, see Marking objects as not revision-managed.
- Only administrators can delete documents containing released objects.

Administrators can specify certain actions:
-
Show watermark for unreleased drawings - When checked, a watermark appears for all unreleased drawings. The watermark is a simple "In Progress". It is removed when the drawing is released, and when a drawing is obsoleted an "Obsolete" watermark is placed on the drawing.
-
Hide watermark for drawings that are not revision managed - When checked, the watermark is not displayed for any drawings that are not revision managed.
-
Require a new revision when an item's properties changed - When checked, If there are any changes to an item's properties since its latest revision, a new revision is required. If the properties change for an item, the following message appears in the Create Release dialog next to the item, in blue:
without this option checked, you will still receive a message, but it will be slightly different, without noting that the company policy requires a new revision:
For more information, see Reverting items to their last revision.

Administrators can define the conditions that, when true, will prohibit a Release candidate from being created. You can select more than one:
- When releasing a part if its Part Studio Feature list contains errors - Select this to prohibit the release of a part if the Part Studio Feature list has any errors.
- When releasing a part if its Part Studio Feature list rollback bar is not at the end (of the Feature list) - Select this to prevent the release of any part with the rollback bar not at the end of the Feature list. Best practice is to delete any unwanted or unused Features from the Feature list and keep the rollback bar at the end of the Feature list to avoid confusion in the future.
- When releasing an Assembly if its Assembly list contains errors - Select this to prevent the release of any Assembly if the Assembly list contains errors.
- When releasing an Assembly if it has pending reference updates - Select this to prevent the release of any Assembly if any object within it has a pending reference update. For more information on updating references, see Updating References.
- When releasing a Drawing if it has a pending update - Select this to prevent the release of any Drawing if the drawing is pending Update.
- When releasing an item whose part number is included in another pending release candidate - Select this to prevent the release of any item whose part number is included in another pending release candidate.
- When releasing an item which has a pending task - Select this to prevent the release of any item within a Part Studio when any item within that same Part Studio has a pending task. When this condition exists, a message is displayed in the Release candidate dialog; the Release candidate can be created, but the Release action is unavailable until the assigned task has been addressed. If this condition is not checked on the Release conditions page, a message is still displayed when the condition exists, but the item can be released.
- When releasing an item which contains obsolete revisions - Select this to prevent the release of any item within a Part Studio, Assembly, or Drawing when that item contains obsolete revisions.

Define the supporting details that must be present in the Create Release candidate dialog before a release is able to be submitted or released. You can select more than one:
- Require an approver in the Create Release candidate dialog:
- Check this to make the Approver field mandatory in the Create Release candidate dialog. An email address will then be required in this field before the Release candidate can be submitted or released.
- Leave this unchecked to allow the creator of the Release candidate to immediately create a Release, skipping the Release candidate and approval step.
- Do not allow creator as approver - When you require an approver on the release, you can also add this option so the creator's name doesn't appear in the list when entering required approvers. This prevents the creator of the release candidate from simply going ahead and approving the candidate as the approver.
- Require approval from all approvers:
- Check this to require that all approvers listed in the Create Release candidate dialog actually approve the Release candidate in order to proceed with the Release. If one approver rejects the Release candidate, then the candidate is rejected, even if all other approvers have approved it.
- This does not enforce the number of approvers listed for the Release candidate.
- Leave this unchecked to allow the Release candidate to be approved by any one of the listed approvers.
- Require a note in the Release dialog:
- Check this to require the creator of the Release candidate (and any person who approves/rejects the release candidate) to enter notes about the release in this field before the Release candidate can be created or released.
- Leave this unchecked to allow the Release candidate to be submitted or released without any text in this field.
- Restrict approvers to these users or teams:
- Professional users see this option and can check this to create a list of approved approvers. Enter the names or email addresses of specific users and/or teams to create a list of users from which approvers must be selected when approvers are entered in the Release dialog.
- Enterprise users can also make these specifications, but through the Approve releases Global permission. Select Global permissions on the Company/Enterprise settings page.
- Allow adding items from other documents:
- Check this to allow the creator to add items that are not from the original document into the Release candidate.
- Leave this unchecked to prevent the creator from adding items from other documents to the Release candidate.
- Enter display names for Release & Obsoletion Management properties
- You can enter new display names of your choice for the following fields in a Release dialog:
- Release name
- Release notes
- Obsoletion names
- Obsoletion notes
- You can enter new display names of your choice for the following fields in a Release dialog:

Check this to automatically obsolete previously released versions. When you re-release a previously released object, the previous release is automatically obsoleted upon approval of the re-release. Right-click on the tab of your drawing or object, and click Revision history to view the object's automatic obsoletion:

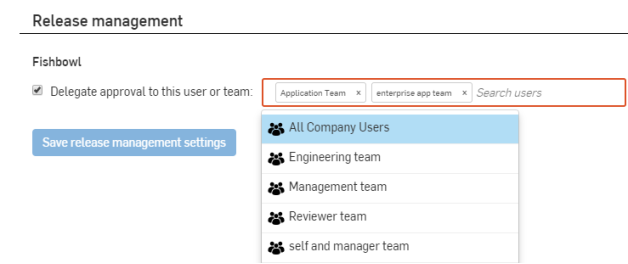
Users who may be asked to approve releases can delegate that approval. This is convenient for planned absences as any user can specify another user to be notified of pending release candidate approval requests and given permission to act on the request. Upon specification of a delegate, the user or team members named as delegate are notified of the assignment. The user who is delegating the approval responsibility sees a message every time they sign in or refresh an Onshape session:
Delegated approval requests cannot be delegated to another user. For example, if User-A delegates approval to User-B, and User-B delegates approval to User-C, User-C will get approval requests that specified User-B, but not approval requests that specified User-A.
To specify a user as your delegate:
- Open the User menu in the top right corner of the window.
- Select My account.
- On the My account page, select Preferences.
- Scroll down to Release management.
- Check the box next to Delegate approval to another user or team.
- Supply the team name or email of the user or users (or click in the box to select from a list of known users and teams).
When something is released, both the user who delegated and the user or users who are delegates receive a notification.