Onshape Publications
![]()
![]()
![]()
Use Publications to create a collection of any released parts, Part Studios, Assemblies, Drawings, and files from any documents and share it with any user with an Onshape account.
Publications functionality is available only for standard, professional, and enterprise users. Publications can be shared with all types of users.
Begin the creation process on the Documents page:
-
Click Create and select Publication.
-
Provide a name for the publication, a description, and add any labels you wish.
-
Click Create.
-
The empty publication opens:
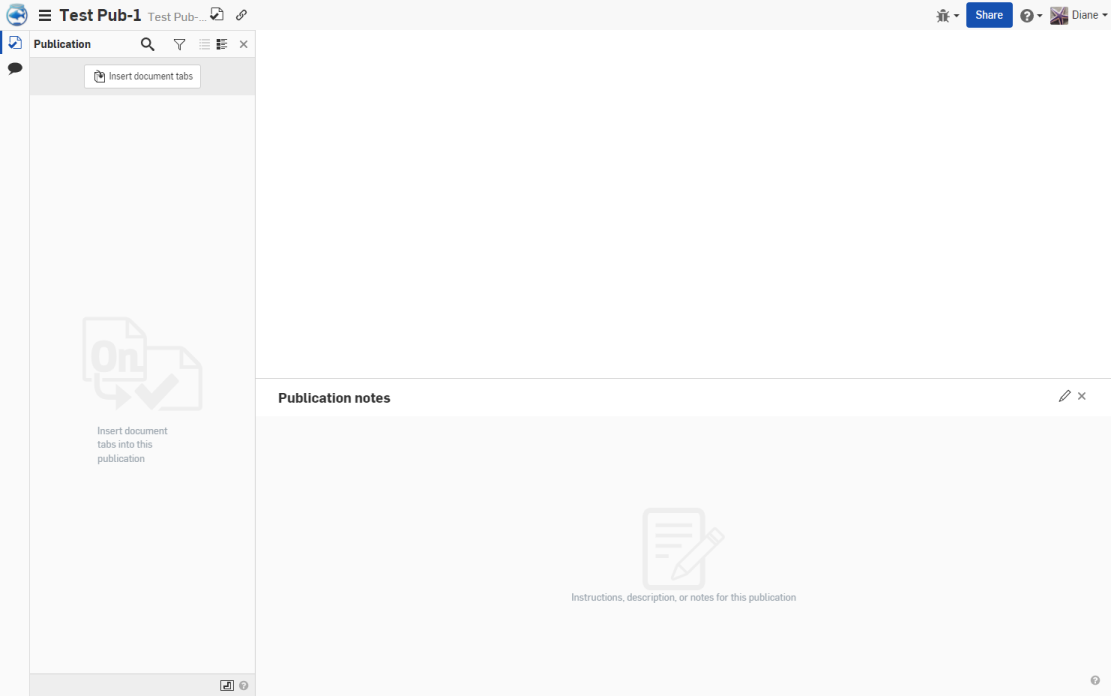
Once the publication is created, you can add tabs from other and disparate documents, as well as include notes about the publication and its contents.
-
Click the Insert document tabs button in the Publication manager pane on the left side of the window to open the Insert document tabs dialog:
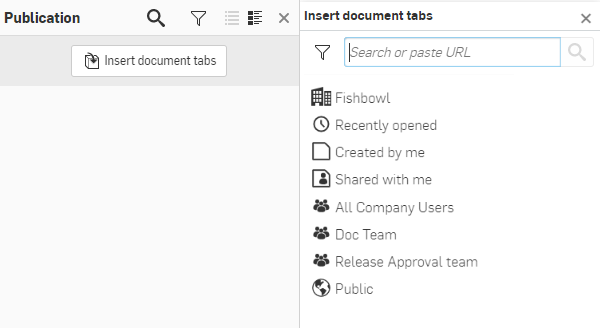
The Publication manager works like the Tab manager.
-
Use the pane to search for the document from which you want to insert a tab:
-
Search for or paste in a document URL.
-
Select one of the search filters like: Recently opened or Created by me.
-
Select a Team filter.
-
Select a Project or Folder filter.
-
-
Once you have a list of Documents, select one.
You can insert only from documents to which you have permission.
-
Filter with the Part Studios, Assemblies, Files, or Drawings filter at the top of the dialog.
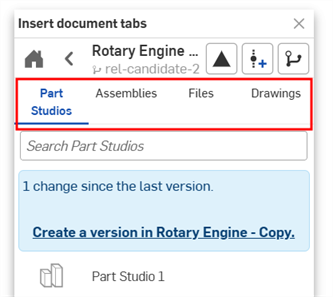
-
Once you have a list of parts or tabs, select one of them to insert it.
-
The tab's document must be versioned or the tab revisioned before it can be inserted.
-
Individual parts from a Part Studio can only be inserted if they are included in a release. To view a document's released items, click the Released item icon (
 ). This allows you to insert individual released parts from a Part Studio (below right).
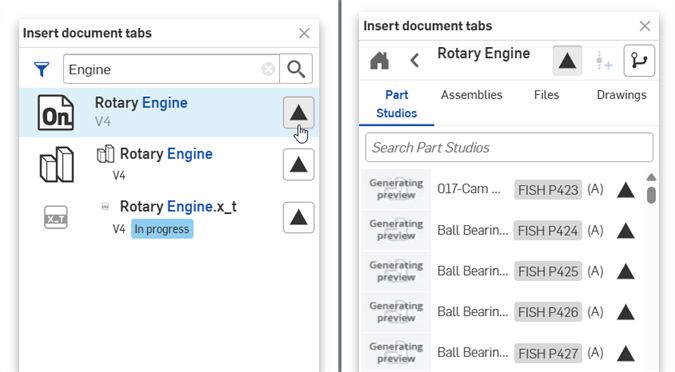
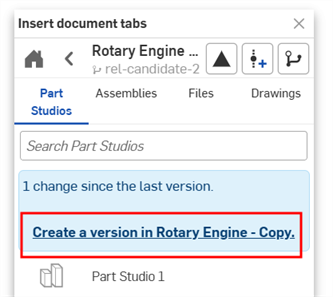
Use the blue Create a version link if necessary to create a version before trying to insert the tab:
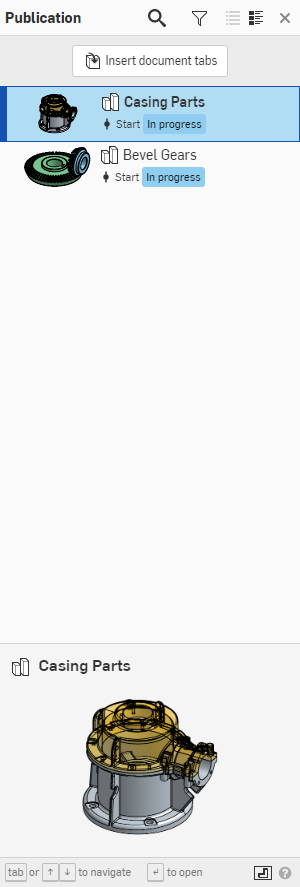
The selected tab is listed in the Publication manager and a thumbnail is show at the bottom of the manager:
-
The dialog prevents you from duplicating inserted tabs:

When a tab is inserted, the data information is included and the model is displayed in the graphics area of the publication. For parts, the included information is the Feature list and Parts list:
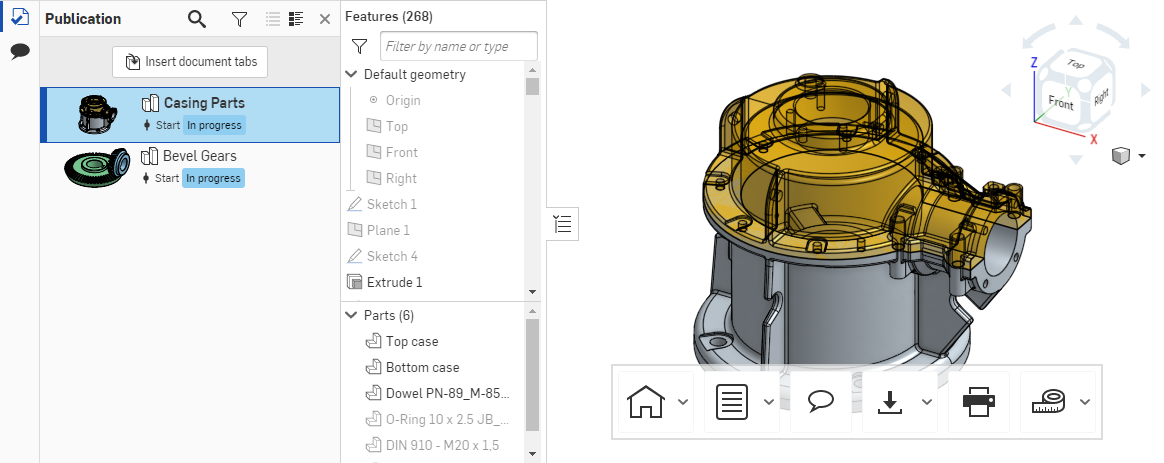
All tabs are included in view-only mode since Publications are entirely view-only. This means the data within the publication is read-only and cannot be changed (versioned and revisioned elements are always view-only). Details of the publication, such as name, description, and other metadata are all editable by users who have permissions.
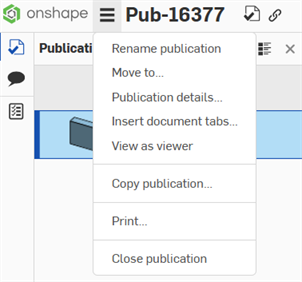
The hamburger menu to the left of the publication name contains the following commands:
-
Rename publication - Change the name of the publication
-
Move to - Move the publication to a different location such as a folder or project
-
Publication details - Opens the Publication details dialog:
-
Description - Publication content summary.
-
Force publication Export rules - When checked, sharing or linking a publication with a non-registered publication user enforces the export rules, if any exist.
If the publication is user-owned, then export rules under My account > Preferences > User export rules are applied. If the publication is owned by the company (Professional subscription) or enterprise (Enterprise subscription), then the export rules found under Company/Enterprise settings > Preferences > Company/Enterprise-wide export rules are applied.
-
-
Insert document tabs - Insert more document tabs
-
View as viewer - View the publication as a person shared into the publication would see it
-
Copy publication - Copy the active workspace to a new publication
-
Print - Print a view of the publication
-
Close publication - Close the publication and return to the Documents page
Users with rights to edit a publication may add tabs to the publication or remove tabs from the publication. No parametric data within a tab can be edited.
Each publication has a Notes section you can use for writing about each tab included in the publication.
When you create a publication, an empty Publication notes section is in the lower half of the window:
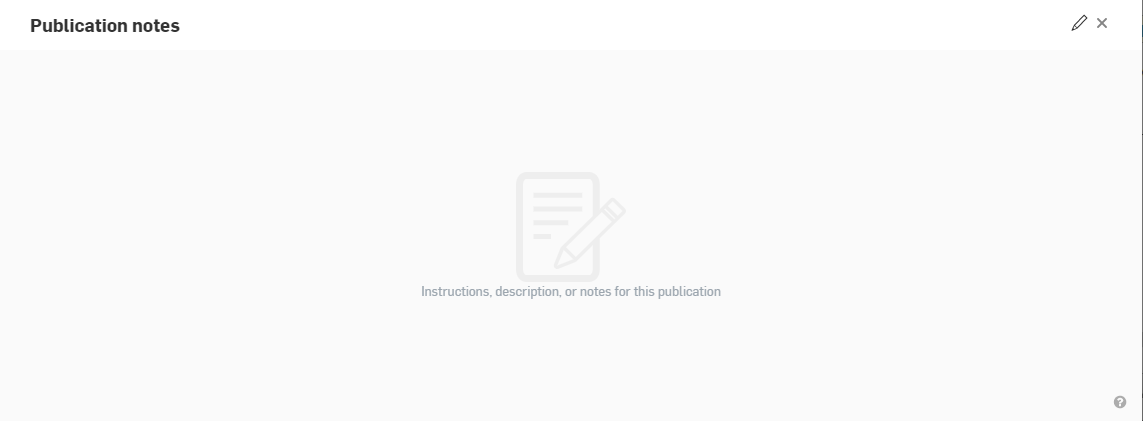
Click the small pencil icon on the right of the window enable editing. You can begin typing in the notes box. When creating notes, you can use Markdown for formatting. To preview the note to see the formatting of the Markdown, click the Preview icon (it appears where the pencil icon was before editing was initiated).
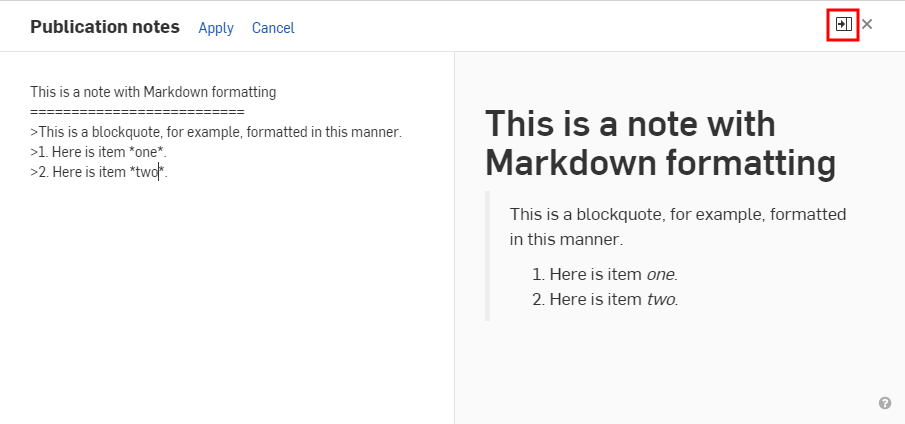
When finished creating or editing notes, click Apply to keep changes, or click Cancel to exit edit mode without keeping changes.
Acceptable Markdown for notes
The notes area accepts traditional Markdown for formatting. Below are some examples.
-
Heading 1 formatted as:
                Heading 1

============ -
Heading 2 formatted as:
                Heading 2

-------------- -
# This is also a heading 1 -
## This is a heading 2 -
###### This is a heading 6 -
# This is also a heading 1# -
## This is also a heading 2## -
### This is also a heading 3### -
Paragraphs using block quotes can be:
-
> This is a blockquote with two paragraphs. You can format it this way,> and it will display appropriately.> Markdown is very versatile.>> This is the second paragraph within a blockquote.> Markdown is very versatile. -
> This is a also blockquote with two paragraphs. Showing another wayto format with Markdown.> Another section would appear here.
-
-
Blockquotes can contain other Markdown elements, including headers, lists, and code blocks:
> ## This is a header.>> 1. This is the first list item.> 2. This is the second list item.>> Here's some example code:>> return shell_exec("echo $input | $markdown_script"); -
Markdown supports ordered (numbered) and unordered (bulleted) lists.
-
Unordered lists use asterisks, pluses, and hyphens — interchangeably — as list markers:
* Red* Green* Blueis equivalent to:
+ Red+ Green+ Blueand:
- Red- Green- Blue -
Ordered lists use numbers followed by periods:
1. First priority2. Second priority3. Third priority
Publications are listed on the lower part of the Documents page in the Documents and Publications section.
Use the Type filter and click on Publications to view only publications in this list.

Use the search bar at the top of the Documents page to search for a publication within the active filter, as stated in the search bar:
![]()
When using the search box to search for a publication, the search is conducted within the currently selected filter.
Use the down arrow in the Search bar to activate an advanced search menu and select a type of Publication:
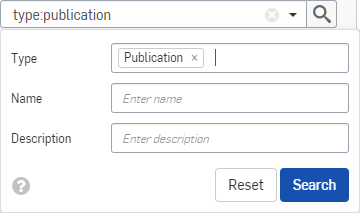
Sharing a publication is at the view-only level. You can share to individuals, Teams, use an email address to invite a guest user into the enterprise, or create a link with which to share the publication. All other share options apply.
Guest users can view only the information that is explicitly shared with them. When creating a link with which to share, anyone with the link can open the publication.
To see the publication as a shared user would see it, you can select View as viewer from the hamburger menu on the publication:

When selected, the publication interfaces displays as it would when a shared-in user opens the publication:
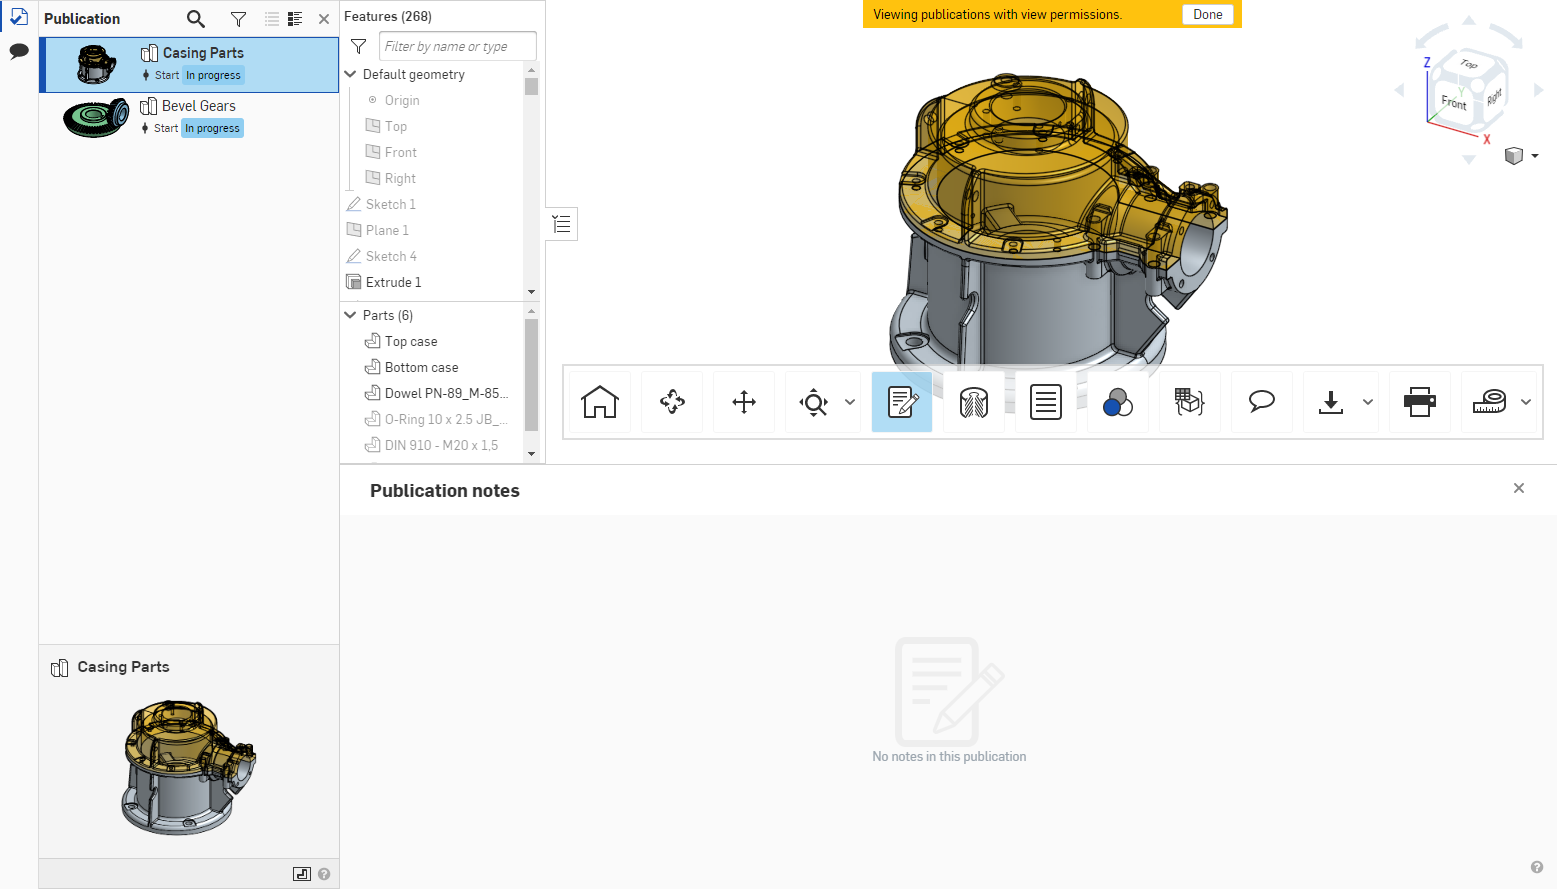
When finished previewing the publication, click the Done button in the gold ribbon at the top of the window.
The view-only toolbar is displayed for all users who are shared into the publication. No change or edit to data on any tab is allowed, regardless of the permission of the user with whom the publication is shared.
Change the thumbnail of a publication from within the publication. In the left pane, where the inserted document tabs are listed:
-
Right-click the name of the tab whose thumbnail you want to use for the publication to open the context menu.
-
Click Select as publication thumbnail:
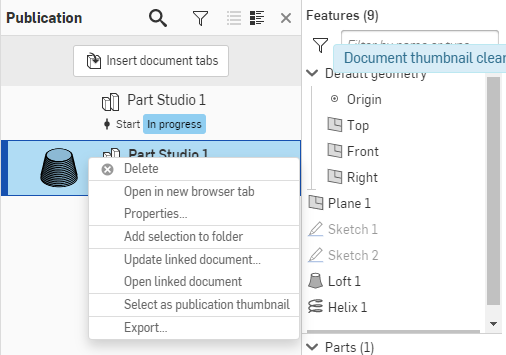
The context menu on each tab also changes with respect to permissions. Right-click on a publication on the Documents page to open the context menu.
The context menu on a publication on the Documents page contains the following commands:
-
Open - Open the publication
-
Open in new browser tab - Open the publication in a new browser tab
-
Rename publication - Open the dialog to edit the name of the publication
-
Copy publication - Copy the active workspace to a new publication
-
Details - Open the Details pane (on the right side of the window) for the publication
-
Labels - Create or add a label to the publication
-
Share - Open the Share dialog for the publication
-
Unshare with me - Remove your permission to view the publication
-
Move to - Move the publication to another location within Onshape, like a folder or project
-
Transfer ownership - Transfer the ownership of the publication to another user
-
Send to trash - Move the publication to the Trash.
iOS support for Publications is similar to the Desktop (browser) platform. Create, edit, share, search for, and insert tabs and notes into publications.
Begin the creation process on the Documents page:
-
Tap the plus button (
 ) at the lower right corner
and select Publication.
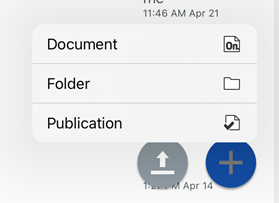
-
Provide a Publication name, Publication description, and Publication location, then tap the Create button:
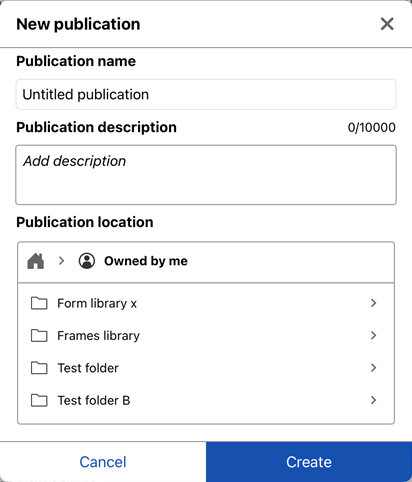
The empty Publication opens:
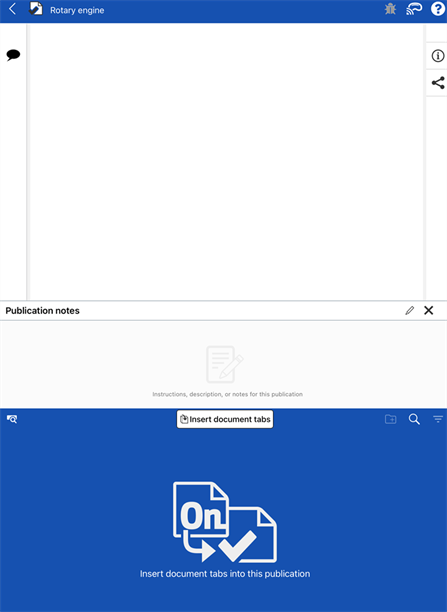
Once the publication is created, you can add tabs from other and disparate documents, as well as include notes about the publication and its contents.
-
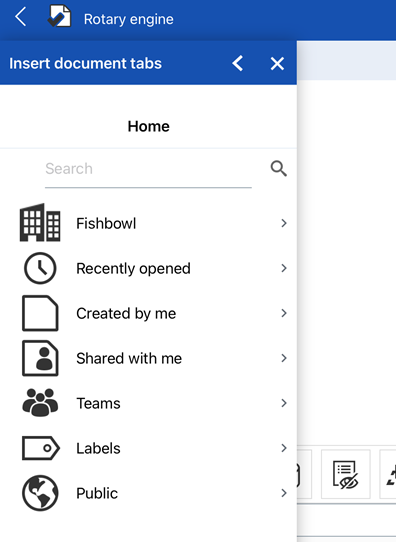
Tap the Insert document tabs in the Publications manager (bottom blue panel of the screen). The Insert document tabs dialog opens:
-
Use this dialog to search for the document from which you want to insert a tab:
-
Search for or paste in a document URL.
-
Select one of the search filters like: Recently opened or Created by me.
-
Select a Team filter.
-
Select a Project or Folder filter.
-
-
Once you have a list of Documents, select one.
You can insert only from documents to which you have permission.
-
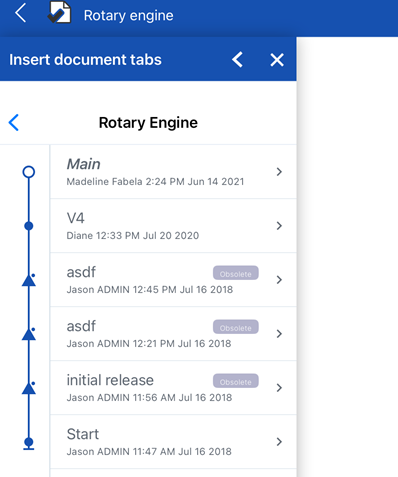
Tap the document version to select it:
-
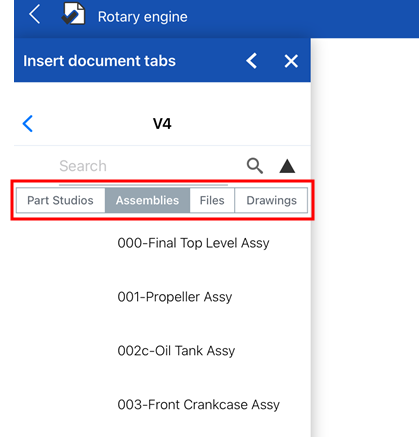
Filter with the Part Studios, Assemblies, Files, or Drawings filter at the top of the dialog:
-
Once you have a list of parts or tabs, tap one of them to insert it.
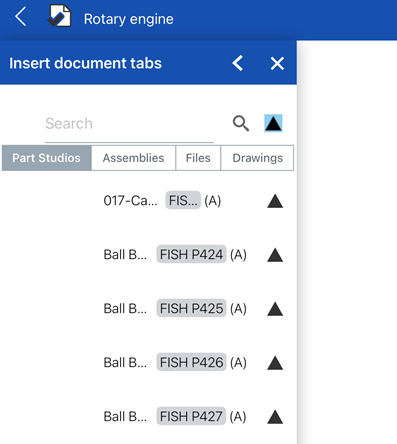
Individual parts from a Part Studio can only be inserted if they are included in a release. To view a document's released items, tap the Released item icon (
 ). This allows you to insert individual released parts from a Part Studio:
-
The inserted tab and its information is displayed in the Publication. For Part Studios and Assemblies, this includes the Parts and Instances list (respectively), and the model in the Graphics area (both in the top of the screen). The Document tab's thumbnail is displayed in the Publications manager (in the bottom of the screen):
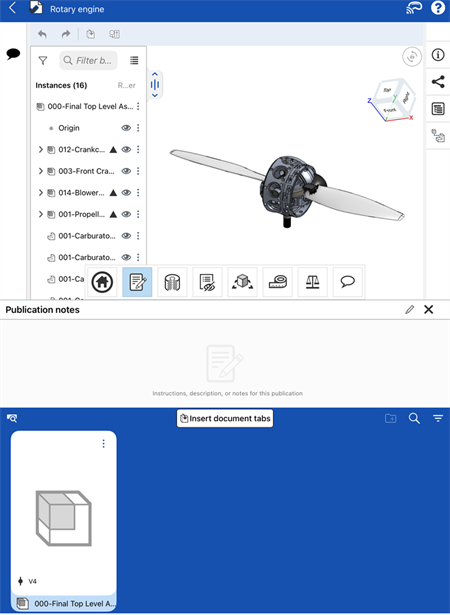
An inserted Assembly. The Instances list is displayed in the graphics area (top), and Assembly thumbnail displayed in the Publications manager (below).
The Insert document tabs dialog prevents you from duplicating inserted tabs.
All tabs are included in view-only mode since Publications are entirely view-only. This means the data within the publication is read-only and cannot be changed (versioned and revisioned elements are always view-only). Details of the publication, such as name, description, and other metadata are all editable by users who have permissions.
Each publication has a Notes section you can use for writing about each tab included in the publication. When you create a publication, an empty Publication notes section is in the middle of the window:
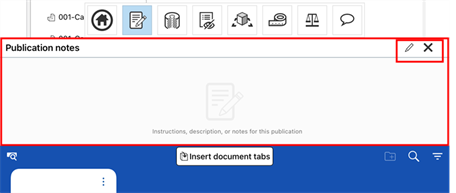
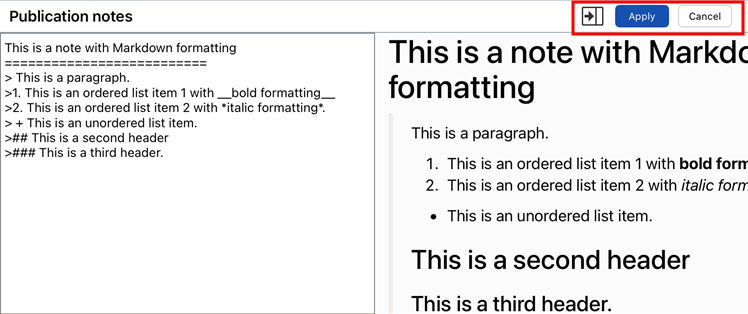
Tap the small pencil icon (![]() ) at the top right of the window to enable editing. Begin typing in the notes box. When creating notes, you can use Markdown for formatting. To preview the note to see the formatting of the Markdown, click the Preview icon (
) at the top right of the window to enable editing. Begin typing in the notes box. When creating notes, you can use Markdown for formatting. To preview the note to see the formatting of the Markdown, click the Preview icon (![]() ). This icon toggles preview on/off.
). This icon toggles preview on/off.
When finished creating or editing notes, tap Apply to keep changes, or tap Cancel to exit edit mode without keeping changes.
Android support for Publications is similar to the Desktop (browser) platform. Create, edit, share, search for, and insert tabs and notes into publications.
Begin the creation process on the Documents page.
-
Tap the plus button (
 ) at the lower right corner
and select Publication.
-
Provide a Publication name, Publication description, and Publication location, then tap the Create button.
The empty Publication opens.
Once the publication is created, you can add tabs from other and disparate documents, as well as include notes about the publication and its contents.
-
Tap the Insert document tabs in the Publications manager (bottom blue panel of the screen). The Insert document tabs dialog opens.
-
Use the dialog to search for the document from which you want to insert a tab.
-
Search for or paste in a document URL.
-
Select one of the search filters like: Recently opened or Created by me.
-
Select a Team filter.
-
Select a Project or Folder filter.
-
-
Once you have a list of Documents, select one.
You can insert only from documents to which you have permission.
-
Tap the document version to select it.
-
Filter with the Part Studios, Assemblies, Files, or Drawings filter at the top of the dialog.
-
Once you have a list of parts or tabs, tap one of them to insert it.
Individual parts from a Part Studio can only be inserted if they are included in a release. To view a document's released items, tap the Released item icon (
 ). This allows you to insert individual released parts from a Part Studio.
 -
The inserted tab and its information is displayed in the Publication. For Part Studios and Assemblies, this includes the Parts and Instances list (respectively), and the model in the Graphics area (both in the top of the screen). The Document tab's thumbnail is displayed in the Publications manager (in the bottom of the screen).
The Insert document tabs dialog prevents you from duplicating inserted tabs.
All tabs are included in view-only mode since Publications are entirely view-only. This means the data within the publication is read-only and cannot be changed (versioned and revisioned elements are always view-only). Details of the publication, such as name, description, and other metadata are all editable by users who have permissions.
Each publication has a Notes section you can use for writing about each tab included in the publication. When you create a publication, an empty Publication notes section is in the middle of the window.
Tap the small pencil icon (![]() ) at the top right of the window to enable editing. Begin typing in the notes box. When creating notes, you can use Markdown for formatting. To preview the note to see the formatting of the Markdown, click the Preview icon (
) at the top right of the window to enable editing. Begin typing in the notes box. When creating notes, you can use Markdown for formatting. To preview the note to see the formatting of the Markdown, click the Preview icon (![]() ). This icon toggles preview on/off.
). This icon toggles preview on/off.
When finished creating or editing notes, tap Apply to keep changes, or tap Cancel to exit edit mode without keeping changes.