 Render Studio Interface - Camera Panel
![]()
Only available for
Available in: Render Studio
Located at the right of the page, the Camera panel displays an editable list of parameters for the Camera directed at the selected object, such as Field of view, Focal length, Position, Rotation, Background, Depth of Field, Exposure, Tone and contrast, Vignetting, and other Advanced options.
Click the Camera panel icon (![]() ) to open the panel:
) to open the panel:
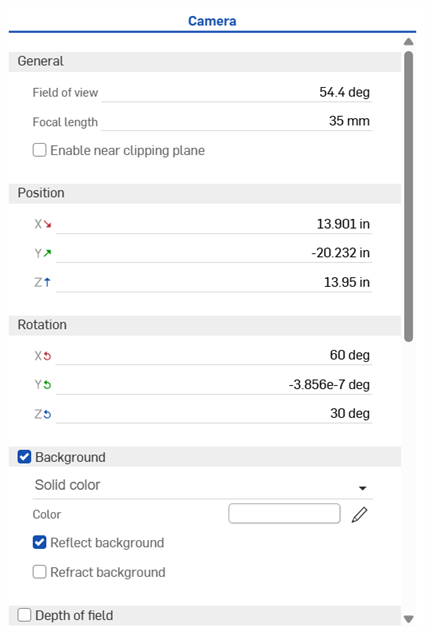
The Camera panel parameters are outlined below:
-
General
-
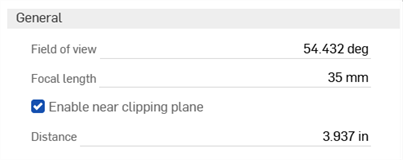
Field of view and Focal length - Specify the Field of view as an angled degree value, from 1 to 175, or a Focal length value, from 1 mm to 2,063 mm.
Either Angle or Focal length can be adjusted. Adjusting one value dynamically computes and updates the other. In most cases, this means you can enter a focal length to compute the angle, and then round up or down to a common focal length (i.e.: 35 mm, 50 mm, or 105 mm).
Higher Angle values compute smaller Focal length values, resulting in a wider angled lens, with the vanishing point further from view (sinking into the background). Lower Angle values compute larger Focal length values, resulting in a narrower angled lens, with the vanishing point closer in view (at the forefront).
Focal length is always given in millimeter units, regardless of how the workspace units are set.
The Field of view option is only available if Perspective is turned on.
-
Enable near clipping plane - When enabled, objects between the camera and the specified distance are not visible or may be partially clipped out.
-
Distance - The distance from the camera before which objects are not visible.
-
Adjusting Angle or Focal length does not make the subject (model) smaller or larger (as would normally occur using a camera in the real world). Instead, the projected size of the model remains roughly the same pixel size, and the surrounding scene's perspective is distorted. In this way, the model remains static, while it appears as though it was shot with a wider or narrower lens.
-
-
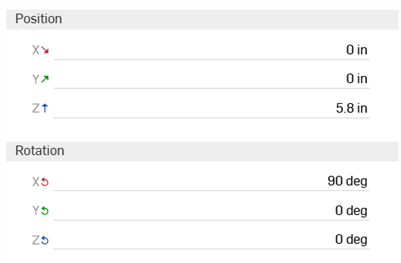
Position and rotation - Adjust the position (X, Y, Z) and Rotation (X, Y, Z) of the camera numerically. This is useful to precisely match the camera position in two different scenes:
-
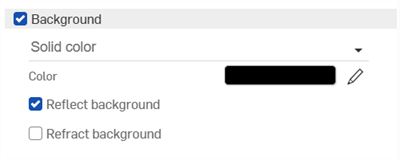
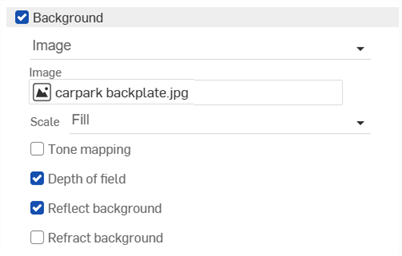
Background - Replaces the background environment with a solid color or a custom image. When disabled, the Environment from the Environment library is used (Standard environment is the default). The following parameters are available:
Solid color
-
Color - Shows the color swatch used for the background. Click the pencil icon to edit the color used from the color picker. Colors can be selected visually by clicking on the color area, by entering a hex or RGB value, or by selecting a swatch at the bottom of the picker.
-
Reflect background - Enable to allow the background to be seen in reflections of the ground instead of the environment.
-
Refract background - Enable to allow the background to be seen through perfectly specular, non-thin-walled objects.
Image
-
Select image - Opens the Select image dialog, where an image can be selected from the current document, other documents, or imported from your computer. See Adding a custom background to a scene section for more information.
-
Scale - How the background image fits to the size of the rendered image if the dimensions between them differ. Options are Fill, Fit, or Stretch,
-
Repeat (available only when Scale is set to Fit) - When enabled, if the background does not fill the image, then it will repeat in those areas. When disabled, those areas are filled with a solid color of your choice. This also affects the background when visible in reflections, so if this option is disabled, you may see the solid color in the reflections of the background.
-
Tone mapping - When enabled, the background image undergoes the same tone mapping as the scene; useful if the background is a high dynamic range image (HDRI).
-
Depth of field - When enabled, the depth of field is applied to the background; useful to make the background look out of focus if it was not already photographed that way.
Setting a Background color or image overrides the Dark mode theme setting for the graphics area.
-
-
Depth of field - Open a dialog to set the view's depth of field, controlling the location and distance from sharp in-focus areas to blurry out-of-focus areas. Regions out of focus become blurred based on their distance from the lens and lens properties:
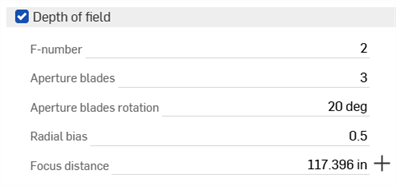
Depth of field options are:
-
F-number - Focal ratio or F-stop number. The ratio of the focal length to the diameter of the aperture of the lens. Smaller values give shallower depth of field (more blurring in out of focus regions). Larger values give narrower depth of field (less blurring in out of focus regions).
While Aperture numbers in real cameras follow a standard sequence (f/1.4, f/2, f/2.8, f/4, f/5.6, f/8, f/11, f/16, f/22), enter any value in the range from 0.063 to 64.
-
Aperture blades - Specify the number of aperture blades, which changes the shape of small, strong highlights in out of focus regions. For values between 0 and 2, highlights are circular. For values between 2 and 20, this activates a blade-shaped aperture with the specified number of blades. For example, a value of 5 results in pentagram-shaped highlights, while a value of 3 results in triangular-shaped highlights.
-
Aperture blade rotation - Available only when the Aperture blades value is greater than 2. Controls the rotation of the aperture blades, which also rotates the shape of the out of focus highlights.
-
Radial bias - Control the bias of the lens system. At 0.5 the lens is treated uniformly. Values between 0 and 0.5 increase the importance of the edge of the lens, darkening the center of out of focus highlights. Values greater than 0.5 increase the importance of the edge of the lens, brightening the center of out of focus highlights.
-
Focus distance - Specify the distance from the lens where the resultant image is in focus. Objects further than or closer than this distance become progressively out of focus.
Click the crosshair button (
 ) to the right of the Focus distance entry to pick the focus point of the object, then use the cross-hair cursor to click an area of the scene to set as a focus point.
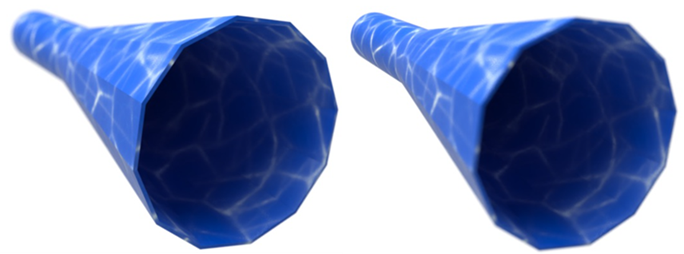
For example, in the left image below the larger front end of the part is selected as the focus point, and the front end remains in focus. As you move toward the back end, the background becomes increasingly out of focus. In the right image below, the reverse is true. The part's smaller back end is selected as the focus point. The background is in sharper focus. As you move toward the front end, the foreground becomes increasingly blurry:
When enabling depth of field, make sure the camera position is final. Adjusting camera position after enabling depth of field requires a reset of the focus point and a re-evaluation of the F-stop number.
-
-
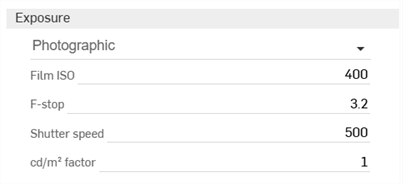
Exposure - Select between Photographic exposure, where you select normal camera settings, or Simple exposure, where only a brightness value is input.
-
Film ISO - Film ISO value. Higher values make the camera more sensitive to light. Lower values make the camera less sensitive to light. When set to zero, the shutter and aperture are disabled and have no effect, and all brightness is controlled by the Candela factor. Higher ISO values also increase noise and static in an image. This is common in photography, and can be a desired effect.
-
F-stop - Focal ratio or F-stop number defining the aperture, or how wide the lens opens, for the purpose of tone mapping. This value does not affect depth of field. This value has no effect when Film ISO is set to 0. The smaller the F-stop value, the larger the lens opens. This allows more light into the scene, and makes the scene brighter.
-
Shutter speed - In photography, the shutter speed is the length of time the aperture remains open, exposing the film to light. The Shutter speed parameter is defined as the camera shutter time expressed as fractional seconds; for example, a value of 100 defines a camera shutter of 1/100. This value has no effect when Film ISO is set to 0.
Increasing this value creates a smaller fractional value, allowing less light to enter the scene, and making the scene darker. Decreasing this value creates a larger fractional value, allowing more light to enter the scene, making it brighter. A value of 0 allows no light into the lens, creating a black scene.
-
cd/m2factor - Conversion factor between pixel values and candela per square meter; the unit of luminous intensity in the scene. When Film ISO is set to zero, this becomes a direct multiplier.
-
Exposure (Simple exposure) - The overall exposure of the scene. Smaller or negative values are used for dimmer scenes, while larger positive values are used for brighter scenes. For example, -6 would be suitable for a scene at night with no moon, while 15 would be suitable for a bright sunny day.
-
-
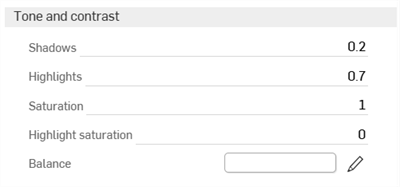
Tone and contrast
-
Shadows - Higher values darken the shadow regions of the image. Lower values bring out more detail in shadow regions.
-
Highlights - Higher values brighten highlight regions of the image. Lower values compress highlights and reduce their contrast.
-
Saturation - Compressing bright color components inherently moves them toward a less saturated color. Sometimes, very strong compressions can leave the image in an unappealingly desaturated state. The saturation parameter allows an artistic control over the final image saturation. 1.0 is the standard, unmodified saturation. Higher values increase saturation, making the colors richer. Lower values decrease saturation, dulling the colors.
-
Highlight saturation - Controls the saturation of highlight areas which tend to look more realistic when desaturated. However, this also changes the color of highlight regions, which is not strictly accurate. Increasing the saturation restores the color of highlight regions.
-
Balance - The color which corresponds to white in the output image. This can be used to compensate for lighting effect.
-
-
Vignetting - In a real camera, the angle at which the light hits the film impacts the exposure, causing the image to be darker around the edges. Vignetting simulates this effect. Note that the field of view of the camera affects how much vignetting is visible. Vignetting has no effect for orthographic views.

-
Strength - At 0 no vignetting is visible. Higher values cause stronger darkening around the edges. A good default is 3, which is similar to what a compact camera would generate.
-
-
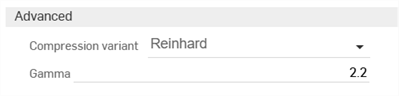
Advanced
-
Compression variant - Determines which tone mapping compression algorithm to use: Reinhard, Uncharted 2, or ACES Unreal 4, and PBR neutral.
-
Gamma - Applies a display Gamma correction. If the image is displayed as-is, without further post-processing by the application, this value should be set to match the display's characteristic. Otherwise, a setting of 1 disables Gamma correction.
-
To add a custom background to a scene:
-
Click the Camera panel icon (
 ) to open it:
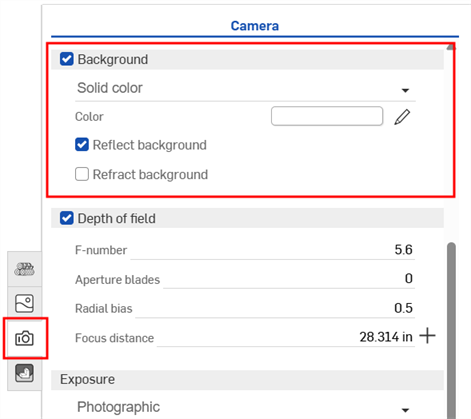
-
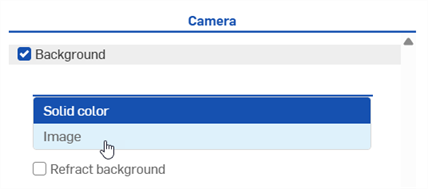
Enable Background, if it's not already enabled.
-
Switch from Solid color to Image:
-
The Select image dialog opens where you can select an image file (.jpg or .png). Do one of the following:

-
Select an image from the Current document
-
Click Other documents to locate an image in another Onshape document
-
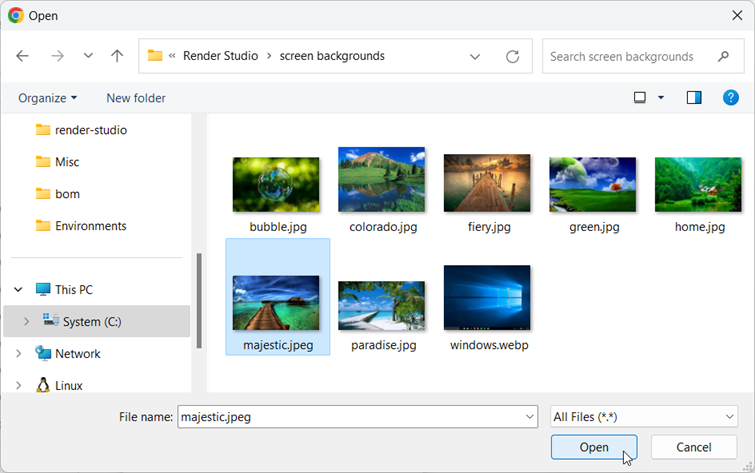
Click the Import link at the bottom of the dialog to locate an image from your computer. When selected, click the Open button:
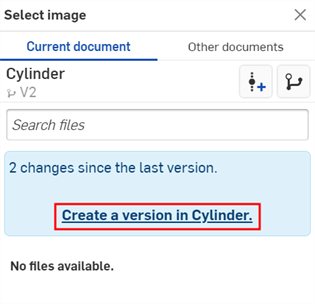
Once the notification indicates the upload is complete, you will not yet see the image in the Select image dialog. This is because the Render Studio scene is a snapshot of the part, Part Studio, or Assembly at the time of import, and this image is brought into the Onshape document post-import. A new version is now required, in order to update the scene. Click the Create a version in [Document name] link in the Select image dialog:
-
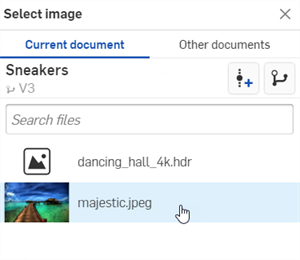
- In the Select image dialog, click on the image to select it and have it loaded into the scene:
-
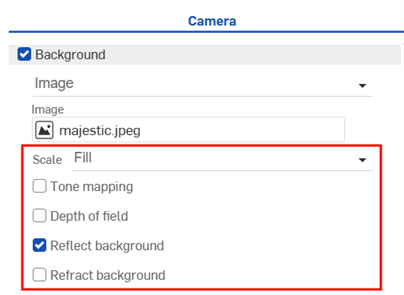
Select any additional options, such as the image Scale (Fill, Fit, or Stretch), Tone mapping, Depth of field, Reflect or Refract background:
If you don't see the Create version link in the Select image dialog, click the Create version button (![]() ) on the Document panel to open the Create version dialog. Create the new version. Close and reopen the Select image dialog. The imported image should now be available.
) on the Document panel to open the Create version dialog. Create the new version. Close and reopen the Select image dialog. The imported image should now be available.
See Importing files for more information about uploading files.
Notes:
-
Though .hdr or .exr files can be used, for best results, use .jpg or .png images.