Render Studio Advanced
![]()
Only available for.
Available in: Render Studio
Render Studio Advanced provides additional functionality when working in Render Studio tabs.
To access this advanced functionality, click the Upgrade to Render Studio button at the top right corner of the interface. Follow additional on-screen instructions.
Render Studio Advanced is managed as any other Application, where seats can be assigned to users as needed. See Applications for more information.
The following additional functionality is available:
-
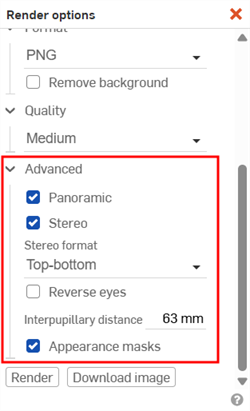
Advanced Render options. See Render Studio interface - Toolbar.
-
Resolution - Non-advanced output is limited to 2.1 megapixels (1920 pixels wide x 1080 pixels high). Advanced limitation is 100 megapixels (10,000 pixels wide x 10,000 pixels high).
-
Panoramic - Creates a spherical panoramic image in an equirectangular projection. In this way, a sphere can be mapped onto a flat, 2D plane. See Creating a Panoramic output file (EXR/HDR) for an example of how this option is used.
-
Stereo - Creates an image containing views for both the left and right eyes.
-
Stereo format - How the left and right eye images are laid out in the image. Options are Top-bottom or Side-by-side.
-
Reverse eyes - Reverses the location of the left and right eye images in the image.
-
Interpupillary distance - Distance between the left and right eyes (63 mm default).
-
-
Appearance masks - Creates an additional image where each color represents an assigned appearance. This is useful when doing advanced image editing of the rendered output in another application such as Adobe Photoshop.
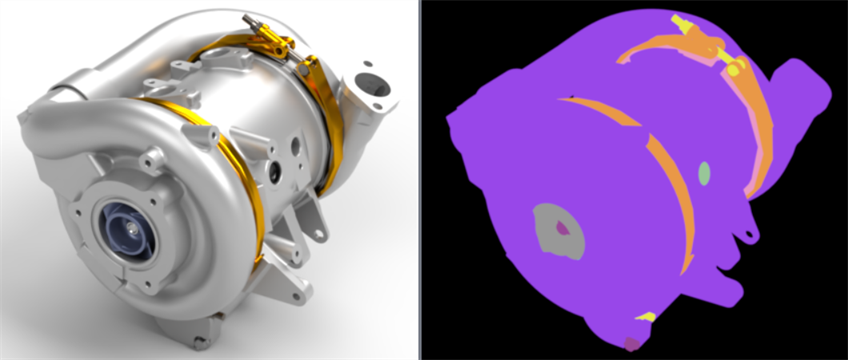
Rendered fuel cell compressor (left) and accompanying image with appearance masks (right)
-
-
AxF Appearance - X-rite AxF appearances are a self-contained file format which are output by X-rite scanning devices such as the TAC-7, MA-T12 and MetaVue VS3200. Unlike a texture file these files completely describe an appearances properties and may include both uniform and spatially varying information. See Using an AxF appearance.
-
Appearance set - An Appearance modifier that is assigned to an entity (Part Studio, Assembly, part, face). Once assigned, multiple appearances can be added to the set in the Appearance panel. Switching between appearances in the set provides a quick and easy method to experiment with appearance variations. See Appearance set.
-
Volume - A volume is a cubic region in which the volumetric portion of an appearance exists and is rendered. The volume can optionally be an OpenVDB 3D texture. Non-advanced users can open a scene that contains Volumes, but their properties are non-editable. See Creating a Volume.
-
Light - A Light is an explicit source of luminescence, with position and direction. Light is emitted into the scene based on one of 3 distribution types (Diffuse, Spot, and Profile) that determines how light varies with the angle to the light source. Lights may also have a surface area that cause them to cast softer shadows. See Light.
-
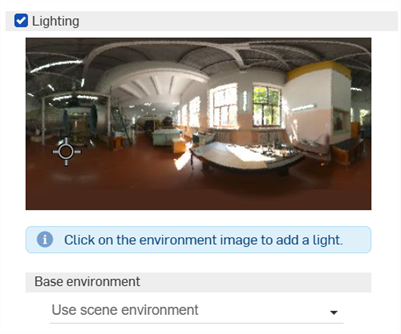
Lighting options. See Environment panel.
-
Allows placement of area light sources of various shapes directly in the environment, along with the ability to move and resize them. When Lighting is enabled, the unwrapped environment image is displayed as a 2D representation of the 3D graphics area.
Once the light is placed, select it's middle point. Once selected, it's shape can be changed. Click and drag to move the light to any location in the environment. You can add as many lights as required.
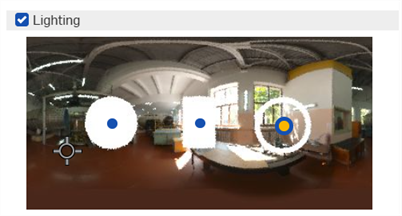
An example of 3 light shapes: Disc (left), Rectangle (middle), Ring (right)
A camera direction indicator (crosshair marker) indicates where the center of the viewport is located (where the camera is pointing). This helps you to visually determine where lights should be placed, relative to the model in the graphics area. This marker updates dynamically as the user navigates the model in the graphics area, thereby navigating the camera.
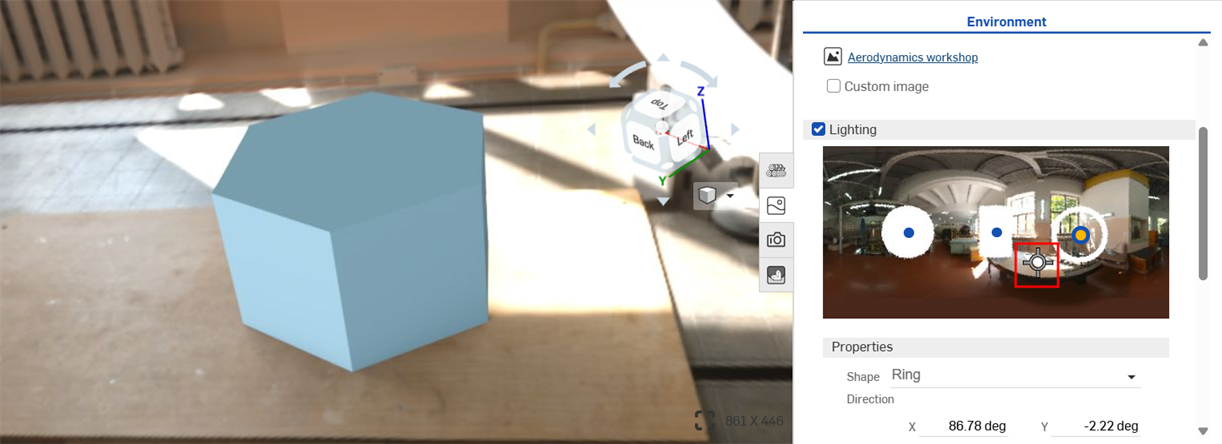
Crosshair center marker in the unwrapped Environment Lighting image on the right indicating the center of the graphics area on the left.
-
Properties
-
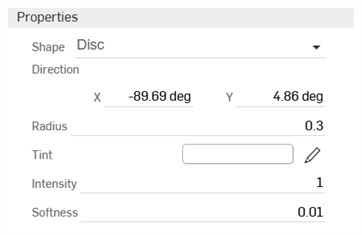
Shape - Physical shape of the light: Disc, Rectangle, or Ring. Click the environment to place a light.
-
Direction - Position of the light in the environment. The horizon and right side of the scene are at 0 degrees. Enter an X and Y value in degrees.
-
Radius (Disc or Ring shape only) - Radius of the disc or center line of the ring light.
-
Width (Rectangle shape only) - Width of the rectangular light.
-
Height (Rectangle shape only) - Height of the rectangular light.
-
Thickness (Ring shape only) - Width of the ring light centered on its radius.
-
Tint - Color of the emitted light. Click the pencil icon to edit the color used from the color picker. Colors can be selected visually by clicking on the color area, by entering a hex or RGB value, or by selecting a swatch at the bottom of the picker.
-
Intensity - Unitless intensity of the emitted light.
-
Softness - Determines whether the light has soft or hard edges. Higher values soften the edges of the light. Lower values harden the edges of the light.
-
-
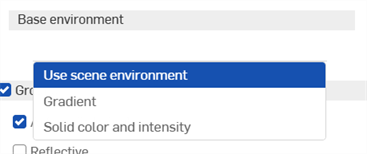
Base environment
-
Use scene environment - Uses the scene's environment, typically selected from the Environments library, on which the light is added.
-
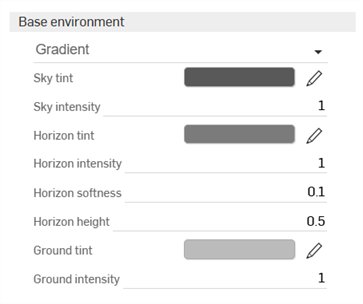
Gradient - Adds a graduated light. The light is added to the background environment.
-
Sky tint - Color of the light emitted from the sky. Click the pencil icon to edit the color used from the color picker. Colors can be selected visually by clicking on the color area, by entering a hex or RGB value, or by selecting a swatch at the bottom of the picker.
-
Sky intensity - Unitless intensity of the light emitted from the sky.
-
Horizon tint - Color of the light emitted from the horizon. Click the pencil icon to edit the color used from the color picker. Colors can be selected visually by clicking on the color area, by entering a hex or RGB value, or by selecting a swatch at the bottom of the picker.
-
Horizon intensity - Unitless intensity of the light emitted from the horizon.
-
Horizon softness - Determines whether the horizon has soft or hard edges. Higher values soften the edges of the horizon. Lower values harden the edges of the horizon. A value of 0 removes the horizon.
-
Horizon height - Position of the horizon in the environment. 0.5 positions the horizon in the center. Higher values move the horizon higher in the sky. Lower values moves the horizon lower to the ground.
-
Ground tint - Color of the light emitted from the ground. Click the pencil icon to edit the color used from the color picker. Colors can be selected visually by clicking on the color area, by entering a hex or RGB value, or by selecting a swatch at the bottom of the picker.
-
Ground intensity - Unitless intensity of the light emitted from the ground.
-
-
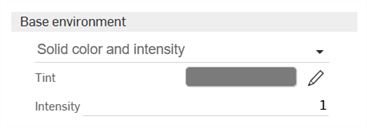
Solid color and intensity - Adds a solid tint and adjustable intensity for the light. The light is added to the background environment.
-
Tint - Color of the light emitted from the environment. Click the pencil icon to edit the color used from the color picker. Colors can be selected visually by clicking on the color area, by entering a hex or RGB value, or by selecting a swatch at the bottom of the picker.
-
Intensity - Unitless intensity of the light emitted from the environment
-
-
-