 Render Studio Interface - Environment Panel
![]()
Only available for
Available in: Render Studio
Located at the right of the page, the Environment panel displays an editable list of parameters for the scene environment. The available panel parameters change, depending on the selected Environment.
Click the Environment panel icon (![]() ) to open the panel:
) to open the panel:
The Environment parameters are outlined below:
-
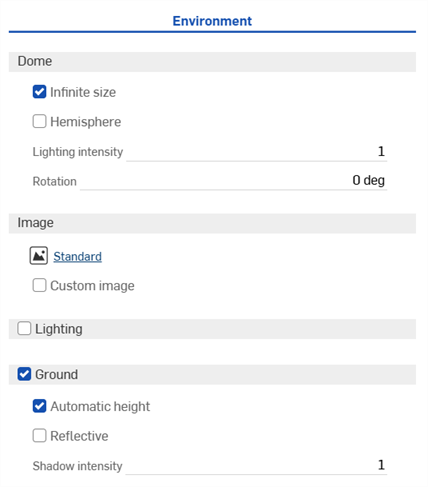
Dome
-
Infinite size - Sets the environment to an infinitely sized dome. In this environment the horizon is so far away that the position of the camera in the scene has no effect, only the direction the camera is looking. This is appropriate for exterior scenes. When not using an infinite environment, a distance to the horizon (Horizon distance) must be provided. This is more appropriate for interior scenes or contained exterior scenes where the position of the camera and not just the orientation should affect the view of the environment.
-
Horizon distance - The distance from the center of the environment to the horizon.
-
-
Hemisphere - Sets the environment to hemispherical. A hemispherical environment has the ground at the base of the hemisphere projected from the lighting environment. This can be useful when you want the scene to stick to the ground rather than float within the environment. When enabled, set the Tripod height to your specification.
-
Tripod height - The height of the camera above the ground when the environment image was captured. This is used to project the lower portion of the environment dome onto a flat ground plane.
-
-
Lighting intensity - Multiplier for the intensity of the lighting contained within the environment image. Values of less than 1 reduce the brightness of the lighting from the environment while values greater than 1 increase it.
-
Rotation - Rotation of the environment dome about the vertical axis.
-
-
Image
-
Library environment (
 ) - Library environment used to illuminate the scene if not overridden by a custom image. Standard is the default environment.
 -
Custom image - Override the environment dome with a user provided HDRI environment image. Images should be in 360/180 degree latitude/longitude and ideally in .hdr or .exr format. See Adding a custom Environment to the scene for further information.
-
Image - Custom HDRI lighting environment image.
-
-
-
Lighting (Render Studio Advanced only)
-
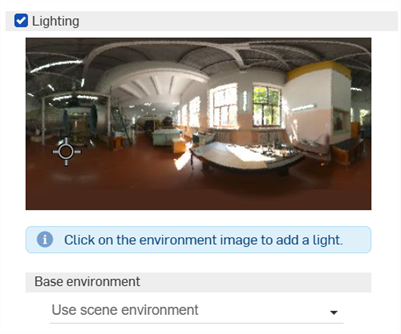
Allows placement of area light sources of various shapes directly in the environment, along with the ability to move and resize them. When Lighting is enabled, the unwrapped environment image is displayed as a 2D representation of the 3D graphics area.
Once the light is placed, select it's middle point. Once selected, it's shape can be changed. Click and drag to move the light to any location in the environment. You can add as many lights as required.
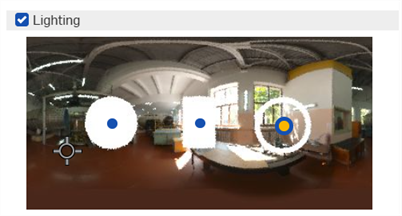
An example of 3 light shapes: Disc (left), Rectangle (middle), Ring (right)
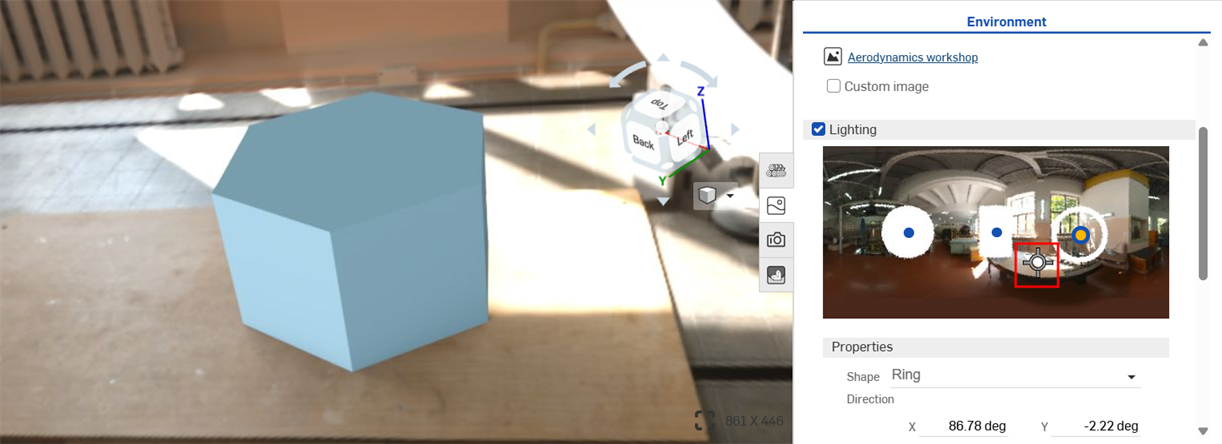
A camera direction indicator (crosshair marker) indicates where the center of the viewport is located (where the camera is pointing). This helps you to visually determine where lights should be placed, relative to the model in the graphics area. This marker updates dynamically as the user navigates the model in the graphics area, thereby navigating the camera.
Crosshair center marker in the unwrapped Environment Lighting image on the right indicating the center of the graphics area on the left.
-
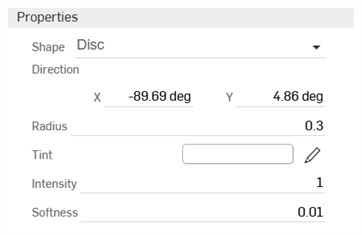
Properties
-
Shape - Physical shape of the light: Disc, Rectangle, or Ring. Click the environment to place a light.
-
Direction - Position of the light in the environment. The horizon and right side of the scene are at 0 degrees. Enter an X and Y value in degrees.
-
Radius (Disc or Ring shape only) - Radius of the disc or center line of the ring light.
-
Width (Rectangle shape only) - Width of the rectangular light.
-
Height (Rectangle shape only) - Height of the rectangular light.
-
Thickness (Ring shape only) - Width of the ring light centered on its radius.
-
Tint - Color of the emitted light. Click the pencil icon to edit the color used from the color picker. Colors can be selected visually by clicking on the color area, by entering a hex or RGB value, or by selecting a swatch at the bottom of the picker.
-
Intensity - Unitless intensity of the emitted light.
-
Softness - Determines whether the light has soft or hard edges. Higher values soften the edges of the light. Lower values harden the edges of the light.
-
-
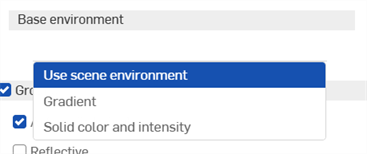
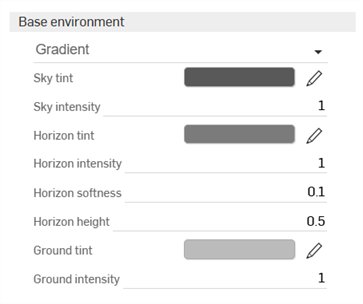
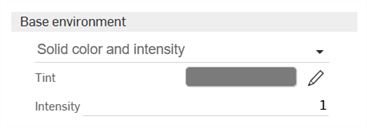
Base environment
-
Use scene environment - Uses the scene's environment, typically selected from the Environments library, on which the light is added.
-
Gradient - Adds a graduated light. The light is added to the background environment.
-
Sky tint - Color of the light emitted from the sky. Click the pencil icon to edit the color used from the color picker. Colors can be selected visually by clicking on the color area, by entering a hex or RGB value, or by selecting a swatch at the bottom of the picker.
-
Sky intensity - Unitless intensity of the light emitted from the sky.
-
Horizon tint - Color of the light emitted from the horizon. Click the pencil icon to edit the color used from the color picker. Colors can be selected visually by clicking on the color area, by entering a hex or RGB value, or by selecting a swatch at the bottom of the picker.
-
Horizon intensity - Unitless intensity of the light emitted from the horizon.
-
Horizon softness - Determines whether the horizon has soft or hard edges. Higher values soften the edges of the horizon. Lower values harden the edges of the horizon. A value of 0 removes the horizon.
-
Horizon height - Position of the horizon in the environment. 0.5 positions the horizon in the center. Higher values move the horizon higher in the sky. Lower values moves the horizon lower to the ground.
-
Ground tint - Color of the light emitted from the ground. Click the pencil icon to edit the color used from the color picker. Colors can be selected visually by clicking on the color area, by entering a hex or RGB value, or by selecting a swatch at the bottom of the picker.
-
Ground intensity - Unitless intensity of the light emitted from the ground.
-
-
Solid color and intensity - Adds a solid tint and adjustable intensity for the light. The light is added to the background environment.
-
Tint - Color of the light emitted from the environment. Click the pencil icon to edit the color used from the color picker. Colors can be selected visually by clicking on the color area, by entering a hex or RGB value, or by selecting a swatch at the bottom of the picker.
-
Intensity - Unitless intensity of the light emitted from the environment
-
-
-
-
Ground - A virtual ground plane with controls for position and reflectivity.
-
Automatic height - Automatically set the ground height based on lowest object.
-
Reflective - Allows the ground plane to reflect the scene.
-
Reflectivity - Amount of reflectivity of the ground plane.
-
Roughness - Roughness of the ground plane. Lower numbers give a mirror-like reflection while higher numbers blur the reflection.
-
-
Shadow intensity - Intensity of shadows on the ground. A value of 1 gives the physically correct result. Values less than 1 give lighter shadows, while values greater than 1 give darker shadows.
-
-
Daylight - Edit the following Daylight parameters (available for some Environments, such as Preetham).

-
Country - Select from a list of countries
-
Province - Select from a list of the selected country's provinces
-
City - Select from a list of major world cities.
-
Date - Select year and date numerically by clicking on the month, day, and year directly, or click the calendar icon to select a date from the pick list.
-
Time - Select a time numerically by clicking on the hour, minute, and AM / PM designation, or click the clock icon to select from the time pick list.
-
Timezone - Select from a list of UTC timezones.
-
DST - When checked, adjustment is made for daylight saving time.
-
Daylight parameters are only available for certain environments (for example, Perez and Preetham). See Editing an Environment with location and time
To adjust the panel width, hover the cursor over a panel edge. When the cursor turns into a double-sided arrow, click and drag to resize the panel.
See Render Studio Examples and Resources for more information.