Company/Classroom/Enterprise Settings - Users
![]()
Only available for
Invite or add new users to your company/classroom/enterprise, view the list of current users, search for a particular user, delete selected users, and see whether a user is a Guest user. Only the company/classroom/enterprise Owner and the Admin (or Educator in the case of Classrooms) have the ability to add users to and remove users from the subscription.
To navigate to your Users settings in Onshape, click on your Account user icon (![]() ) in the top right corner of your Onshape window. This opens a dropdown menu. Click Company/Classroom/Enterprise settings.
) in the top right corner of your Onshape window. This opens a dropdown menu. Click Company/Classroom/Enterprise settings.
Click Users in the list on the left side of the page:
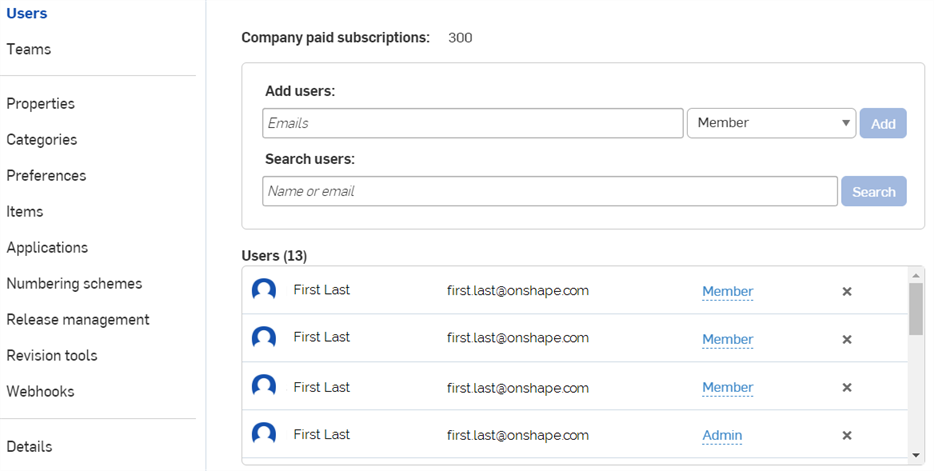
Company settings > Users

Enterprise settings > Users
The company owner has the ability to adjust the number of users paid for with the subscription (seats), as well as add and remove users from the subscription.
Adding users takes effect immediately. Removing users removes the users immediately, but billing updates take place on the next renewal cycle.
A company has two types of users:
- Admin
- Member
The company Owner is the initial account used to create the company. This user has full administrative permissions of a company admin, as well as the ability to manage payment information. A company Admin has administrative permissions to manage the company and may access all documents owned by the company and also has the ability to: add, remove, manage users; manage the company details; create and manage properties to be used throughout the company; define company preferences such as custom material libraries; establish the release management workflow. A company Member has an account within the company and all documents created by that user are owned by that company. Company members may access documents shared with the company.
You may add seats to your subscription if you are the owner of the company and your purchase is on a credit card. If you have a purchase order, please contact your Customer Success representative or Onshape Support for assistance.
- Select <your company name>
company settings
from the User menu:
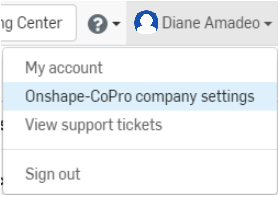
- Select
Users
in the left pane:

- Enter the new number of users you are paying for.
- Click Update.
Review and confirm the number of users in the dialog that appears; click OK.
For further assistance on adding users or other purchase-related activities, please contact your Customer Success representative.
To add users to a subscription:
- Under
Add users, enter the email address of the user to add and select a role (Member or Admin).

- Click Add.
- Repeat steps 1 and 2 to add additional users.
You cannot add a new user as an Admin. Add the user as a Member, and once they have accepted the invitation, you can change the user role to Admin.
- Search for the user you wish to remove, if necessary.
- Click the x at the end of the appropriate user row to open the Remove user dialog box:

The options will automatically be selected. Make your preferred changes and click OK to save them and close the dialog box.
- Search for the appropriate user, if necessary.
- Click the current role (in blue, with a dashed underline).
- Use the dropdown to select a new role.
- Click the check to save. (Click the x to cancel.)
The Enterprise admin can adjust the number of users paid for with the subscription, as well as add and remove users from the subscription. This page also displays the number of Full and Light users currently in the enterprise in relationship to how many seats for each have been purchased.
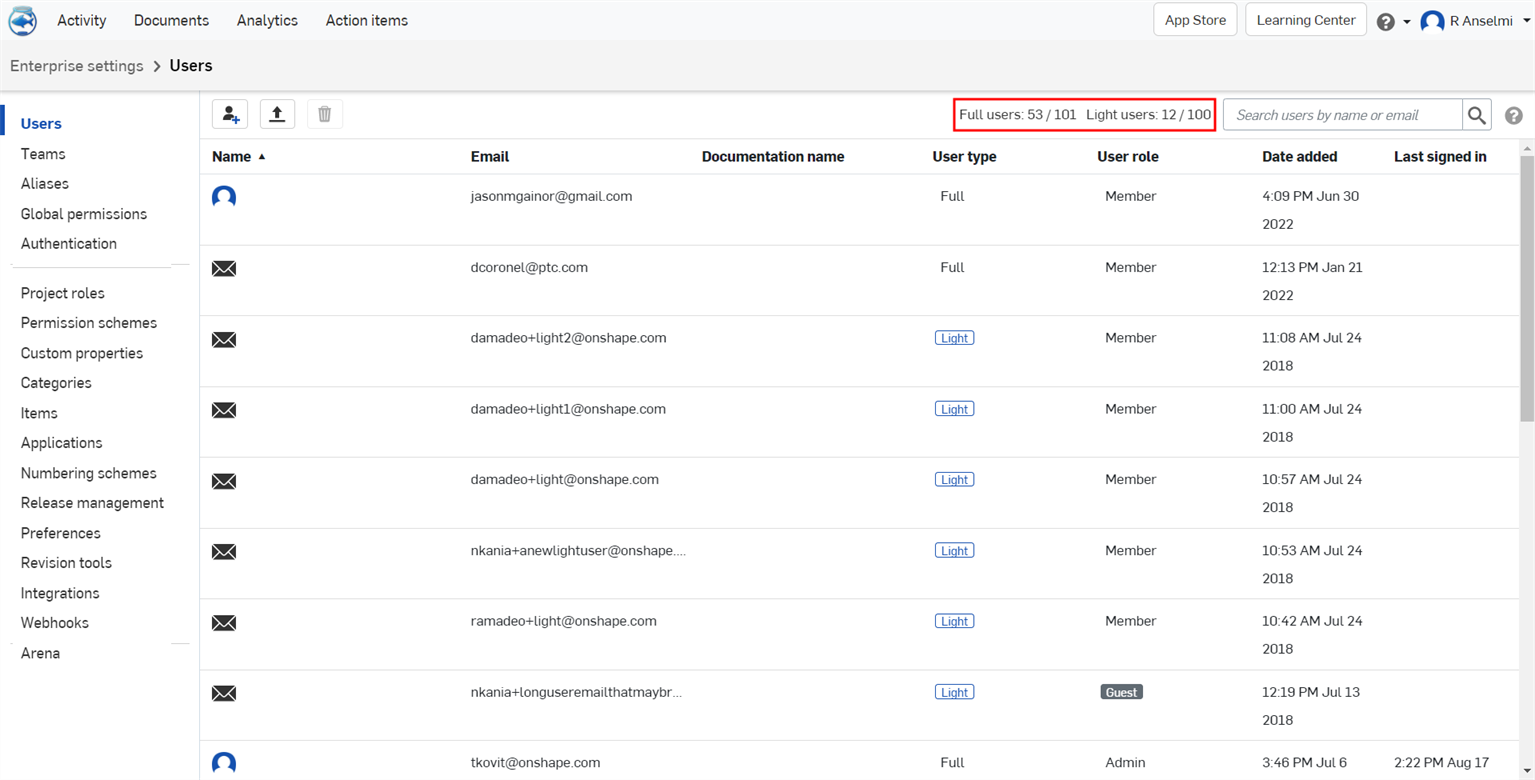
To make it easier to find specific users, you can search for users as well as sort the user list. Searching for users will find matches or partial matches with user names and email. This can be used to find all users of a specific domain (ex. @ptc.com). Sorting can be done on the Name, User type, User role, Date added, or Last signed in columns by clicking on the corresponding header.
As administrator of an enterprise you are responsible for adding and removing users from your enterprise account. If you have upgraded from a Professional account to an Enterprise account, the users defined in the Professional account were all moved to your Enterprise account.
If your company uses an SSO application, like Okta, even better. Onshape works with other single sign on providers, too. See Configuring Integration with Identity Providers for more information.
For more information about types of users in an Enterprise account, see the Managing your Onshape Enterprise subscription.
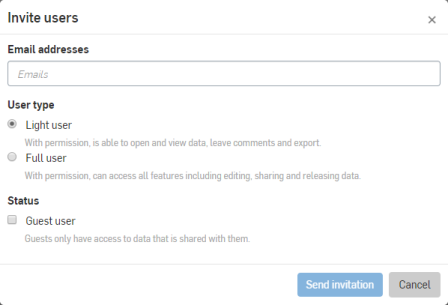
There are two types of users you can add to an Enterprise account: Light and Full. Full users, with permission, can access all functionality including editing, sharing, and releasing data. Light users, by contrast, with permission, can only open and view data, leave comments, and export data.
EDU enterprise users are always Full users, there is no Light user capability within an EDU enterprise.
In addition to being either a full or light user, a user may also have a status of either Member or Guest. Members are typically members of your account, included in the billing for that account. Guests are users outside your enterprise that require access to your documents and resources. Guest users are added to your enterprise (with access only to data that is shared with them) and billed to your account. Guest users are not members of the All enterprise users team, but what they have permission to do in Onshape is determined by the enterprise administrator and users with Share permissions on documents. A user with Share permission can share documents with Guest users and provide certain permissions to that Guest user for that document.
Users must be added to the Enterprise as a Member or Guest if Enterprise information is to be shared directly rather than via anonymous link.
To add users to your enterprise account:
- Click your name in the upper right corner of the window to open the menu.
- Select Enterprise settings.
- Click Users in the left tab pane.
- In the top left corner, click the Invite users button
 .
.
For EDU Enterprise users, this dialog is different, and allows only Full users to be invited (and added) to the EDU Enterprise.

- In the dialog, enter user email addresses, select a User type and a status if necessary.
Use semi-colons (;) to separate multiple email addresses.
- Click Send invitation.
You can also add users using a CSV file:
- Follow steps 1-3 from above.
- In the top left side of the page, click the Manage via CSV button
 .
.
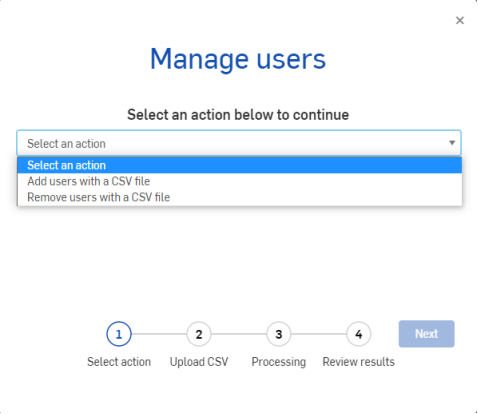
-
In the dropdown menu, select Add users with a CSV file.
- Click Next.
- Upload your CSV file with users to add, or if you need help formatting, click Download template:
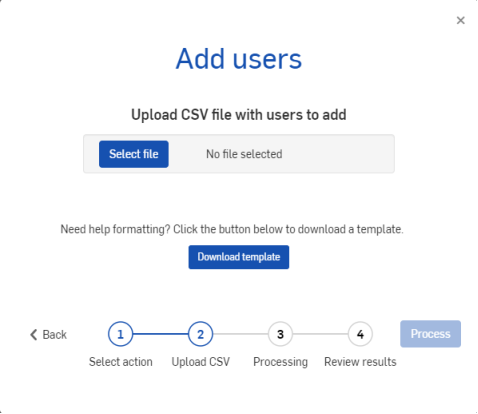
- Click Process to add the users.
- Review your results and click
 .
.
The users are added to your account and become available for inclusion in Permission scheme role maps.
You can give users access to your enterprise documents without giving them access to all of your data. Guest users have access only to the documents that are explicitly shared with them, cannot be included in any global permission and never have access to any enterprise account settings. You might want to let certain vendors, suppliers, contractor or even clients have access to design data. You may let them view design data, but have scoped access, curated to specific projects, folders or documents.
If a guest doesn't have an Onshape account, they receive an email with a link to create an account. Upon signing in, Onshape opens to a private account. The guest must then access the User menu and execute the Switch to <enterprise name> command to access the enterprise account.
If a user already has an Onshape account, an email is sent notifying them that they have been added to an enterprise account in addition to their other account. They can access the enterprise account through the Switch to <enterprise name> command in the User menu.
Guest users are not added to the All enterprise users team automatically nor can they be added manually.
Adding a guest user through Enterprise settings
- From the Enterprise settings, select Users.
- Click Invite Users to open the Add users dialog.
- Enter the email address of the user you wish to add as a guest (or more than one email address, comma-separated).
- Select the checkbox in front of This user is a guest and has access only to data that is shared with them.
- Click Add.
Adding a guest user through the Share dialog
- From within a document, click the Share button.
- Select the Invite guests tab.
- Enter the email or emails of the users you wish to add as guests (use comma separators).
- Select the permissions to allow for the active document.
- Click Share.
- Click Close to close the dialog.
The newly invited guest is displayed as a Guest user on the Users tab in Enterprise settings. Once a user is invited as a guest, you can type their email address directly in the Individuals tab of the Share dialog.
Adding a guest user through the Project dialog
- Access the context menu on a Project and select Edit project.
- At the bottom of the dialog are the Share tabs; select the Invite guests tab.
- Enter the email or emails of the users you wish to add as guests (use comma separators).
- Select the permissions to allow for the active document.
- Click Share.
- Click Close to close the dialog.
The newly invited guest is displayed as a Guest user on the Users tab in Enterprise settings. Once a user is invited as a guest, you can type their email address directly in the Individuals tab of the Share dialog.
To edit a user:
- From the Enterprise settings, select Users.
- Right-click the user name in the Users list and select Edit user.
- In the Edit user dialog, make the following changes:
- Documentation name - Allows an administrator to enter and override the user's Account profile Documentation name. When entered, and the override option checked, the override name is displayed on the Release candidate dialog and Drawings. In the user's profile, the Documentation name shows the override, which cannot be edited by the user. The user is informed that an administrator has overridden the Documentation name. If the user has set their Documentation name prior to the override implementation, this name is preserved and is reinstated if and when the administrator removes the override.
- User type - Change a user type to or from Full or Light user.
- Status - Change a user status to or from Guest. No notifications are sent regarding this action. When a member is switched to Guest status, any permissions on documents not shared explicitly with the user are removed. If the member was assigned to a Permission scheme this assignment and the associated permissions are removed from the user when switched to Guest status.
- click Update.
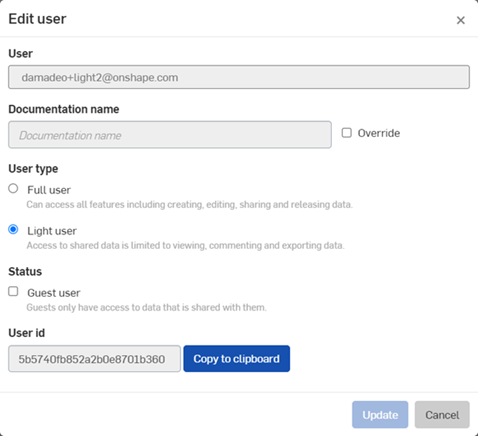
Guest users have a ![]() tag next to their name whenever it appears in the Analytics console.
tag next to their name whenever it appears in the Analytics console.
Permissions for guest users
Guest users have access to only the specific documents shared with them. You can manage their permissions (and thus the actions they can take on documents) by adding them to Project roles. Permissions on Projects are according to the Project Role the guest is assigned to.
You can add guest users to teams, but if the team is added to any Global permissions, the guests users are filtered out of the permissions and those permission to do not apply to them.
All actions taken regarding users and guest users are reflected in the Activity area.
Guest users cannot access Enterprise settings, that option is not available in the User menu.
There may be times when you want to remove a user from your Onshape Enterprise domain and disable their access to all data within that domain. The steps below accomplish both tasks:
- Sign in to your enterprise domain as an enterprise Admin.
- Click your name in the upper right corner of the window to open the User menu.
- Select Enterprise settings.
- Click the Users tab in the left pane.
- Right-click on the user name to remove and select Remove user.
- Review the dialog describing that this user will no longer be able to sign in to the Enterprise domain, then click Remove.
The user is removed from the Enterprise and prevented from being able to sign in to the domain. Any access to enterprise data is also removed within the Enterprise domain. Within the Enterprise domain, Onshape maintains all of the removed users' activity and analytics data, so it is still visible to your team. When looking for a removed user, you will see “(inactive)” next to that users name.
You can also remove users using a CSV file:
- Follow steps 1-4 from above.
- In the top left side of the page, click the Manage via CSV button
 .
.
-
In the dropdown menu, select Remove users with a CSV file:
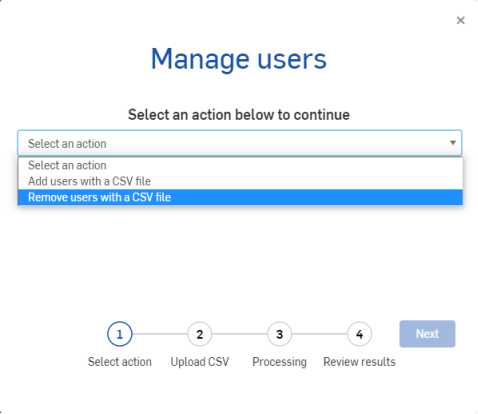
- Click Next.
- You have the following choices:
- Click Select file to upload your CSV file with users to remove.
- Click Download template with which to create a file to upload.
- Click Download users list to expedite the creation of a file with which to remove all or some users:
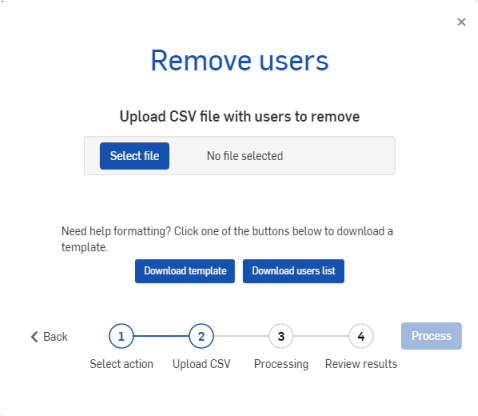
- If you chose Select file, proceed to step 9, below.
- If you chose Download template, create a file with the names of users you wish to remove, then use Select file to upload that file.
- If you chose Download users list, you can edit that file to contain the names of only users you wish to remove, then use Select file to upload that file.
The users list contains the following information:
Email
Name
Role
Type
Guest (y/n)
Date Added
- Click Process to finalize the removal of users.
- Review your results and click
 .
.
For an additional Learning center resource, follow the technical briefing article here: Sharing outside an Enterprise (Onshape account required).