Understanding and Administering Project Roles and Permission Schemes
Project roles and Permission schemes work in tandem to apply access permission to documents grouped together within a Project. A Project references only one Permission scheme, which is comprised of Project roles specifying the permissions.
In a Permission scheme, you’ll associate permissions with Project roles. For example, in one Permission scheme the Engineers role may be associated with Edit, View and Comment permissions. In the same Permission scheme the Vendor role may be associated with View and Comment permissions only.
Project roles are used to group users into functional roles with associated permissions. For example, you may have Project roles like Designer, Engineer, Reviewer, and Vendor. These roles act as buckets that you will later group specific users into when you’re creating a Project.
For example, Onshape provides these default Permissions schemes:
Permission Scheme |
Project Roles |
Permissions |
Onshape Default |
Project Administrators |
All permissions |
|
Managers |
All permissions |
|
Engineers |
Edit, View |
|
Reviewers |
View, Comment |
|
Suppliers |
View only |
Additional (advanced) permissions are also supplied for your convenience, enabling you to customize Roles with these permissions (or create your own roles):
- Export
- Link document
- Share
- Delete
Permission schemes and their Project roles are associated with Projects and users during Project creation (or editing). For more information about Projects and associating Permission schemes, see Understanding and Managing Projects.
Project roles are simply a named group within Onshape. When creating a Project role, you provide the name and description. For example, if your company employs engineers who design and model within Onshape, and project managers who review designs, you might create a “Designer” Project role and a “Reviewer” Project role.
Project roles have no meaning or effect until associated with permissions and users in a Permission scheme that is applied to a particular project.
Project roles are containers meant to be used to group users and pair them with permissions in a Permission scheme. Create Project roles according to expected job functions of your users.
A Project role corresponds to a job function - for example, Designer, Manager, Drafter - but are just names. They acquire meaning and function in the context of Permission Schemes and Projects.
Onshape provides these default Project roles:
- Project administrators
- Managers
- Engineers
- Reviewers
- Suppliers
You are able to edit the names and descriptions of these default Project roles to suit your needs, and also create your own.
- Select Enterprise settings from the User menu.
- Select Project roles tab.
- Click Create project role.
- Enter a name for the Project role and a description (optional).
- Click Save to create the Project role, or click Cancel to quit without creating the Project role.
- Select Enterprise settings from the User menu.
- Select Project roles tab.
- Right-click on a selected Project role and select Edit.
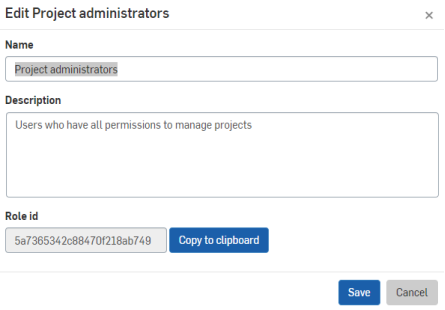
- Make desired changes to the name or description.
- Click Save to save changes or click Cancel to quit without saving the changes.
Notice at the bottom of the dialog is the Role id field: you can use this value in a customized release or obsoletion workflow to indicate that a user acting in a particular role can perform a particular function in the workflow. For more information on customized release workflows, see Creating a Customized Release Workflow.
Permission schemes are a named table of Role-Permission set pairs. For example, the ProjA Permission scheme could look like this:
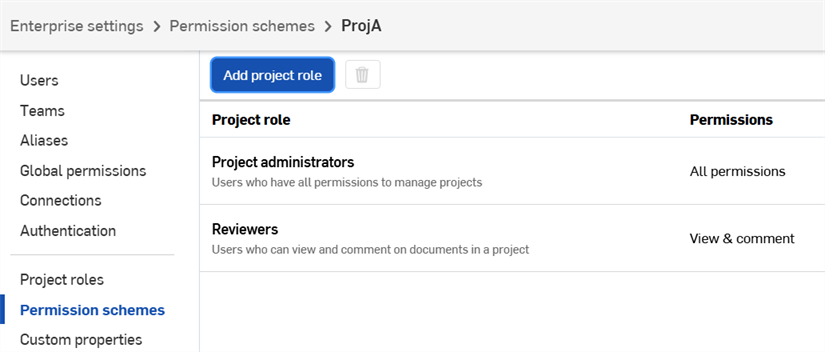
In and of themselves, Permission schemes have no effect on who has what access to which documents.
All Permission schemes have a Project Administrator role by default. This role has all of the permissions automatically to prevent accidentally locking everyone out of a Project.
Permission schemes enable you to group permissions together in logical collections so you can assign them to users when defining a Project. Permission schemes reference one or more roles (described above) paired with one or more permissions.
- Select Enterprise settings from the User menu.
- Select Permission schemes tab.
- Click Create scheme.
- Enter a name and (optional) description for the new Permission scheme.
- Click Create to create the permission scheme (or click Cancel to close the dialog without creating a Permission scheme).
The Project Administrators role is a standard Onshape Project role that is automatically added to all Permissions schemes upon creation. This action may not be undone or edited.
At this point, you should add the desired Project roles to the newly created Permission scheme:
- Click Add project role.
- In the dialog, select the Project role to add and then select the group of permissions to go along with it.
- You are able to select a group of permissions, or select Advanced to specify a customized group of permissions.
- Click Add to save the Role/Permission assignment to the Permission scheme.
- Add more Project roles to the Permission scheme, if needed.
- Select Enterprise settings from the User menu.
- Select Permission schemes tab:
- Right-click on the selected Permission scheme and select Edit details to edit the name or description.
- Right-click on the selected Permission scheme and select Manage project roles and permissions to add Project roles, edit role permissions, or remove a Project role from the Permission scheme.
- To edit role permissions, right-click on the Role and select Edit role permissions or double-click on the role name.
- Use the drop down to select a new set of permissions or select Advanced... to display additional permissions from which to select:
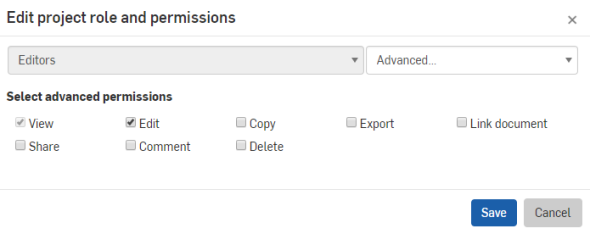
The permissions already associated with that role are checked. Make any changes you wish, remembering that changes affect all Projects that use that Permission scheme. Permissions required for other permissions are automatically checked (for example: Share permission requires Edit, and Delete permission also requires Edit).
- Click Save to save your changes, or click Cancel to close the dialog without making any changes.
Project roles and Permission schemes are used in the definition of a Project. For information on creating and editing Projects, see Understanding and Managing Projects
- If a Permission scheme is being used by (has been assigned to) any project, you are not able to delete that Permission scheme. When you change a Permission scheme, the change affects all the projects that reference the Permission scheme (and all the documents in those Projects); you are able to remove a Permission scheme from a project and assign a new one.
- We recommend that you set up your ideal matrix for all roles and permissions you want to put users in eventually, but use the quick setup instructions and the Onshape defaults to get up and running quickly.
Project roles and Permission schemes work in tandem to apply access permission to documents grouped together within a Project. A Project references only one Permission scheme, which is comprised of Project roles specifying the permissions.
In a Permission scheme, you’ll associate permissions with Project roles. For example, in one Permission scheme the Engineers role may be associated with Edit, View and Comment permissions. In the same Permission scheme the Vendor role may be associated with View and Comment permissions only.
Project roles are used to group users into functional roles with associated permissions. For example, you may have Project roles like Designer, Engineer, Reviewer, and Vendor. These roles act as buckets that you will later group specific users into when you’re creating a Project.
For example, Onshape provides these default Permissions schemes:
Permission Scheme |
Project Roles |
Permissions |
Onshape Default |
Project Administrators |
All permissions |
|
Managers |
All permissions |
|
Engineers |
Edit, View |
|
Reviewers |
View, Comment |
|
Suppliers |
View only |
Additional (advanced) permissions are also supplied for your convenience, enabling you to customize Roles with these permissions (or create your own roles):
- Export
- Link document
- Share
- Delete
Permission schemes and their Project roles are associated with Projects and users during Project creation (or editing). For more information about Projects and associating Permission schemes, see Understanding and Managing Projects.
Project roles are simply a named group within Onshape. When creating a Project role, you provide the name and description. For example, if your company employs engineers who design and model within Onshape, and project managers who review designs. You might create a “Designer” Project role and a “Reviewer” Project role.
Project roles have no meaning or effect until associated with permissions and users in a Permission scheme that is applied to a particular project.
Project roles are containers meant to be used to group users and pair them with permissions in a Permission scheme. Create Project roles according to expected job functions of your users.
A Project role corresponds to a job function - for example, Designer, Manager, Drafter - but are just names. They acquire meaning and function in the context of Permission Schemes and Projects.
Onshape provides these default Project roles:
- Project administrators
- Managers
- Engineers
- Reviewers
- Suppliers
You can edit the names and descriptions of these default Project roles to suit your needs, and also create your own.
These tasks must be performed on the browser platform of Onshape.
- Select Enterprise settings from the User menu.
- Select Project roles tab.
- Click Create project role.
Save
- Enter a name for the Project role and a description (optional).
- Click Save to create the Project role, or click Cancel to quit without creating the Project role.
- Select Enterprise settings from the User menu.
- Select Project roles tab.
- Right-click on a selected Project role and select Edit.
- Make desired changes to the name or description.
- Click Save to save changes or click Cancel to quit without saving the changes.
Notice at the bottom of the dialog is the Role id field: you can use this value in a customized release or obsoletion workflow to indicate that a user acting in a particular role can perform a particular function in the workflow. For more information on customized release workflows, see Creating a Customized Release Workflow.
Permission schemes are a named table of Role-Permission set pairs. For example, the ProjA Permission scheme could look like this:
In and of themselves, Permission schemes have no effect on who has what access to which documents.
All Permission schemes have a Project Administrator role by default. This role has all of the permissions automatically to prevent accidentally locking everyone out of a Project.
Permission schemes enable you to group permissions together in logical collections so you can assign them to users when defining a Project. Permission schemes reference one or more roles (described above) paired with one or more permissions.
- Select Enterprise settings from the User menu.
- Select Permission schemes tab.
- Click Create scheme.
- Enter a name and (optional) description for the new Permission scheme.
- Click Create to create the permission scheme (or click Cancel to close the dialog without creating a Permission scheme).
The Project Administrators role is a standard Onshape Project role that is automatically added to all Permissions schemes upon creation. This action cannot be undone or edited.
At this point, you should add the desired Project roles to the newly created Permission scheme:
- Click Add project role.
- In the dialog, select the Project role to add and then select the group of permissions to go along with it.
- You can select a group of permissions, or select Advanced to specify a customized group of permissions.
- Click Add to save the Role/Permission assignment to the Permission scheme.
- Add more Project roles to the Permission scheme, if needed.
- Select Enterprise settings from the User menu.
- Select Permission schemes tab:
- Right-click on the selected Permission scheme and select Edit details to edit the name or description.
- Right-click on the selected Permission scheme and select Manage project roles and permissions to add Project roles, edit role permissions, or remove a Project role from the Permission scheme.
- To edit role permissions, right-click on the Role and select Edit role permissions or double-click on the role name.
- Use the drop down to select a new set of permissions or select Advanced... to display additional permissions from which to select:
The permissions already associated with that role are checked. Make any changes you wish, remembering that changes affect all Projects that use that Permission scheme. Permissions required for other permissions are automatically checked (for example: Share permission requires Edit, and Delete permission also requires Edit).
- Click Save to save your changes, or click Cancel to close the dialog without making any changes.
Project roles and Permission schemes are used in the definition of a Project. For information on creating and editing Projects, see Understanding and Managing Projects
- If a Permission scheme is being used by (has been assigned to) any project, you can’t delete that Permission scheme. When you change a Permission scheme, the change affects all the projects that reference the Permission scheme (and all the documents in those Projects); you can remove a Permission scheme from a project and assign a new one.
- We recommend that you set up your ideal matrix for all roles and permissions you want to put users in eventually, but use the quick setup instructions and the Onshape defaults to get up and running quickly.