公佈
![]()
![]()
![]()
僅為 提供
使用公佈以建立來自任何文件的已發行零件、Part Studios、組合件、工程圖、與檔案的集合,並與任何有 Onshape 帳戶的使用者共享。
可以在所有計畫中與使用者共享公佈。
公佈是一個唯檢視的套件,在其中將來自各種文件的不同零件、組合件、工程圖以及匯入的檔案集合在此處。這樣的集合可讓您僅分享必要的精準資料,包括特定的修訂或版本。
按一下 [建立] 然後選擇 [公佈]。為公佈取名。選擇性地加入說明與任何需要的標籤來保持井然有序,易於尋找。按一下 [建立]。
若要加入資料,按一下 [插入文件分頁]。加入來自您有連結權限的文件中的任何 Part Studio、組合件、工程圖、或檔案分頁。存取任何團隊、標籤、或篩選器來找出有您要插入分頁的文件。按一下公司名稱來存取您的資料夾結構。按一下「篩選器」圖示來指定特定的分頁類型或使用搜尋欄位來根據名稱、URL、或任何屬性來找出所需的分頁。
在您找到文件之後,選擇所需的分頁來將其加入。與任何的連結文件一樣,僅能插入版本。根據預設會選擇文件的最新版本。若要選擇一個先前的版本,按一下「版本圖表」圖示來選擇一個版本。接著選擇要加入的分頁。若要選擇一個特定的修訂版,按一下「修訂版」圖示,然後選擇物件。對話方塊中會顯示可用的最新修訂版。如果該零件編號需要一個不同的修訂版,按一下物件旁的「修訂版」圖示,然後選擇一個修訂版。根據需要繼續將分頁加入至公佈中。完成後請關閉對話方塊。
分頁會在左邊。連按兩下來在主圖形區域中檢視不同的分頁。
如果使用了發行管理,系統會指出參考的版本或修訂版、零件編號與發行狀態。按右鍵並選擇 [刪除] 來移除分頁。若要調整檢視方式,請選擇「清單檢視」或「詳細資料檢視」的選項。使用篩選器與搜尋以快速找出分頁。
當加入的零件修訂版中的零件是包含在多零件的 Part Studio 中時,Onshape 會在圖形區域中強調顯示零件的選取,並在「特徵」清單中強調顯示相關的特徵。
如果任何參考的物件有更新的版本或修訂版可用,按一下藍色的通知來更新。
若要重新排序分頁,只要在「公佈管理員」中拖曳與置放分頁即可。使用資料夾來組織管理。在公佈分頁上按右鍵,然後選擇 [將選取項目加入至資料夾]。命名資料夾,然後根據需要將分頁拖放到資料夾中。若要移除一個資料夾,在資料夾上按右鍵,然後選擇 [拆開]。
按一下「文件」功能表然後選擇 [以檢視者模式檢視]。這樣會顯示唯檢視使用者查看公佈時會看到的畫面。取決於所檢視的分頁,唯檢視使用者可存取包含適用資訊的唯檢視工具列。例如,組合件中有材料表,Part Studio 中有「外觀」面板。若要退出這個模式,按一下圖形區域中通知上的 [完成]。
可以從文件頁面、使用「類型」的篩選器中存取公佈。選擇 [公佈] 或選擇 [全部顯示] 來同時查看文件與公佈。使用搜尋來找出特定的公佈。
在文件頁面中開始建立的過程:
-
按一下 建立 然後選擇「公佈」。
-
提供公佈的名稱、說明,以及加入任何您要使用的標籤。
-
按一下 建立。
-
空白的公佈隨即開啟:
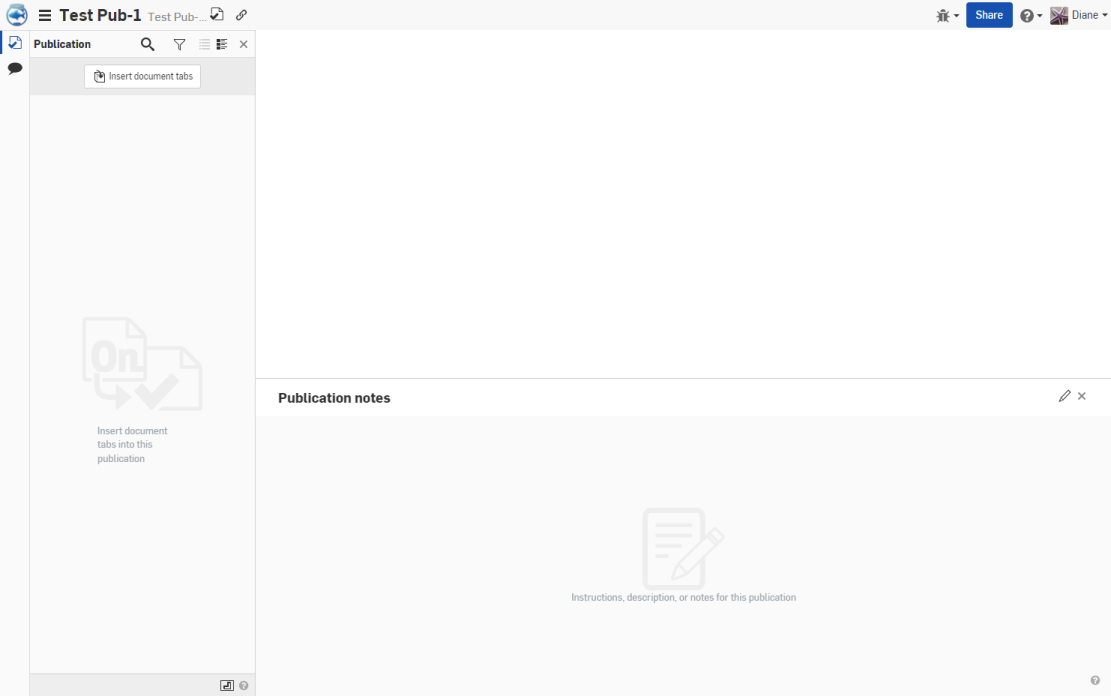
在建立公佈之後,您可以加入來自其他與不同文件的分頁,也可以包括關於公佈與其內容的備註。
-
按一下視窗左側「公佈」管理員窗格內的 [插入文件分頁] 按鈕來開啟「插入文件分頁」對話方塊:
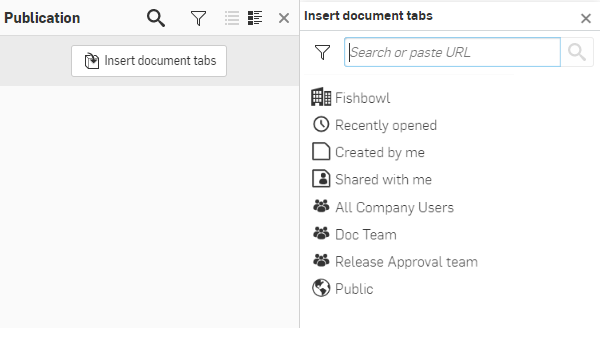
公佈管理員的操作方式與分頁管理員類似。
-
使用窗格來找出要插入其中分頁的文件:
-
搜尋或貼上文件的 URL。
-
選擇一個搜尋篩選器,像是:「最近開啟的」、「本人所建立」。
-
選擇一個「團隊」篩選器。
-
選擇一個「專案」或「資料夾」篩選器。
-
-
在您有文件清單之後,請選擇一個文件。
您僅能插入您有權限的文件。
-
使用對話方塊上方的 Part Studio、Assembly、檔案或工程圖篩選器來篩選。
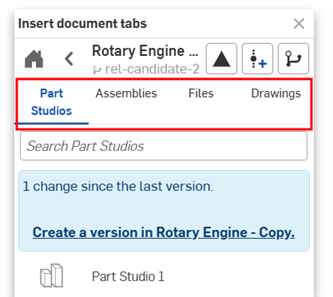
-
在您有零件或分頁的清單之後,選擇其中一個來將其插入。
-
在插入ˊ之前,分頁的文件必須已建立版本,或分頁已建立修訂版。
-
僅在零件已包括在發行中時,才能插入來自 Part Studio 的個別零件。若要檢視文件的已發行項目,按一下已發行項目圖示 (
 )。這可讓您插入來自 Part Studio 的個別已發行零件 (右下圖)。
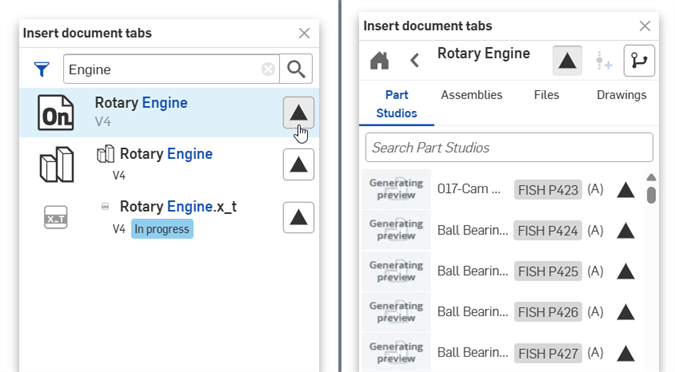
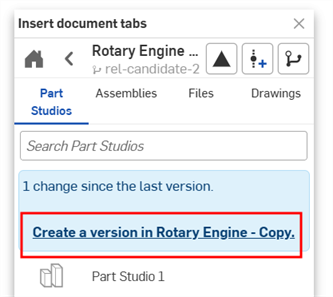
如果需要,請在嘗試插入分頁之前使用藍色的建立版本連結來建立版本:
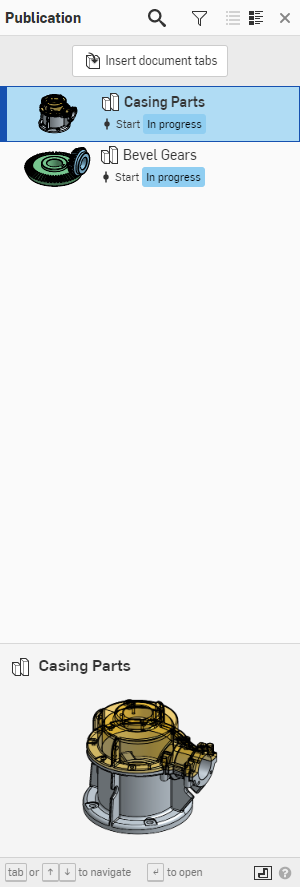
會在「公佈」管理員中列出所選分頁,並在管理員底部顯示一個縮圖:
-
對話方塊會避免您插入重複的分頁:

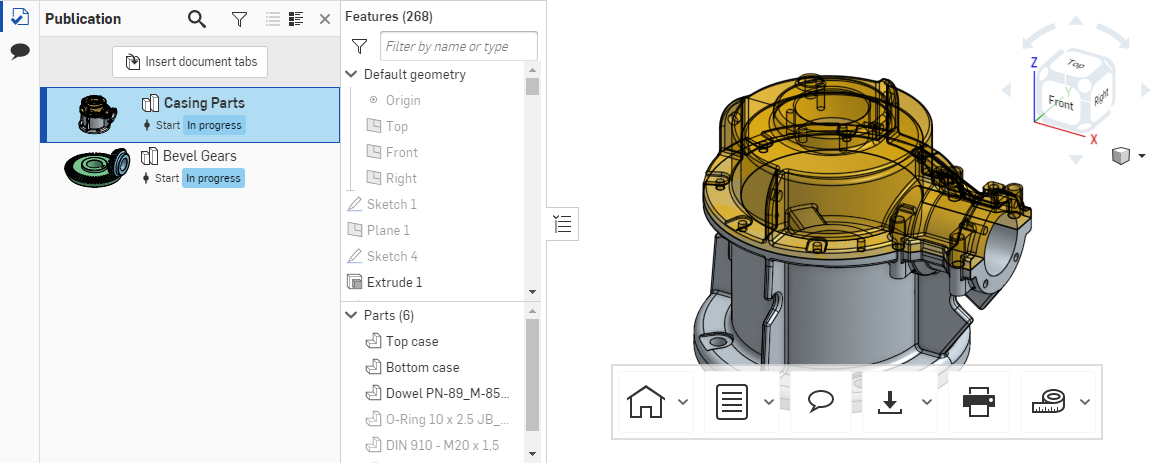
插入分頁時,會包括有資料資訊,並會在公佈的圖形區域中顯示模型。對於零件而言,包括的資訊會是「特徵」清單與「零件」清單。
由於公佈完全是唯檢視的,因此所有包括的分頁也是唯檢視模式的。這表示公佈中的資料是唯讀且無法變更的 (已建立版本與已建立修訂版元素一律是唯讀的)。擁有權限的使用者可以編輯公佈的詳細資料,像是名稱、說明與其他中繼資料。
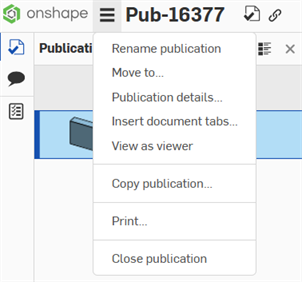
公佈名稱左側的漢堡功能表中包含下列的指令:
-
重新命名公佈 - 變更公佈的名稱
-
移動至 - 將公佈移動到不同的位置,例如移到資料夾或專案中
-
公佈詳細資料 - 開啟「公佈詳細資料」對話方塊:
-
說明 - 關於公佈內容的摘要。
-
強制執行公佈匯出規則 - 核取時,與非註冊公佈使用者的分享或連結會強制執行匯出規則 (如果有的話)。
如果公佈是由使用者所擁有的,則會套用在「我的帳戶」>「喜好設定」>「使用者匯出規則」之下的匯出規則。如果公佈是由 Company (Professional 訂閱) 或 Enterprise (Enterprise 訂閱), 所擁由,則會套用在「Company/Enterprise 設定」>「喜好設定」>「全 Company/Enterprise 匯出規則」之下的匯出規則。
-
-
插入文件分頁 - 插入更多文件分頁
-
以檢視者模式檢視 - 以公佈共享使用者可檢視的方式檢視公佈
-
複製公佈 - 將使用中的工作區複製到新的公佈中
-
列印 - 列印公佈的視圖
-
關閉公佈 - 關閉公佈並回到文件頁面中
有編輯公佈權限的使用者可以將分頁加入至公佈中,會從公佈中移除分頁。無法編輯分頁中的參數式資料。
當您建立公佈時,會在視窗的下半部顯示空白的「公佈備註」區域:
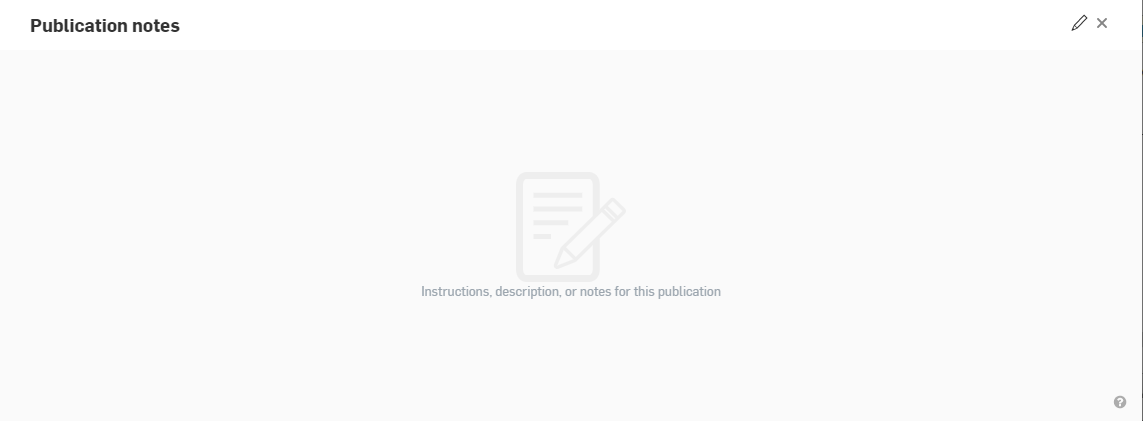
按一下視窗右側的小鉛筆圖示來啟用編輯。您可以開始在備註方塊中輸入。在建立備註時,您可以使用 Markdown 來建立格式。若要預覽備註以查看 Markdown 的格式效果,請按一下「預覽」圖示 (出現在起使編輯之前的鉛筆圖示所在處)。
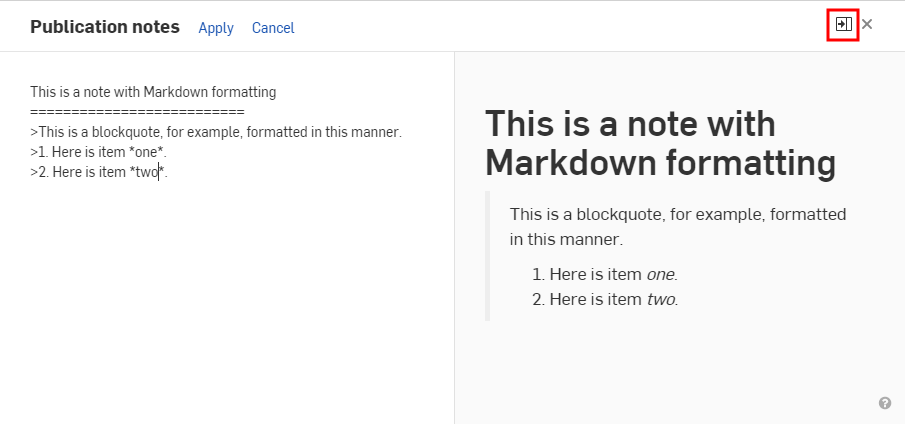
在完成建立或編輯備註之後,按一下 [套用] 來保留變更,或按一下 [取消] 來退出編輯模式而不保留變更。
按一下「重新整理註解」圖示 (![]() ) 來顯示最新的公佈註解。
) 來顯示最新的公佈註解。
備註可接受的 Markdown
備註區域接受傳統的 Markdown 來建立格式。以下為一些範例。
-
Heading 1 格式化為:
                Heading 1

============ -
Heading 2 格式化為:
                Heading 2

-------------- -
# This is also a heading 1 -
## This is a heading 2 -
###### This is a heading 6 -
# This is also a heading 1# -
## This is also a heading 2## -
### This is also a heading 3### -
使用區塊引言的段落可以是:
-
> This is a blockquote with two paragraphs. You can format it this way,> and it will display appropriately.> Markdown is very versatile.>> This is the second paragraph within a blockquote.> Markdown is very versatile. -
> This is a also blockquote with two paragraphs. Showing another wayto format with Markdown.> Another section would appear here.
-
-
區塊引言可以包括其他的 Markdown 元素,包括標題、清單與程式碼區塊:
> ## This is a header.>> 1. This is the first list item.> 2. This is the second list item.>> Here's some example code:>> return shell_exec("echo $input | $markdown_script"); -
Markdown 支援排序 (編號) 與無序 (項目符號) 清單。
-
無序清單使用星號、加號和連字號 — 可交換地 — 做為清單標記:
* Red* Green* Blue等同於:
+ Red+ Green+ Blue也等同於:
- Red- Green- Blue -
排序清單則使用數字接著一個英文句點:
1. First priority2. Second priority3. Third priority
公佈會列在「文件」頁面下半部的文件與公佈的部分。
使用「類型」篩選器,然後按一下 [公佈] 來僅檢視這個清單中的公佈。

使用文件頁面上方的搜尋列來找出啟用篩選器內的公佈,如同搜尋列中所述:
![]()
當使用搜尋方塊尋找公佈時,搜尋是在目前選取的篩選器內進行。
使用「搜尋」列中的向下箭來啟動進階搜尋功能表,然後選擇一個公佈的類型:
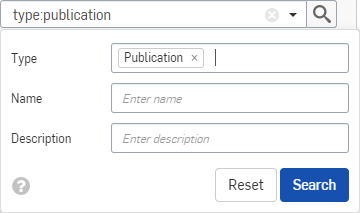
共享公佈是屬於唯檢視層級的。您可以與個人、團隊共享,使用電子郵件邀請訪客使用者加入 Enterprise 帳戶中,或建立可共享公佈的連結。所有其他的共享選項都適用。
訪客使用者僅能檢視明確與其共享的資訊。當建立共享的連結時,任何有連結的使用者都可以開啟公佈。
若要以共享使用者的方式檢視公佈,您可以從公佈的漢堡功能表中選擇 [以檢視者模式檢視]:
![從漢堡功能表中選擇 [以檢視者模式檢視]](Resources/Images/publications/hamburger-menu-04.png)
當選取時,會顯示共享使用者開啟公佈時看到的公佈界面:
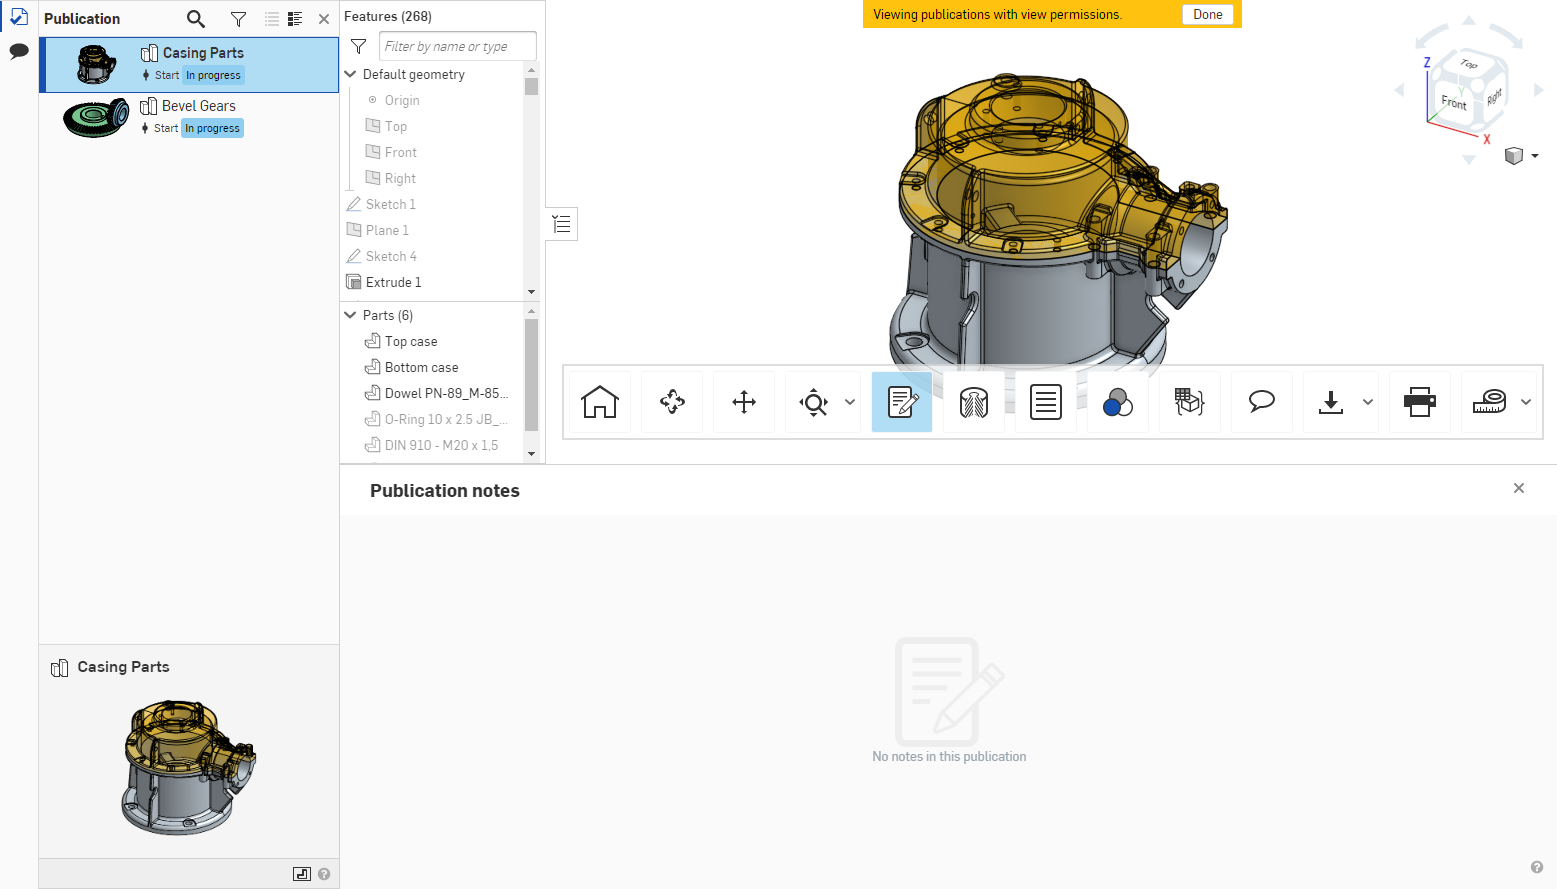
在完成公佈的預覽之後,按一下視窗上方金色功能區中的 [完成] 按鈕。
系統會為所有共享公佈的使用者顯示唯檢視的工具列。無論共享公佈的使用者權限為何,不允許變更或編輯任何分頁中的資料。
在公佈內變更公佈的縮圖。在左側窗格中已插入文件索引標籤的列出處:
-
在您要用為公佈縮圖的索引標籤名稱上按右鍵來開啟環境選單。
-
按一下選取為公佈縮圖:
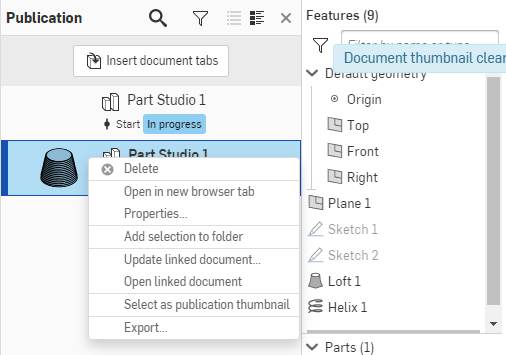
每個分頁上的環境選單也會相對於權限而有所變更。在文件頁面的公佈上按右鍵來開啟環境選單。
文件頁面中公佈的環境選單包含下列的指令:
-
開啟 - 開啟公佈
-
在新瀏覽器分頁開啟 - 在新瀏覽器分頁中開啟公佈
-
重新命名公佈 - 開啟對話方塊來編輯公佈的名稱
-
複製公佈 - 將使用中的工作區複製到新的公佈中
-
詳細資料 - 開啟公佈的「詳細資料」窗格 (在視窗右側)
-
標籤 - 建立或加入標籤到公佈中
-
共享 - 開啟公佈的「共享」對話方塊
-
取消與本人共享 - 移除您檢視公佈的權限
-
移動至 - 將公佈移動到 Onshape 中的另一位置,例如資料夾或專案中
-
轉移擁有權 - 將公佈的擁有權轉移給另一個使用者
-
送至垃圾桶中 - 將公佈移至垃圾桶中。
在 iOS 中對公佈的支援與在桌面版 (瀏覽器) 平台中類似。建立、編輯、共享、搜尋與插入分頁和備註到公佈中。
在文件頁面中開始建立的過程:
-
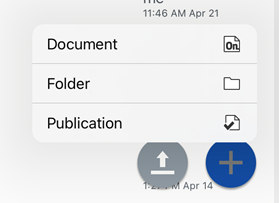
輕觸右下角的加號按鈕 (
 ),然後選擇公佈。
-
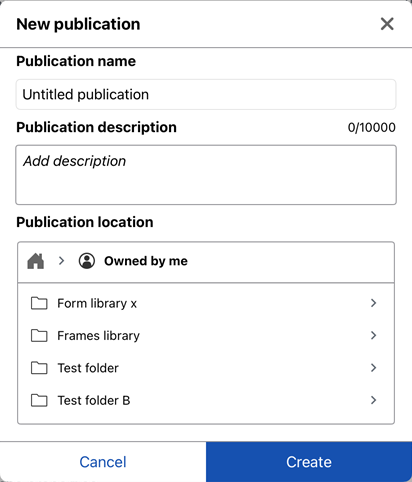
提供公佈名稱、公佈說明、與公佈位置,然後輕觸 建立 按鈕:
空白的公佈隨即開啟:
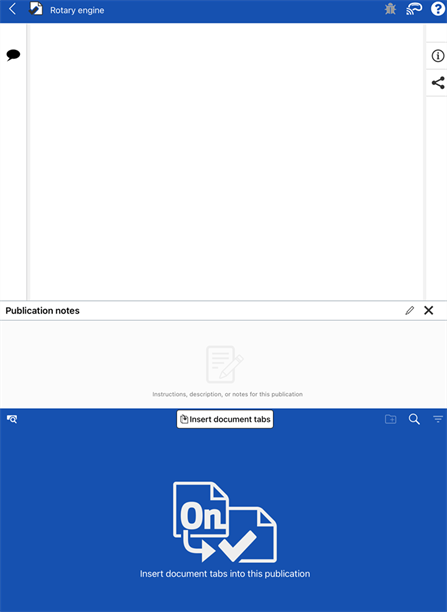
在建立公佈之後,您可以加入來自其他與不同文件的分頁,也可以包括關於公佈與其內容的備註。
-
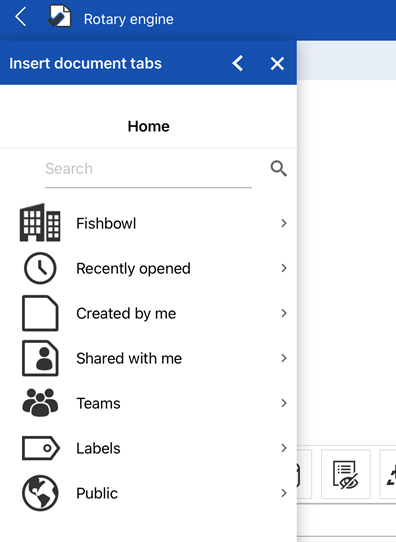
輕觸「公佈管理員」中的插入文件分頁 (螢幕下方的藍色面板)。插入文件分頁對話方塊隨即開啟:
-
使用這個對話方塊來找出要於其中插入分頁的文件:
-
搜尋或貼上文件的 URL。
-
選擇一個搜尋篩選器,像是:「最近開啟的」、「本人所建立」。
-
選擇一個「團隊」篩選器。
-
選擇一個「專案」或「資料夾」篩選器。
-
-
在您有文件清單之後,請選擇一個文件。
您僅能插入您有權限的文件。
-
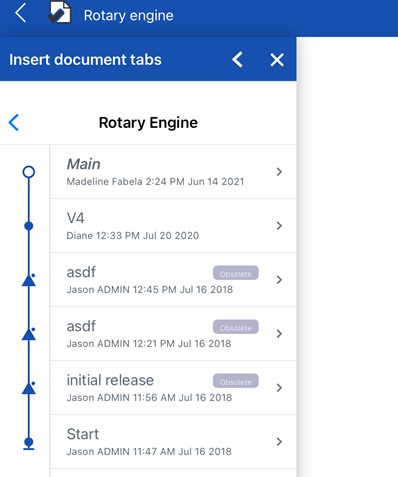
輕觸文件版本來選擇它:
-
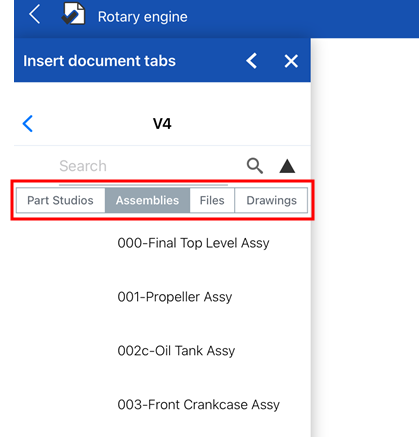
使用對話方塊上方的 Part Studio、組合件、檔案或工程圖篩選器來篩選:
-
在您有零件或分頁的清單之後,輕觸其中一個來將其插入。
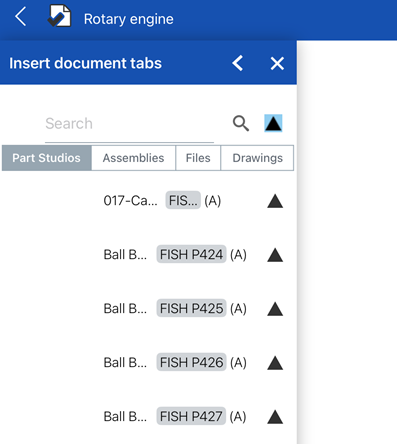
僅在零件已包括在發行中時,才能插入來自 Part Studio 的個別零件。若要檢視文件的已發行項目,輕觸已發行項圖示 (
 )。這可讓您插入來自 Part Studio 的個別已發行零件:
-
已插入分頁與其資訊會顯示在公佈中。對於 Part Studio 與組合件,這包括「零件」與「實例」清單 (分開的),以及在圖形區域中的模型 (兩者皆在螢幕上方)。文件分頁的縮圖則是顯示在「公佈管理員」中 (螢幕底部):
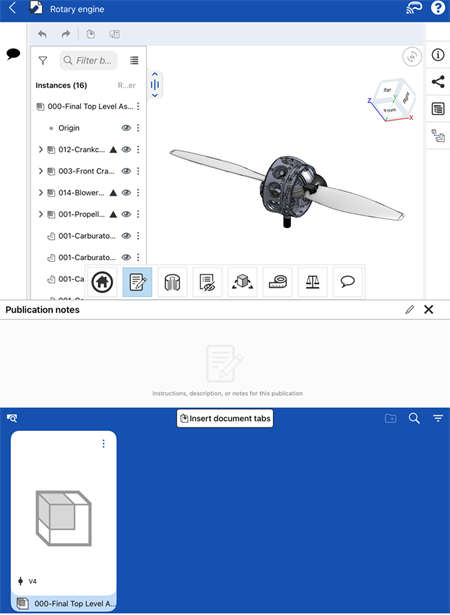
一個以插入的組合件。「實例」清單顯示在圖形區域中 (上方),組合件縮圖顯示在「公佈管理員」中 (下方)。
插入文件分頁對話方塊可避免您重複產生插入的分頁。
由於公佈完全是唯檢視的,因此所有包括的分頁也是唯檢視模式的。這表示公佈中的資料是唯讀且無法變更的 (已建立版本與已建立修訂版元素一律是唯讀的)。擁有權限的使用者可以編輯公佈的詳細資料,像是名稱、說明與其他中繼資料。
當您建立公佈時,會在視窗的中間顯示空白的「公佈註解」區域:
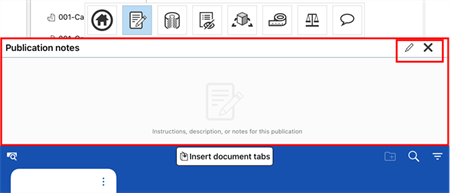
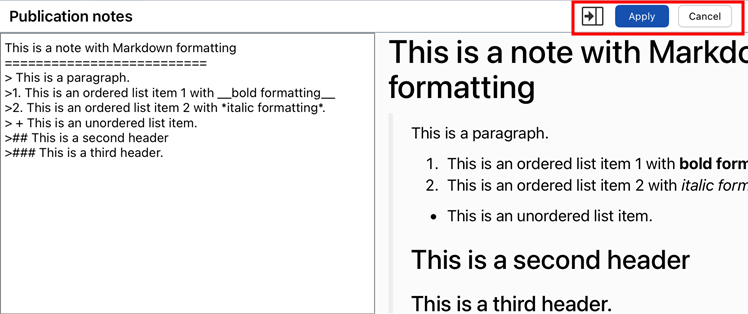
輕觸視窗右上方的小鉛筆圖示 (![]() ) 來啟用編輯,接著在備註方塊中開始輸入。在建立備註時,您可以使用 Markdown 來建立格式。若要預覽備註以查看 Markdown 的格式效果,請按一下「預覽」圖示 (
) 來啟用編輯,接著在備註方塊中開始輸入。在建立備註時,您可以使用 Markdown 來建立格式。若要預覽備註以查看 Markdown 的格式效果,請按一下「預覽」圖示 (![]() )。這個圖示可切換開啟/關閉預覽。
)。這個圖示可切換開啟/關閉預覽。
在完成建立或編輯備註之後,輕觸套用來保留變更,或輕觸取消來退出編輯模式而不保留變更。
在 Android 中對公佈的支援與在桌面版 (瀏覽器) 平台中類似。建立、編輯、共享、搜尋與插入分頁和備註到公佈中。
在「文件」頁面中開始建立的過程。
-
輕觸右下角的加號按鈕 (
 ),然後選擇公佈。
 -
提供公佈名稱、公佈說明、與公佈位置,然後輕觸 建立 按鈕。
空白的公佈隨即開啟。
在建立公佈之後,您可以加入來自其他與不同文件的分頁,也可以包括關於公佈與其內容的備註。
-
輕觸「公佈管理員」中的插入文件分頁 (螢幕下方的藍色面板)。插入文件分頁對話方塊隨即開啟。
-
使用對話方塊來找出要在其中插入分頁的文件。
-
搜尋或貼上文件的 URL。
-
選擇一個搜尋篩選器,像是:「最近開啟的」、「本人所建立」。
-
選擇一個「團隊」篩選器。
-
選擇一個「專案」或「資料夾」篩選器。
-
-
在您有文件清單之後,請選擇一個文件。
您僅能插入您有權限的文件。
-
輕觸文件版本來選擇它。
-
使用對話方塊上方的 Part Studio、Assembly、檔案或工程圖篩選器來篩選。
-
在您有零件或分頁的清單之後,輕觸其中一個來將其插入。
僅在零件已包括在發行中時,才能插入來自 Part Studio 的個別零件。若要檢視文件的已發行項目,輕觸已發行項圖示 (
 )。這可讓您插入來自 Part Studio 的個別已發行零件。
 -
已插入分頁與其資訊會顯示在公佈中。對於 Part Studio 與組合件,這包括「零件」與「實例」清單 (分開的),以及在圖形區域中的模型 (兩者皆在螢幕上方)。文件分頁的縮圖則是顯示在「公佈管理員」中 (螢幕底部)。
插入文件分頁對話方塊可避免您重複產生插入的分頁。
由於公佈完全是唯檢視的,因此所有包括的分頁也是唯檢視模式的。這表示公佈中的資料是唯讀且無法變更的 (已建立版本與已建立修訂版元素一律是唯讀的)。擁有權限的使用者可以編輯公佈的詳細資料,像是名稱、說明與其他中繼資料。
當您建立公佈時,會在視窗的中間顯示空白的「公佈註解」區域。
輕觸視窗右上方的小鉛筆圖示 (![]() ) 來啟用編輯,接著在備註方塊中開始輸入。在建立備註時,您可以使用 Markdown 來建立格式。若要預覽備註以查看 Markdown 的格式效果,請按一下「預覽」圖示 (
) 來啟用編輯,接著在備註方塊中開始輸入。在建立備註時,您可以使用 Markdown 來建立格式。若要預覽備註以查看 Markdown 的格式效果,請按一下「預覽」圖示 (![]() )。這個圖示可切換開啟/關閉預覽。
)。這個圖示可切換開啟/關閉預覽。
在完成建立或編輯備註之後,輕觸套用來保留變更,或輕觸取消來退出編輯模式而不保留變更。