操作限制條件
![]()
![]()
![]()
當建立草圖或開啟草圖來編輯時,才會提供並顯示限制條件。
套用至兩個草圖中圖元間的限制條件 (例如,當您 [使用] 來自一個草圖的圖元至另一個草圖中) 會以藍色的背景來區隔。可能可以手動套用限制條件,某些限制條件會於您繪製草圖幾何時建立。當移動游標暫留時,所參考限制條件的背景是深藍色的:
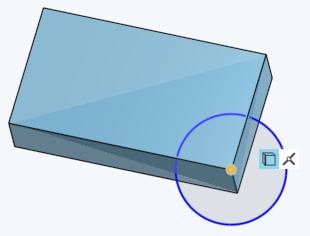
如上所示的使用限制條件 (藍色背景) 將矩形草圖的頂點限制在圓草圖中圓的圓心上。
「限制條件」草圖工具可讓您在建立草圖或開啟草圖來編輯時檢視與修改限制條件。套用至兩個草圖中圖元間的限制條件 (例如,當您使用來自一個草圖的圖元至另一個草圖中) 會以藍色的背景來區隔。可能可以手動套用限制條件,某些限制條件會於您繪製草圖幾何時建立。當移動游標暫留時,所參考限制條件的背景是深藍色的。
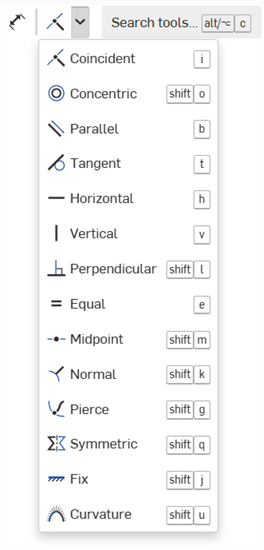
可用的限制條件如下:重合、同心、平行、相切、水平、立式垂直、正交垂直、等長、中點、垂直、貫穿、對稱、固定與曲率。可以使用推斷來將限制條件自動加入草圖中,或使用工具列來手動加入。
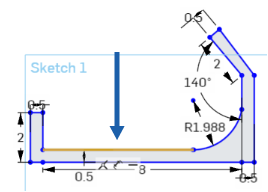
在這個範例中,於垂直建構線與圓之間加入了中點限制條件。 先選擇圓的中點,然後選擇建構線。按一下草圖工具列中的「中點」限制條件。這個操作過程適用於不同的限制條件。另一個方法是您可以先從草圖工具列中選擇「中點」限制條件,然後再選擇建構線與圓。
若要套用工程圖限制條件,您可以使用下列方法之一:
-
從功能表中選擇限制條件 (或使用相對應的快速鍵),然後在草圖中選擇要套用限制的圖元。
-
選擇草圖圖元,然後按一下工具列限制條件功能表中的限制條件。
工具列限制條件功能表中提供下列的限制條件:
-
重合 - 使兩或多個草圖圖元共享草圖中的同一位置。
-
同心 - 使任何點與弧心或圓心重合。同時讓選取的弧與圓共享中心點。
-
平行 - 使兩或多條直線互為平行。
-
相切 - 使兩個草圖圖元間,或一個草圖圖元與一平面間有相切的限制條件。
-
水平 - 將一或多條直線或一組點限制為水平的。
-
立式垂直 - 將一或多條直線或一組點限制為立式垂直的。
-
正交垂直 - 使兩條直線互為垂直。
-
等長 - 使得多條線等長,或多個弧有相同的半徑。
-
中點 - 將一個草圖點限制在直線或弧的中點上。
-
垂直 - 使一曲線與直線,或一曲線與一平面垂直。
-
貫穿 - 使草圖圖元與使用中草圖平面外的另一圖元重合。
-
對稱 - 使相同類型的兩個圖元相對於一直線、平面或線性邊線對稱。
-
固定 - 將草圖圖元鎖於草圖平面上使其無法移動。
-
曲率 - 建立草圖樣條或圓錐與相鄰幾何間的曲率連續轉換。
在草圖是開啟的情況下,移動游標暫留至一草圖圖元上,例如直線或弧來查看該圖元的限制條件。當您移動滑鼠暫留至圖元上時,僅會出現強調顯示圖元的限制條件。若要保持所有的限制條件都顯示可見,移動滑鼠時請使用 Shift 鍵。
移動游標暫留時圖元會以橘色被強調顯示,例外的情況是參考的限制條件會有藍色的背景,移動暫留時會是深藍色的。當您選擇一個限制條件時,相關的圖元會以黃色強調顯示,對等的圖元也會被強調顯示。
並未在工具列的「限制條件」部分提供這些限制條件,但會在如下所述的特定操作過程中自動建立:
-
 四分之一圓 - 將一個點限制為與橢圓以及該橢圓的主軸或副軸重合。可藉由推斷、拖曳項目至橢圓上各點或將項目放置在橢圓上各點來建立此限制條件。
 -
 使用 - 將在一個草圖中的草圖圖元限制為在另一個草圖中的草圖圖元。可以藉由選擇「使用」該工具,然後在原始的草圖或特徵中選擇一個圖元 (草圖圖元、面或邊線) 來建立此限制條件。
 -
 相交 - 將開放曲線的端點 (使用相交工具所產生而來) 限制為貫穿的限制條件
  ,使得端點落在相交面的邊線上;對於封閉的曲線,會使用相交限制條件來限制草圖圖元。
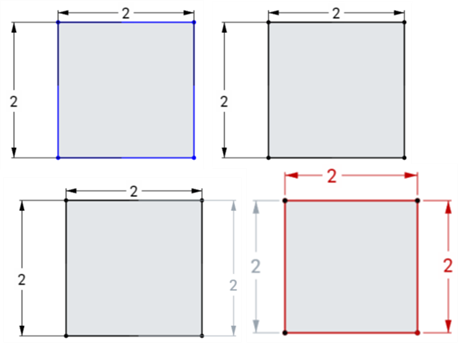
The color of sketch entities indicate its constrained status:
- Blue means under-constrained.
- Black means fully constrained.
- Red means a constraint problem (over-constrained).
The color of a constraint icon indicates its constrained status:
- Black on gray means well-defined.
- White on red indicates a problem.
- When selecting, non-fully constrained sketch points (blue and red) are prioritized over any overlapping, fully constrained sketch points (black).
Adding more dimensions or constraints will further constrain the sketch. Dragging entities may help you understand what constraints or dimensions you may want to add.
檢視與篩選草圖限制條件與尺寸以分析這些項目,並更正任何的草圖限制條件錯誤。
存取「限制條件管理員」
從草圖對話方塊中:
-
按一下顯示草圖診斷工具圖示 (
 )。
)。 -
按一下限制條件管理員。
![從草圖診斷工具中按一下 [限制條件管理員]](Resources/Images/sketch-tools/constraint-manager-00.png)
「限制條件管理員」對話方塊開啟:
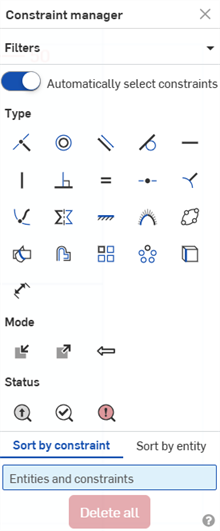
使用「限制條件管理員」
在「限制條件管理員」對話方塊中,您可以執行下列的操作:
-
篩選器 - 一次摺疊/展開對話方塊的所有區段 (類型、模式、狀態)。
-
自動選擇限制條件 - 當切換開啟時 (預設),在「限制條件管理員」對話方塊中選取限制條件會在草圖中相對應的限制條件周圍放置一個黃色的邊界方塊。關閉此選項時,系統不會在限制條件周圍放置邊界方塊 (不選擇限制條件)。
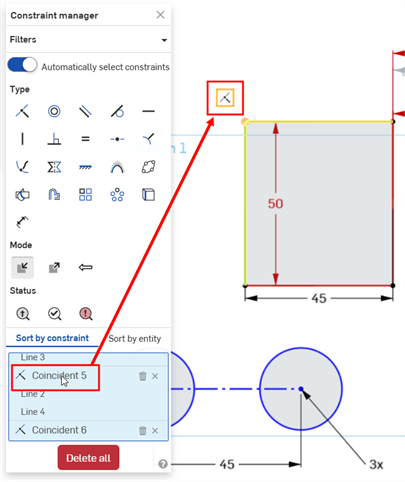
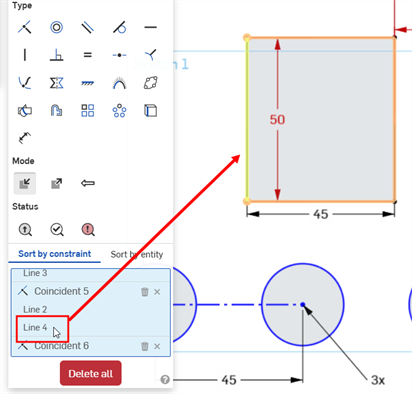
如果您僅要為草圖的特定部分選擇某些限制條件,這個選項是相當有用的。例如,先切換關閉這個選項,然後選擇您要在草圖某部分找出的限制條件「類型」(例如下方範例中的重合限制條件)。接著在您草圖特定部分 (下方範例中的矩形) 周圍建立一個選取方塊。只有該部分中的限制條件會有邊界方塊顯示在限制條件周圍,並顯示在圖元與限制條件清單中 (請見下方)。
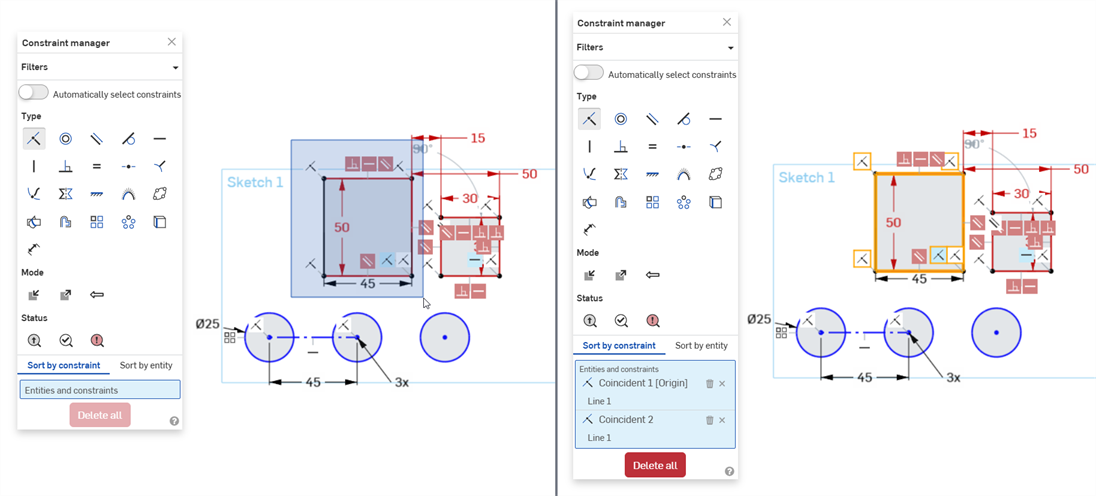
停用「自動選擇限制條件」,然後以方塊選取草圖中的矩形 (左圖)。在選取之後,系統僅將篩選器套用至所選的草圖圖元中。在此處的範例中,僅為先前選取的矩形顯示重合的限制條件 (右圖)。
-
類型 - 從可用的限制條件清單中選擇。例如,選擇重合會在草圖中的重合限制條件周圍放置黃色的邊界方塊 (在啟用了「自動選擇限制條件」的情況下)。
-
模式 - 從下列 3 個模式中選擇:
-
內部 - 從目前的草圖中選擇限制條件。
-
外部 - 從外部來源中選擇限制條件。
-
在關聯中 - 選擇在關聯中參考的限制條件。
-
-
狀態 - 從下列 3 個狀態中選擇:
-
從動 - 從動的限制條件。當選取時,系統會以黃色強調顯示從動的限制條件。如果是有不足的限制條件,系統會以深藍色強調顯示。
-
解出 - 已解出的限制條件。當選取時,系統會以黃色強調顯示解出的限制條件。如果是有不足的限制條件,系統會以深藍色強調顯示。
-
錯誤 - 有錯誤的限制條件。當選取時,系統會以深紅色強調顯示有錯誤的限制條件。
-
-
根據限制條件來排序 - 先根據限制條件來排序下方的圖元與限制條件清單,然後再依圖元排序。
-
根據圖元來排序 - 先根據圖元來排序下方的圖元與限制條件清單,然後再依限制條件排序。
-
圖元與限制條件清單 - 取決於在對話方塊中選取的篩選器,顯示所有選取的限制條件。移動游標在清單中的限制條件或圖元上暫留以在草圖中強調顯示它們。從清單中您可以:
-
刪除限制條件 (
 ) - 從草圖中刪除限制條件。
 -
移除選取項目 (
 ) - 從圖元與限制條件清單中移除限制條件。
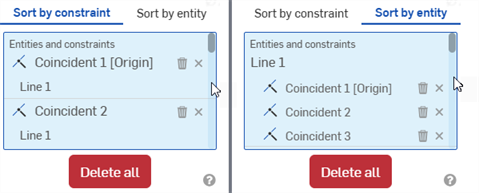
根據限制條件排序 (左圖);根據圖元排序 (右圖)
在圖元與限制條件清單中的限制條件或圖元上按右鍵以存取下列的指令:
-
刪除限制條件/圖元 - 刪除選取的項目 (限制條件或圖元)
-
縮放至選取範圍 - 放大至選取項目 (限制條件或圖元)
-
隱藏外部參考 - 隱藏所有外部參考的限制條件
-
全部清除 - 清除來自「圖元與限制條件」清單中的所有限制條件

-
-
-
全部刪除 - 刪除草圖中所有選取的限制條件。
關閉「限制條件管理員」
若要關閉「限制條件管理員」,可以:
-
按一下「限制條件管理員」對話方塊右上角的 X。
-
按一下顯示草圖診斷工具圖示 (
),然後選擇關閉限制條件管理員: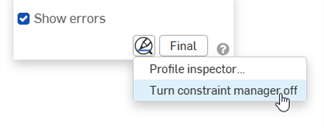
提示
-
從對話方塊中選擇盡可能多的類型、模式和狀態來做為依據篩選出限制條件。可以使用任意組合的篩選器。
-
如果在草圖對話方塊中停用了顯示限制條件與顯示錯誤,將游標移動至圖元與限制條件清單中的限制條件上暫留僅會在草圖中顯示該限制條件 (與相關的圖元):
-
在「圖元與限制條件」清單中選擇一個圖元時,系統會以淡黃色強調顯示圖元:
-
「限制條件管理員」同時可作用於鈑金展開圖樣視圖的草圖中:

您可以在限制條件圖示上使用的互動操作:
- 按一下並拖曳一個圖示或一組圖示至不同的位置。
- 在一個限制條件上暫留來查看哪些圖元被強調顯示,表示套用了限制條件於其上。
- 刪除限制條件:按一下一個限制條件然後按下 Delete,或從環境選單中選擇 [刪除]。
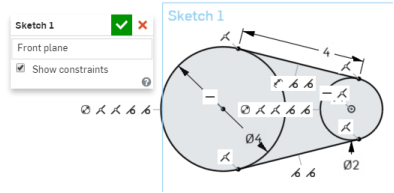
- 在草圖對話方塊中,核取顯示限制條件來顯示為草圖定義的所有限制條件。
- 衝突的限制條件會以紅色背景中的白色符號出現。
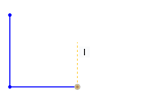
當繪製草圖時,如果曲線抓到推斷,限制條件指標會出現在滑鼠游標旁。
新增、套用與編輯限制條件來在 Onshape 中定義零件。當正在建立草圖或開啟草圖以編輯時,限制條件會列於草圖對話方塊中。
可以將限制條件套用至一個草圖的圖元之間,或套用至兩或多個草圖的圖元之間 (例如,當您使用來自一個草圖的圖元至另一個草圖中)。可以手動套用限制條件,某些限制條件會於您繪製草圖幾何時建立。關自動建立的限制條件的詳細資訊,請參考自動推斷。
在草圖對話方塊中,輕觸清單中的限制條件以強調顯示相關的草圖幾何。例如,如果將兩條直線限制為互為水平,則當您輕觸水平限制條件時,會同時強調顯示兩條直線。
新增、套用與編輯限制條件來在 Onshape 中定義零件。僅當建立草圖或開啟草圖來編輯時,才會提供並顯示限制條件。
關於在行動裝置上使用特定限制條件的資訊,請參考各個特定限制條件的主題。