預設公差資源庫
![]()
![]()
![]()
在 Part Studio 中提供此功能
預設公差資源庫通常是由管理員所建立,提供 Company 使用者或團隊使用以確保採用預設的公差。可以在資源庫資料夾中建立不同的預設公差以供特定的目的使用 — 例如模型評估或加工。一旦建立之後,使用者可以在建構零件時從 Part Studio 中的檢查表格內存取公差。
可以將預設公差資料庫視為用作 MBD 範本的公差清單,或是您組織中數個使用者可遵循的 MBD 公差規則清單。
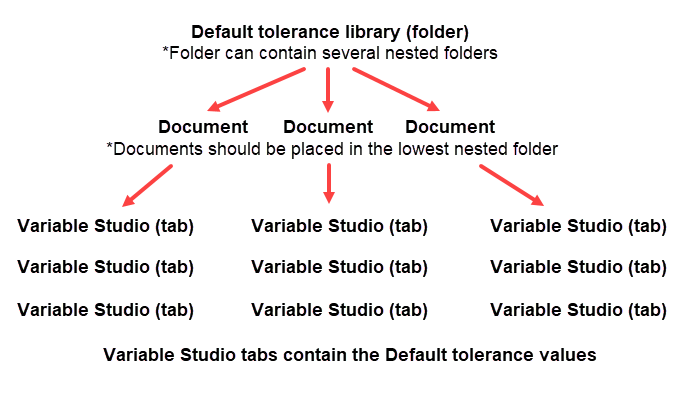
管理員通常會建立預設公差資源庫資料夾的架構。在建立之後,會在層級結構中最底層的資料夾中建立文件。 這些文件包含一或多個 Variable Studios,其中包含預設公差的值。可在同一文件中建立多個預設公差 Variable Studios,同時也可以在資源庫資料夾中包含多個文件。階層結構概述如下:
預設公差資源庫是特殊的資料夾,其中包含在 Part Studio 中用做為範本並套用至零件的預設公差。每個公司可以有一個由管理員所擁有的預設公差資源庫資料夾,為公司提供的共享權限可讓公司中的每個人存取與使用在指定資料夾中的預設公差。此外,每個使用者可以就其個人的使用設定一個預設公差資源庫資料夾。這個資料夾並不需要特殊的許可權限。個人的預設公差資源庫資料夾是由個別的使用者存取及使用的。
Onshape 在 Onshape 預設公差 資源庫中提供標準的預設公差。詳細資訊請參考 Onshape 預設公差資源庫。
-
系統會在 Onshape 資料夾中建立預設公差並儲存。取決您要設定與管理資源庫的方式,可以從「文件」頁面中:
-
建立一個資料夾。必須在根資料夾中建立公司資源庫。這是用在選擇預設公差對話方塊中的資源庫欄位中。
-
選擇性地在第一個資料夾之下建立第二個嵌套資料夾。資料夾的名稱會用於選擇預設公差對話方塊中的標準欄位上。
-
選擇性地在第二個資料夾之下建立第三個嵌套資料夾。資料夾的名稱會用於選擇預設公差對話方塊的類型欄位中。
如果在您的階層架構中有兩個資料夾,第二個嵌套資料夾的名稱會用於「預設公差」欄位中。
-
-
如果這是公司帳戶的資源庫,則請在「文件」頁面中:
-
按一下您階層架構中根資料夾的 「共享」
 圖示來開啟共享設定對話方塊:
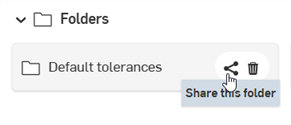
-
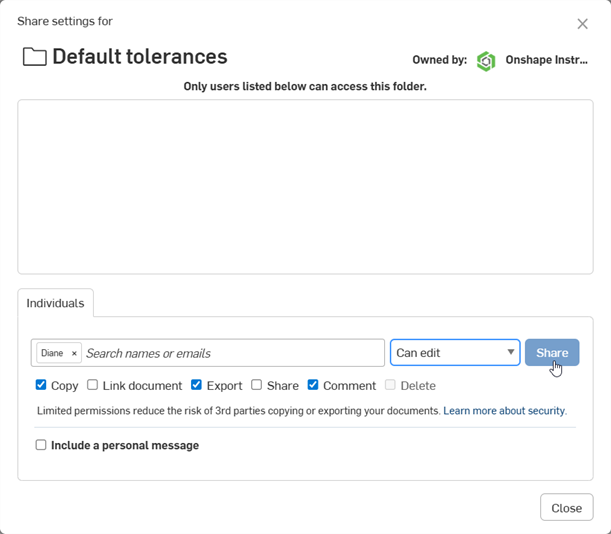
選擇公司分頁。
-
核取「連結文件」與「共享」的核取方塊。
-
按一下 共享 按鈕:
-
按一下 關閉 按鈕。
-
-
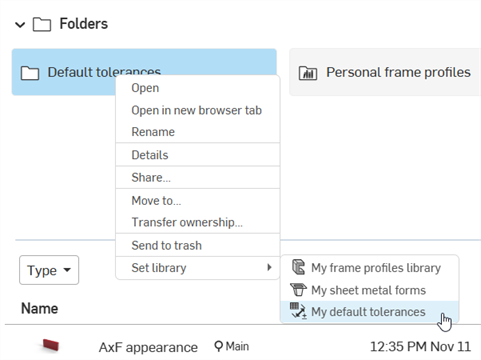
在根資料夾上按右鍵,然後選擇設定資源庫 > 我的預設公差來將資源庫設定為預設:
在設定資料夾結構之後,您需要在最底層的嵌套式資料夾中至少加入一個文件。這個文件必須至少包含一個 Variable Studio 分頁,其中包含有預設的公差值。以下是所需步驟的簡單概要說明:
-
在最底層的嵌套式資料夾中建立文件。
-
將 Variable Studio 分頁插入至文件中。
-
在文件 Part Studio 分頁的檢查表格中,編輯、加入與儲存預設的公差值。
-
會對文件建立版本。
-
最上層的資料夾被更新。
依照以下詳細步驟來編寫預設公差資源庫文件:
-
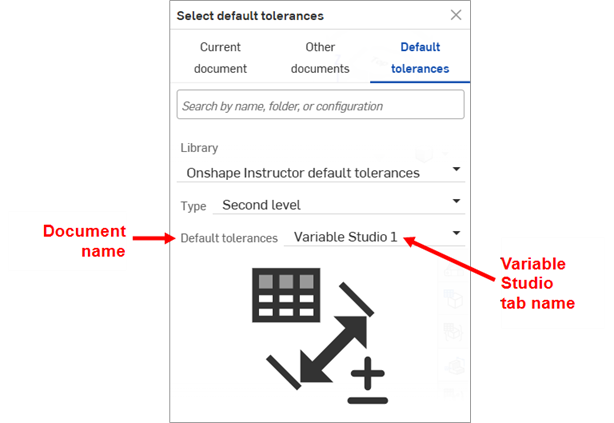
在上方建立預設公差資源庫資料夾部分中所建立層級的最後一個資料夾內建立一個新的文件。當使用者選擇「預設公差」資源庫時,文件名稱會用作選擇預設公差對話方塊中最底部下拉選項的標籤。
-
按一下插入新分頁圖示 (
 ),然後選擇 [建立 Variable Studio] (
 )。這是用來存放您預設公差之處。
 -
選擇性地按右鍵並選取 [重新命名] 來為 Variable Studio 分頁提供一個名稱。當使用者選擇「預設公差」資源庫時,文件名稱會用作為選擇預設公差對話方塊中最底部的下拉選項。
您可以在單一文件中儲存多個 Variable Studios。每個 Variable Studio 都可以設定為參考一組預設公差。您也可以在您資料夾階層的最後一個資料夾中有多個預設公差文件。
-
切換回預設的 Part Studio 1 分頁中,建立一個範例零件,以測試您將設定為資源庫中預設公差的公差。
-
按一下「檢查表格」圖示 (
 ) 來開啟檢查面板。
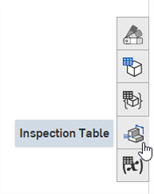
-
按一下 選擇預設公差 按鈕:

-
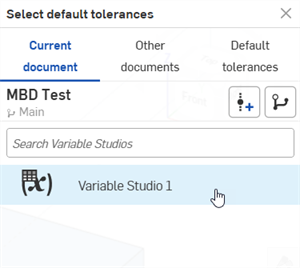
選擇預設公差對話方塊開啟。按一下目前文件,然後在清單中按一下您建立的 Variable Studio:
-
按一下右上角的 X 來關閉對話方塊。會在「預設公差」表格中顯示一個錯誤訊息:
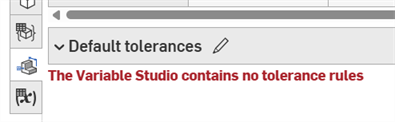
-
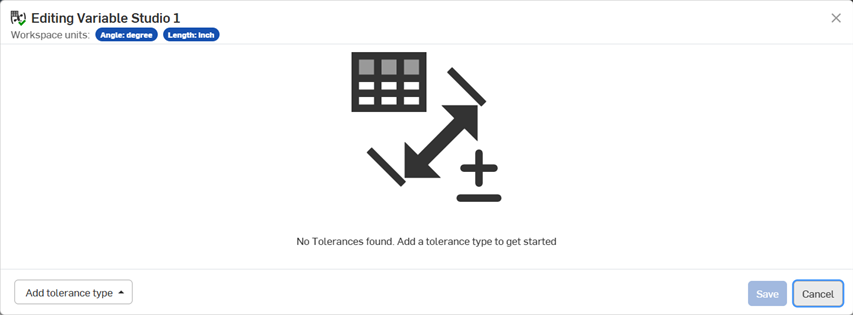
-
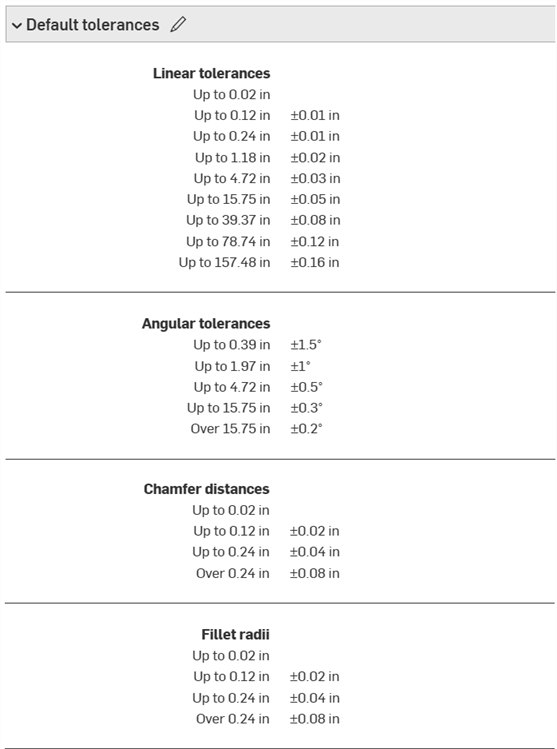
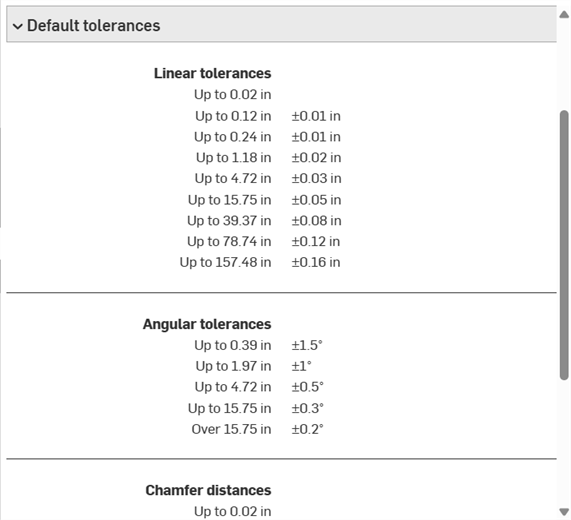
按一下左下角的加入公差類型按鈕,然後從下列公差類型選項中選擇:線性公差、角度公差、倒角角度、倒角距離、圓角半徑、與自訂類別 (可以是帶線性公差單位或帶角度公差單位):
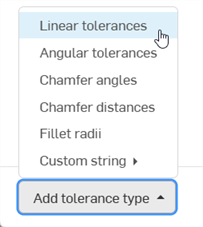
如果需要,您可以加入任意數量的公差類型到「預設公差」表格中,並在每個類型下加入任意數量的預設公差值。
-
如果這是一個自訂類別,再繼續操作之前,您必須先輸入一個顯示名稱與自訂特徵類別 ID:
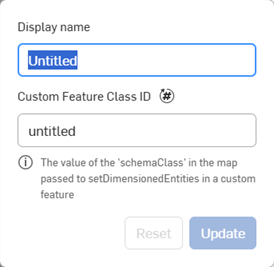
-
對於所有其他公差類型,系統會提供 3 個選項來定義您的公差值類型:
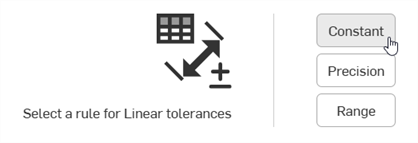
-
固定 - 定義一個固定與不變的公差值,像是 +/-0.01 in。

「固定」預設公差的範例
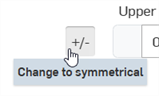

切換 +/- 按鈕以變更為對稱公差的範例
-
精度 - 定義公差值的詳細程度 (小數位數),像是 x、x.x、x.xx、x.xxx 等等。
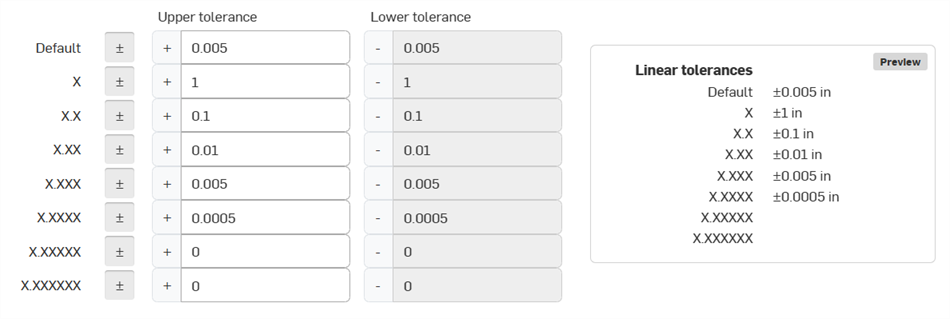
精準預設公差的範例
-
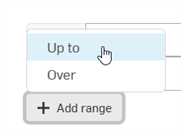
範圍 - 定義公差值的上限和下限 (最小/最大),像是 +0.6 / -0.4。

預設公差「範圍」的範例
按一下按鈕來開啟一個選項功能表,您可於其中選擇範圍是多至或超過一個指定的公差值:
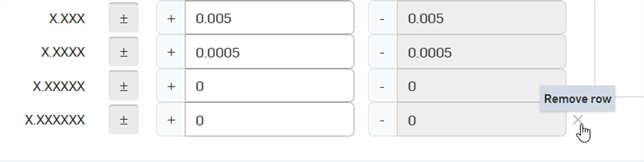
若要移除預設公差清單中的一個列,按一下 列右側的「移除列」(X) 按鈕。只能移除「預設公差」表格中最後一個列。
-
-
-
根據需要將公差值加入至表格中。完成時按一下 儲存。或者如果要退出而不做出任何變更,按一下。
-
在儲存之後,預設公差會出現在檢查表格底部的下拉清單中:
-
按一下文件面板中的建立版本 (
 )。輸入一個版本名稱與可選填的說明,然後按一下 建立 按鈕:
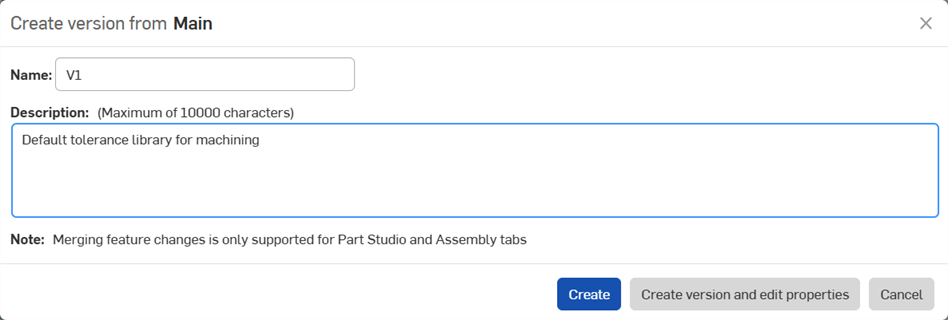
-
更新預設的公差資源庫。每次對預設公差資源庫文件進行變更時,都必須執行此步驟。請參考下方的更新預設公差資源庫。
或者,您可以將 Onshape 預設公差資源庫規格之一複製到您的文件中,作為 Variable Studios 的分頁。請參考複製 Onshape 預設公差到文件中。完成之後,請繼續執行下列步驟。
如果對預設公差資源庫資料夾內的預設公差文件做出變更,必須更新資料夾來讓新的變更傳遞至參考那些預設公差的所有 Part Studio 中。
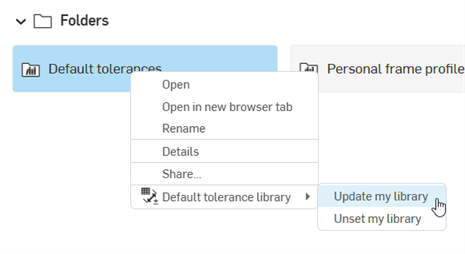
在文件頁面中的預設公差資源庫資料夾上按右鍵,然後選擇預設公差資源庫 > 更新我的資源庫:
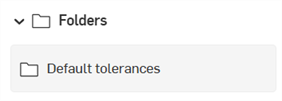
若要移除資料夾作為使用者/公司的預設公差資源庫的指定,在文件頁面中的資料夾上按右鍵,然後選擇預設公差資源庫 > 取消設定我的資源庫 (下方中第一個圖片所示)。
資料夾會變更為標準的資料夾圖示,表示其是一個標準的資料夾 (![]() ),下方中第二個圖片所示:
),下方中第二個圖片所示:
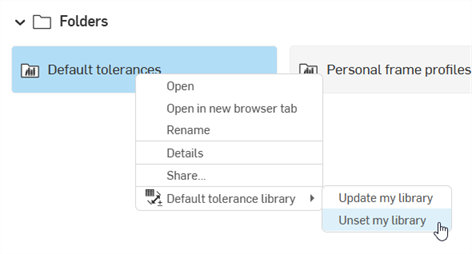
並未刪除資料夾與其內容。
在建立公司或使用者預設公差資源庫,並且其中包含一或多個預設公差 Variable Studio 之後,可以將預設公差資源庫插入到檢查表格中來設定 Part Studio 中零件的限制。
-
從任何文件的 Part Studio 中,確定至少有一個零件,該零件的某個特徵套用了公差 (例如,一個擠出特徵 > 深度公差),或透過檢查表格套用了註記到零件的一或多個面上 (基準、尺寸、幾何公差、或熔接符號):
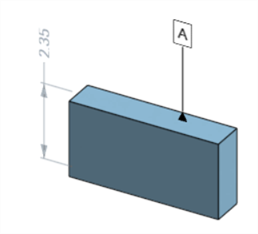
已套用基準與尺寸的零件
-
在檢查表格中,按一下上方的 選擇預設公差 按鈕:
-
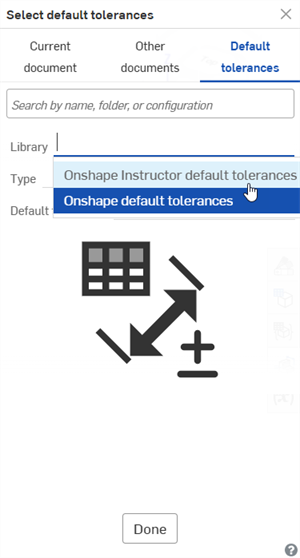
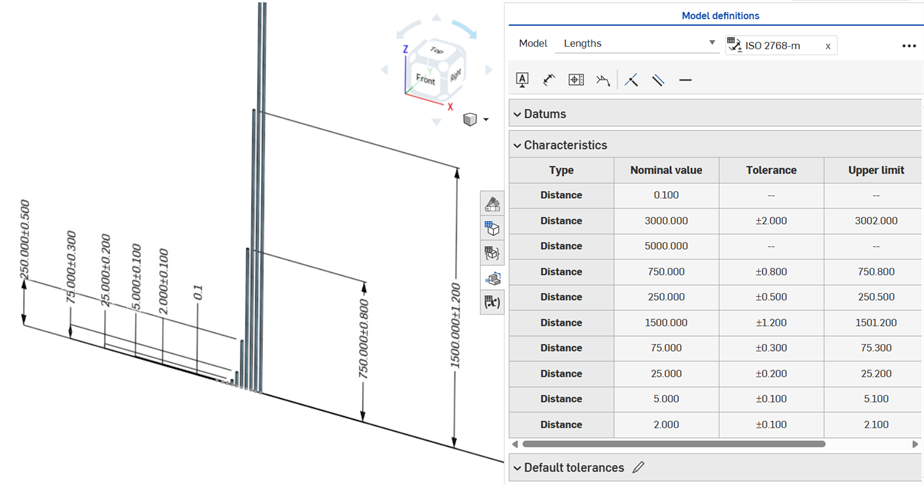
選擇預設公差對話方塊開啟。從預設公差位置,選擇資源庫 (下方第一個圖片中的 Onshape Instructor default tolerances)。
取決您設定資料夾結構的方式,您可能會有其他下拉清單選項可以選擇 (像是標準與類型)。
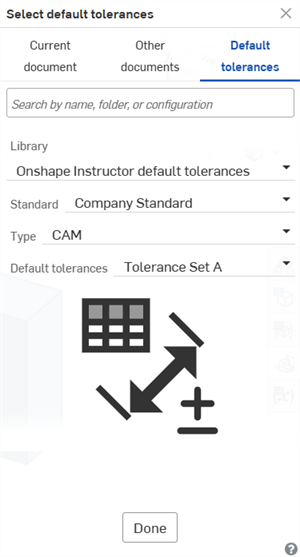
最後,選擇預設公差 (預設公差 (文件) 與 Tolerance Set A (Variable Studio),如下方第二個圖片):
-
按一下 Done。
預設公差出現在檢查表格底部的下拉清單中:
-
可支援非零的空白公差值。
-
可支援零 (0) 公差值,以及負的上限/下限(-/-) 和正的上限/下限 (+/+) 值。
-
無法刪除預設公差資源庫。請先取消設定資料夾,然後再刪除它。
-
無法編輯預設公差資源庫資料的共享權限。請先取消設定資料夾,然後即可編輯共享的權限。
-
當您編輯預設公差時,可以將其套用到 Part Studio 中的範例零件上以查看效果:
-
「檢查」面板的「尺寸」工具 (
 ) 永遠是使用線性或角度的預設公差。使用此工具來標註圓角面的尺寸會套用線性的預設公差類型。基於此一理由,建議在「圓角」特徵對話方塊中套用圓角公差 (對於驅動尺寸),或是使用「檢查」面板內的圓角尺寸 (對於從動尺寸)。
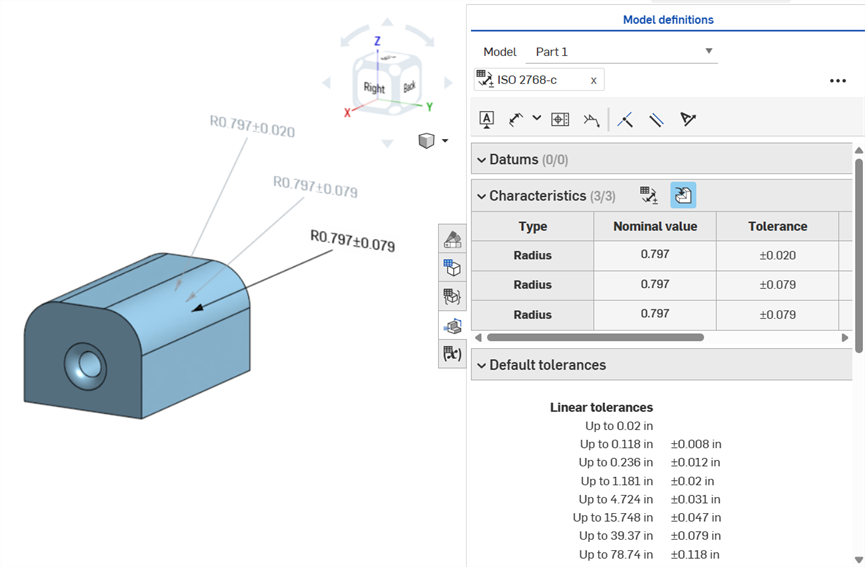
標註圓角面尺寸:按順時針方向註解:使用「尺寸」工具 (從動;以灰色註解),使用圓角尺寸工具 (從動;以灰色註解),使圓角特徵的半徑值具有公差 (從動;以黑色註解)。3 個尺寸都會列在 Characteristics 表格中。