![]()
![]()
![]()
快捷键:Shift+i
隔离使所有选定的 “Part Studio” 或“装配体”图元保持不透明,同时使其他图元透明。选项包括可视化透明的内部几何形状,以便对其进行选择、测量、分析和编辑,以及根据连接性或物理距离扩展隔离选择范围。
已使用隔离:
-
提高大型 “Part Studio” 和“装配体”中的图元可见度。
-
对被其他几何图元遮挡的几何图元(例如,点、边、面、配合连接器)进行可视化和执行任务。
-
作为隐藏/显示命令的替代方案,当需要查找并隐藏/显示图元以访问相关模型几何图元时,此方法可避免操作困难或繁琐。
隔离命令与“设为透明”命令相反。
“隔离”和“设为透明”命令是相反的。
将选定的 Part Studio 或装配体元素“设为透明”的同时保持所有其他元素不透明,而“隔离”则保持选定元素不透明并使所有其他元素透明。
这两个命令都增强了大型 Part Studio 和装配体中的元素可见性,并有助于可视化被其他几何图元遮挡的元素。
要使一个或多个元素不透明或透明,请在 Part Studio 的零件清单、装配体的实例列表或图形区域中进行选择,然后右键单击并从环境菜单中选择 “隔离” 或 “设为透明”。或者,将鼠标悬停在元素上方,然后按 Shift+I 进行隔离,或按 Shift+T 设为透明。将光标悬停在元素上方,并使用相同的快捷方式累积添加元素。
选中选择透明几何图元可在图形区域中选择、测量、分析和编辑透明几何图元。
使用显示或隐藏内部几何图元滑块来调整透明度。
在 “隔离” 和 “设为透明” 中,滑块控制透明度外边缘和透明度内部几何体的可见性。当滑块完全向左时,外边缘保持可见,而内部几何形状完全透明。当滑块向右移动时,内部几何形状会显现。当滑块进一步向右移动时,内部几何图元和外部会所选边逐渐消失,直到它们都完全不可见。
使用零部件控件按距离或连接进行扩展。当按距离扩展并将滑块向右移动时,“隔离”会使每个连续的零件变得不透明,而“设为透明”会根据与原始选区的距离来调整透明度。通过连接进行扩展时,向右移动滑块会使每个连续零件根据与原始选择的嵌合连接的距离而变为透明或不透明。通过连接进行扩展仅在装配体中可用。
关闭对话框或按 Escape 键以退出。
退出和重新进入对话框时,以及在文档会话之间,“选择透明几何图元和透明度” 滑块设置将保持不变。
当右键单击模型选择时,“隔离”可作为环境菜单命令从“零件”列表(在 “Part Studio” 中)、“实例”列表(在装配体中)或 “Part Studio” 或“装配体”图形区域中使用。
从 Part Studio 或装配体中使用:
-
从“零件”或“实例”列表或图形区域中选择要隔离的图元。这些可以是零件/实例、点、边、面、配合连接器、文件夹或组。
-
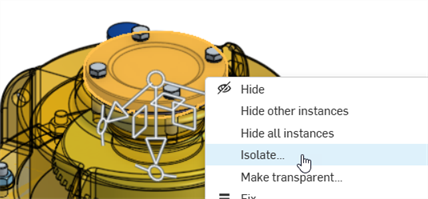
右键单击列表或模型选择,然后从环境菜单中选择“隔离 ”。打开“隔离”对话框:

-
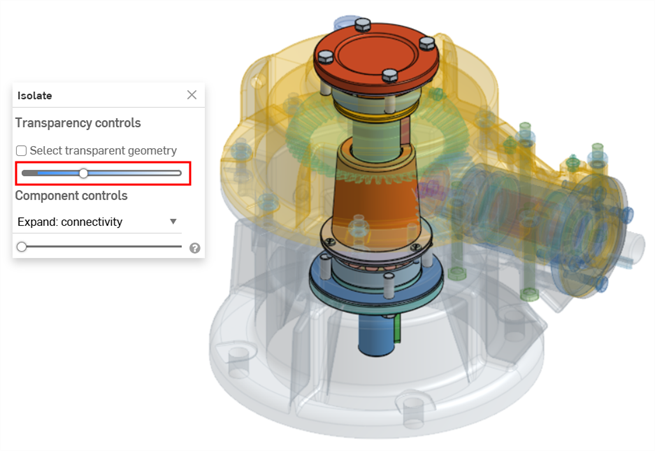
设置透明度滑块(在“透明度控件下):
-
设置为最左边,将仅显示透明几何图元的外边。不显示所选内容的内部几何形状(如上所示)。
-
设置为最右边,透明几何图元将完全透明。
-
设置在两侧之间的任意位置,将显示透明几何图元的内部几何形状(如下所示)。向右移动滑块会增加透明度,从而使透明几何图元的变得更透明。向左移动滑块会降低透明度,使透明几何图元更加不透明。
-
-
选中“选择透明几何图元”后,您可以在图形区域(如下所示)中选择、测量、分析和编辑透明几何图元,例如零件/实例、点、边、面和配合连接器。如果未选中,则只能选择、测量、分析和编辑非透明几何图元。
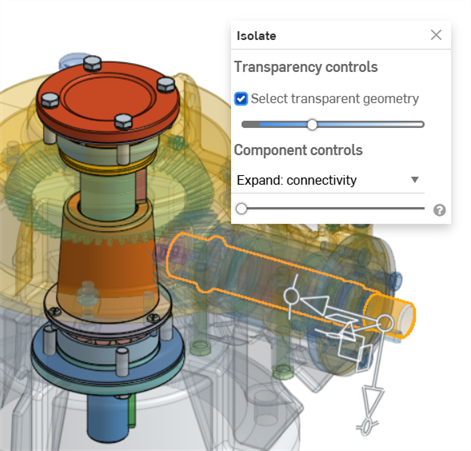
选中“选择透明几何图元”后,还可以从“零件或实例”列表中选择透明零件/实例、文件夹、配合连接器和组。
-
使用零部件控件选择以下任一选项:
-
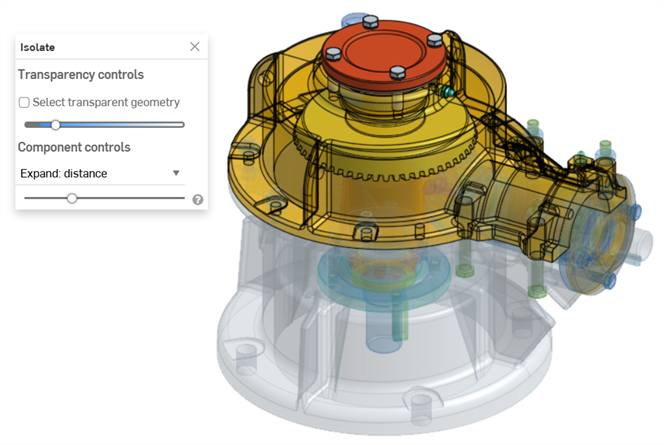
扩展:距离 - 使用滑块根据所选零件或实例的物理距离,逐一隔离每个零件或实例。向右移动滑块会使更多零件/实例变得不透明(非透明)。
-
扩展:连接(仅限装配体) - 使用滑块根据配合连接逐一隔离每个连续实例。向右移动滑块会使更多实例不透明(非透明)。
-
-
单击对话框中的 x 图标将其关闭,并将所有零件恢复到可见状态。退出后,在“隔离”对话框中所做的任何选择都将保留。
在下面的示例中,选择了齿轮和阀门装配体的顶盖实例,并 从环境菜单中选择“隔离”:
扩展:距离滑块用于根据实例与所选封面实例的距离连续隔离实例:
扩展:连接 滑块用于根据连续的配合连接,依次将实例与封面实例隔离开:

-
使用快捷方式 Shift+i 隔离光标下的零件或实例。此命令是累积的;您可以依次对多个零件或实例使用该命令,直至退出隔离对话框为止。您也可以多选零件或实例,然后选择 Shift+i 命令。
-
选择其他 (`) 键(重音键,位于 “1” 键的左侧)也可用于累积选择其他图元。
-
要隔离整个文件夹或一组零件或实例,请在零件或实例列表中右键单击该文件夹或组,然后选择隔离。
-
如果您退出对话框并重新输入,则会记住“选择透明几何图元”和“透明度滑块 ”的设置。
-
如果选中“选择透明几何图元”,将透明度滑块完全向左或向右移动会自动禁用该选项(未选中)。随后,再次移动滑块将自动再次将其启用(选中)。
-
除了通过 x 图标退出隔离对话框之外,还可以:
-
右键单击图形区域中的模型,或右键单击“零件/实例”列表,然后从环境菜单中选择“退出隔离”
-
单击 Esc(退出)键
-
-
在 iOS 平台上,仅可用“扩展:距离”。请选择零件,然后使用两个手指轻按以打开环境菜单,然后选择“隔离”。