![]()
![]()
![]()
通过创建整个 Part Studio 或特定零件的变体来创建零件族。您可以配置任何特征或输入值,甚至是零件特性、自定义零件特性、面和零件外观,以及草图文本。例如,您可以配置拉伸特征的深度、圆角特征的应用、为圆角选择的面、自定义特征的 FeatureScript 以及零件编号、颜色和材料。
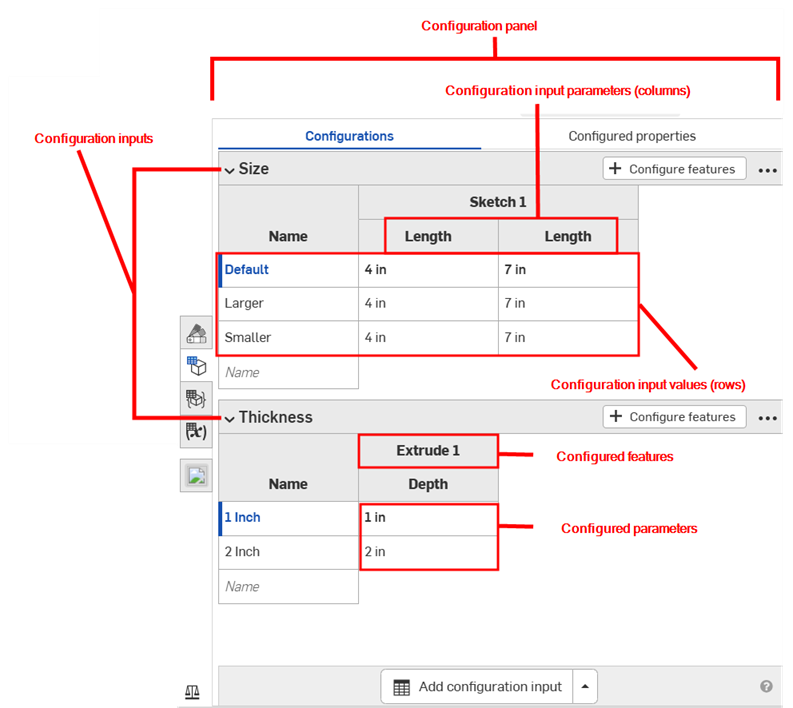
您在一个 Part Studio 中配置的所有特征和输入参数都称为配置。每个 Part Studio 都可以有一个配置。但是,您可以在一个配置中创建多个配置输入。当您要配置的特征或输入不一定相互关联时,这特别有用。例如,当零件的长度和直径与是否应用圆角无关时,可以使用两个配置输入。这提供了更多的灵活性,并且可以帮助防止每个配置输入变得过于复杂。
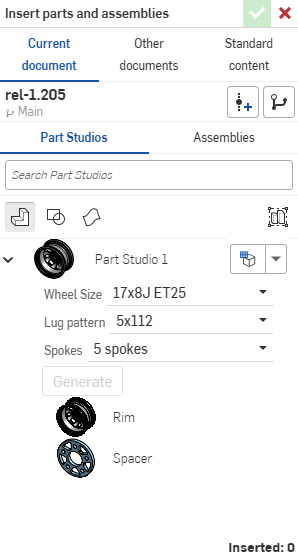
当您将零件插入到装配体或工程图中时,您在 Part Studio 中定义的配置输入将变成“插入”对话框中的选项。例如,您可以创建配置输入以创建不同的滚轮选项。将“Part Studio”插入到装配体中时,您可以为每个配置输入选择一个选项,以指定要插入的整体 Part Studio 配置。
配置只能在浏览器上创建,但可以在 iOS 和 Android 上查看。有关使用已配置零件和 Part Studio 的更多详情,请参见使用配置。另请参见装配体配置、Variable Studio 配置和发布配置。
当多个人在同一文档中工作时,每个人都会看到自己选择的配置,但在跟随模式下工作时除外,那时,跟随者会看到引领者选择的配置。
配置只能在浏览器(在 Part Studio 或装配体中)中创建。通过创建整个 Part Studio 或特定零件的变体来创建零件族。您可以配置任何特征或参数值,甚至是零件属性、自定义零件属性、面和零件外观,以及草图文本。例如,您可以配置拉伸特征的深度、圆角特征的应用、为圆角选择的面、自定义特征的 FeatureScript 以及零件编号、颜色和材料。
您在一个 Part Studio 中配置的所有特征和参数都属于一个配置。每个 Part Studio 可以有一个配置;但是,您可以在一个配置中创建多个配置输入。
当您将零件插入装配体或工程图时,您在 Part Studio 中定义的配置输入将变成“插入”对话框中的选项。
在此示例中,创建了两种配置:新的钣金厚度配置和替代法兰配置。将模型置于工作区后,单击“配置”图标以打开“配置”面板。单击“配置 Part Studio”按钮。输入 “Sheet thickness”(钣金厚度)作为配置名称。单击选项卡以创建新行,然后输入 “Alternate flange”(替代法兰)作为第二个配置名称。每行都是不同的配置。
选择“钣金厚度”这一行后,单击“配置特征”按钮。在“特征”列表中双击包含该参数的特征。选择参数以用黄色虚线勾勒出轮廓,在本例中为“钣金厚度”参数。在表中会为该参数创建一个新列。双击表格单元格,然后提供一个新值。接下来,选择“替代法兰”配置行,使用“法兰”特征执行相同操作,并在表中提供“距离”和“折弯角度”的替代值。
若要使用模型测试输入,请单击“特征”列表的“配置”区域中的下拉箭头,然后选择新配置以查看结果。模型使用新的输入参数进行更新。
通过工作区中的模型或草图,打开“配置”面板:
- 单击“视图立方体”下方的“配置”面板图标 (
 )。
)。 -
“配置”面板打开。单击“配置 Part Studio”以添加输入:
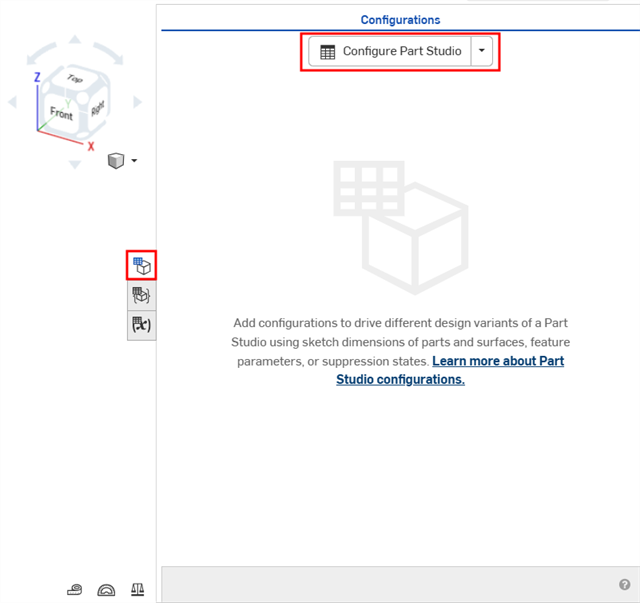
默认情况下,“配置”左边的插入符号是展开的,当您完成面板的某个部分后,点击插入符号即可折叠该部分。
- 单击第一行将其激活,然后在第一列中输入输入值名称。按 页签移至下一行。该行左侧的蓝条表示当前在 Part Studio 中选择的配置。
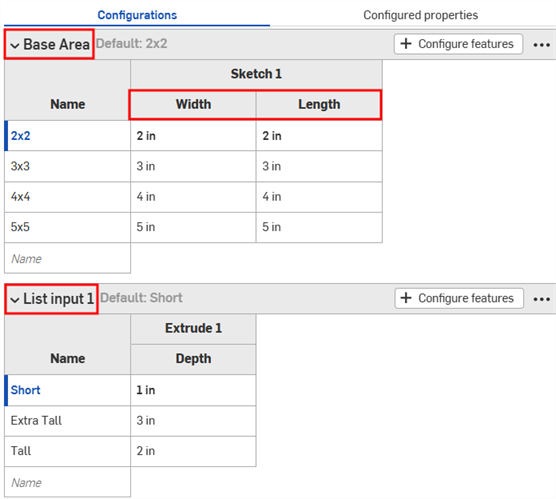
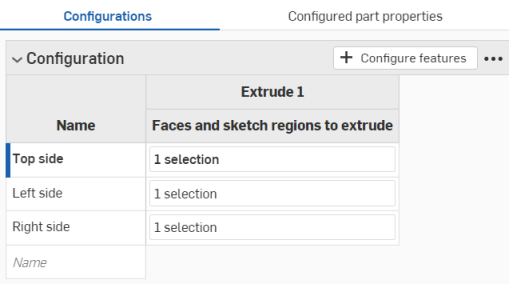
此示例有 3 种可能的配置:“短”、“中”和“高”。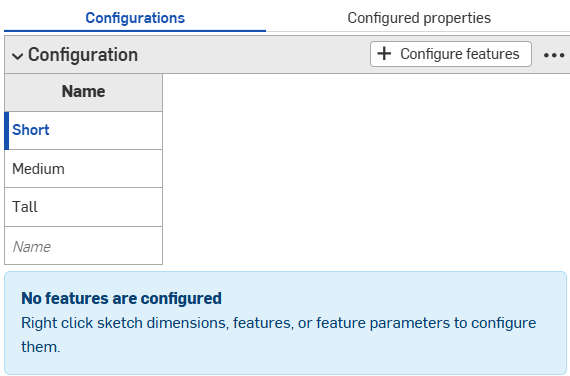
- 要为所选输入值配置特征,单击“配置特征”。
- 在特征列表中,单击要配置的特征并选择参数。该参数将以黄色虚线框标出,并为该参数创建了一个新列。
例如,单击“特征”列表中的“拉伸”特征,然后在“拉伸”对话框中选择“深度”参数。该参数在对话框中以黄色亮显,表格中会出现一个新列。
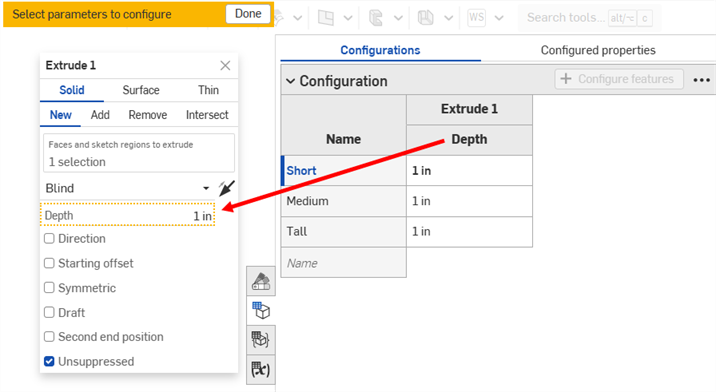
列名称默认为特征名称(作为顶级标题)加上参数名称(作为下级标题),在这种情况下,挤出 1 是特征名称,深度 是字段名称。
将光标悬停在特征对话框中的输入框上,查看可以配置的参数。将光标悬停在可供配置的参数上面时,这些参数以黄色亮显。
- 要编辑已配置的参数,请执行以下操作:
- 要编辑某个值,请双击该值并输入新值。
在此示例中,我们将为 3 个输入值设置深度: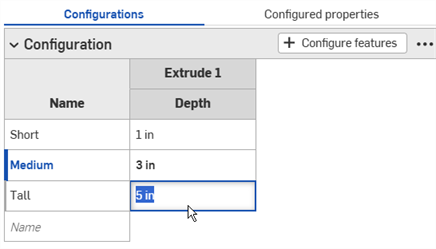
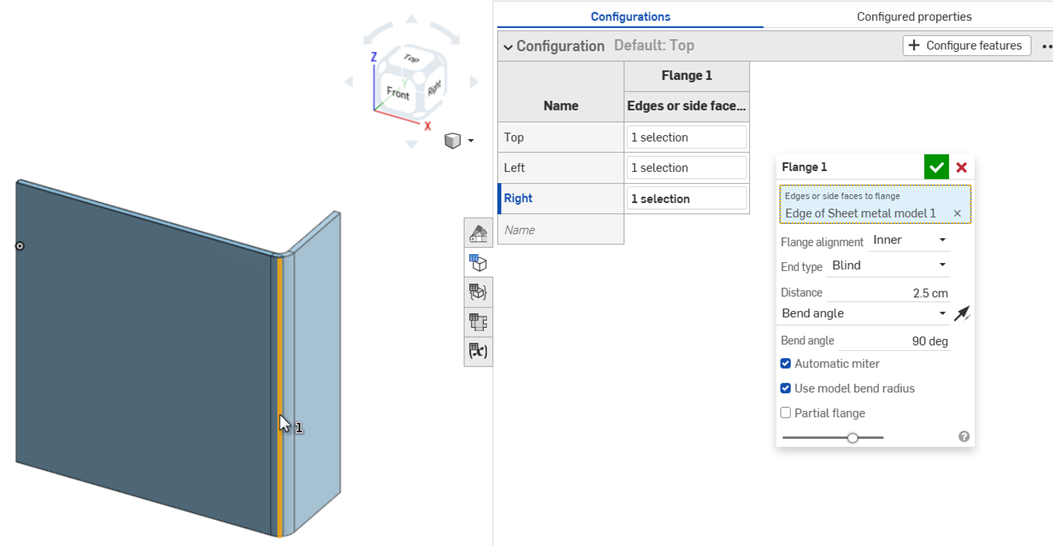
- 要编辑对话框中的选择,请双击表中配置的参数以打开特征对话框。
特征对话框中的参数以蓝色亮显。移除任何不需要的选择,然后在模型或草图上做出新的选择。单击特征对话框中的绿色复选标记将其关闭。
- 要编辑某个值,请双击该值并输入新值。
- 完成配置定义后,请单击黄色横幅中的“完成”按钮
- 要向输入中添加另一个参数(列),请重复步骤 4-7。
- 要使用模型测试输入,请在左侧面板的“配置”下,使用向下箭头从菜单中进行选择:
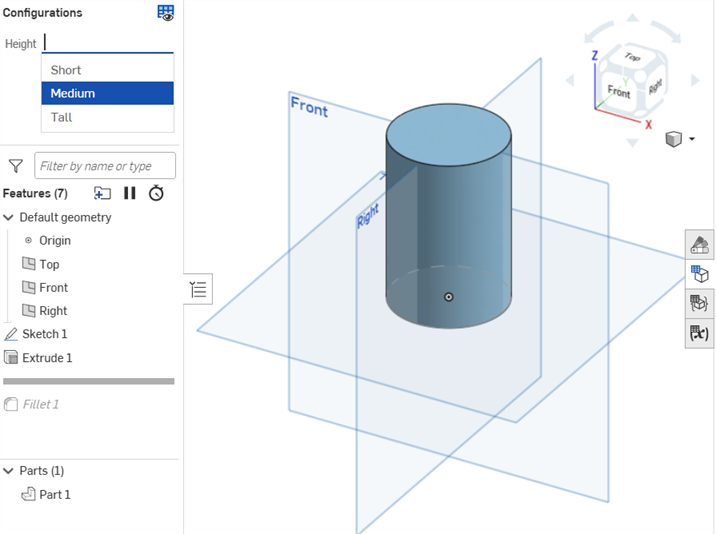
模型应该相应地更新。如果未更新,请检查设计意图的模型和配置定义以进行精确选择。
交叉参考配置的特征
将光标悬停在配置的表格中的特征上可在模型空间中查看该特征(如下所示):
Part Studio 配置可以包含一个或多个配置输入。上面的步骤解释了如何创建列表类型配置输入,当将零件插入到装配体或工程图时,配置输入会产生配置选项列表。您可以创建多个配置输入(以防止一个输入变得太复杂或复制输入),并且还可以创建不同类型的输入。您可以配置的其他类型输入是配置变量和复选框。您还可以将来自另一个 Part Studio 或装配体的输入粘贴到当前文档或外部文档中。
定义配置输入(使用上述步骤)后,您可以使用配置面板底部的 ![]() 按钮创建其他配置输入:
按钮创建其他配置输入:
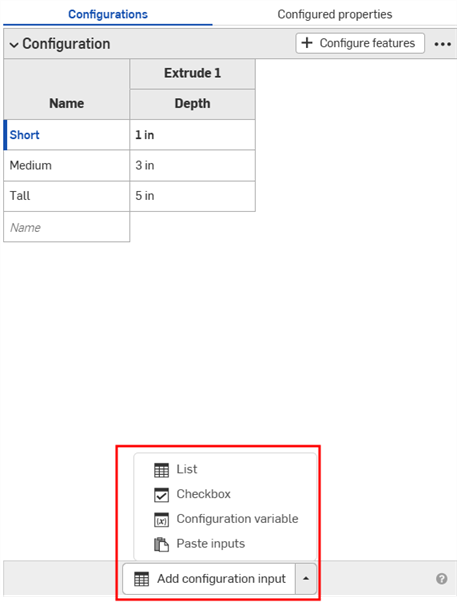
创建配置输入时,您可以指定要添加的输入类型:
- 列表 - 在 Part Studio 中创建一个特征输入列表,并在将一个或多个零件插入到装配体或工程图中时,作为选项列表显示。(这种类型在上面也有说明。)
- 复选框 - 创建一个复选框以打开或关闭特征,例如圆角和倒角,以及抑制或取消抑制特征。这种类型会显示一个复选框,供您在插入期间选中/取消选中。创建后,使用“+配置特征”按钮选择关联特征。
- 配置变量 - 创建可用于任何特征和 FeatureScript 中的变量。变量的类型包括:长度、角度、整数、实数和文本。在插入时输入变量的值。
- 粘贴输入 - 将来自其他 Part Studio 或装配体的输入粘贴到此文档或其他文档中。请参见复制和粘贴输入。
以这种方式创建时,会显示一个“列表输入”对话框。您为配置输入提供的名称将成为系统中的变量。这与使用上面使用基本步骤创建的名称不同;该名称不是系统中的变量。
- 单击
 箭头并选择“列表”。新输入将添加到“配置”面板。
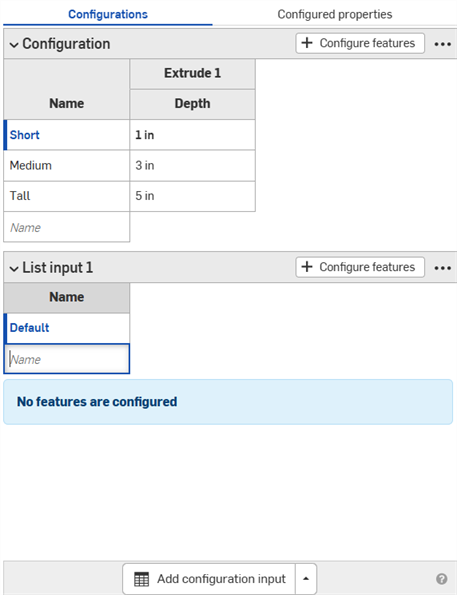
- 按照上述“基本步骤”部分中提供的步骤配置参数。
- 单击
 箭头并选择复选框。复选框输入对话框打开。
- 为输入输入一个名称。
配置输入有一个列,其中包含一个未选中复选框行和一个已选中复选框行:
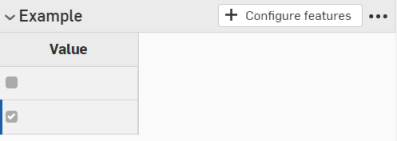
- 要配置参数,请单击
 。
。 - 在特征列表中,单击以打开包含参数的特征并选择该参数。该参数随后以黄色虚线表示,并为表格中的该参数创建一个新列。(在其他输入中配置的参数用黄色虚线表示,不可用于配置。)
在此示例中,选中“取消抑制”作为配置参数。
- 单击
 关闭特征对话框。
 - 在“配置输入”中,参数列有两行,均带有已选中的复选框。取消选中第一列中未选中框旁边的复选框,使表格如下所示:
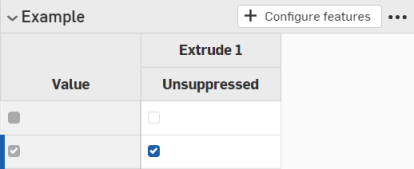
在特征列表上的配置列表中,此配置输入显示一个复选框,以打开(取消抑制)或关闭(抑制)拉伸。
- 单击
 按钮右侧的箭头。
 - 选择
 编辑外观
编辑外观 - 在“变量输入”对话框中输入变量输入的名称。这成为系统中的实际变量,以 #variableName 的形式被参考。
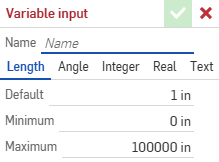
- 选择变量类型:长度、角度、整数、实数、文本。文本可以是可以在自定义 FeatureScript 中使用的任何类型的文本。
- 为您所选的变量类型,输入值。
- 单击复选标记以保存您的定义。
- 将变量应用于特征:
- 双击特征列表中的某个特征将其打开。
- 右键单击输入,然后单击“设置为 #variableName”。您也可以直接在任何表达式中键入变量名称(以 # 开头)。
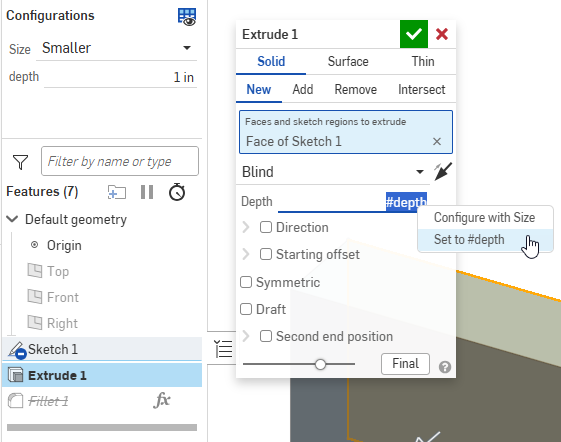
- 关闭特征对话框。变量输入的使用情况在“配置”面板中列出。
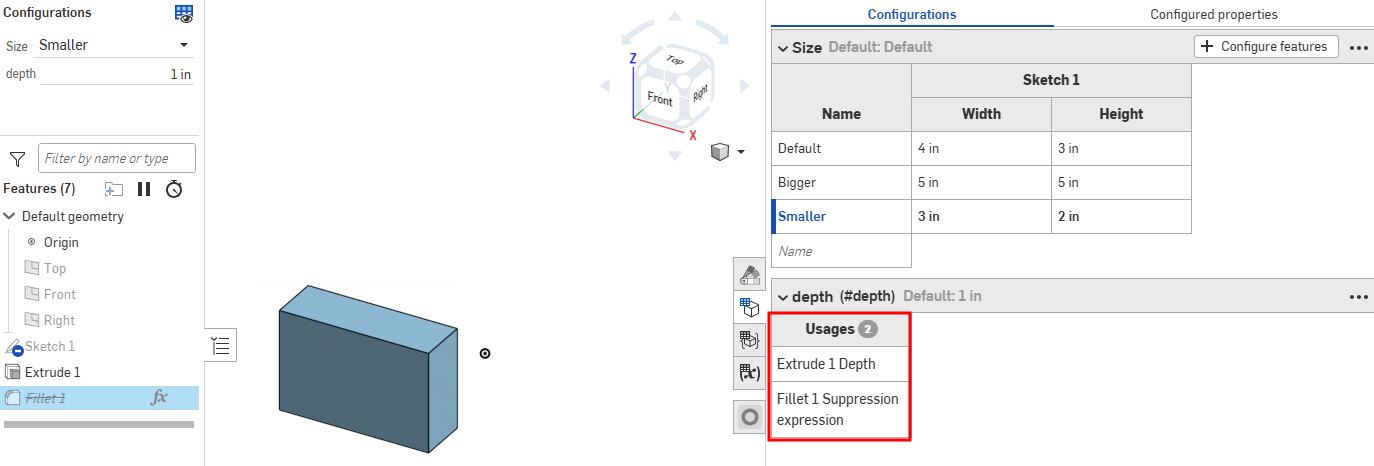
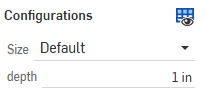
- 通过在页面左侧特征列表上方的配置列表中选中该值来测试该值:
源自装配体镜像的 Part Studio 中的配置表和输入仅供查看,并从源 Part Studio 中参考。这些配置表和输入必须从其源 Part Studio 页签中进行编辑。
要重命名配置输入或输入参数(列),请将鼠标悬停在当前名称上方以显示 I 型光标。单击选择当前文本,键入新文本,然后按 Enter 键。
重命名配置
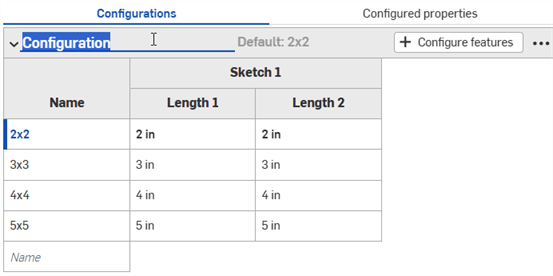
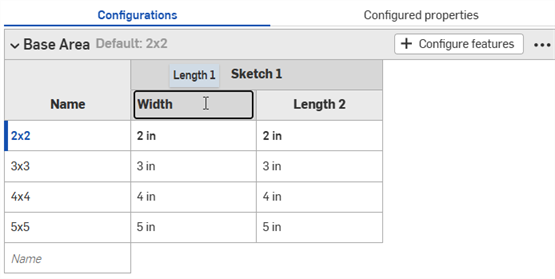
只能为草图特征重命名配置输入参数(列)。
也可以通过环境菜单重命名配置输入。请参见下方的“上下文菜单”部分。
配置环境菜单
要调整配置输入,请单击三点按钮 ![]() 。环境菜单上的选项会有所不同,具体取决于您正在配置的是 Part Studio、装配体还是 Variable Studio:
。环境菜单上的选项会有所不同,具体取决于您正在配置的是 Part Studio、装配体还是 Variable Studio:
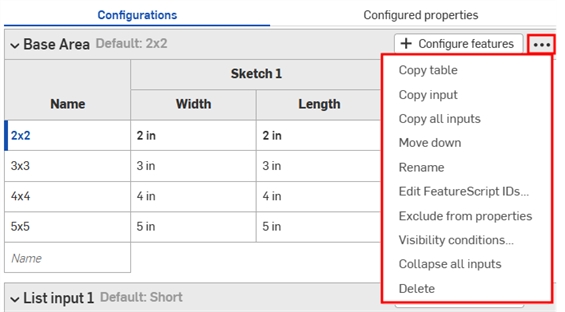
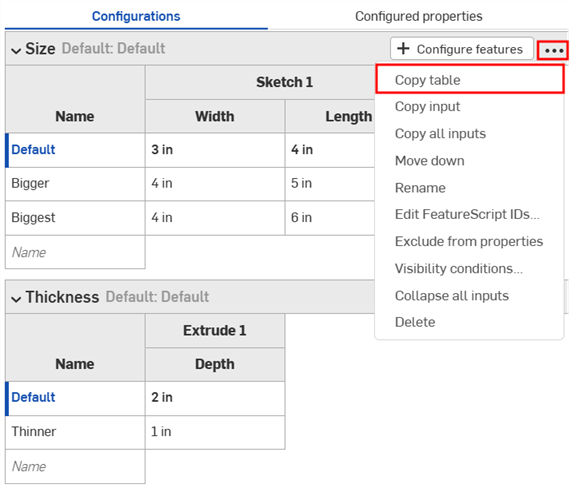
- 复制表 - 复制整个配置输入。您可以将其粘贴到电子表格中进行记录保存或编辑。同样,您可以将电子表格中的内容粘贴回配置输入中。请参见此页面上的“复制和粘贴输入值和参数”部分。
- 复制输入 - 复制输入和值(行)。然后,您可以将其粘贴到另一个 Part Studio 或装配体的“配置”面板中,并使用“复制表”命令添加参数。请参见此页面上的“复制和粘贴输入”部分。
- 复制所有输入 - 复制“配置”面板中的所有输入和值(行)。然后,您可以将其粘贴到另一个 Part Studio 或装配的“配置”面板中,并使用“复制表”命令添加参数。请参见此页面上的“复制和粘贴输入”部分。
- 向上/向下移动 - 重新排序配置面板中的输入。您也可以单击并拖动输入以对其进行重新排序。
- 重命名 - 重命名配置输入。您也可以按照“重命名配置”部分的说明重命名输入。
- 编辑 FeatureScript ID - (仅限零件和 Part Studio)。此对话框将更改配置输入的内部 FeatureScript 标识符。在对话框内单击以更改 ID。完成后,选择右下角的“打断参考并更改 ID”。
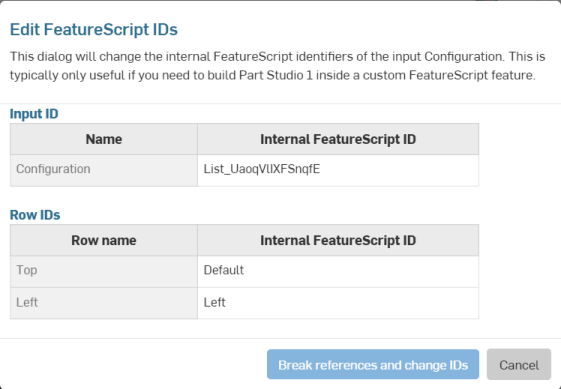
此对话框通常仅在您需要在自定义 FeatureScript 特征中构建 Part Studio 时才有用。
- 从属性中排除 - (仅限零件和 Part Studio)。请参见“排除影响属性的配置”。
- 折叠/展开所有输入 - 折叠或展开“配置”面板中的所有配置输入。
- 可见性条件 - 请参见此页面上的“设置可见性条件”部分。
- 删除 - 选择此操作可立即删除配置输入;不发出警告。
对于所有表,使用环境菜单(右键单击)对行或列进行操作:
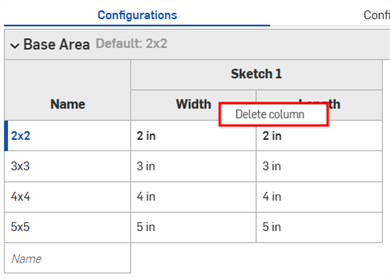
列环境菜单
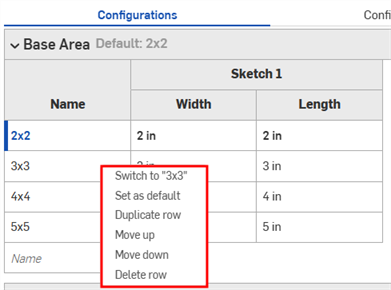
行环境菜单
- 切换到 - 右键单击不是当前所选输入的行时,菜单项的前面会显示“切换到其他输入”。
- 设为默认值 - 如果某行当前不是默认输入值,则将其设置为新的默认值。当前默认值显示在输入名称旁边。
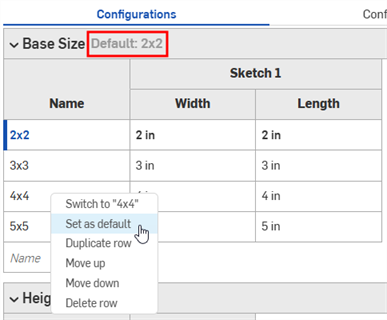
- 重复行 - 创建重复行;这在准备将新表粘贴到该行时特别方便。有关更多信息,请参见此页面上的“将表格复制并粘贴入以及复制并粘贴出配置输入”部分。
- 向上/向下移动 - 将所选行向上或向下移动一行。您也可以单击并拖动对行进行重新排序。
- 重命名 - 重命名输入。
- 删除列/行 - 删除选定的列或行。
您可以单击并拖动表格中的单个列边来调整它们的大小。如果已堆叠列标签,请单击并拖动底部标签,如上图中蓝色箭头所示。
配置可见性条件对话框允许您在配置中添加逻辑,因此您可以控制某些输入和选项何时可用。
假设一个有两个输入的零件:高度和宽度。
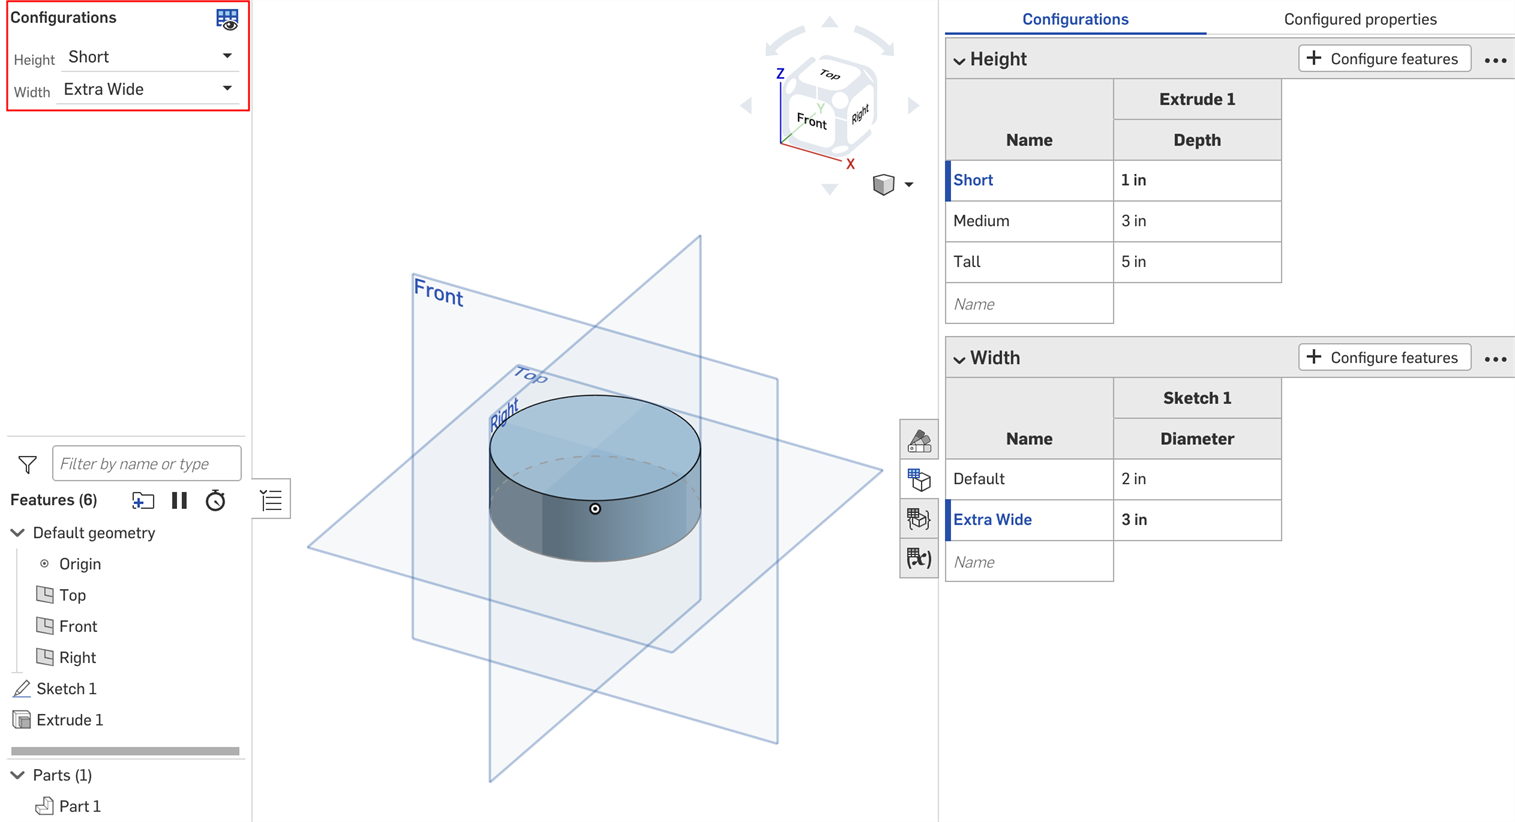
默认情况下,任意高度的零件可以将宽度设置为任意值。但是,假设超宽度仅适用于“较高”高度。在这种情况下,我们可以设置“宽度”输入参数可见的条件。
- 在“配置”面板中,单击输入的三点按钮,然后从菜单中选择“可见性条件”。
“配置可见性条件”对话框打开。右侧面板显示当前选定配置的预览。您可以在此面板中更改所选选项以预览您的设置。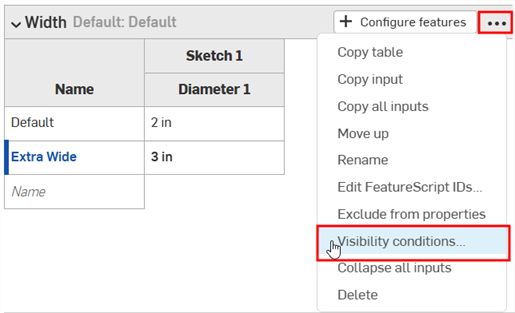
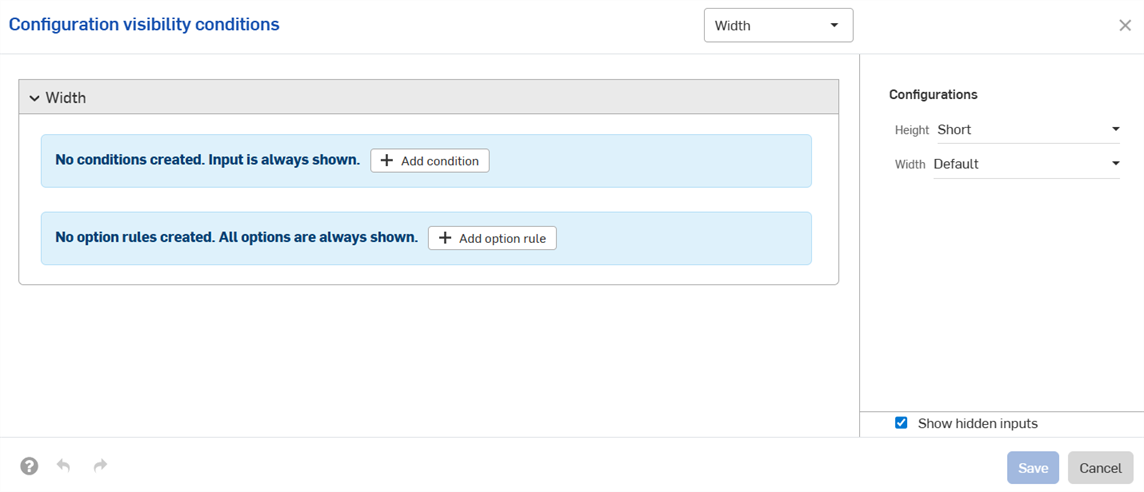
- 单击“添加条件”。
- 单击第一个下拉菜单,然后选择应控制此输入参数可见性的参数。在此示例中,我们将选择“高度”输入参数。
- 在第二个下拉列表中,选择要么选择特定选项,要么在两者之间选择一系列选项:
- 是:单击出现的第三个下拉列表,然后为输入选择允许的选项。
- 介于两者之间:单击第三个下拉列表,然后选择该范围内第一个允许的选项。单击第四个下拉列表,然后选择该范围内的最终允许选项。
在此示例中,宽度输入仅适用于 Tall 身高。右侧的预览会更新以反映您的选择。在下图中,您可以看到宽度输入不再适用于默认高度。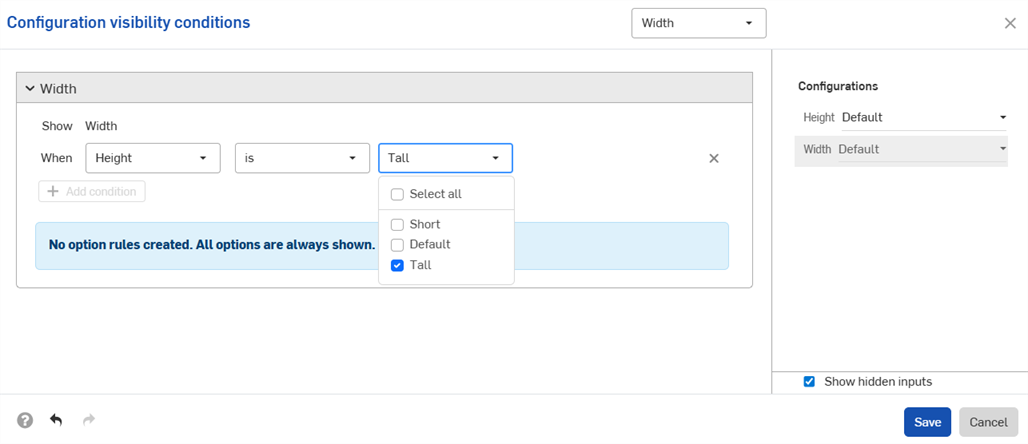
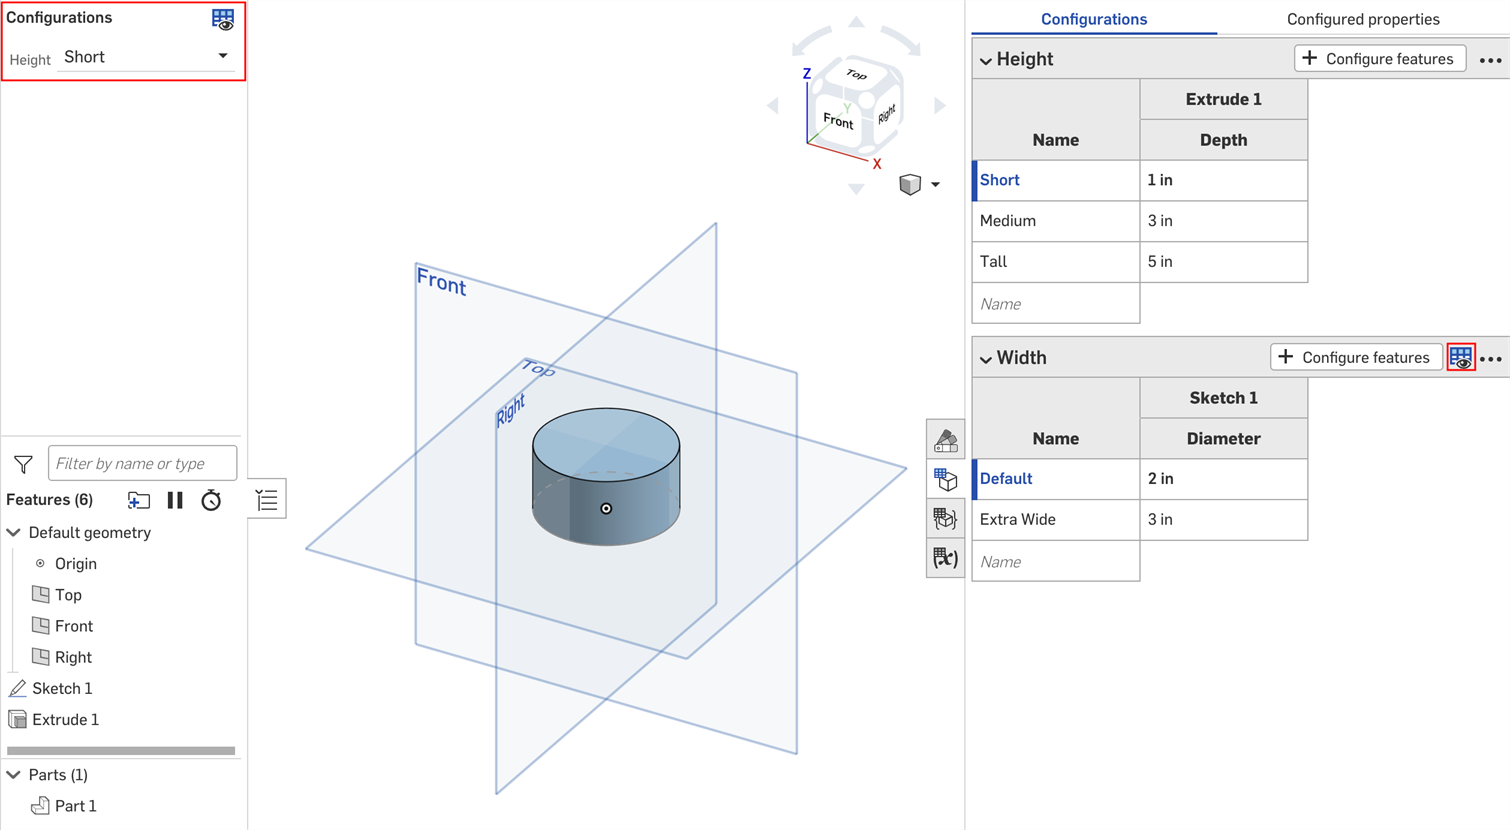
- 单击“保存”。现在,“宽度”输入参数仅在选择“较高”高度时可见,“宽度”输入参数表显示可见性条件图标
 。
。
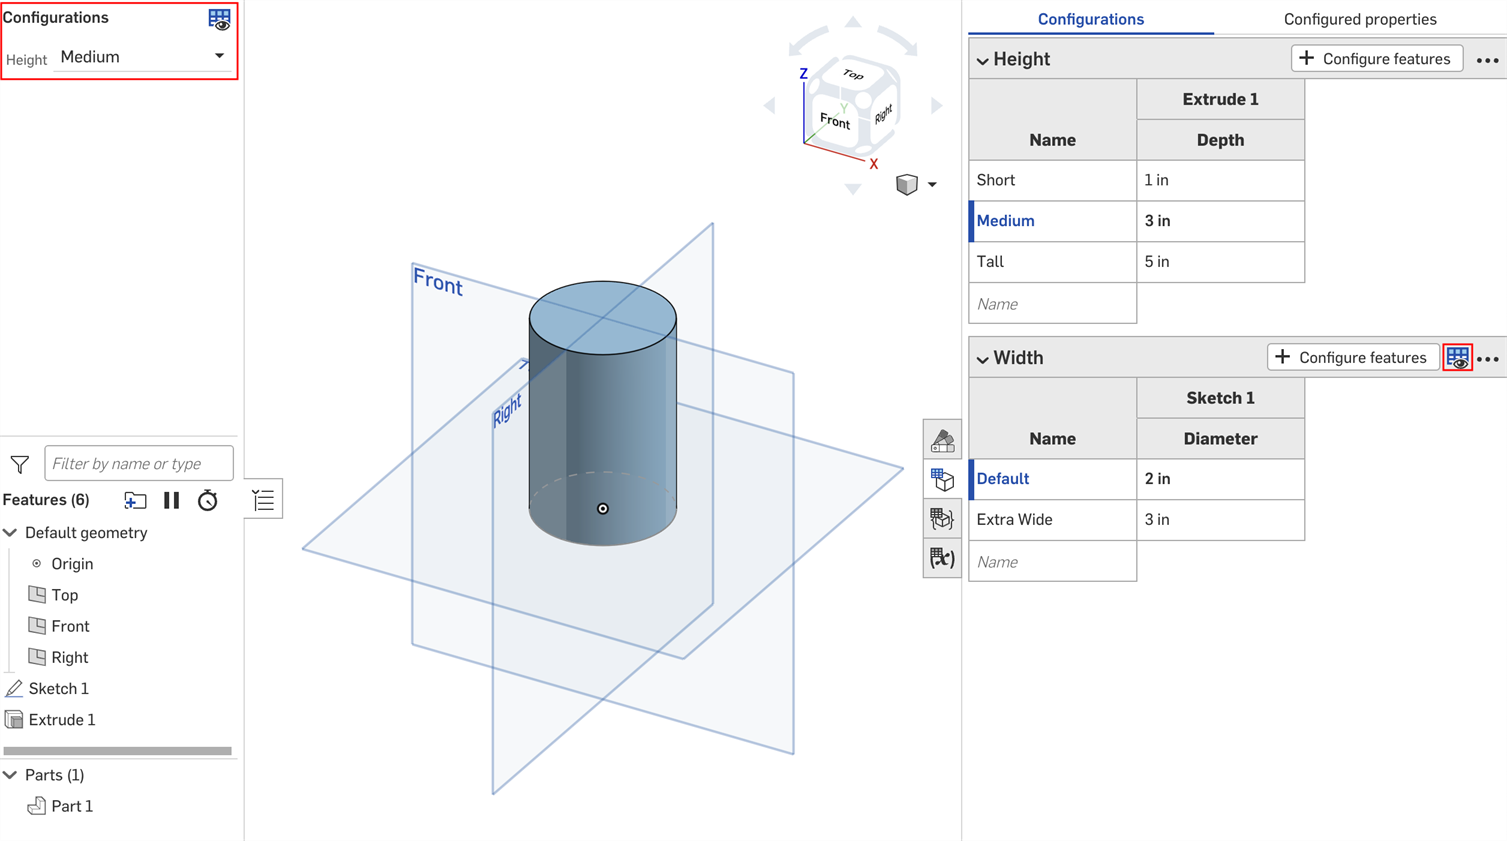
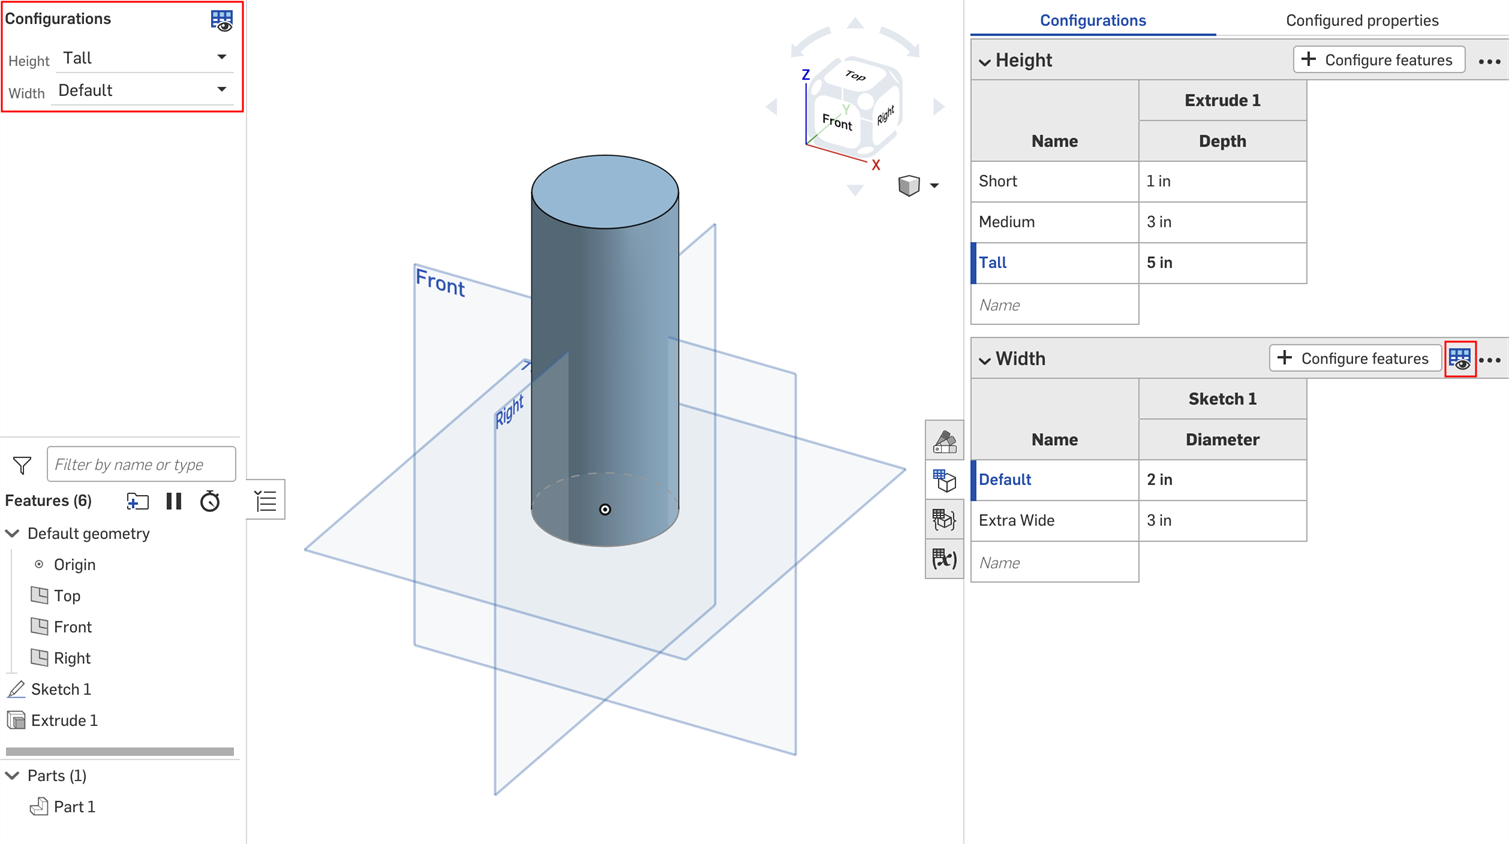
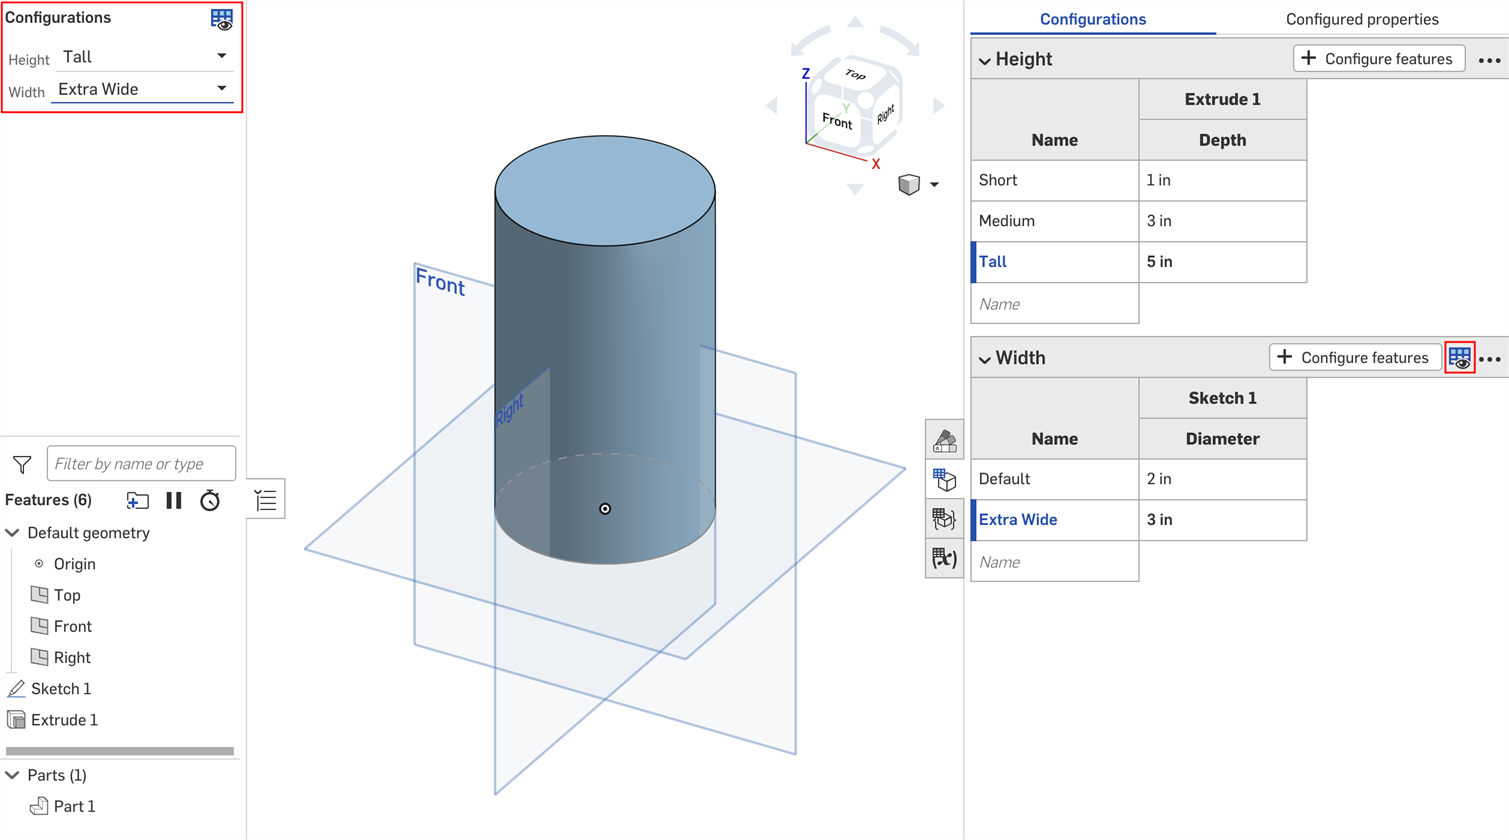
您可以使用配置可见性条件对话框中的选项规则设置来指定某些选项的显示条件。
只能为列表输入设置选项规则逻辑。
- 在“配置可见性条件”对话框中,展开输入并单击“添加选项规则”。对话框中出现一个新部分:
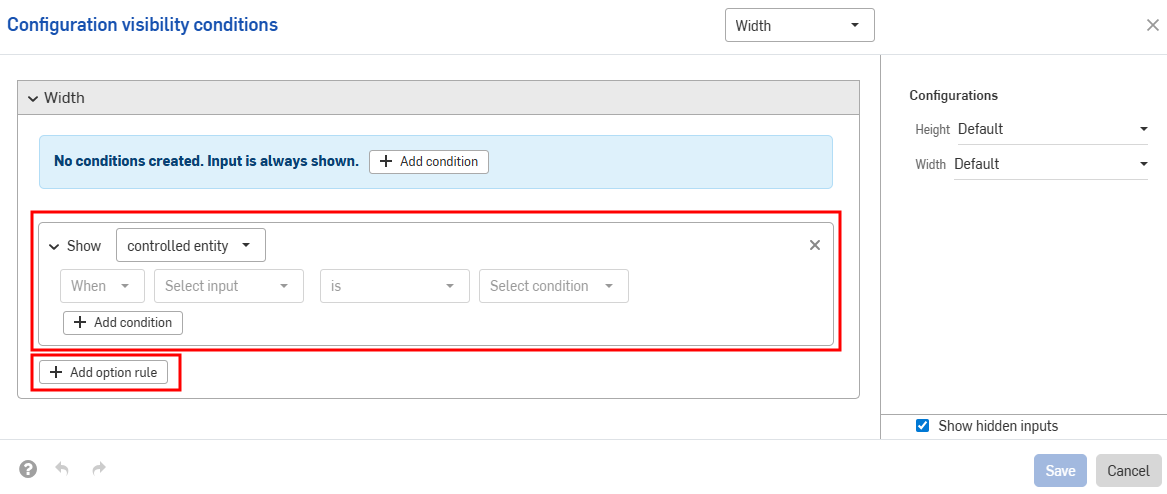
- 在“显示”行中,选择受控制的选项。
- 选项:单击出现的下拉列表,然后选择要为其设置条件的选项。
- 范围:单击第一个下拉列表并选择该范围内的第一个选项。单击第二个下拉列表,然后选择该范围内的最后一个选项。范围包含特定选项,允许重叠范围。
- In the When line, click the When dropdown and select Always (to always show the option) or When (to set option conditions). If you choose When, you must also:
- Select the input from the second dropdown.
- 选择要么选择特定的选项,要么介于两者之间来选择一系列选项。
- 是:单击出现的下拉列表并选择该选项的允许值。
- 介于两者之间:单击第一个下拉列表,然后选择该范围内第一个允许的选项。单击第二个下拉列表,然后选择该范围内的最终允许选项。
-
通过单击“添加条件”并重复这组步骤,继续在配置中添加逻辑。
期权规则中的条件以 AND 语句组合在一起;必须满足所有条件才能显示受控期权。
- 再次单击“添加选项规则”,为其他选项添加条件。
- 单击保存。
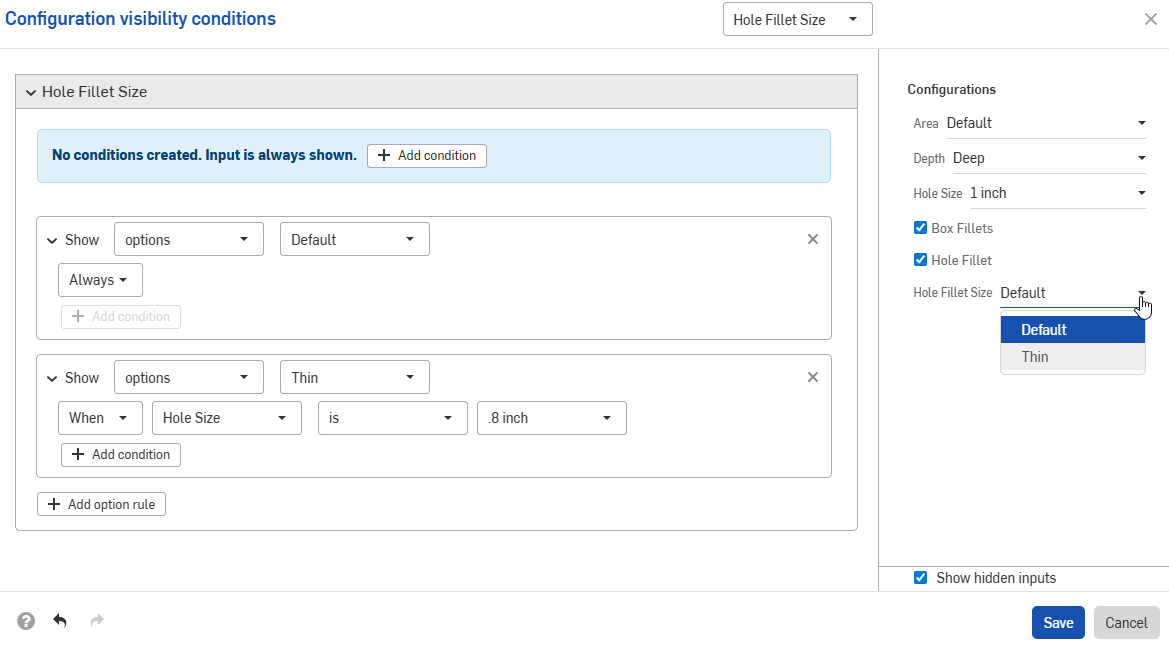
In the example below, the "Thin" option is only allowed when the Hole Size is .8 inches. The Default option is always allowed:
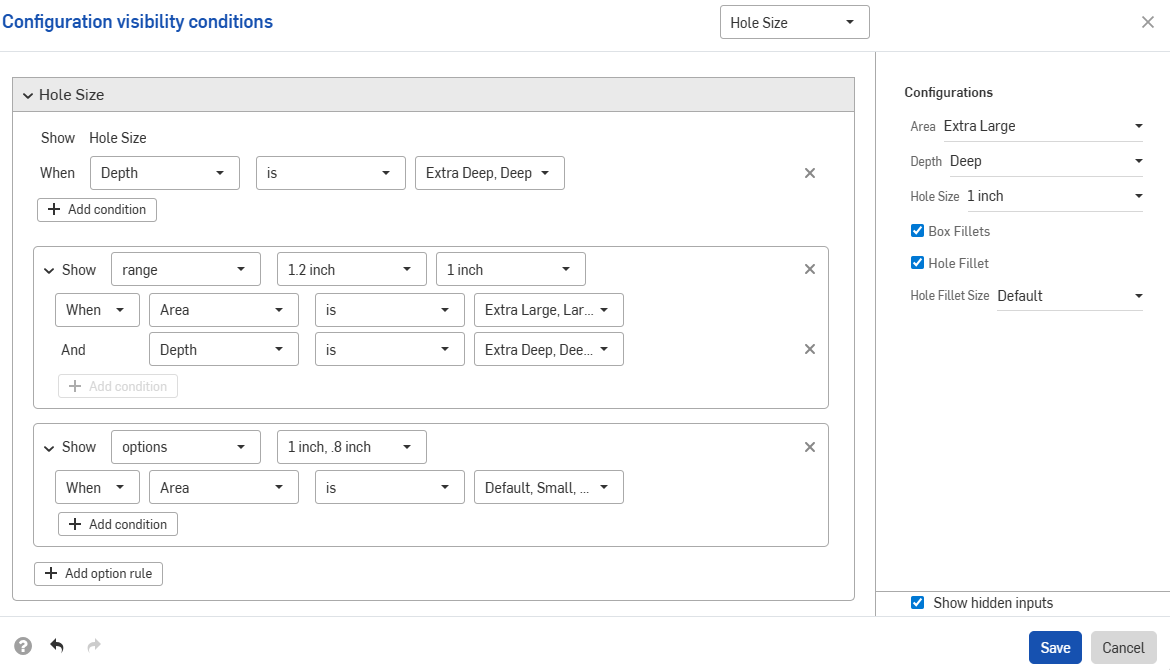
下一个示例使用重叠范围来指定可见性条件:

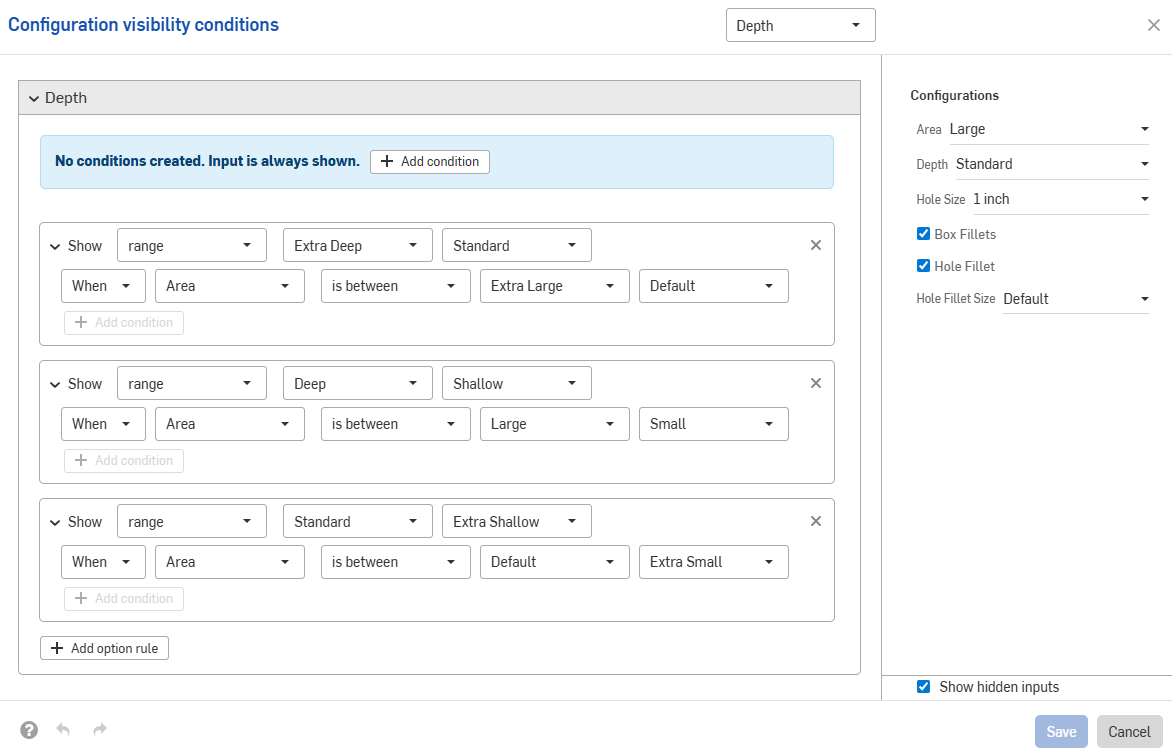
以下示例使用选项和范围控件的组合来设置所需的逻辑。
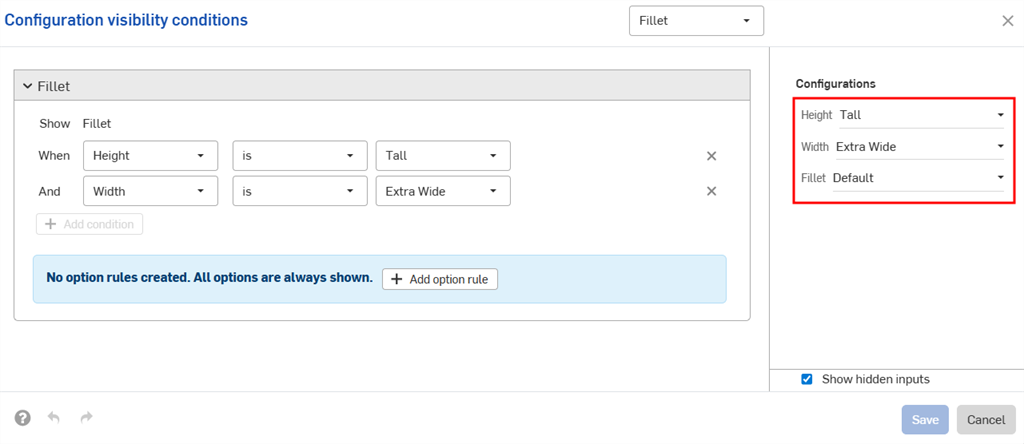
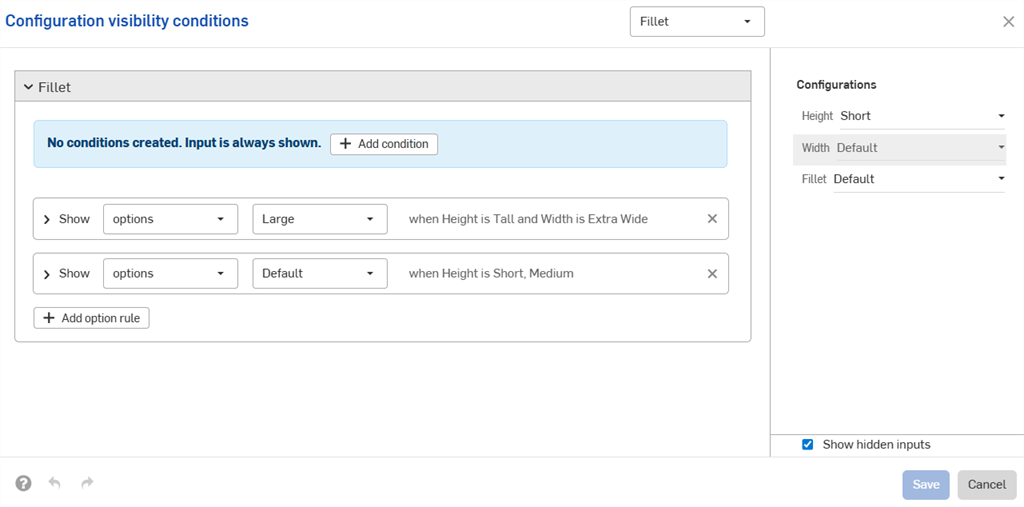
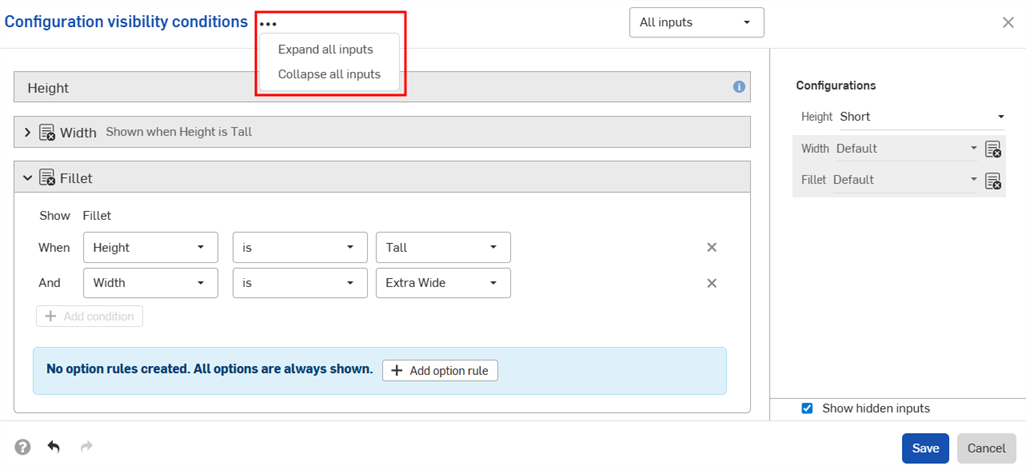
输入条件是累加的;如果我们在上面的示例中添加第三种配置并设置下图所示的条件,则“大圆角”选项将仅适用于同时具有“较高”高度和“超宽”宽度输入参数的零件。
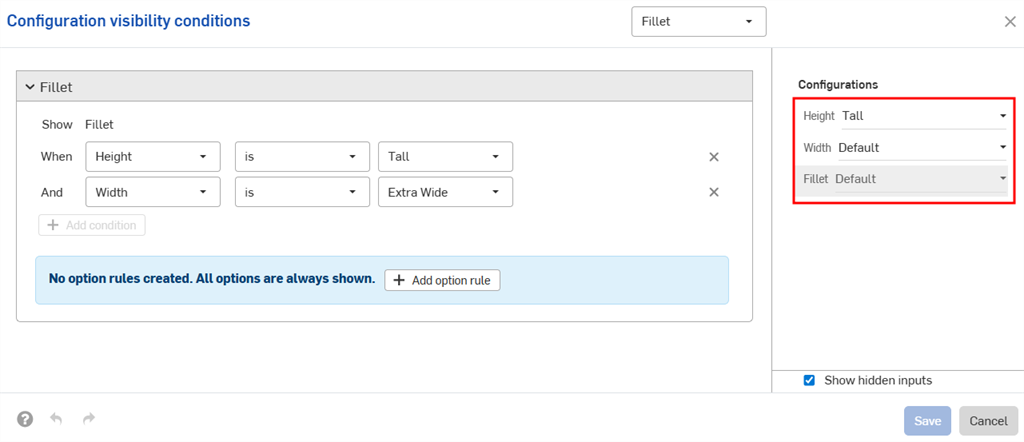
当将“较高高度”设置为“默认宽度”时,“圆角”配置将被隐藏。
配置输入参数只能控制“配置”面板中显示在其下方的输入的可见性。在本示例中,“宽度”输入参数可以由“高度”输入参数控制,但不能由“圆角”输入参数控制。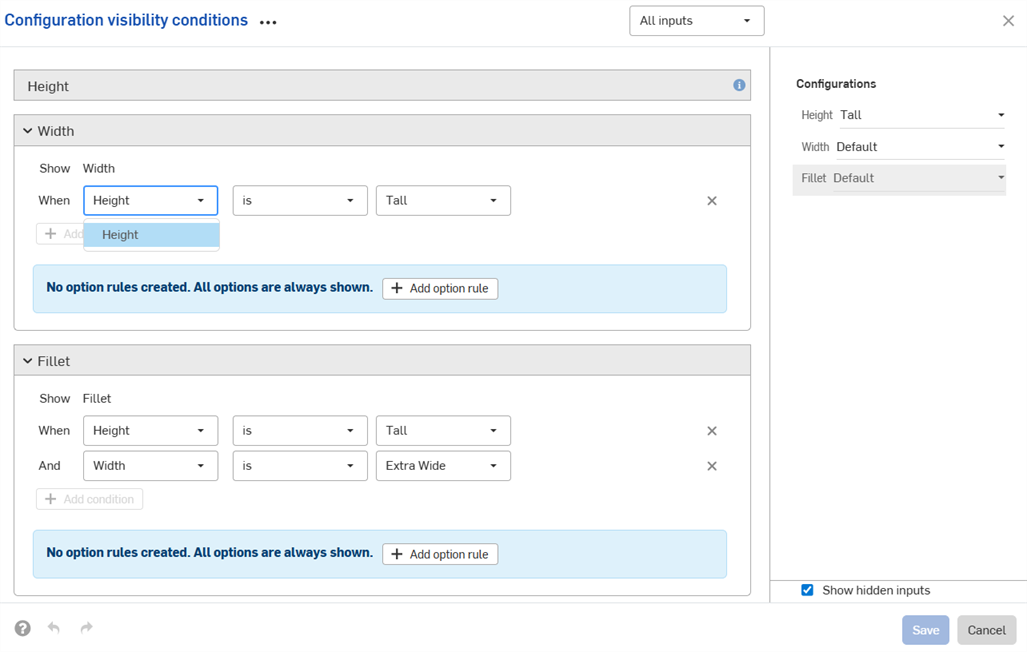
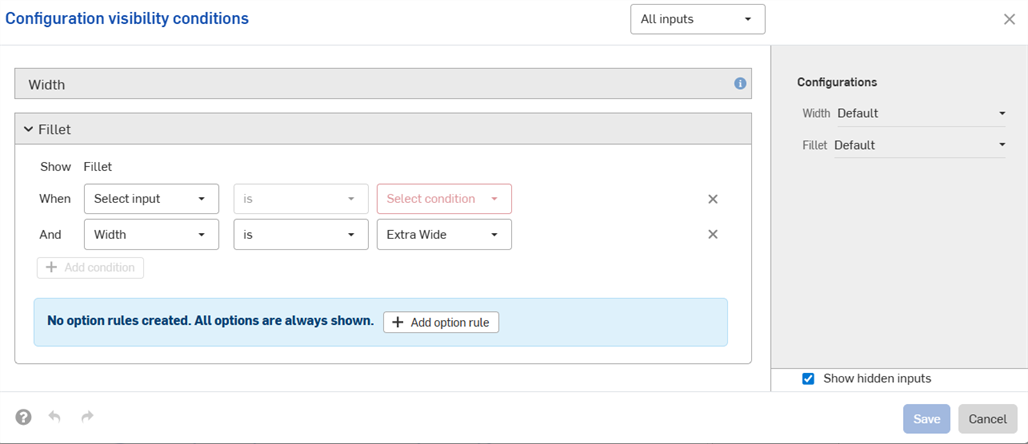
如果找不到必要的输入或选项,则会自动修复(移除)可见性条件。
例如,如果宽度输入的可见性取决于高度输入,并且删除了高度输入,则宽度的可见性条件将自动移除。这同样适用于被删除或移动的单个选项。在本示例中,高度输入也已从“圆角”选项中移除。
您将在工作区中看到一条警告,对话框中的条件已删除:

-
您设置的可见性条件和选项规则可在所有“插入”对话框中找到(例如,将配置的零件插入到装配体时)。对可见性条件所做的更改会自动反映在引用配置元素的所有现有文档中。
-
隐藏的输入始终有其默认值。在本页的第一个示例中,尽管未设置宽度选项,但短高度和中等高度部分的默认宽度仍为默认宽度。
-
如果配置输入没有可见的选项,则会将其隐藏并采用其默认值。
-
-
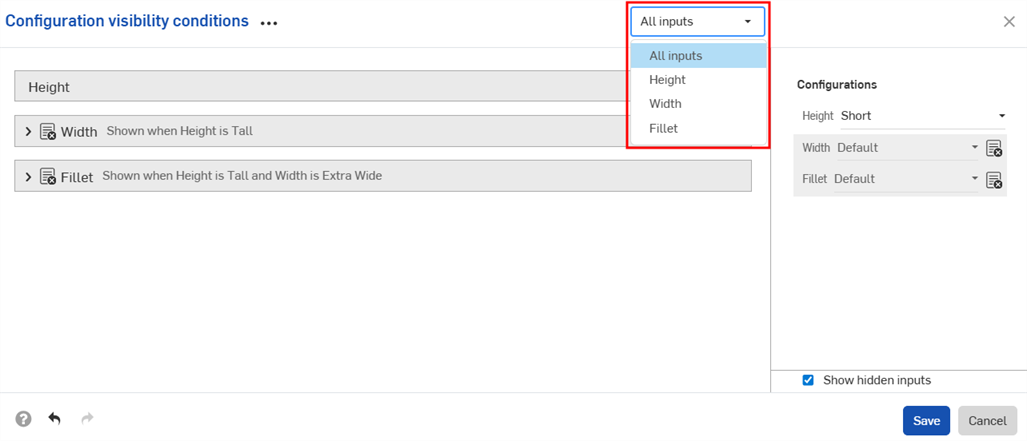
折叠输入或选项后,对话框中会显示可见性条件的摘要。
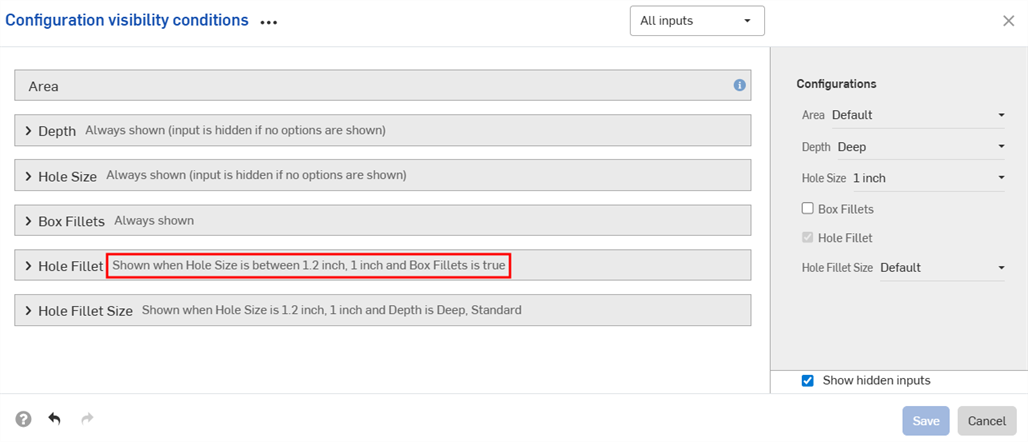
-
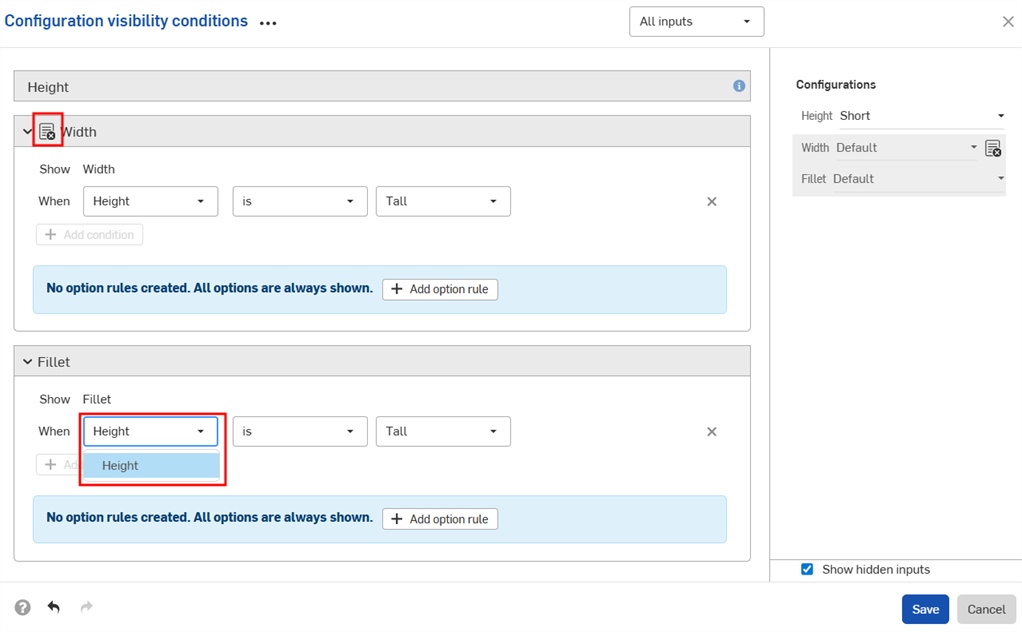
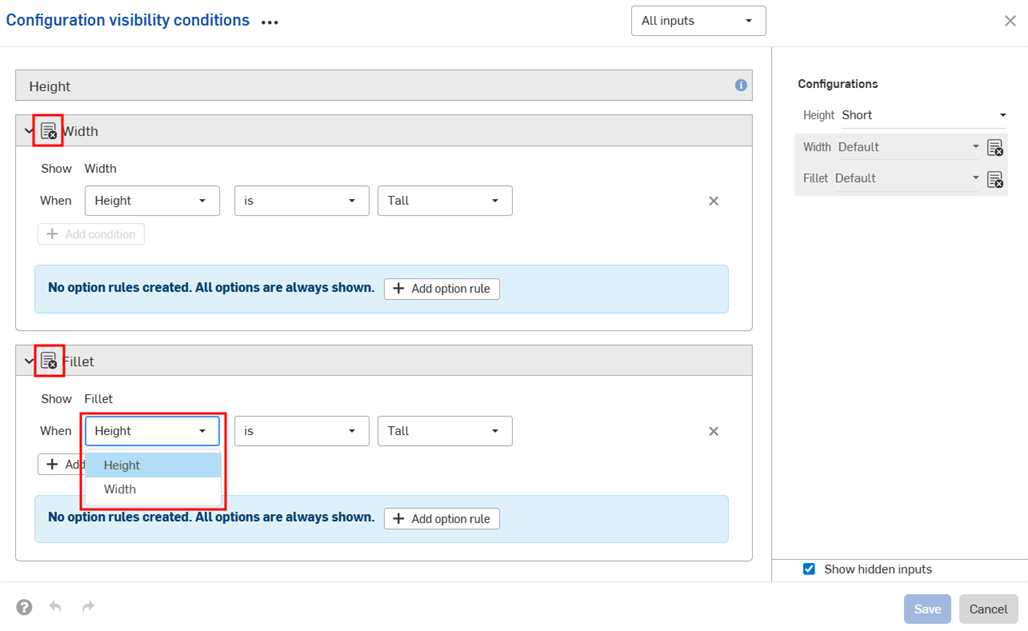
(仅限零件和 Part Studio):已从特性中排除的配置输入只能控制其下方其他输入的可见性,这些输入参数也已从特性中排除。在下面的示例中,如果将“宽度”排除在特性中(由图标
 指示),则只有当“圆角”也从特性中排除时,它才能控制圆角的可见性。
-
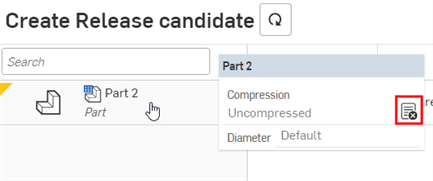
(仅限零件和 Part Studio):已从特性中排除的配置输入项,在发布包和修订引用值中将被视为采用其默认值。若可见性条件阻止使用默认值,则采用首个可见值。
- 使用“配置可见性条件”对话框中的“输入”下拉菜单来查看其他输入参数。您可以选择“所有输入”来查看所有可用输入参数。
- 当对话框中显示多个输入时,单击三点按钮可展开或折叠所有输入。
- 您可以将配置可见性条件对话框的预览部分用作操场来测试您的配置。
- 取消选中“显示隐藏的输入”复选框以从对话框中移除灰色的输入。
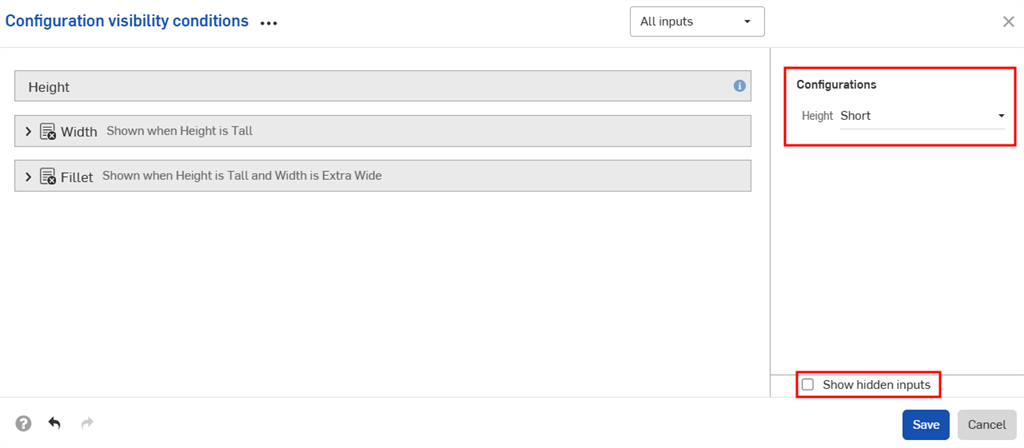
- 取消选中“显示隐藏的输入”复选框以从对话框中移除灰色的输入。
-
将配置部件添加到装配体时,“配置”面板中的隐藏输入显示为灰色。
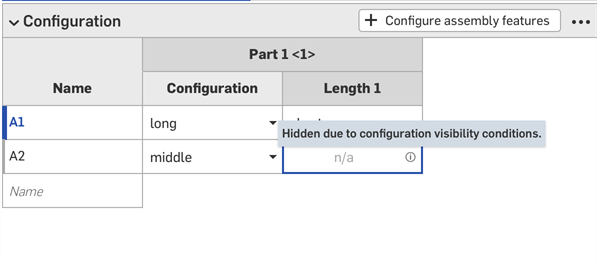
-
单击配置选择器中的
 打开所有输入参数的“配置可见性条件”对话框。单击配置面板中的
  以打开该输入参数的对话框。
您可以将配置输入复制并粘贴到 Part Studio、装配体或 Variable Studio 中或从中复制粘贴出来。这使得在设计之间共享配置变得轻松快捷。
-
在 Part Studio、装配体或 Variable Studio 中打开包含要复制的输入的“配置”面板。
-
单击输入的三点菜单,然后选择“复制输入”或“复制所有输入”。
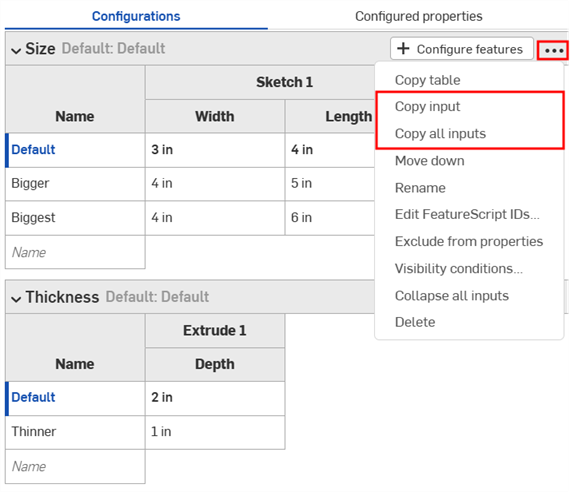
-
在页签中打开“配置”面板粘贴输入。
-
单击“配置 Part Studio/装配体/Variable Studio”旁边的箭头,然后选择“粘贴输入”。
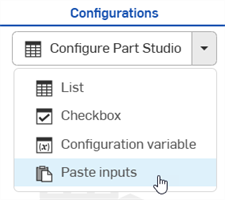
输入将插入到“配置”面板中。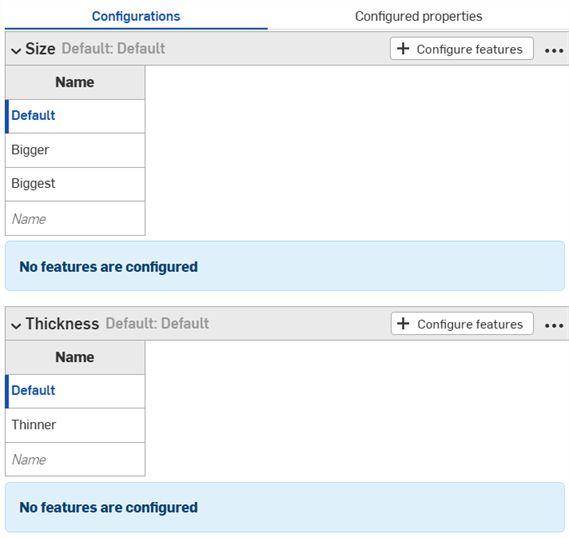
-
从新页签中选择要配置的参数。继续阅读以了解现在如何将输入值和参数复制到输入表格中。
注释:
- 您可以复制和粘贴配置输入:在 Part Studio、装配体和 Variable Studio 之间;在同一个文档中;以及在不同文档之间。
- 所有名称、可见性条件、FeatureScript ID 和变量定义都与输入一起复制。
- 在用户登出之前,复制的输入都可用。
- 复制的输入和粘贴的输入之间的参考不会保留;粘贴后,对原始配置输入的更改不会反映在粘贴的输入中。
- 如果目标配置没有计算可见性所需的所有输入,则粘贴的可见性条件将自动修复(移除)。
- 不粘贴具有相同内部 FeatureScript ID 的配置输入。要修复此问题,您可以删除具有相同内部 FeatureScript ID 的配置输入,然后重新粘贴。
您可以将配置复制并粘贴到配置中,以帮助输入或编辑值。
要复制值和参数,请执行以下操作:
- 打开“配置”面板右上角的
 菜单。
菜单。 - 选择“复制表格”:
- 复制表格后,您可以将其粘贴到电子表格中:
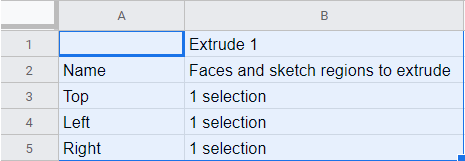
请注意,列名也与表一起出现,如上所示。现在您可以编辑表格并将其复制/粘贴回 Onshape:
- 只选择具有数据的行和列(不是列名或标题),如下面的蓝色所示:
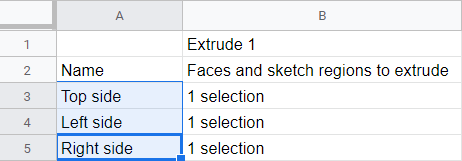
如果需要,您还可以为表格添加额外的空白行。在为复制命令进行选择时,只需包括电子表格中的额外行。
- 发出“复制”命令。
- 在 Onshape 配置表中,单击表格左上角的单元格。
- 发出键盘“粘贴”命令:
Onshape 会自动将配置输入表的行和列中的数据替换为复制的数据。Onshape 还会自动包含每个输入的默认单位。
请注意,如果从电子表格复制的行数多于 Onshape 配置输入表格中的行数,则这些行不包含在粘贴中。Onshape 会立即创建行。
但是,如果从电子表格复制的列数多于 Onshape 配置输入表格中的列数,则这些列不包含在粘贴中。Onshape 尚未动态创建列。但是,在粘贴前,您可以在配置表格中创建其他列(参数)。
Onshape 还有一种机制,可以直接从“配置”面板为您先前定义的每个配置输入和选项配置属性。您可以配置零件属性或外观属性。如果您有 Professional 或 Enterprise 帐户,则还可以配置自定义特性。
- 在 “配置” 面板中输入现有配置后,单击面板顶部的 配置属性。
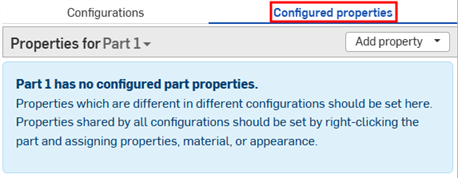
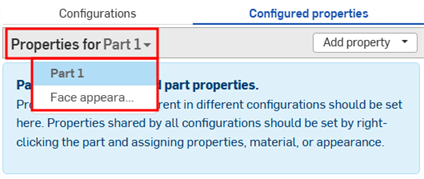
- 单击“特性”下拉列表选择要配置的零件或外观。
包含已配置属性的零件和外观在列表中以复选标记显示: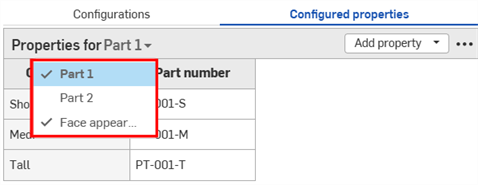
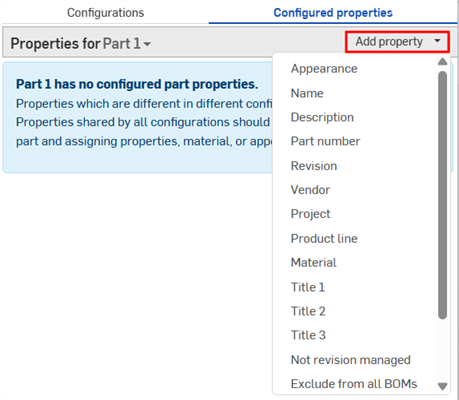
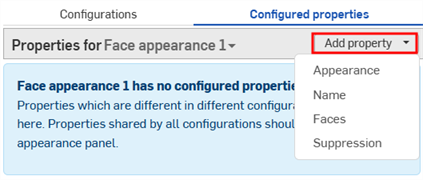
- 单击“添加特性”。
-
选择要配置的特性;特性可用于零件、外观和自定义特性。所有配置输入都将添加到表中。
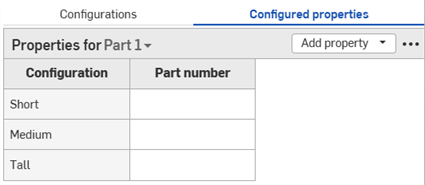
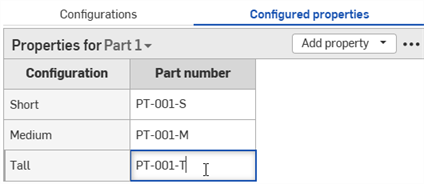
- 双击“特性”列中的单元格进行编辑。按 Tab 键移至下一行。
- 要编辑一个值,请键入新值并按 Enter 键接受。
- 要编辑对话框选择,请在对话框中进行新选择,然后单击
 关闭对话框。
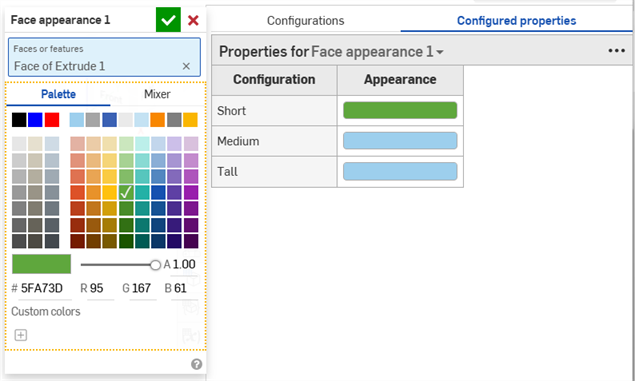
- 要编辑一个值,请键入新值并按 Enter 键接受。
-
根据需要重复操作以配置其他特性。以下示例均配置了零件编号和面外观特性。

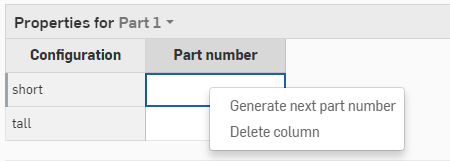
如果您启用了自动生成零件编号的功能(通过您的 Professional 版公司编号方案或 Enterprise 版编号方案),则可以在“零件编号”属性列中右键单击,然后选择“生成下一个零件编号”:
如果表中的任何属性设置为只读,则无法删除表、向表中添加属性或删除只读属性列。您仍可以修改可编辑属性的单元格值。再次将只读属性设置为可编辑以修改该表。
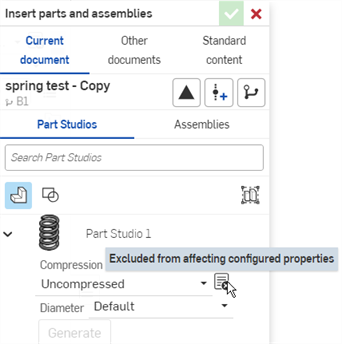
某些配置表可以从特性中排除。当您不想重复配置的特性表中的配置选项时,这很有用。排除的配置被视为始终使用其默认值。
例如,以弹簧为例。弹簧的直径和高度均有配置可供选择。
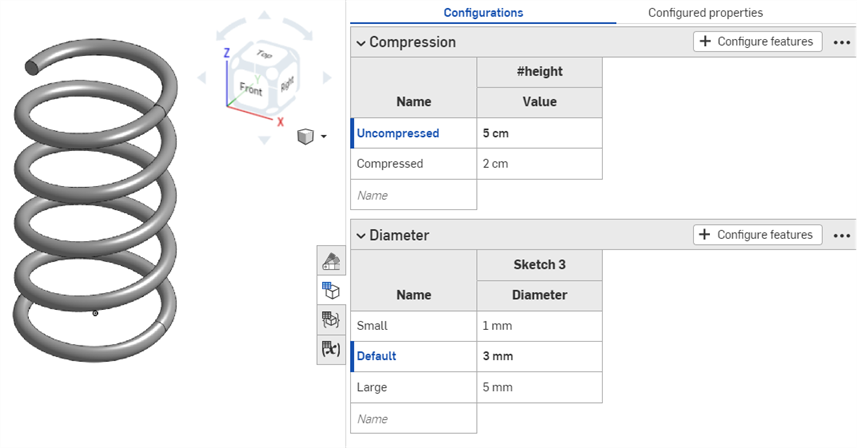
弹簧是否压缩会影响几何图元,但不会影响零件编号;压缩和未压缩时弹簧是同一个零件。若要指定无论弹簧高度如何都应分配所有零件编号,必须将每个配置选项添加到配置特性表中,并为每个配置选项指定零件编号。
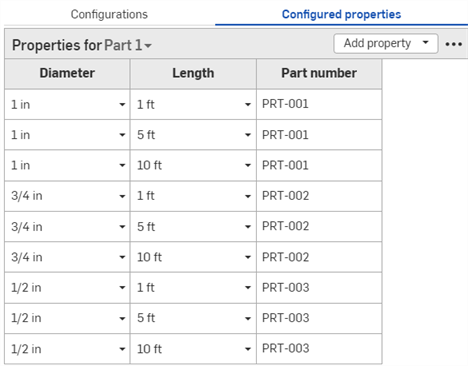
为每种配置可能性设置零件编号。
如果改为从特性中排除压缩配置表,您可以根据直径指定零件编号:
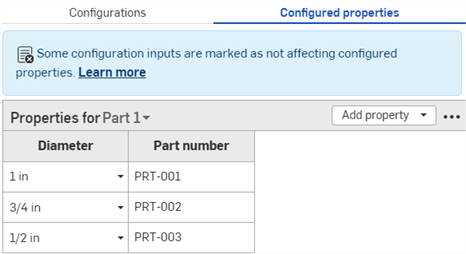
压缩配置表不包括在配置的特性表中。无论弹簧高度如何,都应设置零件号。
步骤:从特性中排除配置输入
-
在“配置”面板中,单击配置的三点按钮,然后从菜单中选择 “从特性中排除”。“从特性中排除”图标
 显示在配置名称旁边。
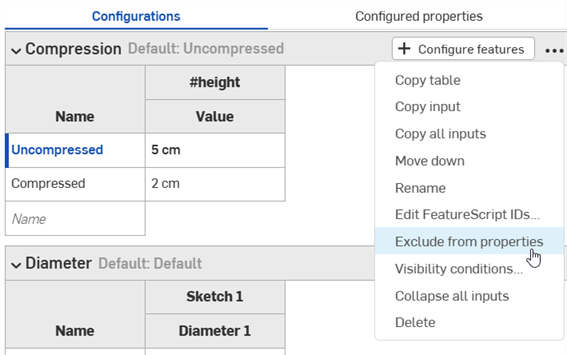
步骤:将排除的配置添加回特性中
-
在“配置”面板中,单击配置的三点按钮,然后从菜单中选择 “包含在特性中”。
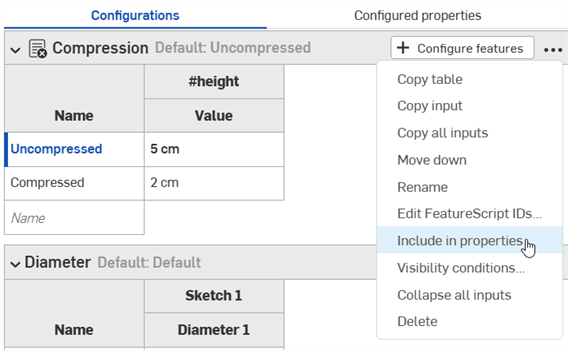
排除的配置说明
要配置动态抑制表达式,请在所需输入中单击“配置特征”,然后右键单击特征列表中的相应特征,并从环境菜单中选择“配置抑制”(或“使用...配置抑制”),将该特征添加到“配置”面板。然后,您可以直接在“配置”面板中编辑该表达式。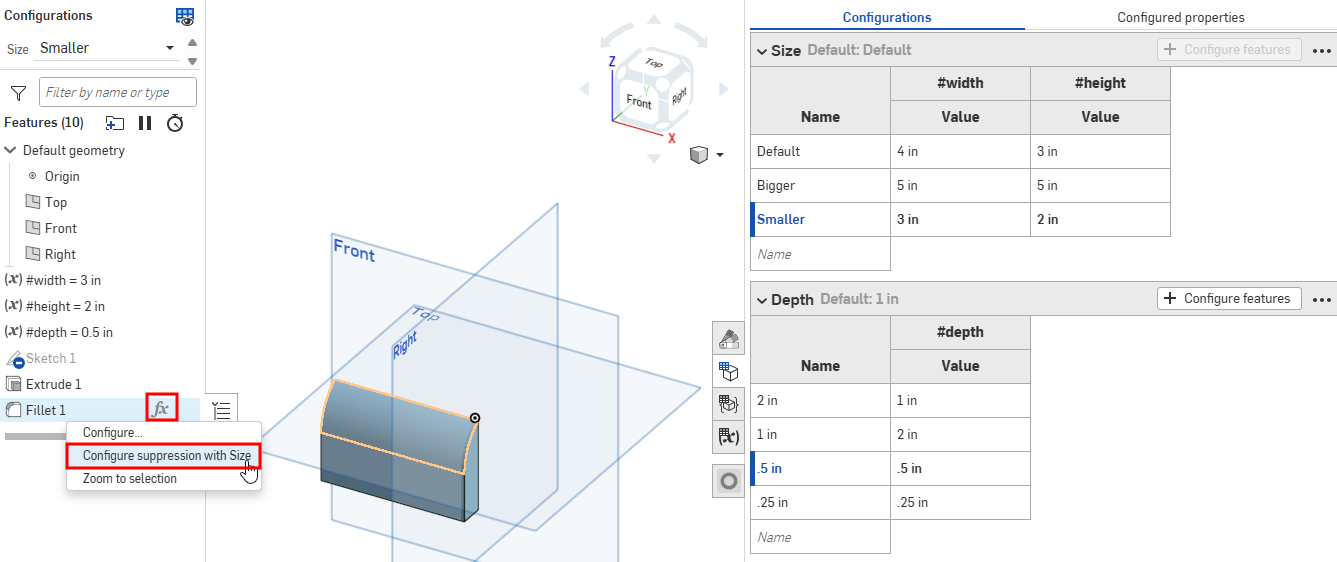
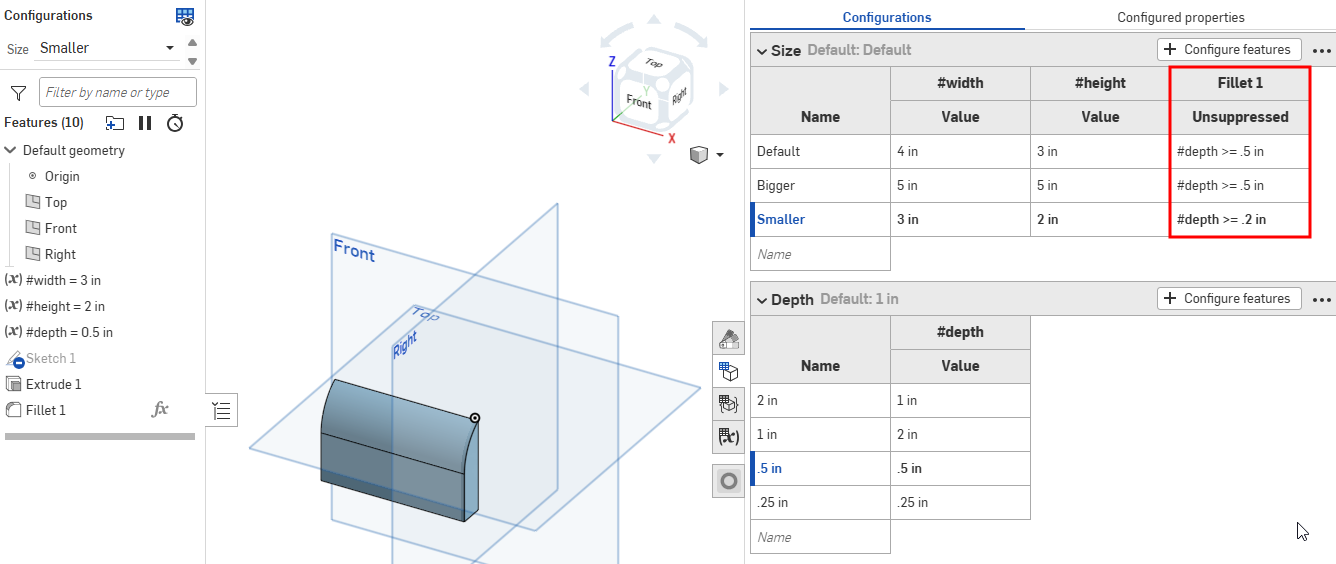
要将复选框转换为表达式,请右键单击“配置”面板中的复选框,然后单击“转换为表达式”。然后,您可以直接在“配置”面板中编辑该表达式。要转换回复选框,请右键单击该表达式并单击“转换为复选框”。
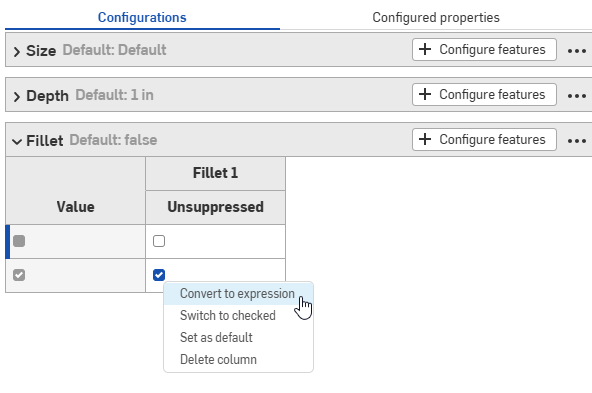
如果从特征中移除已配置的动态抑制,则该表达式会自动转换为“配置”面板中的复选框。
您可以使用直接在 Part Studio 或装配体中创建的配置输入来预览其设计。但是,创建配置输入的主要用途是选择特定的配置以插入到其他装配体、工程图、发布版本等之中。
预览配置
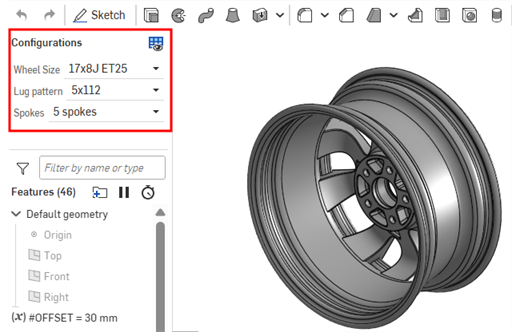
使用屏幕左上角的配置区域选择配置输入,以查看它们如何影响整体设计。设计会更新以匹配所选输入,因此您可以预览最终设计。可能的配置输入的每种排列都是一个配置。
插入配置
您可以通过“插入 Part Studio 和装配体”对话框将已配置的零件、Part Studio,或装配体插入到装配体、发布版本和工程图中
-
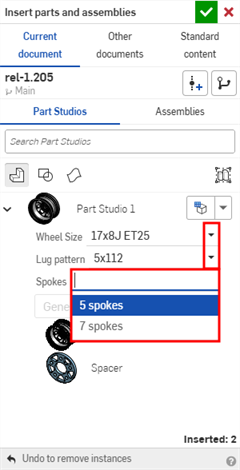
直接在“插入”对话框中选择所需的输入:
-
单击“设为上次查看的配置”图标 (
 ),选择在“Part Studio”或“装配体”选项卡中预览最后一个处于活动状态的配置,或单击箭头并选择“重置为默认值”以将所有输入设置为其默认值。
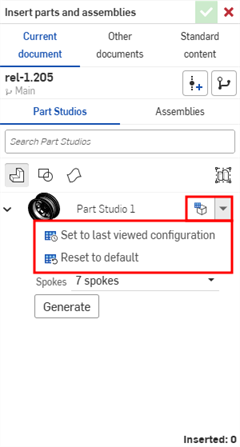
-
如您对配置感到满意,单击“生成”。
-
单击要插入的配置。
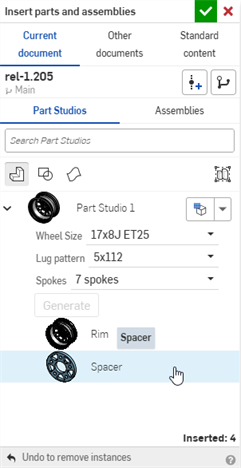
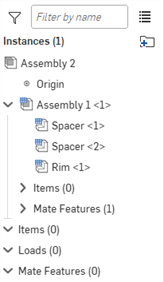
在装配体中,配置的零件和装配体由实例列表中的 ![]() 图标指示:
图标指示:
更改配置
将已配置的零件或装配体插入到装配体中后,您可以更改配置:
- 右键单击实例列表中的零件或装配体,然后选择“更改配置”。
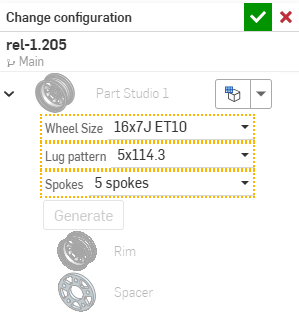
- 选择新的配置值。
- 当您对选择的内容满意时,请单击
 。(使用
。(使用  可取消操作。)
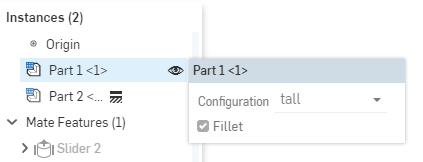
要查看装配体中当前有哪些配置处于活动状态,请将鼠标悬停在实例列表中的某个零件上,出现包含配置信息的工具提示:
iOS 和 Android 对配置的支持仅限于以下内容:
-
查看右侧的“配置”面板 (
 )。
)。 -
在左侧面板(功能列表上方)中的“配置”之间进行选择:
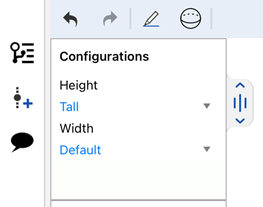
在 iOS 上选择“配置”
-
(仅限 iOS)如果配置中存在“可见性条件”,则应用这些条件。
您无法在 iOS 或 Android 平台上创建或编辑配置或可见性条件。这只能在桌面(浏览器)平台上完成。
有关其他学习中心资源,请参阅:自定进度课程 > 配置。您还可以在此处阅读学习路径课程:零件配置简介(需要 Onshape 帐户),以及此处的技术简报文章:参数变量与配置变量(需要 Onshape 帐户)。
