![]()
![]()
![]()
단축키: Shift+i
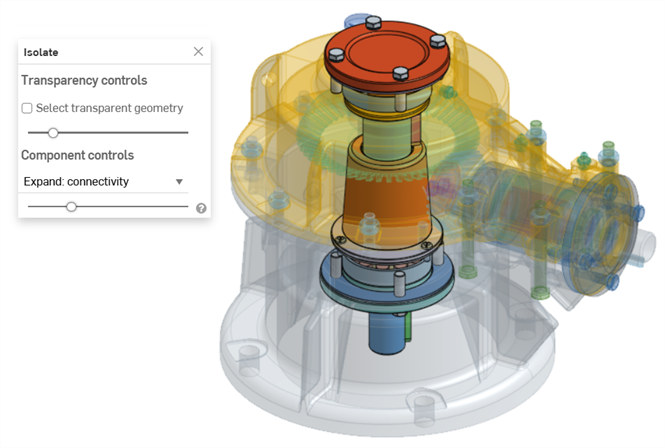
격리 피처는 선택한 모든 Part Studio 또는 어셈블리 요소를 불투명하게 유지하고 다른 요소는 투명하게 유지합니다. 옵션에는 선택, 측정, 분석 및 편집할 수 있도록 투명한 내부 형상을 시각화하는 것과 연결성 또는 물리적 근접성을 기반으로 격리된 선택을 확장하는 것이 포함됩니다.
격리가 사용됩니다.
-
대규모 Part Studio와 어셈블리에서 요소 가시성을 향상시킵니다.
-
다른 형상에 의해 가려진 형상(예: 점, 모서리, 면, 메이트 커넥터)에 대한 작업을 시각화하고 수행합니다.
-
관련 모델 형상에 액세스하기 위해 요소를 찾아 숨기거나 표시하는 것이 어렵거나 지루한 경우, 숨기기/표시 명령의 대안으로 사용할 수 있습니다.
격리 명령은투명하게 만들기 명령의 반대입니다.
분리 명령과 투명하게 만들기 명령은 서로 반대입니다.
투명하게 만들기는 다른 모든 요소를 불투명하게 유지하고 선택한 Part Studio 또는 어셈블리 요소를 투명하게 만드는 반면, 분리는 선택한 요소를 불투명하게 유지하고 다른 모든 요소를 투명하게 만듭니다.
두 명령 모두 대형 Part Studio와 어셈블리의 요소 가시성을 향상시키고 다른 형상에 의해 가려진 요소를 시각화하는 데 도움이 됩니다.
하나 이상의 요소를 불투명하거나 투명하게 만들려면 Part Studio의 파트 리스트, 어셈블리의 부품 리스트 또는 그래픽 영역에서 선택한 다음 마우스 오른쪽 버튼을 클릭하고 컨텍스트 메뉴에서 분리 또는 투명하게 만들기를 선택합니다. 또는 요소 위에 마우스를 놓고 Shift+i를 눌러 분리하거나 Shift+T를 눌러 투명하게 만들 수 있습니다. 요소 위에 커서를 놓고 동일한 바로가기 키를 사용하여 요소를 누적하여 추가합니다.
그래픽 영역에서 투명 형상을 선택, 측정, 분석 및 편집하려면 투명 형상 선택을 선택합니다.
투명도를 조정하려면 내부 형상 표시 또는 숨기기 슬라이더를 사용합니다.
분리 및 투명하게 만들기에서 슬라이더는 투명도의 외부 모서리와 투명도의 내부 형상의 가시성을 제어합니다. 슬라이더를 완전히 왼쪽으로 이동하면 외부 모서리는 계속 보이고 내부 형상은 완전히 투명해집니다. 슬라이더를 오른쪽으로 이동하면 내부 형상이 표시됩니다. 슬라이더를 더 오른쪽으로 이동하면 내부 형상과 외부 선택 모서리가 모두 완전히 보이지 않을 때까지 희미해집니다.
구성 요소 컨트롤을 사용하여 거리 또는 연결에 따라 확장할 수 있습니다. 거리만큼 확장하고 슬라이더를 오른쪽으로 이동하면 분리는 연속되는 각 부품을 불투명하게 만들고 투명하게 만들기는 원래 선택 영역과의 근접성을 기반으로 투명도를 조정합니다. 연결로 확장할 때 슬라이더를 오른쪽으로 움직이면 원래 선택한 메이트 연결과의 근접성을 기준으로 각 연속 파트가 투명하거나 불투명해집니다. 연결을 통한 확장은 어셈블리에서만 사용할 수 있습니다.
대화상자를 닫거나 Esc 키를 눌러 종료합니다.
투명 형상 선택 및 투명도 슬라이더 설정은 대화상자를 종료하고 다시 들어갈 때와 문서 세션 간에 유지됩니다.
격리는 파트 목록(Part Studio), 부품 목록(어셈블리) 또는 Part Studio나 어셈블리 그래픽 영역에서 모델 선택 영역을 마우스 오른쪽 버튼으로 클릭할 때 나타나는 컨텍스트 메뉴 명령으로 사용할 수 있습니다.
Part Studio 또는 어셈블리에서,
-
파트 또는 부품 목록이나 그래픽 영역에서 분리할 요소를 선택합니다. 파트/부품, 점, 모서리, 면, 메이트 커넥터, 폴더 또는 그룹 등이 될 수 있습니다.
-
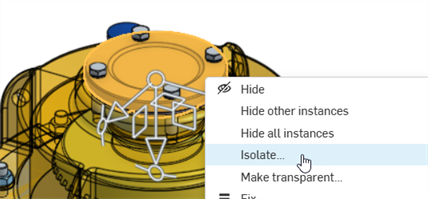
목록이나 모델 선택 영역을 마우스 오른쪽 버튼으로 클릭하고 컨텍스트 메뉴에서 격리를 선택합니다. 격리 대화상자가 열립니다.
-
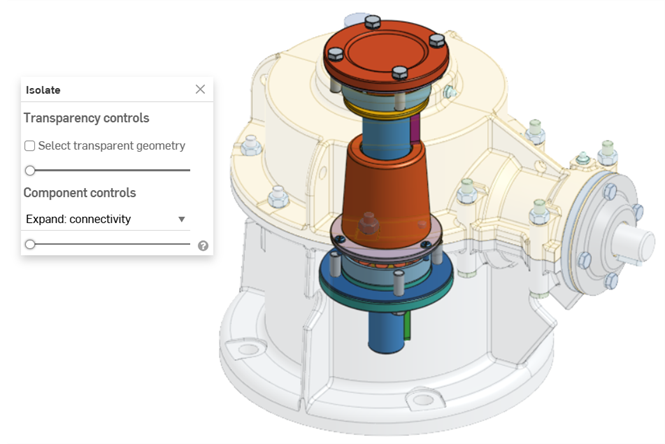
투명도 슬라이더(투명도 컨트롤 아래)를 설정합니다.
-
가장 왼쪽으로 설정하면 투명한 형상의 바깥쪽 가장자리만 표시됩니다. 선택 영역의 내부 형상은 표시되지 않습니다(위 그림 참조).
-
가장 오른쪽에 위치한 투명한 형상은 완전히 투명합니다.
-
두 면 사이의 아무 곳에나 설정하면 투명한 형상의 내부 형상이 표시됩니다(아래 참조). 슬라이더를 오른쪽으로 움직이면 투명도가 증가하여 투명한 형상의 불투명도가 낮아집니다. 슬라이더를 왼쪽으로 움직이면 투명도가 감소하여 투명한 형상의 불투명도가 높아집니다.
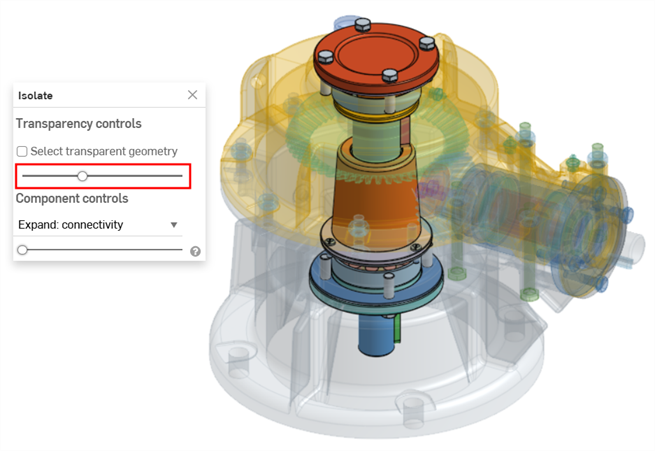
-
-
투명 형상 선택을 체크하면 그래픽 영역(아래 그림 참조)에서 파트/부품, 점, 모서리, 면, 메이트 커넥터와 같은 투명한 형상을 선택, 측정, 분석 및 편집할 수 있습니다. 체크하지 않으면 불투명 형상만 선택, 측정, 분석 및 편집할 수 있습니다.

투명 형상 선택을 선택하면 부품 또는 부품 목록에서 투명 파트/부품, 폴더, 메이트 커넥터 및 그룹을 선택할 수도 있습니다.
-
구성 요소 컨트롤을 사용하여 다음 중 하나를 선택합니다.
-
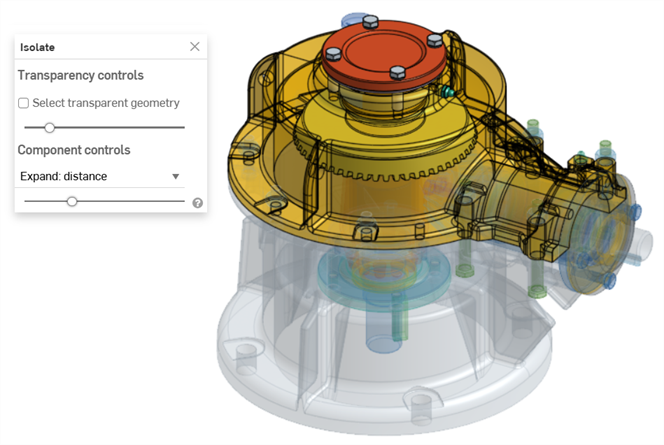
확장: 거리 - 슬라이더를 사용하여 선택한 파트 또는 부품과의 물리적 근접성을 기준으로 각 연속적인 파트 또는 부품을 격리합니다. 슬라이더를 오른쪽으로 이동하면 더 많은 파트/부품이 불투명해집니다.
-
확장: 연결(어셈블리에만 해당) - 슬라이더를 사용하여 메이트 연결을 기준으로 연속되는 각 부품을 분리합니다. 슬라이더를 오른쪽으로 움직이면 더 많은 부품이 불투명해집니다.
-
-
대화상자의 x 아이콘을 클릭하여 대화상자를 닫고 모든 파트를 표시 상태로 되돌립니다. 종료 후에도 격리 대화상자에 있는 동안 선택한 모든 항목이 그대로 유지됩니다.
아래 예에서 기어 및 밸브 어셈블리의 상단 커버 부품이 선택되고 컨텍스트 메뉴에서 격리가 선택됩니다.
확장: 거리슬라이더는 선택한 커버 부품의 근접성을 기준으로 부품을 연속적으로 격리하는 데 사용됩니다.
확장: 연결 슬라이더는 커버 부품에서 연속적인 메이트 연결을 기반으로 부품을 격리하는 데 사용됩니다.
-
커서 아래에 있는 파트나 부품을 격리하려면 단축키 Shift+i를 사용하세요. 이 명령은 누적되므로, 격리 대화상자를 종료할 때까지 파트나 부품에 하나씩 사용하여 모든 파트나 부품을 격리할 수 있습니다. 파트나 부품을 여러 개 선택한 다음 Shift+i 명령을 선택할 수도 있습니다.
-
다른 항목 선택(`) 키(1 키 왼쪽에 있는 악센트 키)를 사용하여 추가 요소를 누적적으로 선택할 수도 있습니다.
-
전체 폴더 또는 파트나 부품 그룹을 격리하려면 파트나 부품 목록에서 폴더나 그룹을 마우스 오른쪽 버튼으로 클릭하고 격리를 선택합니다.
-
격리는 컨텍스트에서 모델링하고 단면도를 사용할 때도 사용할 수 있습니다.
-
대화상자를 종료하고 다시 입력하면투명 형상 선택 및투명도 슬라이더 설정이 기억됩니다.
-
투명 형상 선택이 체크된 경우, 투명도 슬라이더를 왼쪽이나 오른쪽으로 완전히 움직이면 자동으로 비활성화됩니다(체크 해제). 이후 슬라이더를 움직이면 자동으로 다시 활성화됩니다(체크).
-
x 아이콘을 통해격리 대화상자를 종료하는 대신, 다음 중 하나를 사용할 수 있습니다.
-
그래픽 영역에서 모델을 마우스 오른쪽 버튼으로 클릭하거나 파트/부품 목록을 마우스 오른쪽 버튼으로 클릭하고 컨텍스트 메뉴에서 격리 종료를 선택합니다.
-
Esc(이스케이프) 키를 클릭합니다
-
-
iOS 플랫폼에서는 확장: 거리만 사용할 수 있습니다. 해당 부분을 선택한 다음 두 손가락으로 탭하여 컨텍스트 메뉴를 엽니다. 그런 다음 격리를 선택합니다.