パブリケーション
![]()
![]()
![]()
のみ利用可能
パブリケーションを使用すると、リリース済みのパーツ、Part Studio、アセンブリ、図面、ファイルのコレクションを任意のドキュメントから作成し、Onshape アカウントを持つすべてのユーザーと共有できます。
パブリケーションはすべてのプランのユーザーと共有できます。
パブリケーションは、さまざまなドキュメントに由来するさまざまなパーツ、アセンブリ、図面、およびインポートしたファイルを 1 か所に集めた閲覧限定のパッケージです。このコレクションでは、特定のリビジョンやバージョンなど、必要なデータのみを共有できます。
[作成] をクリックして [パブリケーション] を選択します。パブリケーションに名前を付けます。必要に応じて、説明や必要なラベルを追加することで、整理され、見つけやすくなります。[作成] をクリックします。
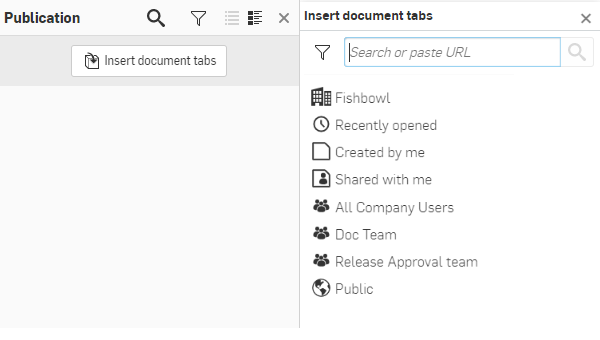
データを追加するには、[ドキュメントタブを挿入] をクリックします。リンクのアクセス許可がある任意のドキュメントから、Part Studio、アセンブリ、図面、またはファイルのタブを追加します。任意のチーム、ラベル、またはフィルターにアクセスして、挿入したいタブを含むドキュメントを見つけます。会社名をクリックしてフォルダ構造にアクセスします。フィルターアイコンをクリックして特定のタブの種類を指定するか、検索フィールドを使用して、名前、URL、または任意のプロパティによって、必要なタブを見つけます。
ドキュメントを見つけたら、必要なタブを選択して追加します。リンクされた他のドキュメントと同様に、挿入できるのはバージョンのみです。既定では、ドキュメントの最新バージョンが選択されます。以前のバージョンを選択するには、バージョングラフアイコンをクリックしてバージョンを選択します。次に、追加するタブを選択します。特定のリビジョンを選択するには、リビジョンアイコンをクリックしてオブジェクトを選択します。ダイアログには利用可能な最新のリビジョンが表示されます。該当するパーツ番号に別のリビジョンが必要な場合は、オブジェクトの横にあるリビジョンアイコンをクリックして、リビジョンを選択します。必要に応じて、引き続きパブリケーションにタブを追加します。完了したら、ダイアログを閉じます。
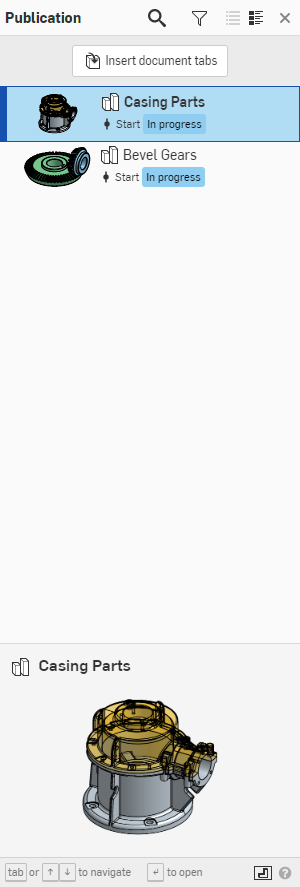
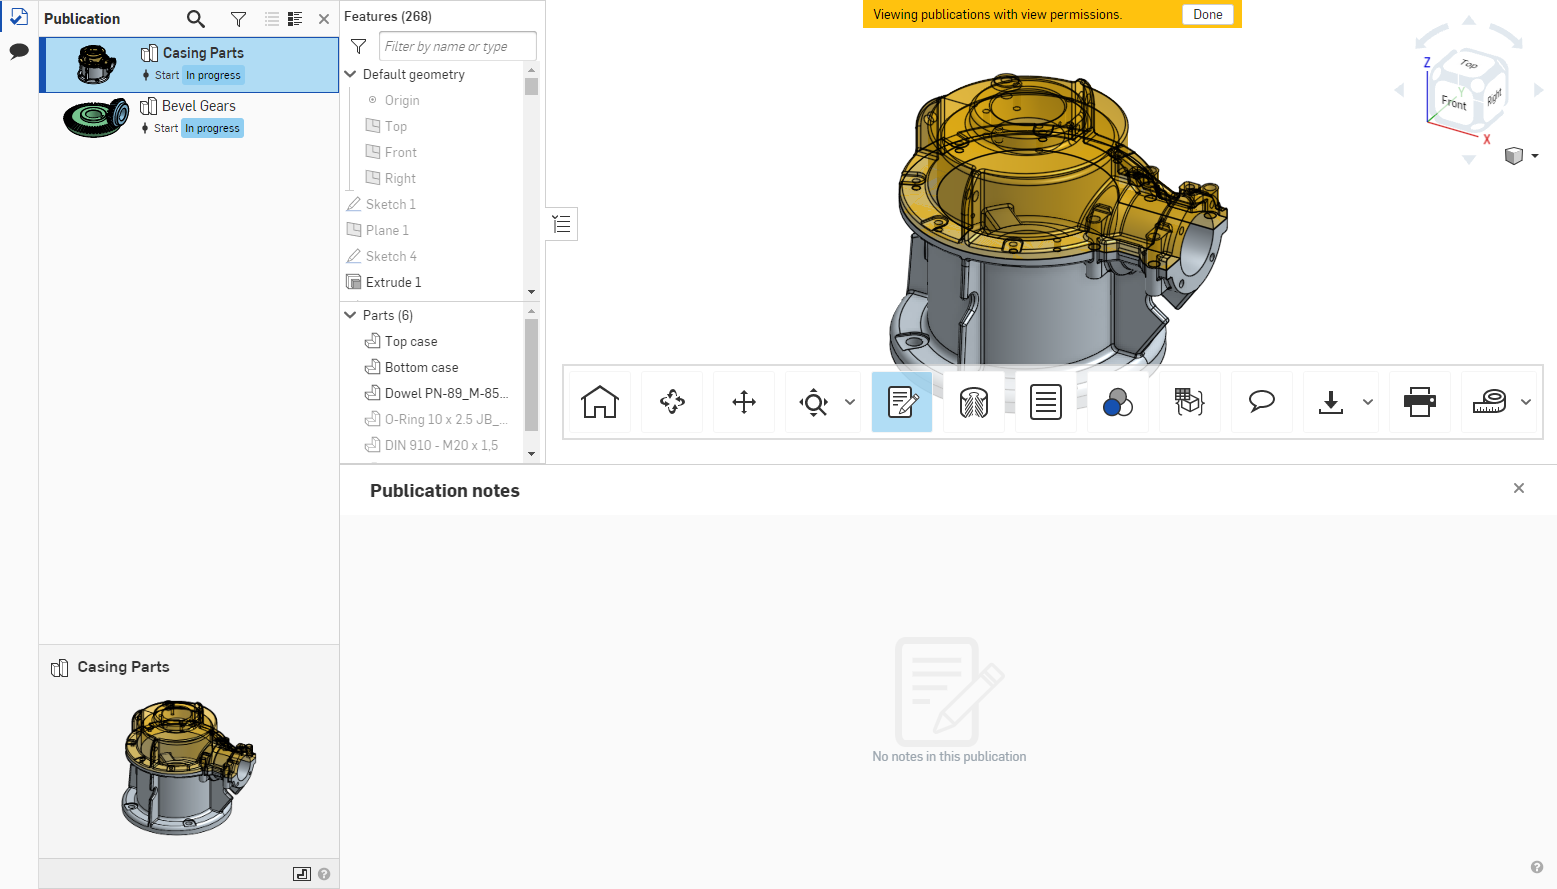
タブは左側にあります。ダブルクリックすると、メインのグラフィック領域に別のタブが表示されます。
参照されているバージョンまたはリビジョン、パーツ番号、リリース状態 (リリース管理を使用している場合) が表示されます。右クリックして [削除] を選択してタブを削除します。ビューを調整するには、リストビューまたは詳細ビューのオプションを選択します。フィルターと検索を使用すると、タブをすばやく見つけることができます。
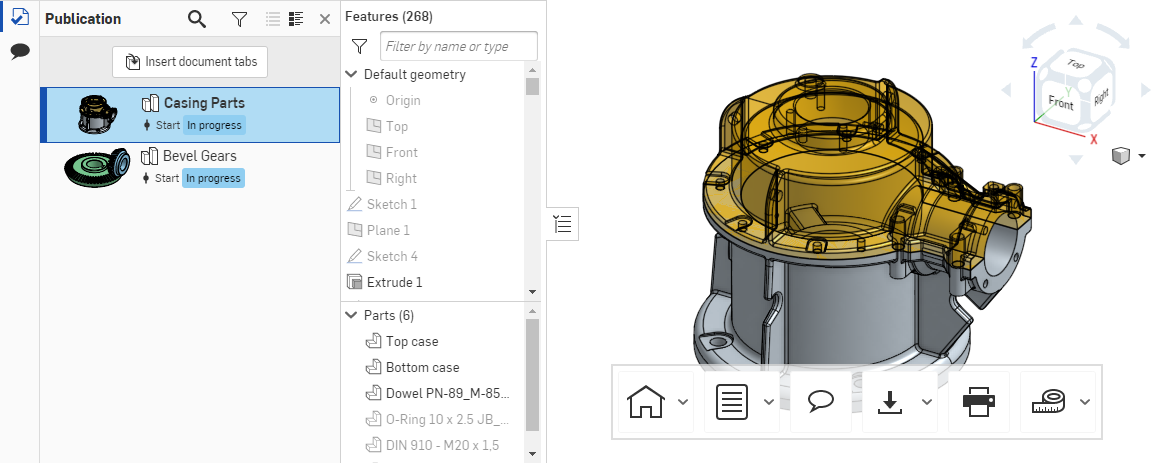
複数パーツの Part Studio に含まれるパーツのリビジョンを追加する場合、Onshape では、グラフィック領域で選択するパーツが強調表示され、フィーチャーリストで関連するフィーチャーが強調表示されます。
参照オブジェクトのいずれかに利用可能な新しいバージョンまたはリビジョンがある場合は、青い通知をクリックして更新します。
タブを並べ替えるには、タブをパブリケーションマネージャーにドラッグアンドドロップします。フォルダを使って整理します。パブリケーションタブを右クリックして、[選択項目をフォルダに追加] を選択します。フォルダに名前を付け、必要に応じてタブをフォルダにドラッグアンドドロップします。フォルダを削除するには、フォルダを右クリックして [展開] を選択します。
ドキュメントメニューをクリックし、[ビューアーとして表示] を選択します。これは、閲覧限定のユーザーがパブリケーションを表示したときに表示される内容を示します。閲覧限定のユーザーは、表示しているタブに基づいて、該当する情報を含む閲覧限定ツールバーにアクセスできます。たとえば、アセンブリには部品表があり、Part Studio には外観パネルがあります。このモードを終了するには、グラフィック領域の中央に表示される通知で [完了] をクリックします。
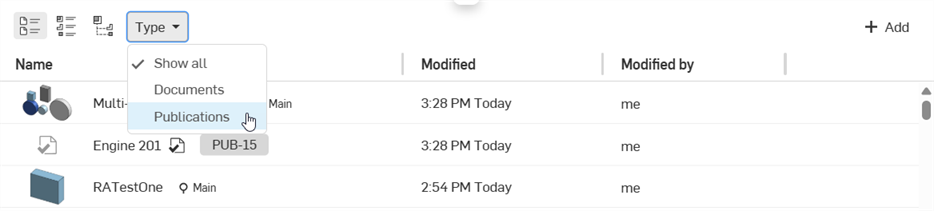
パブリケーションはドキュメントページからアクセスでき、タイプでフィルタリングできます。[パブリケーション] を選択するか、[すべてを表示] を選択すると、ドキュメントとパブリケーションの両方が表示されます。検索を使用して特定のパブリケーションを見つけます。
ドキュメントページから作成プロセスを開始します。
-
[作成] をクリックして、パブリケーションを選択します。
-
パブリケーションの名前と説明を入力し、必要なラベルを追加します。
-
[作成] をクリックします。
-
空のパブリケーションが開きます。
![[パブリケーション] ウィンドウ (空)](Resources/Images/publications/pub-window-empty.png)
パブリケーションを作成したら、他のドキュメントや異なるドキュメントからタブを追加したり、パブリケーションやその内容に関する注記を追加したりできます。
-
ウィンドウ左側のパブリケーションマネージャーペインで [ドキュメントタブを挿入] ボタンをクリックし、[ドキュメントタブを挿入] ダイアログを開きます。
パブリケーションマネージャーは、タブマネージャーのように機能します。
-
このパネルを使用して、タブを挿入するドキュメントを検索します。
-
ドキュメントの URL を検索するか、貼り付けます。
-
[最近開いたアイテム] や [作成したアイテム] など、いずれかの検索フィルターを選択します。
-
チームフィルターを選択します。
-
プロジェクトまたはフォルダのフィルターを選択します。
-
-
ドキュメントのリストを作成したら、1 つを選択します。
自分がアクセス許可を持つドキュメントだけから挿入できます。
-
ダイアログの上部にある [Part Studio]、[アセンブリ]、[ファイル]、または [図面] フィルターを使用してフィルタリングします。
-
パーツまたはタブのリストを作成したら、その中の 1 つを選択して挿入します。
-
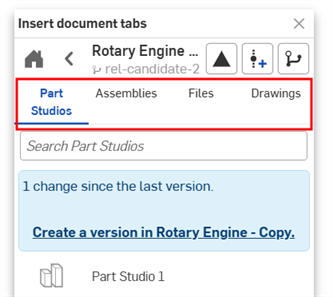
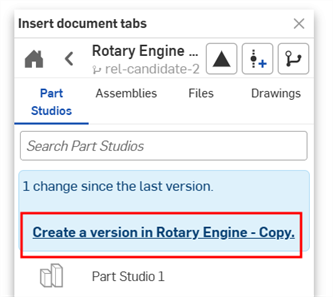
挿入する前に、タブのドキュメントをバージョン管理するか、タブを改訂する必要があります。
-
Part Studio の個々のパーツは、リリースに含まれている場合のみ挿入できます。ドキュメントのリリース済みアイテムを表示するには、リリース済みアイテムアイコン (
 ) をクリックします。これにより、Part Studio (右下) からリリースされた個々のパーツを挿入できます。
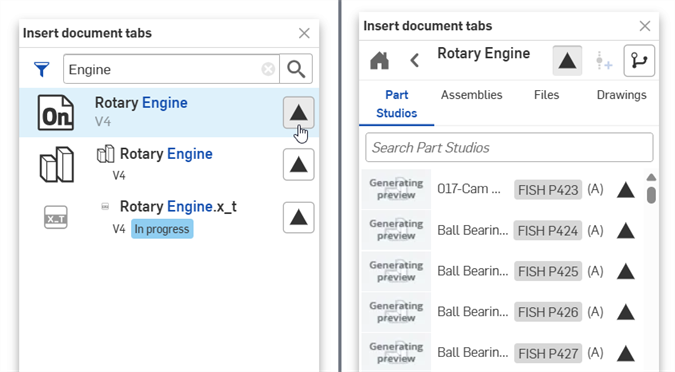
タブを挿入する前に、必要に応じて青色の [バージョンを作成] リンクを使用してバージョンを作成してください。
選択したタブがパブリケーションマネージャーにリストされ、マネージャーの下部にサムネイルが表示されます。
-
このダイアログでは、挿入したタブを複製できません。

タブを挿入すると、データ情報が含まれ、モデルがパブリケーションのグラフィック領域に表示されます。パーツの場合、情報にはフィーチャーリストとパーツリストが含まれます。
パブリケーションは完全に閲覧限定なので、すべてのタブが閲覧限定モードに含まれています。つまり、パブリケーション内のデータは読み取り専用であり、変更はできません (バージョン管理された要素と改訂された要素は常に閲覧限定です)。名前、説明、その他のメタデータなどのパブリケーションの詳細はすべて、アクセス許可を持つユーザーが編集できます。
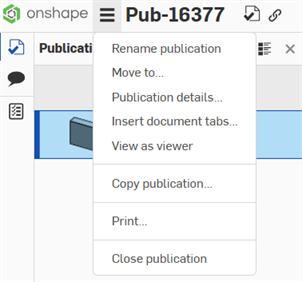
出パブリケーション名の左にあるハンバーガーメニューには、以下のコマンドが含まれています。
-
パブリケーション名を変更 - パブリケーションの名前を変更します。
-
移動する - パブリケーションを異なる場所 (フォルダやプロジェクトなど) に移動します。
-
パブリケーションの詳細 - パブリケーションの詳細ダイアログを開きます。
-
説明 - パブリケーションコンテンツの概要。
-
パブリケーションのエクスポートルールを強制する - オンにすると、未登録のパブリケーションユーザーとパブリケーションを共有またはリンクした際に、エクスポートルール (存在する場合) が適用されます。
パブリケーションがユーザー所有の場合は、[マイアカウント] > [環境設定] > [ユーザーエクスポートルール] のエクスポートルールが適用されます。パブリケーションが Company (Professional サブスクリプション) または Enterprise (Enterprise サブスクリプション) が所有している場合は、[Company/Enterprise 設定] > [環境設定] > [Company/Enterprise 全体のエクスポートルール] にあるエクスポートルールが適用されます。
-
-
ドキュメントタブを挿入する - ドキュメントタブをさらに挿入します。
-
ビューアーとして表示 - パブリケーションの共有を受けた人が見るビューを表示します。
-
パブリケーションのコピー - アクティブなワークスペースを新しいパブリケーションにコピーします。
-
印刷 - パブリケーションのビューを印刷します。
-
パブリケーションを閉じる - パブリケーションを閉じてドキュメントページに戻ります。
パブリケーションを編集する権限を持つユーザーは、パブリケーションにタブを追加したり、パブリケーションからタブを削除したりできます。タブ内のパラメトリックデータは編集できません。
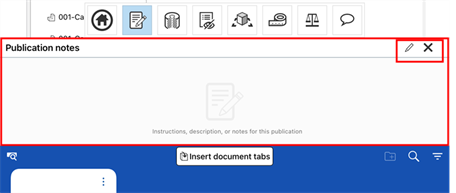
パブリケーションを作成すると、ウィンドウの下半分に空の [パブリケーションの注記] セクションが表示されます。
![[パブリケーションの注記] セクション (空)](Resources/Images/publications/notes-window.png)
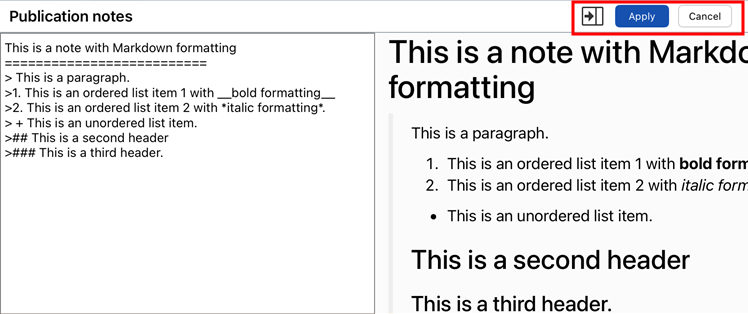
編集を有効にするには、ウィンドウの右側にある小さな鉛筆アイコンをクリックします。注記ボックスに入力を開始できます。注記を作成するときは、Markdown を使用して書式を設定できます。注記をプレビューして Markdown の書式を確認するには、プレビューアイコンをクリックします (編集を開始する前に、鉛筆アイコンが表示されていた場所に表示されます)。
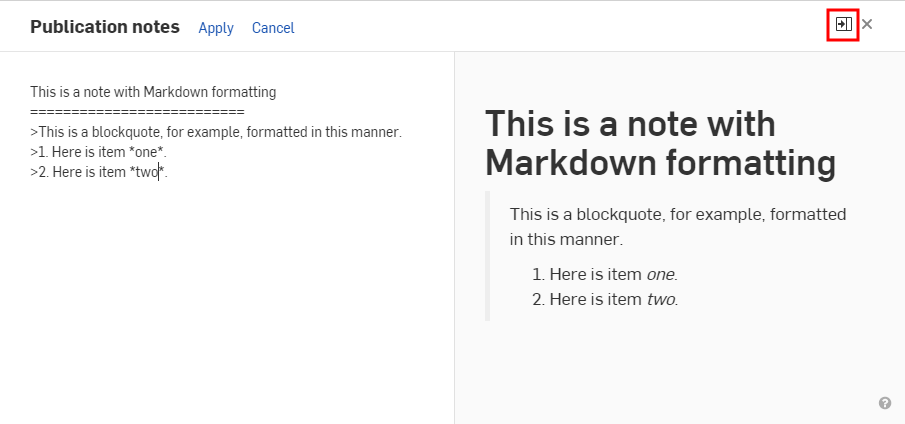
注記の作成または編集が終了したら、[適用] をクリックして変更を保存するか、[キャンセル] をクリックして変更を保存せずに編集モードを終了します。
[注記を更新] アイコン (![]() ) をクリックすると、最新のパブリケーションの注記が表示されます。
) をクリックすると、最新のパブリケーションの注記が表示されます。
注記に使用可能な Markdown
注記の領域では、従来の Markdown による書式設定が可能です。以下にいくつかの例を示します。
-
見出し 1 の形式は次のとおりです。
                Heading 1

============ -
見出し 2 の形式は次のとおりです。
                Heading 2

-------------- -
# This is also a heading 1 -
## This is a heading 2 -
###### This is a heading 6 -
# This is also a heading 1# -
## This is also a heading 2## -
### This is also a heading 3### -
ブロック引用符を使用する段落は次のようになります。
-
> This is a blockquote with two paragraphs. You can format it this way,> and it will display appropriately.> Markdown is very versatile.>> This is the second paragraph within a blockquote.> Markdown is very versatile. -
> This is a also blockquote with two paragraphs. Showing another wayto format with Markdown.> Another section would appear here.
-
-
ブロック引用符には、ヘッダー、リスト、コードブロックなど、他の Markdown 要素を含めることができます。
> ## This is a header.>> 1. This is the first list item.> 2. This is the second list item.>> Here's some example code:>> return shell_exec("echo $input | $markdown_script"); -
Markdown は、順序付き (番号付き) リストと順序なし (箇条書き) リストをサポートしています。
-
順序なしのリストでは、アスタリスク、プラス、ハイフンを同じ意味でリストマーカーとして使用します。
* Red* Green* Blue以下と同等
+ Red+ Green+ Blueおよび:
- Red- Green- Blue -
番号付きリストでは、数字の後にピリオドが続きます。
1. First priority2. Second priority3. Third priority
パブリケーションは、ドキュメントページの下パーツの「ドキュメントとパブリケーション」セクションに一覧表示されます。
種類のフィルターを使用して [パブリケーション] をクリックすると、このリスト内のパブリケーションのみが表示されます。
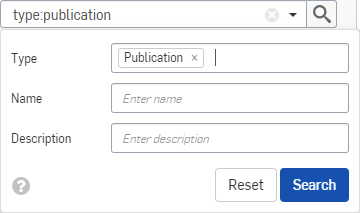
検索バーに示されているように、パブリケーションページの上部にある検索バーを使用して、アクティブなフィルター内のドキュメントを検索します。
![]()
検索ボックスを使用してパブリケーションを検索すると、現在選択しているフィルタ内で検索が行われます。
検索バーの下向き矢印を使用して高度な検索メニューをアクティブにし、パブリケーションの種類を選択します。
パブリケーションの共有は閲覧限定レベルです。個人やチームに共有したり、メールアドレスを使用してゲストユーザーを企業に招待したり、パブリケーションを共有するためのリンクを作成したりできます。その他すべての共有オプションが適用されます。
ゲストユーザーは、明示的に共有された情報のみを表示できます。共有するリンクを作成すると、そのリンクを知っている人なら誰でもパブリケーションを開けます。
パブリケーションを共有ユーザーと同じように表示するには、パブリケーションのハンバーガーメニューから [ビューアーとして表示] を選択します。
選択すると、共有ユーザーがパブリケーションを開いたときと同じようにパブリケーションインターフェイスが表示されます。
パブリケーションのプレビューが完了したら、ウィンドウの上部にある金色のリボンにある「完了」ボタンをクリックします。
閲覧専用ツールバーは、パブリケーションを共有しているすべてのユーザーに表示されます。パブリケーションを共有するユーザーの権限に関係なく、どのタブ上のデータも変更または編集することはできません。
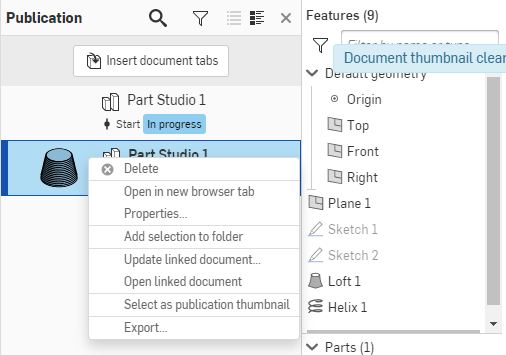
パブリケーション内からパブリケーションのサムネイルを変更します。左側のペインには、挿入したドキュメントタブが一覧表示されます。
-
パブリケーションにサムネイルを使用したいタブの名前を右クリックして、コンテキストメニューを開きます。
-
[パブリケーションのサムネイルとして選択] をクリックします。
各タブのコンテキストメニューもアクセス許可に応じて変わります。ドキュメントページのパブリケーションを右クリックすると、コンテキストメニューが開きます。
ドキュメントページのパブリケーションのコンテキストメニューには、次のコマンドが含まれます。
-
開く - パブリケーションを開きます。
-
新しいブラウザタブで開く - ブラウザタブでパブリケーションを開きます。
-
パブリケーション名を変更 - 名前を編集するパブリケーションを開きます。
-
パブリケーションのコピー - アクティブなワークスペースを新しいパブリケーションにコピーします。
-
詳細 - パブリケーションの [詳細] パネル (ウィンドウの右側) を開きます。
-
ラベル - ドキュメントにラベルを作成または追加します。
-
共有 - パブリケーションの共有ダイアログを開きます。
-
共有解除 - パブリケーションの表示許可を削除します。
-
移動する - パブリケーションを Onshape 内の別の場所 (フォルダやプロジェクトなど) に移動します。
-
所有権の引き継ぎ - パブリケーションの所有権を別のユーザーに引き継ぎます。
-
ごみ箱に送る - パブリケーションをごみ箱に移動します。
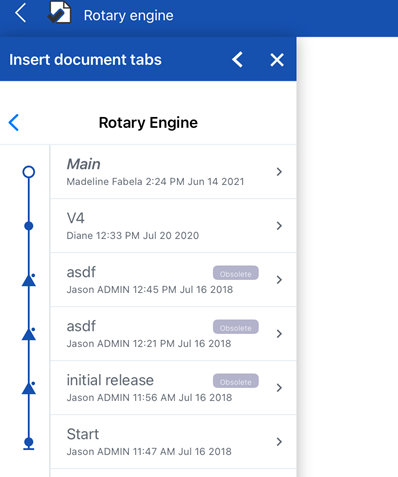
iOS でのパブリケーションのサポートは、デスクトップ (ブラウザ) プラットフォームと似ています。タブやメモを作成、編集、共有、検索して、パブリケーションに挿入できます。
ドキュメントページから作成プロセスを開始します。
-
右下隅のプラスボタン (
 ) をタップし、[パブリケーション] を選択します。
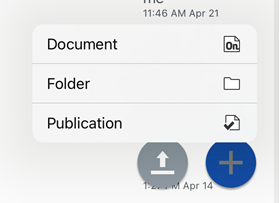
-
[パブリケーション名]、[パブリケーションの説明]、[パブリケーションの場所] を入力し、[作成] ボタンをタップします。
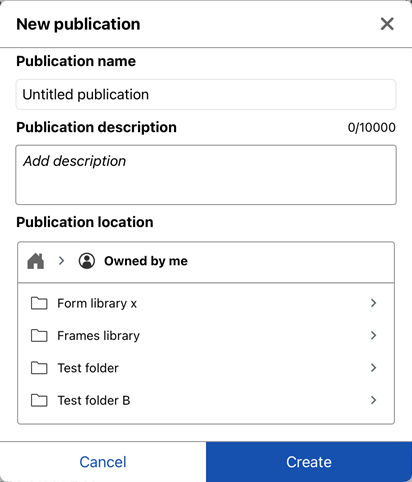
空のパブリケーションが開きます。
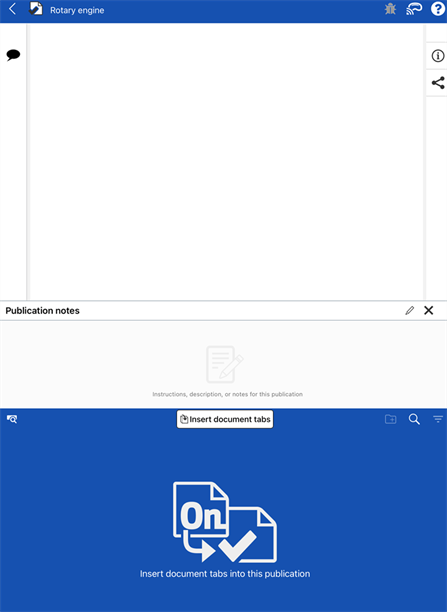
パブリケーションを作成したら、他のドキュメントや異なるドキュメントからタブを追加したり、パブリケーションやその内容に関する注記を追加したりできます。
-
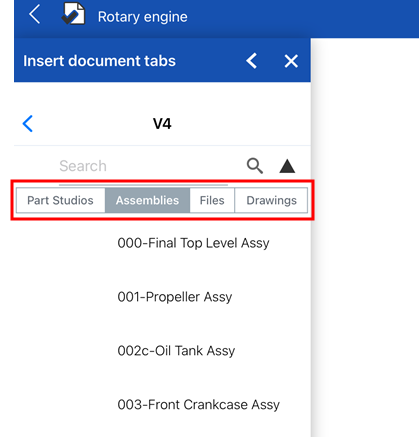
パブリケーションマネージャー (画面の下の青いパネル) の [ドキュメントタブを挿入] タブをタップします。[ドキュメントタブを挿入] ダイアログが開きます。
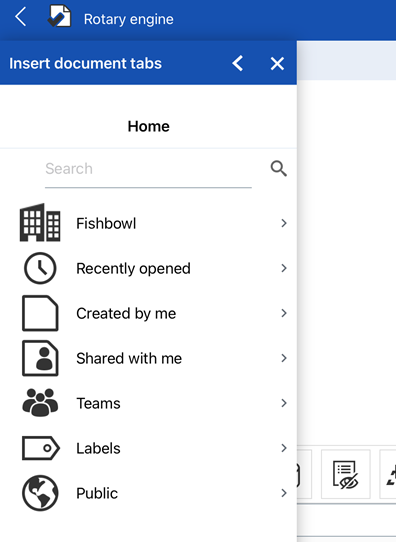
-
このダイアログを使用して、タブを挿入したいドキュメントを検索します。
-
ドキュメントの URL を検索するか、貼り付けます。
-
[最近開いたアイテム] や [作成したアイテム] など、いずれかの検索フィルターを選択します。
-
チームフィルターを選択します。
-
プロジェクトまたはフォルダのフィルターを選択します。
-
-
ドキュメントのリストを作成したら、1 つを選択します。
自分がアクセス許可を持つドキュメントだけから挿入できます。
-
ドキュメントバージョンをタップして選択します。
-
ダイアログの上部にある [Part Studio]、[アセンブリ]、[ファイル]、または [図面] フィルターを使用してフィルタリングします。
-
パーツまたはタブのリストを作成したら、その中の 1 つをタップして挿入します。
Part Studio の個々のパーツは、リリースに含まれている場合のみ挿入できます。ドキュメントのリリース済みアイテムを表示するには、リリース済みアイテムアイコン (
) をタップします。これにより、Part Studio からリリースされた個々のパーツを挿入できます。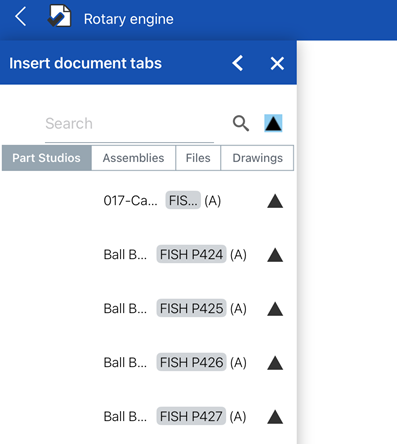
-
挿入したタブとその情報がパブリケーションに表示されます。Part Studio とアセンブリの場合、これにはそれぞれ [パーツ] リストと [インスタンス] リスト、およびグラフィックス領域のモデル (両方とも画面上部) が含まれます。パブリケーションマネージャー (画面下部) にはドキュメントタブのサムネイルで、
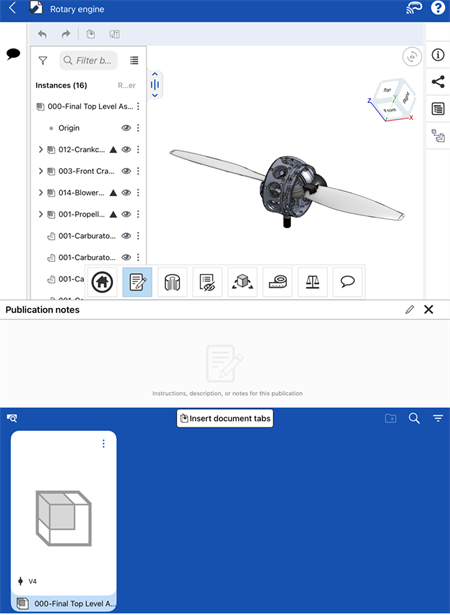
挿入したアセンブリが表示されます。グラフィック領域 (上) にインスタンスリストが表示され、パブリケーションマネージャ (下) にアセンブリサムネイルが表示されます。
ドキュメントタブを挿入ダイアログでは、挿入したタブを複製できません。
パブリケーションは完全に閲覧限定なので、すべてのタブが閲覧限定モードに含まれています。つまり、パブリケーション内のデータは読み取り専用であり、変更はできません (バージョン管理された要素と改訂された要素は常に閲覧限定です)。名前、説明、その他のメタデータなどのパブリケーションの詳細はすべて、アクセス許可を持つユーザーが編集できます。
パブリケーションを作成すると、ウィンドウの下半分に空の [パブリケーションの注記] セクションが表示されます。
編集を有効にするには、ウィンドウの右上にある小さな鉛筆アイコン (![]() ) をタップします。注記ボックスに入力を開始します。注記を作成するときは、Markdown を使用してフォーマットできます。注記をプレビューして Markdown の形式を確認するには、プレビューアイコン (
) をタップします。注記ボックスに入力を開始します。注記を作成するときは、Markdown を使用してフォーマットできます。注記をプレビューして Markdown の形式を確認するには、プレビューアイコン (![]() ) をクリックします。このアイコンはプレビューのオン/オフを切り替えます。
) をクリックします。このアイコンはプレビューのオン/オフを切り替えます。
注記の作成または編集が終了したら、[適用] をタップして変更を保存するか、[キャンセル] をタップして変更を保存せずに編集モードを終了します。
Android でのパブリケーションのサポートは、デスクトップ (ブラウザ) プラットフォームと似ています。タブや注記を作成、編集、共有、検索し、パブリケーションに挿入できます。
ドキュメントページで作成プロセスを開始します。
-
右下隅のプラスボタン (
) をタップし、[パブリケーション] を選択します。 -
[パブリケーション名]、[パブリケーションの説明]、[パブリケーションの場所] を入力し、[作成] ボタンをタップします。
空のパブリケーションが開きます。
パブリケーションを作成したら、他のドキュメントや異なるドキュメントからタブを追加したり、パブリケーションやその内容に関する注記を追加したりできます。
-
パブリケーションマネージャー (画面の下の青いパネル) の [ドキュメントタブを挿入] タブをタップします。[ドキュメントタブを挿入] ダイアログが開きます。
-
このダイアログを使用して、タブを挿入するドキュメントを検索します。
-
ドキュメントの URL を検索するか、貼り付けます。
-
[最近開いたアイテム] や [作成したアイテム] など、いずれかの検索フィルターを選択します。
-
チームフィルターを選択します。
-
プロジェクトまたはフォルダのフィルターを選択します。
-
-
ドキュメントのリストを作成したら、1 つを選択します。
自分がアクセス許可を持つドキュメントだけから挿入できます。
-
ドキュメントバージョンをタップして選択します。
-
ダイアログの上部にある [Part Studio]、[アセンブリ]、[ファイル]、または [図面] フィルターを使用してフィルタリングします。
-
パーツまたはタブのリストを作成したら、その中の 1 つをタップして挿入します。
Part Studio の個々のパーツは、リリースに含まれている場合のみ挿入できます。ドキュメントのリリース済みアイテムを表示するには、リリース済みアイテムアイコン (
) をタップします。これにより、Part Studio からリリースされた個々のパーツを挿入できます。 -
挿入したタブとその情報がパブリケーションに表示されます。Part Studio とアセンブリの場合、これにはそれぞれ [パーツ] リストと [インスタンス] リスト、およびグラフィックス領域のモデル (両方とも画面上部) が含まれます。ドキュメントタブのサムネイルはパブリケーションマネージャー (画面下部) に表示されます。
ドキュメントタブを挿入ダイアログでは、挿入したタブを複製できません。
パブリケーションは完全に閲覧限定なので、すべてのタブが閲覧限定モードに含まれています。つまり、パブリケーション内のデータは読み取り専用であり、変更はできません (バージョン管理された要素と改訂された要素は常に閲覧限定です)。名前、説明、その他のメタデータなどのパブリケーションの詳細はすべて、アクセス許可を持つユーザーが編集できます。
パブリケーションを作成すると、ウィンドウの中央に空の [パブリケーションの注記] セクションが表示されます。
編集を有効にするには、ウィンドウの右上にある小さな鉛筆アイコン (![]() ) をタップします。注記ボックスに入力を開始します。注記を作成するときは、Markdown を使用してフォーマットできます。注記をプレビューして Markdown の形式を確認するには、プレビューアイコン (
) をタップします。注記ボックスに入力を開始します。注記を作成するときは、Markdown を使用してフォーマットできます。注記をプレビューして Markdown の形式を確認するには、プレビューアイコン (![]() ) をクリックします。このアイコンはプレビューのオン/オフを切り替えます。
) をクリックします。このアイコンはプレビューのオン/オフを切り替えます。
注記の作成または編集が終了したら、[適用] をタップして変更を保存するか、[キャンセル] をタップして変更を保存せずに編集モードを終了します。