![]()
![]()
![]()
Acceso directo: Mayús+i
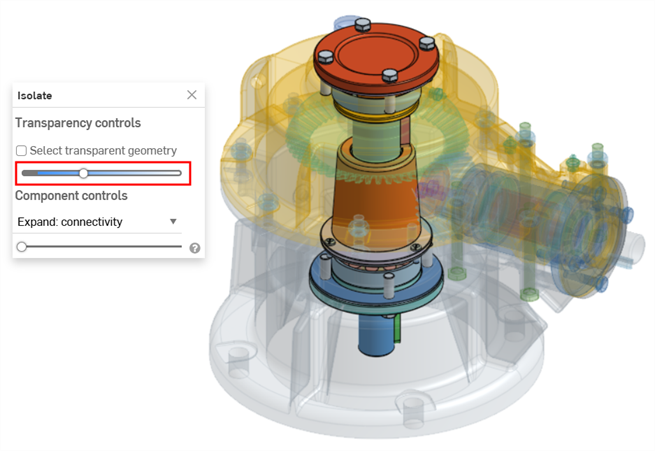
Aislar mantiene opacas todas las entidades de Part Studio o Ensamblaje seleccionadas y hace que otras entidades sean transparentes. Las opciones incluyen visualizar la geometría interna transparente para que pueda seleccionarse, medirse, analizarse y editarse, y ampliar la selección aislada en función de la conectividad o la proximidad física.
Aislar se usa para lo siguiente:
-
Para mejorar la visibilidad de las entidades en Part Studios y Ensamblajes grandes.
-
Para visualizar y realizar tareas sobre la geometría (por ejemplo, puntos, aristas, caras, conectores de relación) que están ocluidos por otra geometría.
-
Como alternativa a los comandos Ocultar/mostrar, en los que buscar y ocultar o mostrar entidades para acceder a la geometría relevante del modelo resulta difícil o tedioso.
El comando Aislar es el inverso del comando Hacer transparente.
Los comandos Aislar y Hacer transparente son inversos.
La opción Hacer transparente hace que los elementos seleccionados de un Part Studio o ensamblaje se vuelvan transparentes, mientras que el resto de elementos se mantienen opacos. Por otro lado, Aislar mantiene los elementos seleccionados opacos y hace que el resto de elementos se vuelvan transparentes.
Ambos comandos mejoran la visibilidad de los elementos en Part Studios y ensamblajes de gran tamaño y ayudan a visualizar los elementos ocluidos por otras geometrías.
Para hacer que uno o más elementos sean opacos o transparentes, haga selecciones en la lista de piezas del Part Studio, en la Lista de instancias del ensamblaje o en el área gráfica y, luego, haga clic derecho y seleccione Aislar o Hacer transparente en el menú contextual. También puede colocar el cursor sobre un elemento y presiona Mayús+I para aislarlo o Mayús+T para hacerlo transparente. Coloque el cursor sobre los elementos y utilice las mismas teclas de acceso directo para agregar elementos de forma acumulativa.
Marque la opción Seleccionar geometría transparente para seleccionar, medir, analizar y editar la geometría transparente en el área gráfica.
Utilice el control deslizante Mostrar u ocultar la geometría interna para ajustar la transparencia.
Tanto en Aislar como en Hacer transparente, el control deslizante controla la visibilidad de las aristas exteriores y la geometría interna de la transparencia. Cuando el control deslizante está completamente a la izquierda, las aristas exteriores permanecen visibles, mientras que la geometría interna es completamente transparente. A medida que el control deslizante se mueve hacia la derecha, la geometría interna se hace visible. A medida que el control deslizante se mueve más a la derecha, la geometría interna y las aristas de selección externas se difuminan hasta que ambas se vuelven totalmente invisibles.
Use los controles de componentes para expandir por distancia o conectividad. Cuando expande por distancia y mueve el control deslizante hacia la derecha, Aislar hace que cada pieza sucesiva sea opaca, mientras que Hacer transparente ajusta la transparencia en función de la proximidad a la selección original. Cuando expande por conectividad, si mueve el control deslizante hacia la derecha, cada pieza sucesiva se vuelve transparente u opaca en función de la proximidad a sus conexiones de relación con respecto a la selección original. La expansión por conectividad solo está disponible en los ensamblajes.
Cierre el cuadro diálogo o presione Escape para salir.
Los ajuses del control deslizante Seleccionar geometría transparente y transparencia se mantienen por más que cierre y vuelva a abrir el cuadro de diálogo, además de entre las sesiones de documentos.
Aislar está disponible como comando del menú contextual de la Lista de piezas (en un Part Studio), en la Lista de instancias (en un Ensamblaje) o en el área gráfica de un Part Studio o Ensamblaje cuando se hace clic derecho en una selección de modelos.
En un Part Studio o un Ensamblaje, haga lo siguiente:
-
Seleccione las entidades que quiera aislar de la Lista de piezas o instancias o del área gráfica. Pueden ser piezas o instancias, puntos, aristas, caras, conectores de relación, carpetas o grupos.
-
Haga clic derecho en la lista o la selección de modelos y seleccione Aislar en el menú contextual. Se abrirá el cuadro de diálogo Aislar:

-
Configure el control deslizante de transparencia (en Controles de transparencia):
-
Si se establece en el extremo izquierdo, solo se muestran las aristas exteriores de la geometría transparente. No se muestra la geometría interna de la selección (se muestra arriba).
-
Si se sitúa en el extremo derecho, la geometría transparente es completamente transparente.
-
Situada en cualquier punto entre los dos lados, se muestra la geometría interna de la geometría transparente (que se muestra a continuación). Cuando se mueve el control deslizante hacia la derecha, la transparencia aumenta, lo que hace que la geometría transparente sea menos opaca. Cuando se mueve el control deslizante hacia la izquierda, la transparencia disminuye, lo que hace que la geometría transparente sea más opaca.
-
-
Con la opción Seleccionar geometría transparente activada, puede seleccionar, medir, analizar y editar la geometría transparente, como piezas o instancias, puntos, aristas, caras y conectores de relación en el área gráfica (se muestra a continuación). Si la opción no está activada, solo se puede seleccionar, medir, analizar y editar la geometría que no sea transparente.

Si la opción Seleccionar geometría transparente está activada, también se pueden seleccionar piezas o instancias transparentes, carpetas, conectores de relación y grupos de la Lista de piezas o instancias.
-
Utilice los Controles de componentes para seleccionar una de estas opciones:
-
Expandir: distancia: utilice el control deslizante para aislar cada pieza o instancia sucesiva en función de su proximidad física a las piezas o instancias seleccionadas. Mover el control deslizante hacia la derecha hace que más piezas o instancias dejan de ser transparentes (opacas).
-
Expandir: conectividad (solo en Ensamblajes): utilice el control deslizante para aislar cada instancia sucesiva en función de su conectividad de relación. Mover el control deslizante hacia la derecha hace que más instancias dejen de ser transparentes (opacas).
-
-
Haga clic en el ícono de la x del cuadro de diálogo para cerrarlo y devolver todas las piezas a su estado visible. Tras salir, se conservarán las selecciones realizadas en el cuadro de diálogo Aislar.
En el siguiente ejemplo, se selecciona la instancia de cubierta superior de un ensamblaje de engranajes y válvulas y se selecciona Aislar en el menú contextual:

El control deslizante Expandir: distancia se usa para aislar las instancias sucesivamente en función de su proximidad a la instancia de la cubierta seleccionada:

El control deslizante Expandir: conectividad se usa para aislar instancias en función de las conexiones de relación sucesivas de la instancia de la cubierta:

-
Utilice la tecla de acceso directo Mayús + i para aislar piezas o instancias que estén debajo del cursor. Este comando es acumulativo; puede usarlo pieza tras pieza o instancia tras instancia para aislarlas todas hasta que salga del cuadro de diálogo Aislar. También puede seleccionar varias piezas o instancias y, luego, usar el comando Mayús + i.
-
La tecla Seleccionar otro (`) (tecla de acento grave, a la izquierda de la tecla «1») también se puede usar para seleccionar entidades adicionales de forma acumulativa.
-
Para aislar una carpeta completa o un grupo de piezas o instancias, haga clic derecho en la carpeta o el grupo de la Lista de piezas o instancias y seleccione Aislar.
-
Aislar también está disponible cuando se modela en contexto y se utiliza la vista Sección.
-
Los ajustes de Seleccionar geometría transparente y del control deslizante Transparencia se conservan si cierra el cuadro de diálogo y vuelve a abrirloentrar.
-
Si la opción Seleccionar geometría transparente está activada, cuando mueva el control deslizante de transparencia completamente a la izquierda o a la derecha, se desactivará automáticamente (queda desmarcada). Posteriormente, cuando mueva el control deslizante, se volverá a activar automáticamente (queda marcada).
-
Como alternativa para salir del cuadro de diálogo Aislar mediante el ícono de la x, puede hacer lo siguiente:
-
Haga clic derecho en el modelo ubicado en el área gráfica o haga clic derecho en la Lista de piezas o instancias y seleccione Salir de aislar en el menú contextual.
-
Haga clic en la tecla Esc (escape).
-
-
En plataformas iOS, solo Expandir: distancia está disponible. Seleccione la pieza y, luego, pulse con dos dedos para abrir el menú contextual. A continuación, seleccione Aislar.