Standard Content
![]()
![]()
![]()
Onshape standard content is content created by Onshape, kept in a database in Onshape, and maintained by Onshape. Users can insert Standard content in their Assemblies. There is never any risk of this content disappearing or not working from one release to another. We have integrated time-saving process in this workflow to simplify the insertion of standard content.
Supported standard content includes:
- ANSI - Bolts and screws, nuts, and washers
- DIN - Bolts and screws, nuts, washers, and shaft keys
- ISO - Bolts and screws, nuts, and washers
- PEM ® - from PennEngineering® including their Unified category of self-clinching nuts
Standard content is identified in the Assembly list with this icon:
![]()
Shift+Insert, Alt+Insert
Select standard content directly from the filter provided in the Insert parts and assemblies dialog in an Onshape Assembly.
Standard content is an Onshape database of fasteners available to insert into an assembly.
Click Insert and select the Standard content tab. Filter through the available hardware by selecting the Standard, Category, Class, and Component.
Use the Auto-size fastener button to have Onshape calculate the best size based on a selected circular edge or cylindrical face. The Size updates to the best calculated measurement.
When using it for bolts and screws, the calculation rounds down to ensure there is no interference. When using it for a nut size, a bolt shaft selection results in Onshape rounding up, ensuring the nut fits without interference.
Fastener options are tailored based on the selections.
Optionally, for those with adequate permissions, enter a Part number and Description. This defines the properties for the standard part. This is done once for each unique component and is set for the entire company or enterprise.
A preview is displayed at the bottom of the dialog to ensure the correct part is inserted.
Place fasteners individually by first clicking Insert, then hover over the hole and select a mate connector for placement. Use the A key to flip the orientation of the fastener being inserted. This creates a fastened mate to define the placement and degrees of freedom of the fastener.
Place multiple fasteners at once by making the selections first, and then click Insert. These selections can include any combination of hole faces, hole edges, and faces that contain holes.
Insert automatically places the fastener next to the selected geometry.
When inserting subsequent standard content, use Insert closest to selection and Insert furthest from selection to automatically place it in the stack of fasteners mated to the selected geometry.
The fasteners are now listed in the instances list with their own Standard content icon.
Edit all standard content of the same Standard, Category, Class, and Component at once by right-clicking a fastener in the list and selecting either Select instances with the same configuration or Select instances with the same part and same configuration.
Right-click again and select Edit standard content instance. Here, options such as Size and Length can be changed, but not the Standard, Category, Class, or Component. Update to apply the changes and then accept.
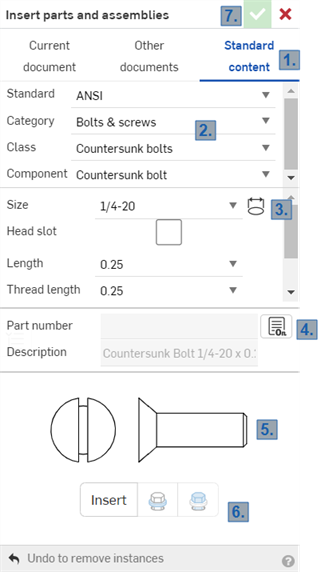
- Click the Standard content filter on the Insert parts and assemblies dialog.
- Select the specifics about the content you want to insert: Standard, Category, Class, and Component.
- Select
 (the auto-size icon) and then a hole on the model to automatically select the proper size in the dialog.
Or, select the size manually from the dropdown.
If there is no standard part that matches the size of the hole selected, a message is displayed:

- Depending on your subscription, you can edit the Standard content as follows:
- For Enterprise and Professional subscriptions, the part number and description, if present in the system, are automatically supplied. If you wish, click the Open metadata properties for this configuration icon (
 ) to open the Properties dialog where you can enter metadata information for the standard content part. Metadata properties are shared company-wide if you are part of a company, or limited to your user account if you are not part of a company.
Once the standard content is inserted into an Assembly, you can access its properties by right-clicking on the instance in the Instance list and selecting Properties from the context menu.
All Professional and Enterprise Administrators can edit standard content metadata. Enterprise Administrators can also grant other users and teams access to edit standard content metadata under Enterprise settings > Global permissions. See Understanding global permissions for more information.
For all other subscriptions (Free, Standard, EDU), the part number and description, if present in the system, are automatically supplied. If you wish, click the Edit icon (
 ) to make the Part number and Description fields editable. Enter a part number and description for the standard content part. The following message displays:
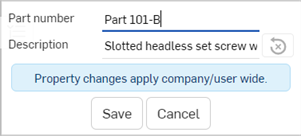
Click Save.
Click the Reset metadata icon (
 )to reset the Description to its default.
In both cases, a preview of the selected part is shown.
- For Enterprise and Professional subscriptions, the part number and description, if present in the system, are automatically supplied. If you wish, click the Open metadata properties for this configuration icon (
- Click
Insert
to automatically insert the part if a planar or cylindrical face or an edge is already selected. If no selection is made, the part appears at your mouse location: drag it to the preferred location and click to snap to a Mate connector (implicit or explicit).
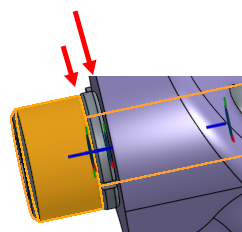
Use the Insert closest to selection and Insert furthest from selection icons when inserting subsequent standard content to automatically place the content in the stack of content mated to the selected part. To flip the orientation of the part being inserted, press the 'a' key on your keyboard.
In the example below, Insert closest to selection will insert at the shorter (leftmost) arrow and Insert furthest from selection will insert at the longer (rightmost) arrow:
-
Click the checkmark (
 ) on the dialog to save your actions and create instances of the standard content in the assembly and list it in the Instances lists (along with the Mate connector, implicit or explicit).
When inserting, Onshape has the ability to detect a mated bolt or screw, and if a washer is selected for insertion into the same hole, Onshape places and fastens the washer at the bottom of the bolt or screw head.
Bolts have only one reference point available (called a mate). Washers and nuts have two mates available, so they are able to be stacked and you have the ability to insert at the closest or furthest from selection. When inserting a second washer, for example, if you select Closest to selection (or use Alt+Insert) the washer is fastened to the top of the selected washer, against the bolt head. If you select Furthest from selection (or use Shift+Insert) the washer is fastened to the bottom of the selected washer, against the part.
Pre-selection, or the lack thereof, impacts the insert process for standard content. In the absence of selection (on the model), clicking Insert initiates drag mode. The standard content appears at your mouse cursor and you drag it to the desired location, mate references will appear, and click to place the part.
To facilitate the insertion process, you have the ability to pre-select individual holes (their circular edge or cylindrical face) to place standard content specifically. Make your selection prior to clicking the Insert button on the dialog.
You also have the ability to pre-select a planar face. In this case, upon clicking the Insert button, the standard content is fastened to all holes on the selected faces, whether the size of the selected standard content is appropriate or not.
If the holes you select have been created with the Onshape Hole feature, the inserted standard content with find the 'fine' or 'coarse' thread definition of the feature and apply it. If the hole was not created through the Hole feature, Onshape defaults to 'coarse'.
There may be times when you want to edit a particular instance of standard content in an assembly:
- Right-mouse click on the part in the assembly or the instance in the Instance list.
- Select Edit standard content instance from the menu.
- The Edit standard content dialog opens and you are able to change whichever characteristics you wish; you may want to change the material or the length, for example.
- Depending on your subscription, do the following:
For Enterprise and Professional subscriptions, you can edit metadata content for the standard content instance:
Click the Open metadata properties for this configuration icon (
 ) to open the Properties dialog
Enter metadata information for the standard content part. Metadata properties are shared company-wide if you are part of a company, or limited to your user account if you are not part of a company.
Click Save. The dialog closes.
Beneath the preview of the selected instance, click Update.
- For all other subscriptions (Free, Standard, EDU), you can edit the part number and description of the instance:
-
Click the Edit icon (
 ) to make the Part number field editable.
- Enter a part number for the standard content part.
Click Save.
Beneath the preview of the selected instance, click Update.
-
Click the Edit icon (
-
Click the checkmark icon (
 ) to close the dialog.
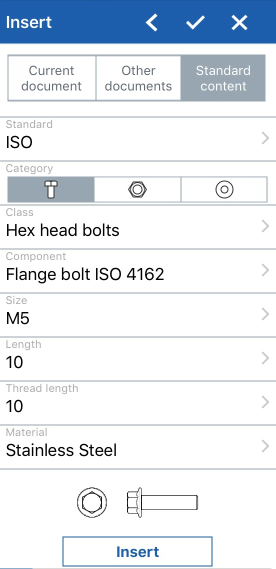
- Tap the Standard content tab on the Insert parts and assemblies dialog.
- Select the specifics about the content you want to insert: Standard, Category, Class, and Component.
- Select the size.
- A preview of the selected part is shown.
- Tap Insert to automatically insert the part if a planar or cylindrical face or an edge is already selected. If no selection is made, the part appears at the origin. Drag it to the preferred location and tap to snap to a Mate connector (implicit or explicit).
- Tap the check on the dialog to save your actions and create instances of the standard content in the assembly and list it in the Instances lists (along with the Mate connector, implicit or explicit).
Once an instance of standard content is inserted into an Assembly, it is listed in the Assembly list. To edit the instance, tap the three-button menu and select Edit to open the Insert parts and assemblies dialog again. Make your new selections and tap Update to change the part instance in the Assembly.
When inserting, Onshape has the ability to detect a mated bolt or screw, and if a washer is selected for insertion into the same hole, Onshape places and fastens the washer at the bottom of the bolt or screw head.
Bolts have only one reference point available (called a mate). Washers and nuts have two mates available, so they are able to be stacked and you have the ability to insert at the closest or furthest from selection. When inserting a second washer, for example, if you select Closest to selection (or use Alt+Insert) the washer is fastened to the top of the selected washer, against the bolt head. If you select Furthest from selection (or use Shift+Insert) the washer is fastened to the bottom of the selected washer, against the part.
Pre-selection, or the lack thereof, impacts the insert process for standard content. In the absence of selection (on the model), tapping Insert initiates drag mode. The standard content appears at your mouse cursor and you drag it to the desired location, mate references will appear, and tap to place the part.
To facilitate the insertion process, you have the ability to pre-select individual holes (their circular edge or cylindrical face) to place standard content specifically. Make your selection prior to tapping the Insert button on the dialog.
You also have the ability to pre-select a planar face. In this case, upon tapping the Insert button, the standard content is fastened to all holes on the selected faces, whether the size of the selected standard content is appropriate or not.
If the holes you select have been created with the Onshape Hole feature, the inserted standard content with find the 'fine' or 'coarse' thread definition of the feature and apply it. If the hole was not created through the Hole feature, Onshape defaults to 'coarse'.
There may be times when you want to edit a particular instance of standard content in an assembly:
- Tap and hold the part in the assembly or the instance in the Instance list.
- Select Edit standard content instance from the menu.
- The Insert dialog opens and you have the ability to change whichever characteristics you wish; you may want to change the material or the length, for example.
-
Tap
 to save your changes (or tap Cancel to close the dialog without saving changes).
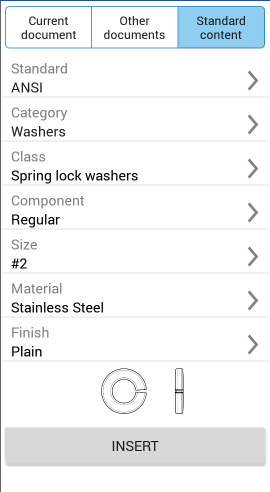
- Tap the Standard content tab on the Insert parts and assemblies dialog.
- Select the specifics about the content you want to insert: Standard, Category, Class, and Component.
- Select the size.
- A preview of the selected part is shown.
- Tap Insert to automatically insert the part if a planar or cylindrical face or an edge is already selected. If no selection is made, the part appears at the origin. Drag it to the preferred location and tap to snap to a Mate connector (implicit or explicit).
- Tap the check on the dialog to save your actions and create instances of the standard content in the assembly and list it in the Instances lists (along with the Mate connector, implicit or explicit).
Once an instance of standard content is inserted into an Assembly, it is listed in the Assembly list. To edit the instance, tap the three-button menu and select Edit to open the Insert parts and assemblies dialog again. Make your new selections and tap Update to change the part instance in the Assembly.
When inserting, Onshape has the ability to detect a mated bolt or screw, and if a washer is selected for insertion into the same hole, Onshape places and fastens the washer at the bottom of the bolt or screw head.
Bolts have only one reference point available (called a mate). Washers and nuts have two mates available, so they are able to be stacked and you have the ability to insert at the closest or furthest from selection. When inserting a second washer, for example, if you select Closest to selection (or use Alt+Insert) the washer is fastened to the top of the selected washer, against the bolt head. If you select Furthest from selection (or use Shift+Insert) the washer is fastened to the bottom of the selected washer, against the part.
Pre-selection, or the lack thereof, impacts the insert process for standard content. In the absence of selection (on the model), tapping Insert initiates drag mode. The standard content appears at your mouse cursor and you drag it to the desired location, mate references will appear, and tap to place the part.
To facilitate the insertion process, you have the ability to pre-select individual holes (their circular edge or cylindrical face) to place standard content specifically. Make your selection prior to tapping the Insert button on the dialog.
You also have the ability to pre-select a planar face. In this case, upon tapping the Insert button, the standard content is fastened to all holes on the selected faces, whether the size of the selected standard content is appropriate or not.
If the holes you select have been created with the Onshape Hole feature, the inserted standard content with find the 'fine' or 'coarse' thread definition of the feature and apply it. If the hole was not created through the Hole feature, Onshape defaults to 'coarse'.
There may be times when you want to edit a particular instance of standard content in an assembly:
- Tap and hold on the part in the assembly or the instance in the Instance list.
- Select Edit standard content instance from the menu.
- The Insert dialog opens and you are able to change whichever characteristics you wish; you may want to change the material or the length, for example.
-
Tap
 to save your changes (or tap Cancel to close the dialog without saving changes).
For an additional Learning center resource, follow the technical briefing article here: Onshape's Standard Content (Onshape account required).