 Use
Use
![]()
![]()
![]()
Project (or convert) an edge, edges, and silhouette edges of a part or sketch onto the active sketch plane.
Shortcut: u
To project or convert an edge, edges, and silhouette edges of a part, or sketch onto the active sketch plane, create a new sketch, select the plane that you wish to use, then click the Use (project/convert) sketch tool on the sketch toolbar. You can now select the lines that appear based on the plane. When you're done, click on the green check mark to accept the sketch, and you now have a new sketch based on the part.
Steps
- Create a sketch or part.
- Start another sketch.
-
Click
 , then an edge, edges, or silhouette edges from the first sketch or part.
In this example, the highlighted edge of the part was selected to use (project) onto the sketch plane, resulting in the highlighted horizontal line.
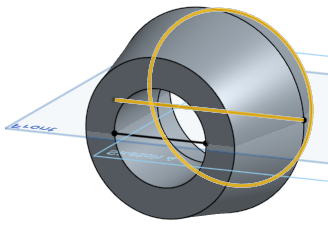
When hovering over entities, a preview of the projected lines will appear.
Using silhouette edges
When viewing a model normal to a sketch, any visible boundary that isn't an edge is a silhouette edge; where the surface transitions from facing you to facing away from you.
How does using a silhouette edge work?
- Click
 .
.
Note that there is NO pre-select behavior for silhouette edges.
- Hover over the face for which you want a silhouette edge.
You should see highlights. If the actual silhouette edge is out of the sketch plane you will see two. One that is the 'real' silhouette edge, one which is the projection in the sketch plane. Both are selectable.
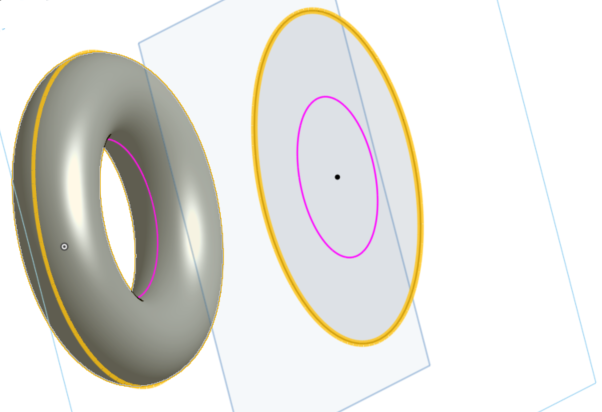
- Hover on and then click on a highlight to project that silhouette edge. (The highlight being hovered over in order to be selected, above, is shown in yellow highlight.)
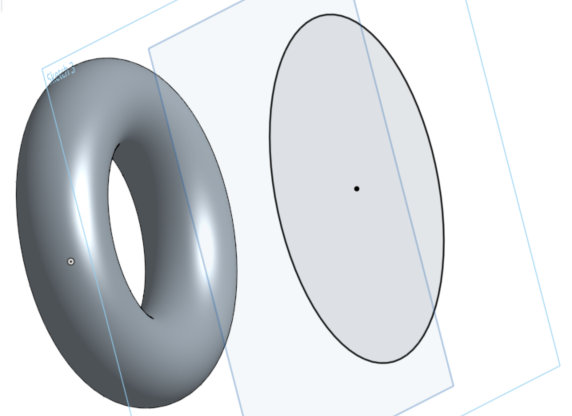
Note that when multiple silhouette edges are available, you are able to click a face to select all silhouette edges, or hover over an individual silhouette edge and click to select just the ones you wish to use:
This is what the highlight looks like during hover:
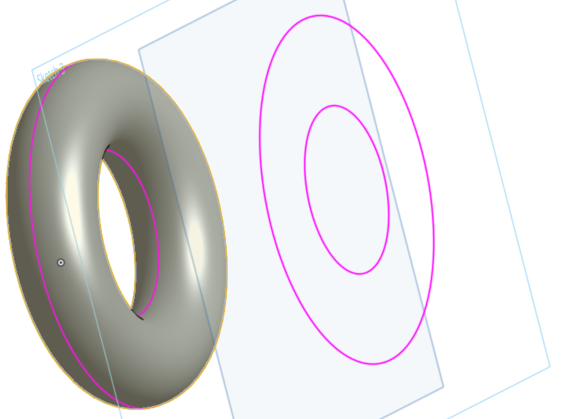
After selection and projection onto another plane:
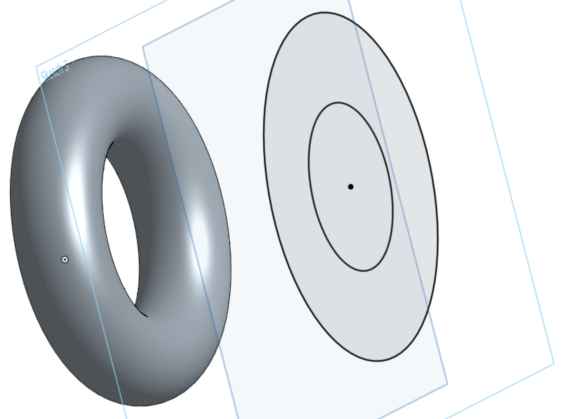
When hovering over entities, a preview of the projected lines will appear.
If no highlights are visible, you may be running into a limitation, see Tips below.
Tips
- All used edges update when the underlying geometry changes. However, this doesn't react well to changes of geometry type (circle to line, etc.) caused by model changes.
- Some things about Onshape Use may be different from other systems, including:
- Onshape does not constrain the ends of the silhouette edge. You are able to choose how to fix the ends.
- Onshape does not distinguish between "bits" of silhouette edges, like in this example of a cylinder with a hole through it:
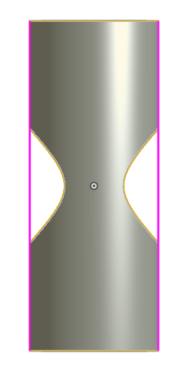
- Onshape does not Use a face, like the cylinder above with a hole through it, and automatically extract either edges or silhouette edges and sew them all together.
- Onshape only uses silhouette edges that are trackable. This is enables a level of certainty the silhouette edge may still be updated later.
- Supported silhouette edges include: cylinders, cones, tori, spheres, extruded surfaces, and any surface with one silhouette edge.
- Silhouette edges that are self-intersecting after projection are not usable.
Project (or convert) an edge, edges, and silhouette edges of a part or sketch onto the active sketch plane.
Steps
- Create a sketch or part.
- Start another sketch.
-
Tap
 , then select an edge, edges, or silhouette edge from the first sketch or part.
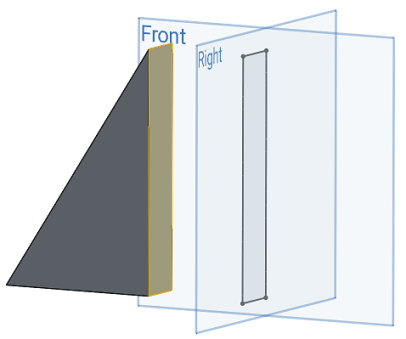
Here, the highlighted face was selected to use (project) onto the Right sketch plane, resulting in the black sketch lines that form a rectangle on the Right sketch plane.
Using silhouette edges
When viewing a model normal to a sketch any visible boundary that isn't an edge is a silhouette edge; where the surface transitions from facing you to facing away from you.
How does using a silhouette edge work?
-
Tap
 .
.
- Use the Precision selector to hover over the face for which you want a silhouette edge. See
Selection
for more info.
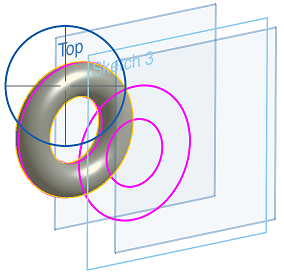
The projection of the silhouette edge appears in pink on the active sketch plane.
- Hover over (line the cross-hairs up with) a specific pink silhouette edge section and it turns yellow to indicate that it is selected. Release to select it and that silhouette edge is now projected onto your current sketch plane.
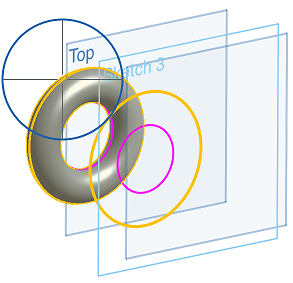
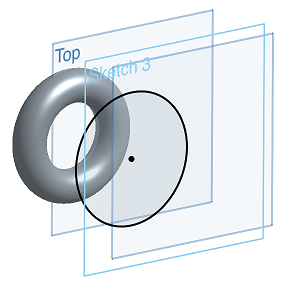
- If you do not specify a selection by hovering over a pink silhouette edge to turn it yellow, then releasing to select will project all of the silhouette edge options.
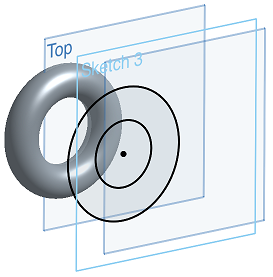
This may be used as a more efficient way of projecting an entire silhouette edge at once.
There is NO pre-select behavior for silhouette edges.
Tips
- All used edges update when the underlying geometry changes. However, this doesn't react well to changes of geometry type (circle to line, etc.) causes by model changes.
- Some things about Onshape Use may be different from other systems, including:
- Onshape does not constrain the ends of the silhouette edge. You are able to choose how to fix the ends.
- Onshape does not distinguish between "bits" of silhouette edges, like in this example of a cylinder with a hole through it:
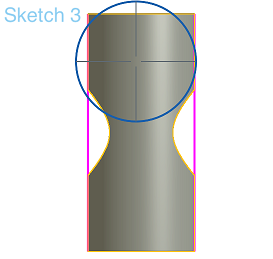
- Onshape does not use a face, like the cylinder above with a hole through it, and automatically extract either edges or silhouette edges and sew them all together.
- Onshape only uses silhouette edges that are trackable. This enables that the silhouette edge can still be updated later.
- Supported silhouette edges include cylinders, cones, tori, spheres, extruded surfaces, and any surface with one silhouette edge.
- Silhouette edges that are self-intersecting after projection are not usable.
Project (or convert) an edge, edges, and silhouette edges of a part or sketch onto the active sketch plane.
Steps
- Create a sketch or part.
- Start another sketch.
-
Tap
 , then select an edge, edges, or silhouette edge from the first sketch or part.
Here, the highlighted face was selected to use (project) onto the Right sketch plane, resulting in the black sketch lines that form a rectangle on the Right sketch plane.

Using silhouette edges
When viewing a model normal to a sketch any visible boundary that isn't an edge is a silhouette edge; where the surface transitions from facing you to facing away from you.
How does using a silhouette edge work?
-
Tap
 .
.
- Use the Precision selector to hover over the face for which you want a silhouette edge. See
Selection
for more info.

The projection of the silhouette edge appears in pink on the active sketch plane.
- Hover over (line the cross-hairs up with) a specific pink silhouette edge section and it turns yellow to indicate that it is selected. Release to select it and that silhouette edge is now projected onto your current sketch plane.


- If you do not specify a selection by hovering over a pink silhouette edge to turn it yellow, then releasing to select will project all of the silhouette edge options.

Use this as a more efficient way of projecting an entire silhouette edge at once.
There is NO pre-select behavior for silhouette edges.
Tips
- All used edges update when the underlying geometry changes. However, this doesn't react well to changes of geometry type (circle to line, etc.) causes by model changes.
- Some things about Onshape Use may be different from other systems, including:
- Onshape does not constrain the ends of the silhouette edge. You are able to choose how to fix the ends.
- Onshape does not distinguish between "bits" of silhouette edges, like in this example of a cylinder with a hole through it:

- Onshape does not use a face, like the cylinder above with a hole through it, and automatically extract either edges or silhouette edges and sew them all together.
- Onshape only uses silhouette edges that are trackable. This means that the silhouette edge may still be updated later.
- Supported silhouette edges include cylinders, cones, tori, spheres, extruded surfaces, and any surface with one silhouette edge.
- Silhouette edges that are self-intersecting after projection are not usable.