 Auxiliary View
![]()
![]()
![]()
Available in: Drawing
Create an auxiliary view; an orthographic view that is folded out 90 degrees from a selected edge in the parent view (usually from a slanted edge). Alternatively, you can create a sketch line or centerline about which to orient the auxiliary view.
-
Click
 .
.
- Optionally supply a label for the view
- Choose an auxiliary view type:
- Click
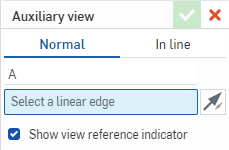
Normal
to create an auxiliary view perpendicular to a linear edge.
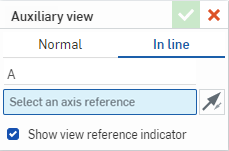
- Click
In line
to create an auxiliary view oriented about a sketch line or centerline.
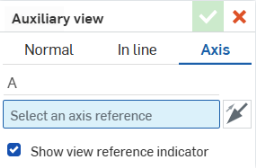
Click Axis to create an auxiliary view down the axis of a hole.
- Click
Normal
to create an auxiliary view perpendicular to a linear edge.
- Select the edge or line about which to orient the auxiliary view. This edge or line is added into the selection field in the dialog.
-
Optionally, click the reverse icon
 to flip the auxiliary view.
- By default the view reference indicator is visible. Uncheck Show view reference indicator to hide it.
- Drag the cursor to the location for the auxiliary view, and click to place the view. The view is placed and the dialog closed.

- By default, the scale is off. To see the scale, double-click the view to open the
View properties
dialog, and check Scale label at the bottom.
Scale input is in an N:N or N/N format. For user input values, the second digit or denominator is always set to 1, and you can double-click the Scale label to edit it. By default, the scale of an Auxiliary view is always set to Parent (the same scale as the parent view).
Labels are automatically applied (you are able to change them) and by default progress from A through Y, omitting I, O, Q, S, X, and Z.
Selecting an Auxiliary view also highlights the edge in the parent view.
Click to select the view reference indicator and use the snap point at the ‘elbow’ of the arrow to drag the line to shorten it or lengthen it.

Use the middle snap point to move the view reference indicator between the selected edge and the middle of the auxiliary view.
Selecting and right-clicking on the view reference indicator opens a context menu with the following options:
-
Edit auxiliary view - Opens the Auxiliary view dialog.
-
Flip direction - Flips the auxiliary view.
-
Clear selection - Clears all sheet selections.
-
Zoom to fit - Zooms the sheet into view.
-
Delete - Deletes the Auxiliary view.
You can also double-click on the view to open the View properties dialog.
This table illustrates the types of views from which the Auxiliary view can be created:
| Auxiliary view | |
| Can be created from: | Cannot be created from: |
|
Crop views Linear edge in base views Linear edge in projected orthographic views Linear edge in auxiliary views Linear edge in isometric views Linear edge in section views Linear edge in aligned section views Sketch line in "in line" auxiliary views Centerline in "in line" auxiliary views Flat pattern views |
Detail views Break views |