![]()
![]()
Onshape 提供將文件版本或工作區 (合併的來源) 中的變更與目前使用中文件工作區 (合併的目標) 合併的機制。
當您將所選的來源 (工作區或版本) 與目前使用中的目標 (工作區) 合併時,您可以 (1) 使用來源來取代目標中的所有變更,(2) 將來自來源的所有變更合併到目標中,或是 (3) 保留所有來自目標的變更。此外,您可以使用這 3 個相同的策略來指定要如何合併工作區中的各別獨立分頁。
您無法選擇分頁中個別的變更。必須保留、合併或取代來自每個分頁的所有變更。
Onshape 建立分支的功能可為設計實驗建立新的工作區而不影響其他的工作區。可使用「合併」來輕鬆地將變更從一個分支複製到另一個分支中。
這個文件有兩個工作區:一個是原始設計所在的 Main 工作區,另一個是名為 Square Base 的工作區。團隊要使用 Square Base 來繼續設計,在 Main 工作區是啟用的情況下,於 Square Base 工作區上按右件,然後選擇合併至目前工作區。
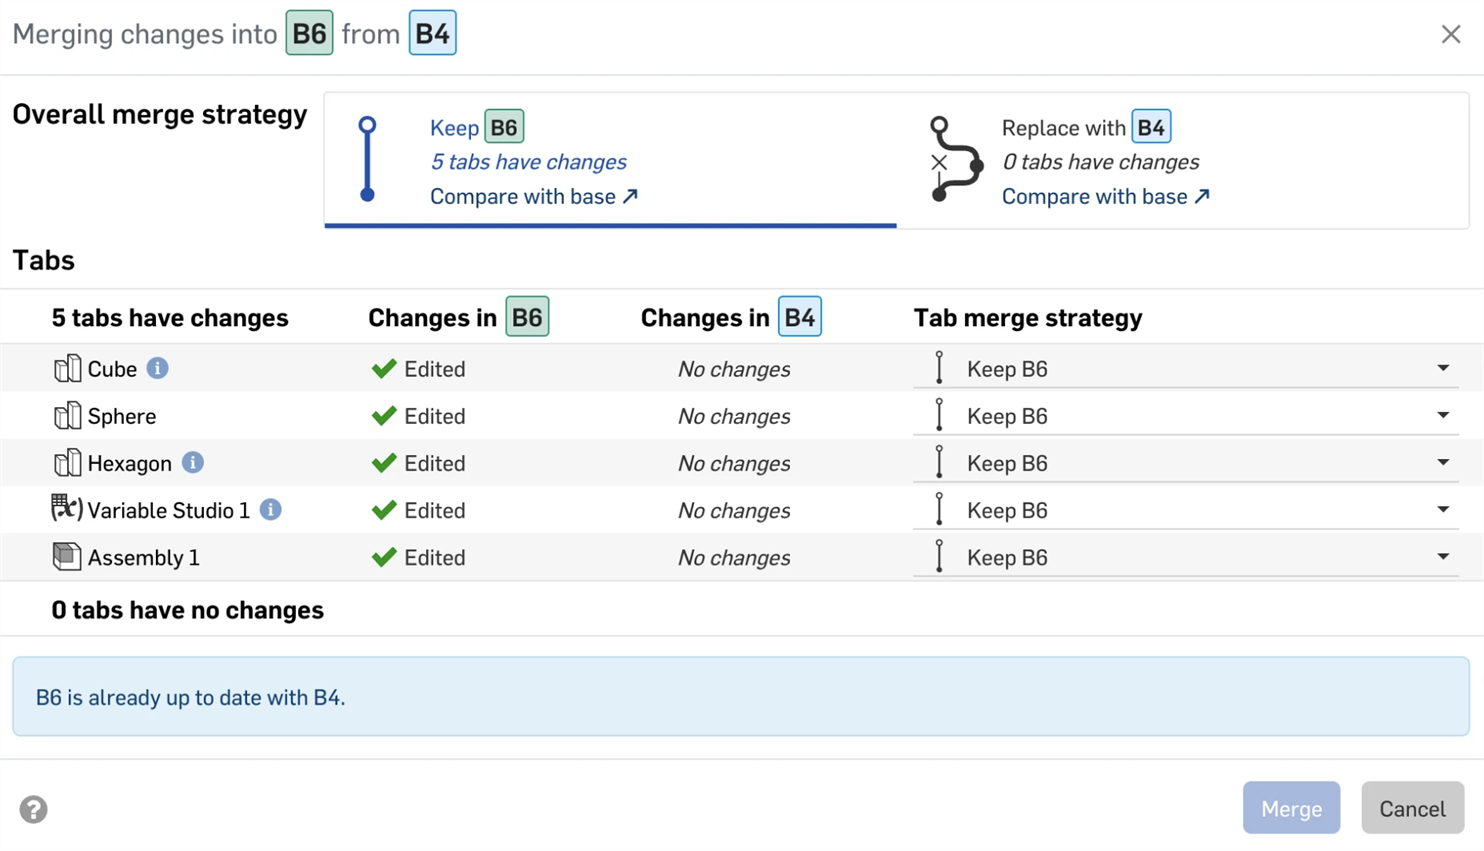
合併對話方塊分為兩個部分:一部分是有變更的分頁,另一部分則是沒有變更的分頁。您可於上方選擇變更的整體合併策略。在保留與取代選項下方會有與基準比較的連結。可將該分支與在分支點的文件狀態進行比較。
保留會保留目標工作區分頁,將其維持在目前的狀態。這表示在合併的過程中,不會對 Main 分支中的該分頁做出任何變更。
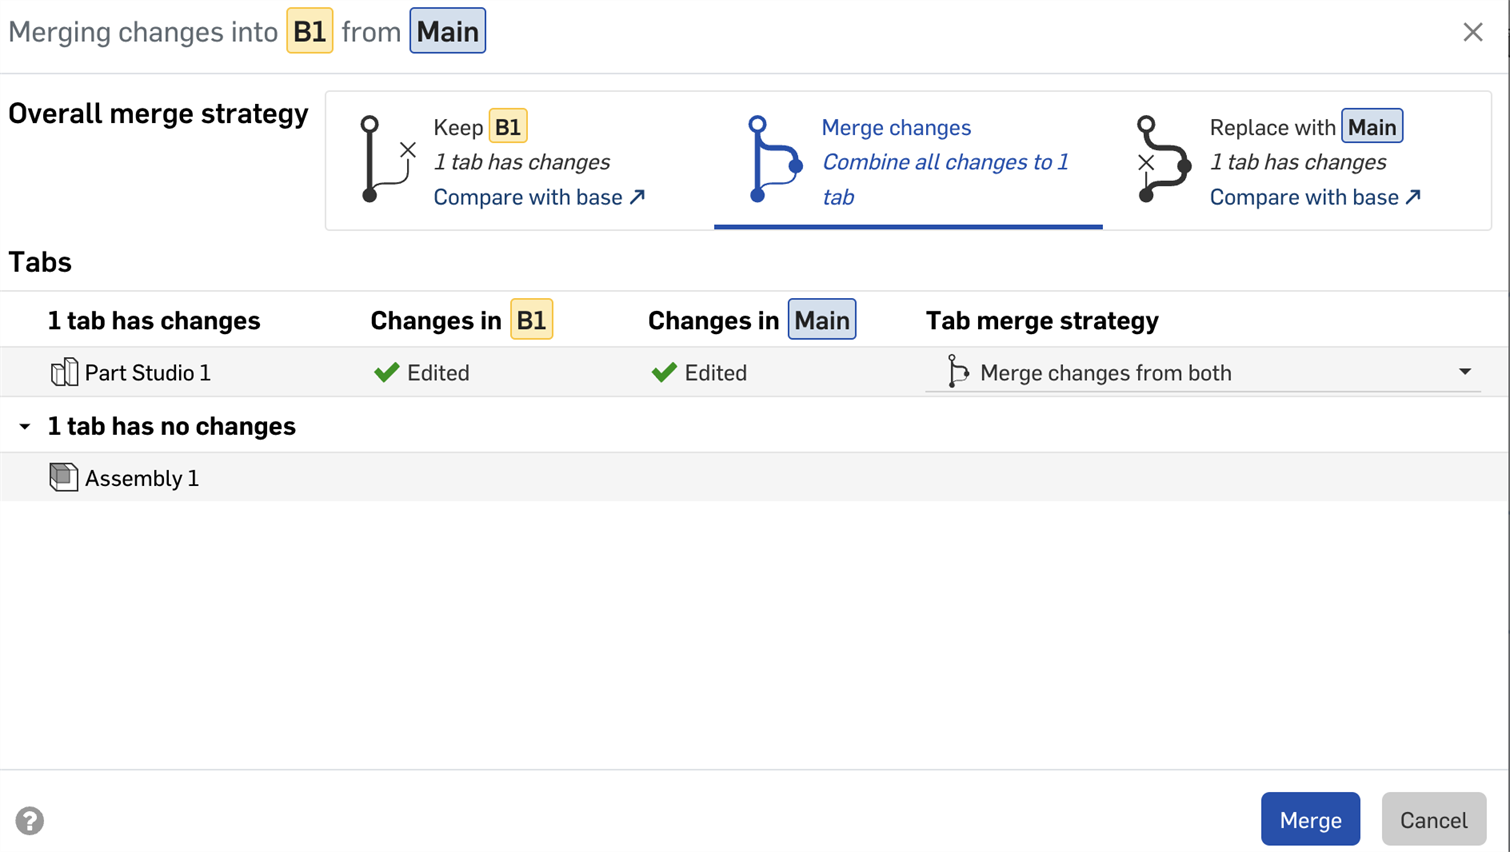
合併會將來自兩個分支的變更合併。僅為Part Studio 與組合件提供這個選項,且僅在兩個分支同時包含某一特定分頁的變更時可用。並未為工程圖與其他分頁類型提供這個選項。在 Part Studio 中的變更包括建立、修改或刪除特徵、組態輸入項、材料或外觀。在組合件中的變更包括修改、新增或移除零組件、結合連結器或組態。由於來自不同分支的變更可能會不相容而導致錯誤,因此小心地使用這個選項是很重要的。
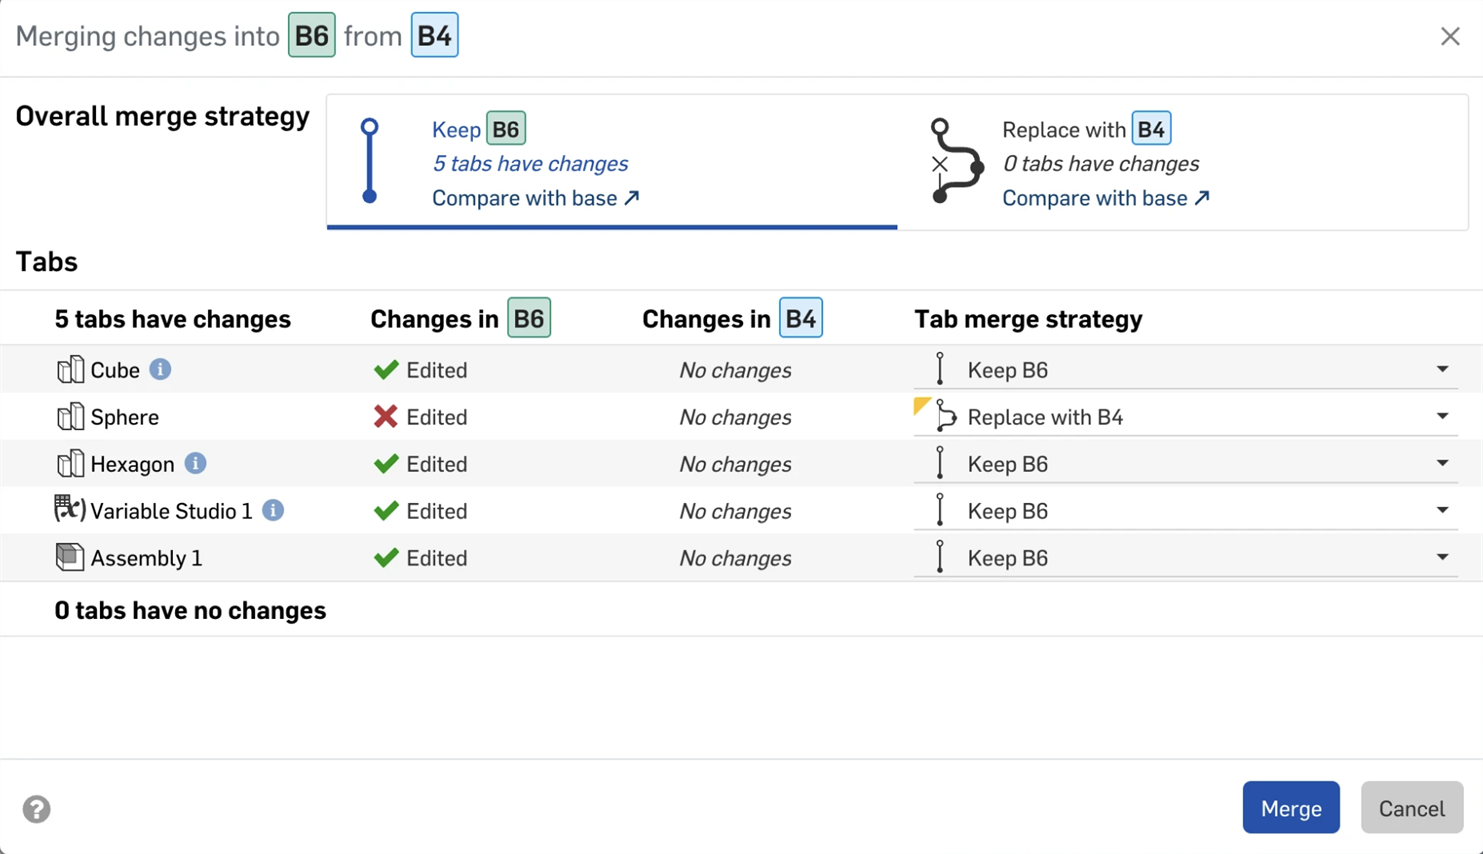
取代會用來源來更新目標。如果有任何變更存在於目標分支中,將會被完全覆寫。在每個變更的分頁旁,您可以用特定於該分頁的策略取代整體的策略。系統會用黃色表明有不同合併策略的分頁。
選擇取代的整體合併策略。這樣會用在 Main 分支中的方形基座來取代原始的基座。按一下顯示或隱藏圖示來切換合併線的顯示與否。
在啟用時,圖表會視覺呈現每個合併的操作。合併線將每個合併從其來源到目標連接起來,清楚地顯示在整個文件歷程中如何合併與傳遞變更。如果對設計的變更是未預期或不希望的,您可以將工作區還原至合併之前的最後一個動作來復原合併。
這個範例展示兩個工作區的合併,但您也可以使用相同的程序以將來自另一分支的版本合併到目前的工作區中。
-
開啟「版本與歷程」面板。
-
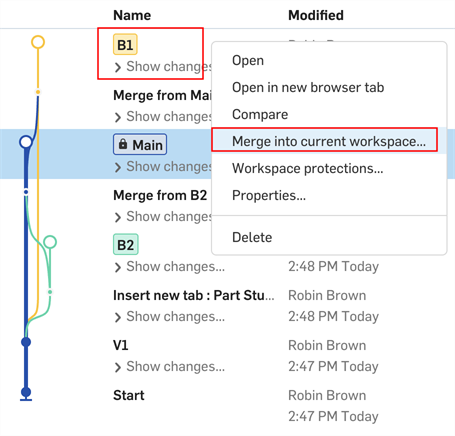
系統會以深藍色強調顯示目前使用中的工作區 (也就是目標;下方圖片中的 Main)。若要將另一個工作區或版本 (也就是來源;下方圖片中的 B1) 合併到目標中,請在來源上按右鍵,然後選取 [合併至目前的工作區]:
![從環境選單中存取 [合併至目前的工作區]](Resources/Images/history/merge-rmb-01.png)
-
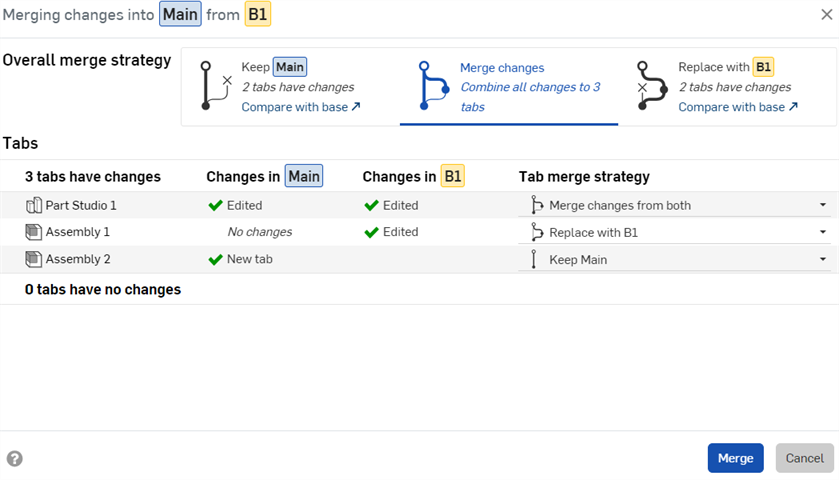
合併的對話方塊開啟,顯示從來源和目標分支分叉之後的變更:
-
選擇性地選取「整體合併策略」:
-
保留 [目標] - 保留目標中的變更。
-
合併變更 - 這是預設。系統會將來源與目標中的變更合併。
在合併變更時,合併的基準會是分支分叉處的變更 (例如,建立分支處的版本 ),或如果有的話,會是相同來源分支先前合併至這個目標的最後一個點 (假定並未還原合併的情況下)。
-
以 [來源] 來取代 - 來源中的變更會取代目標中的變更。
-
-
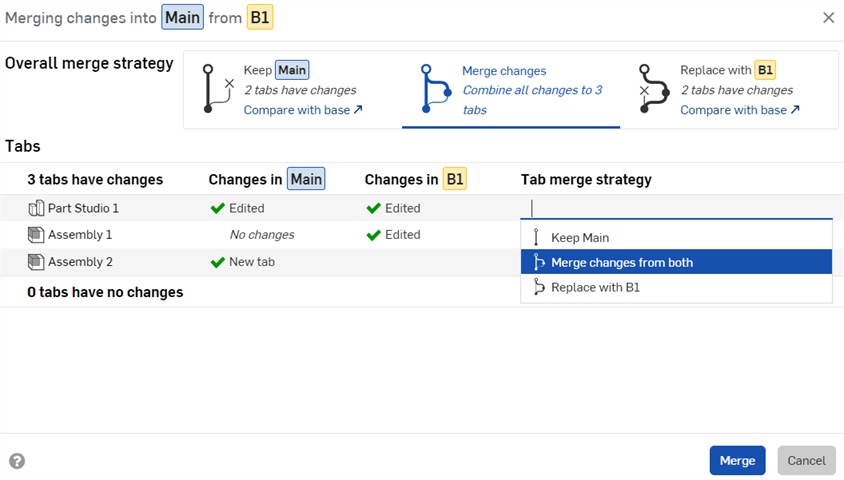
選擇性地為每個分頁選取合併策略來取代「整體合併策略」。合併策略的選項與「整體合併策略」相同,除了在分頁建立或刪除處,或是對不支援「合併來自雙方的變更」選項的分頁類型 (請參閱下方的第一個提示)。在這些實例中您僅能選擇 (1) 保持 [目標] 或 (2) 以 [來源] 來取代:
-
有綠色核取記號圖示
 的變更表示在該工作區中對分頁的編輯會在合併之後保留在目標工作區中。
 -
有紅色 x 圖示
 的變更表示在工作區分頁中遭捨棄的編輯 (例如,已刪除的特徵) 會在合併之後保留在目標工作區中。
 -
帶有驚嘆號圖示
 的變更表示合併之後分頁不會存在於目標工作區中。
 -
資訊圖示
 表示對於這個分頁類型,無法合併來自個別分支的變更 (例如,工程圖)。您必須選擇目標 (保留 [目標]) 或來源 (以 [來源] 來取代)。請參考無法合併來自個別分支變更的分頁。
-
-
按一下 合併,在「版本與歷程」圖表中,合併線會顯示分支 B1 已合併到 Main 分支中。
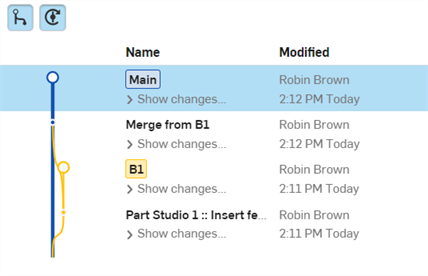
All merges are displayed explicitly in the Versions and history graph, which updates automatically as changes are made to the document.
Showing and hiding merge lines
To make the Versions and history graph easier to visualize, toggle the Show/Hide merges and Show/Hide automatic versions buttons as needed:

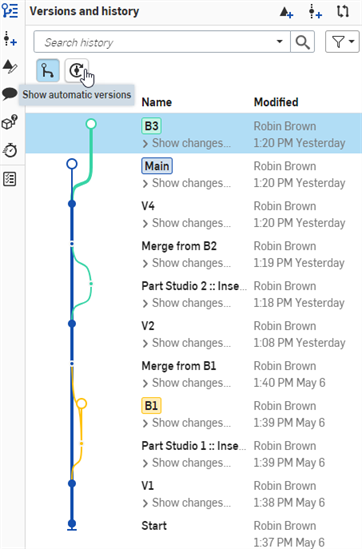
A Versions and history graph with merge lines and automatic versions shown on the Onshape browser application (above).
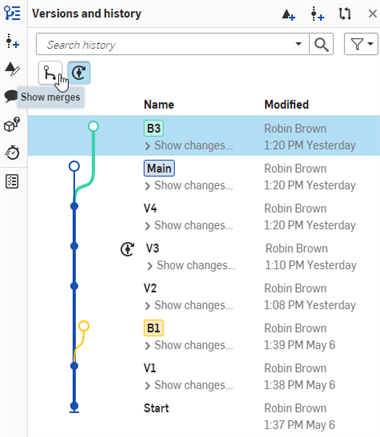
A Versions and history graph with merges hidden on the Onshape browser application (above).
A Versions and history graph with automatic versions hidden on the Onshape browser application (above).
Merge lines example
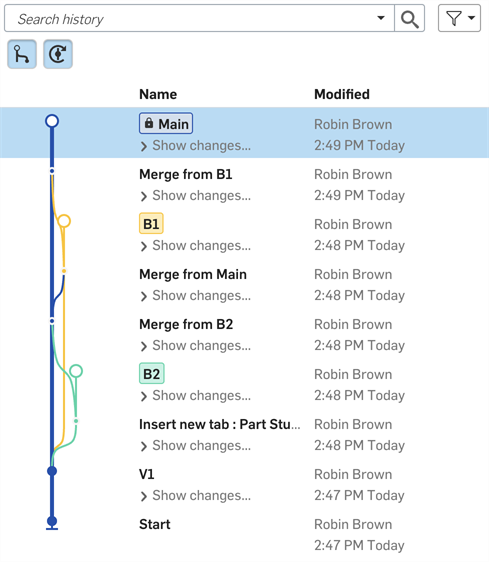
The example below shows a complex Versions and history graph with several branches. Each branch was created from the Main workspace, and then individual work was done on each branch. As work on each branch was completed, the branches were merged back into Main. The flow of lines to and from the Main branch shows the merging workflow, making it easy to see which changes were merged when.
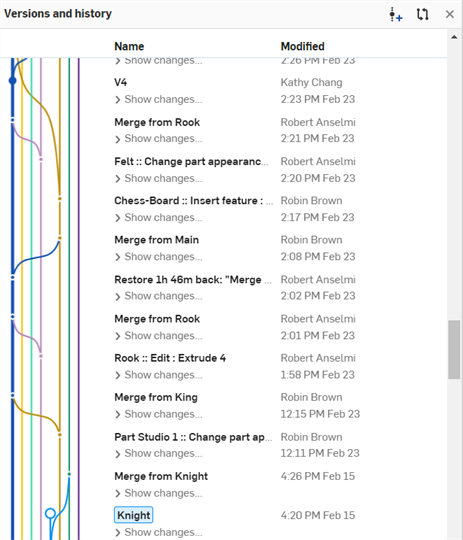
A Versions and history graph with several branches shown on the Onshape browser application (above).
當選擇要合併的分支時,會為除了工程圖和 PCB Studio 之外的所有分頁類型提供合併來自雙方的變更選項。在工程圖與 PCB Studio 中操作時,建議您在一個工作區 (分支) 中操作,然後將該分支合併至另一個分支中。同時在兩或多個分支上操作可能會導致從一個分支合併到另一個分支時變更的遺失。
例如:
-
在 Main (目標) 中建立一個工程圖 (Drawing 1),然後插入一個零件。
-
建立一個版本 (V1),然後從這個版本產生一個分支 (來源 B1)。
-
在 B1 工作區中,於 Drawing 1 分頁內將尺寸加入到零件的一個邊上。
-
在 Main 工作區中,將尺寸加入到同一 Drawing 1 分頁內相同零件的不同邊上。
-
將 B1 (來源) 工作區的變更合併到 Main (目標) 工作區中。
-
在合併對話方塊中為 Drawing 1 分頁選擇「分頁合併策略」,系統會提示您選擇下列之一:
-
保留 Main - 這會保留來自 Main 工作區的 Drawing 1 分頁。系統會保留加入到 Main 工作區的尺寸,覆寫掉加入至 B1 的尺寸。
-
以 B1 來取代 - 這樣會以 B1 工作區的 Drawing 1 分頁來取代 Main 工作區的 Drawing 1 分頁。系統會以加入至 B1 的尺寸覆寫加入到 Main 工作區的尺寸。
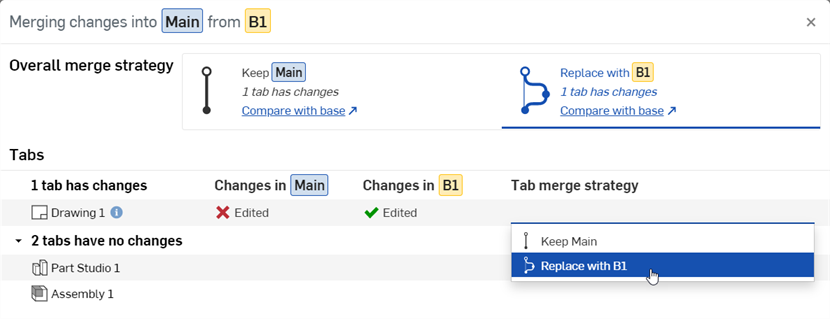
在上方的兩個案例中,系統會保留一個尺寸並覆寫另一個尺寸。若要避免此種情況,請僅在一個工作區 (例如 Main) 中對 Drawing 1 分頁進行所有操作,然後在將 B1 合併到 Main 時,選擇「保留 Main」,這樣就可以保留所有在 Drawing 1 分頁中的變更。
如果目標與來源分支是相同的,且所有分頁都使用保留的合併策略,則不需要任何更新。「合併」按鈕將無法使用。
- 若要用來源分支取代目標分支,請將「分頁合併策略」變更為取代。
-
按一下「合併」。
When working with protected branches, the working branch must be kept up-to-date with the protected branch before a merge can occur. If the Merge button in the Merge dialog is disabled and you see the Workspace protections are enabled warning:
- Close the Merge dialog to return to the document.

- Select the working branch in the Versions and history graph.
- With the working branch selected, right-click the protected branch and select Merge into current workspace from the context menu.

- In the Merge dialog, confirm that you are merging the protected branch into the working branch, then click Merge. The working branch is updated with the changes from the protected branch.
- In the Versions and history graph, select the protected branch.
- With the protected branch selected, right-click the working branch and select Merge into current workspace.
- You should now be able to merge your changes into the protected branch.
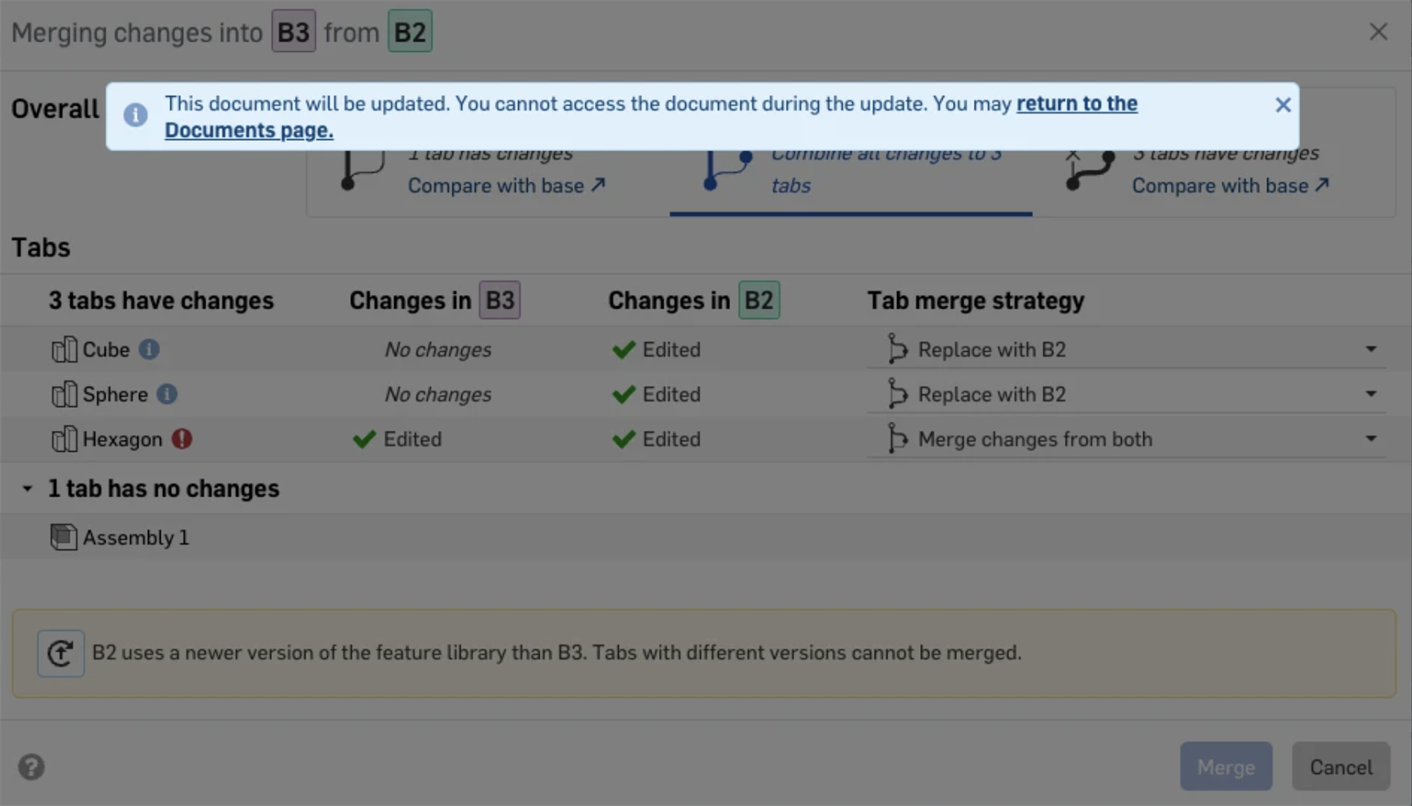
無法合併有過時 FeatureScript 版本的分支。如果一或多個分支使用舊版本的 FeatureScript,您會在合併對話方塊中看到關於這個版本不相符的警告訊息。
-
按一下「更新 FeatureScript」圖示
 來將目標與來源分支中的 FeatureScript 版本同時更新為最新的版本。
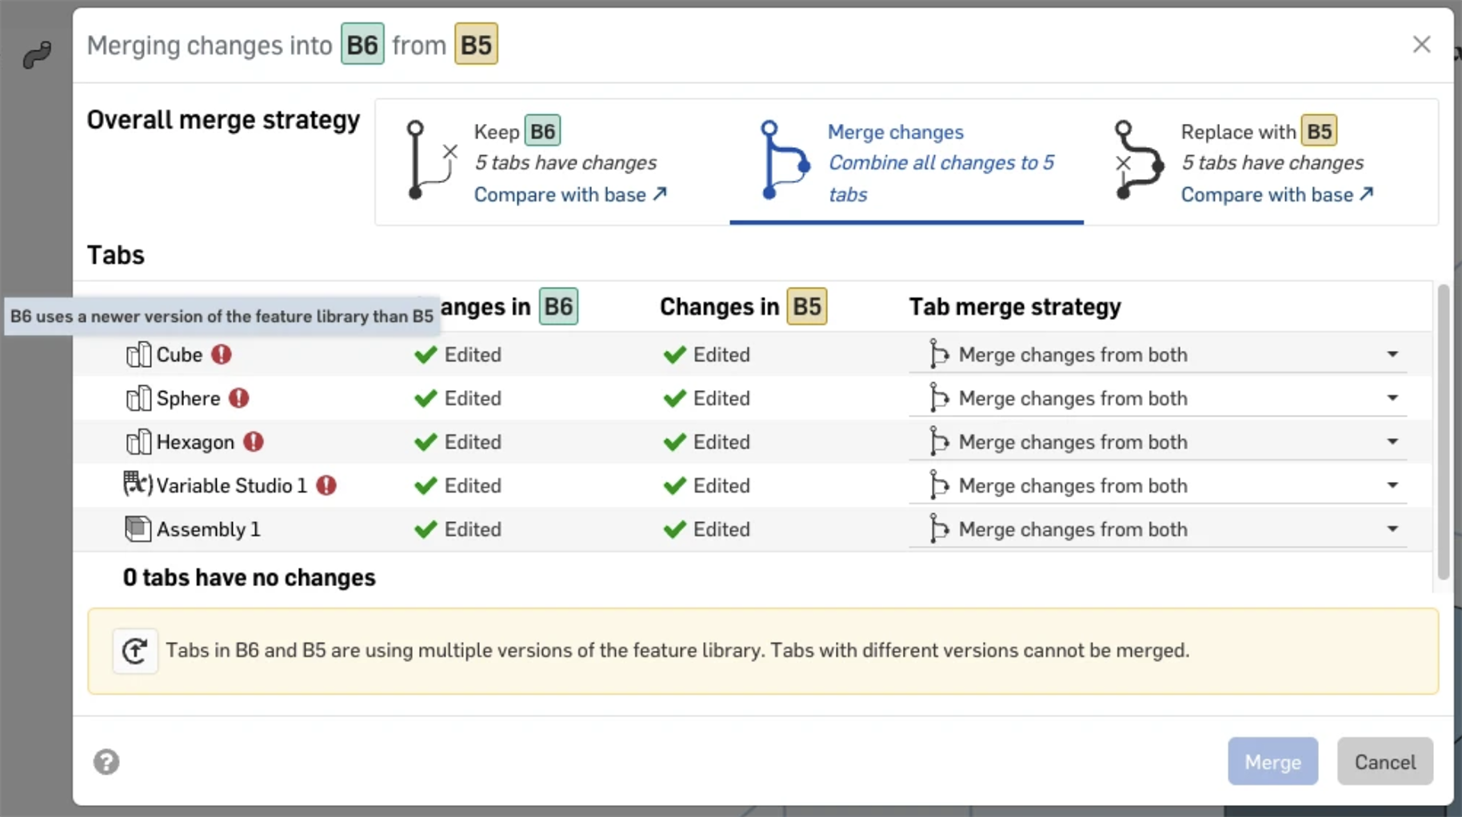
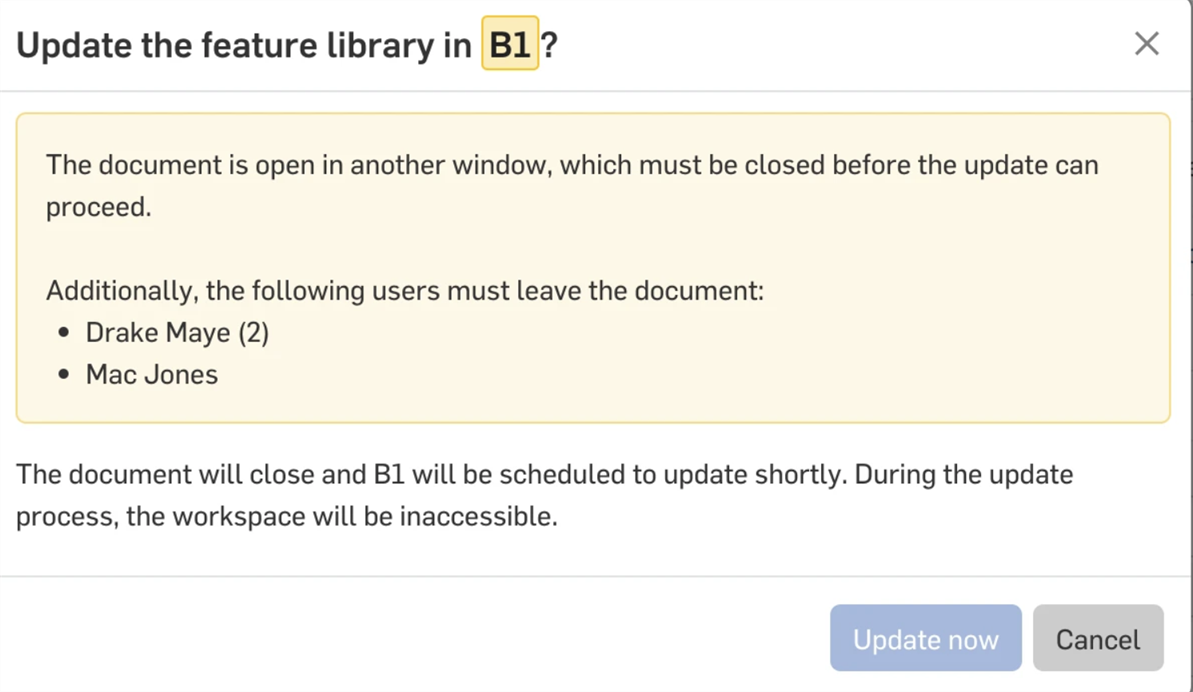
- 在開啟的視窗中按一下「立即更新」以完成更新。
- 按一下「合併」。
如果文件正在使用中,將無法合併分支。如果其他使用者開啟了文件,或您在多個瀏覽器視窗或分頁中開啟了文件,您將會看到一個錯誤,其中列出使用者和開啟的執行個體數量。
- 確定您和其他使用者已關閉文件。
- 對話方塊會自動重新整理,然後您可以按一下「立即更新」。
- 如果 Onshape 無法確認文件不在使用中 (例如,由於網路連線的問題),您將會看到下方的警告:
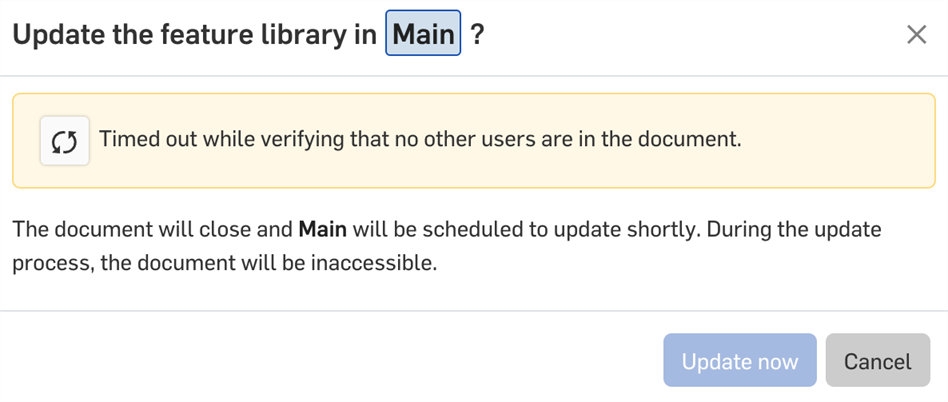
- 按一下對話方塊中的「重試」圖示
 來再次嘗試驗證。
- 如果 Onshape 無法確認文件不在使用中 (例如,由於網路連線的問題),您將會看到下方的警告:
- 按一下「合併」。
當更新正在進行中時,無法完成合併。請在目前更新完成之後稍後再試。
-
由於無法使用
 「復原」圖示來還原一個合併,因此在執行合併之後,會開啟一個訊息,其中有您可以點按以還原合併的一個連結。當轉換分頁、工作區與比較不同工作區時這個訊息會持續出現,讓您可以檢查合併的結果。按下
  「關閉」圖示來接受合併並結束訊息:
如果在合併文件之後,您或其他使用者變更了文件,然後您又還原了合併,則變更會遺失。
-
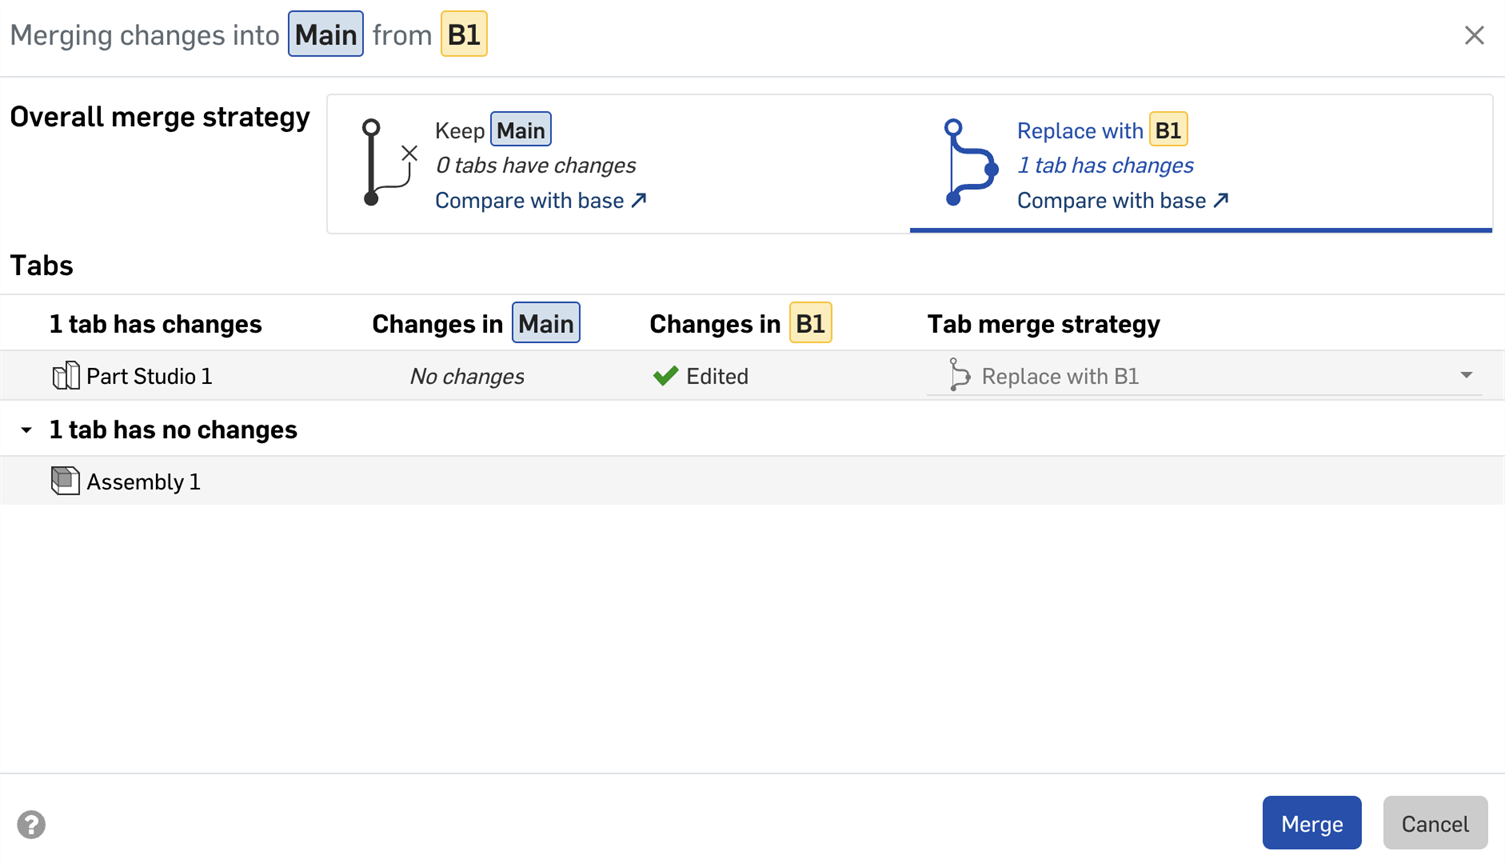
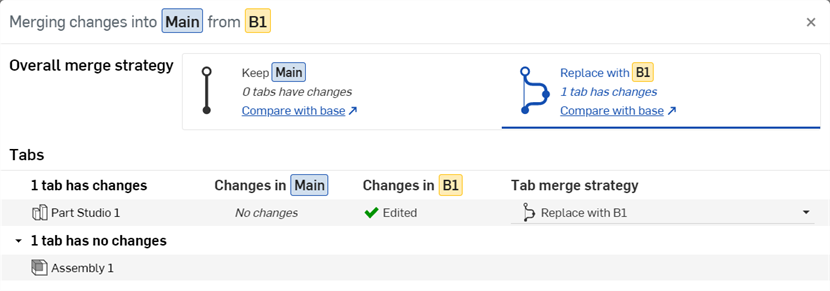
如果沒有任何變更存在會需要合併來源與目標,在合併對話方塊中的選項會僅是 (1) 保留 [目標] 或 (2) 以 [來源] 來取代。預設的選項是以 [來源] 來取代:
-
按一下合併對話方塊中的「與基準比較」連結,系統會開啟一個新的瀏覽器分頁,其中比較來源與目標。詳細資訊請參考比較。
-
若要合併一或多個分頁的變更而不改變目前工作區中的任何其他項目,請為「整體合併策略」 選擇「保留 [目標]」,然後根據您的需求為每個分頁選擇「以 [來源] 來取代」或「合併來自雙方的變更」。
-
在合併對話方塊中對分頁的排序是將有變更的分頁排在上方,沒有變更的分頁則在下方。接著每個部分會根據分頁在分頁列中由左到右的位置從上到下排列,會先顯示目標分支,然後再顯示來源分支,不會顯示資料夾。
當您將所選的來源 (工作區或版本) 與目前使用中的目標 (工作區) 合併時,在來源中所做的全部變更將會合併至目標中,包括所有其他的特徵、分頁等等。
-
輕觸「版本與歷程」圖示
 來開啟面板:
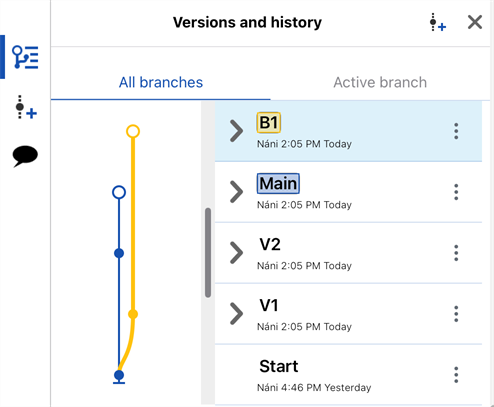
-
在「版本與歷程」面板中選擇目標分支 (要合併至的分支)。
- 在仍選取了目標分支的情況下,輕觸來源分支 (要合併的分支) 右側的三點功能表,然後輕觸 [合併至目前工作區]。
![在選取了目標分支的情況下,於來源分支上按右鍵,然後選擇 [合併至目前工作區]](Resources/Images/m-Version_Manager/ios-merge1-01.png)
在來源中所做的變更會全部合併至目前啟用的工作區中 (目標)。會將這個動作記錄在版本與歷程飛出視窗內的項目中,如果需要,您可以還原為之前的記錄來還原合併的動作。關於還原版本的詳細資訊,請參考文件管理。
當合併包含工程圖、圖片、PDF 或其他不是 Part Studio 或 Assembly 分頁的工作區時,如果同時在來源與目標的分頁中做出變更,則在來源分支中的變更會覆寫在目標分支中的變更。例如,如果您同時更新兩個分支 (來源與目標) 中的 PDF 分頁,然後合併分支,則合併之後,來源分支中的 PDF 會出現在目標分支中。
All merges are displayed explicitly in the Versions and history graph, which updates automatically as changes are made to the document.
Showing and hiding merge lines
To make the Versions and history graph easier to visualize, toggle the Show/Hide merges and Show/Hide automatic versions buttons as needed:
A Versions and history graph with merge lines and automatic versions shown on the Onshape browser application (above).
A Versions and history graph with merges hidden on the Onshape browser application (above).
A Versions and history graph with automatic versions hidden on the Onshape browser application (above).
Merge lines example
The example below shows a complex Versions and history graph with several branches. Each branch was created from the Main workspace, and then individual work was done on each branch. As work on each branch was completed, the branches were merged back into Main. The flow of lines to and from the Main branch shows the merging workflow, making it easy to see which changes were merged when.
A Versions and history graph with several branches shown on the Onshape browser application (above).
當合併包含工程圖 (在工程圖分頁中) 的工作區時,合併過程中會以有變更的工程圖為優先。明確地說,當來源與目標分支中的工程圖同時有變更時,會以來源工程圖為優先:
- 如果在來源中的工程圖變更而目標中的工程圖並未變更,則會將來源中的工程圖複製到目標中,取代目標中的工程圖。任何並出現在來源中的目標工程圖內的變更則會被覆寫。
- 如果來源工作區的工程圖沒有變更 (相較於目標中的工程圖),則在目標中的工程圖會保持不變。
建議您在一個工作區的一個工程圖 (分支) 上進行操作,然後將該分支合併至另一個分支中。同時在一或多個分支上操作工程圖可能會導致將工程圖從一個分支合併到另一個分支時,變更的遺失。