Educator 班級
![]()
![]()
![]()
這個主題說明如何管理 Educator 計畫中的班級。
只有被指定為教育工作者的使用者可以在 Educator 訂閱中建立與管理班級。
在 iOS 和 Android 裝置上,目前僅為教育工作者提供對班級的「唯檢視」模式。
建立班級
建立班級,將成員加入其中 (您的學生名冊),然後建立配合課程的作業。若要從您 Onshape Educator 帳戶中的文件頁面建立班級:
-
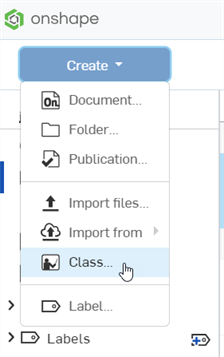
在文件頁面上按一下 建立 按鈕,然後選擇 [班級]:
-
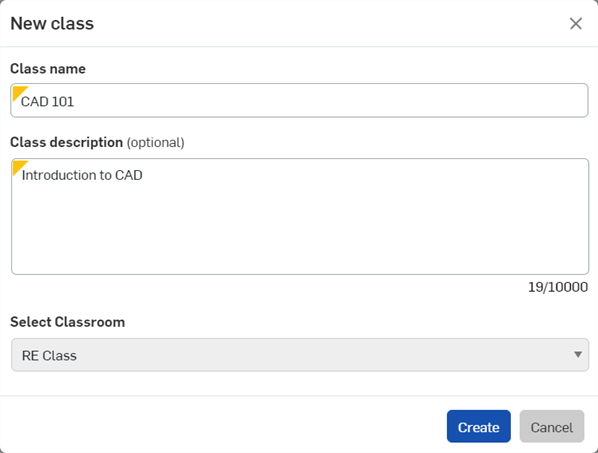
「新班級」對話方塊開啟。輸入班級的名稱與描述。學生們會看到這個名稱,且應讓其可辨識這是他們註冊的班級。
-
按一下 建立。
-
「建立作業」頁面開啟。

關於建立作業的詳細資訊,請參考 Educator 計畫中的作業。
將學生/教育工作者加入至班級中
在您建立班級後,可以將使用者 (學生或教育工作者) 加入班級中。一旦發佈了班級,這些使用者都會獲得可存取班級的權限。
-
若要從「文件」頁面中存取「班級」頁面,按一下左側窗格中的 [班級] 篩選器,然後在「班級」頁面中點按需要的特定班級。
-
按一下 成員。

-
執行下列操作之一:
-
按一下「邀請使用者」圖示 (
 ) 來根據電子郵件地址個別加入使用者。在「新增使用者」對話方塊中:
-
輸入您所要加入使用者的電子郵件。
-
選擇使用者是「學生」或「教育工作者」。
-
按一下 邀請。
-
-
按一下「透過 CSV 管理」按鈕 (
 ) 來將有使用者名稱的成員清單移入 CSV (以逗號分隔值) 檔案中。進一步的操作說明請參考下方「使用 CSV 檔案加入學生/教育工作者」的部分。
-
-
完成時按一下 關閉。
使用 CSV 檔案加入學生/教育工作者
如果您有學生電子郵件和/或教育工作者電子郵件的 CSV (以逗號分隔值) 檔案,您可以用來邀請使用者加入班級中:
-
按一下「透過 CSV 管理」按鈕 (
 )。
)。 -
在「新增使用者」對話方塊中執行下列操作之一:
-
按一下 選擇檔案,然後從您的電腦中選擇 CSV 檔案 (用正確的格式)。
-
按一下 下載範本 來開啟其中有所需欄位的試算表:
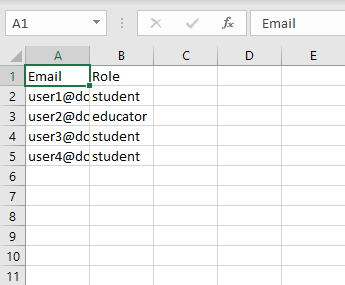
將列 1 保留原狀。
在欄 A 中用學生和/或教育工作者的電子郵件編輯其餘的列,並在欄 B 中編輯每個使用者的適當角色。角色 (Role) 必須是學生 (Student) 或教育工作者 (Educator)。
-
-
按一下 處理 來上傳。
當處理完成時,會跳出新增使用者狀態的通知。系統會將新成員的名稱與電子郵件移入「成員」清單中,並會有其「使用者類型」(教育工作者或學生),以及加入與上次登入的日期。
發佈班級
發佈班級可讓已加入班級的使用者 (學生與教育工作) 看到班級。在發佈班級之前,班級會出現在已加入至班級中教育工作者「班級」清單頁面的「未發佈」類別內,學生不會在任何地方看到這個班級。
-
從「班級」清單中選擇一個班級。
-
在該班級的「作業」頁面上按一下 發佈。
移除學生
從班級中移除一個使用者 (學生或教育工作者):
-
巡覽至特定班級的「成員」分頁。
-
按一下您要移除使用者列最右方的 X。

從班級中移除學生並不會將其從課堂中移除。所有經移除的學生仍可存取其 Onshape 文件。若要從課堂中移除學生,請導覽至「課堂設定」>「使用者」,然後按一下您要移除使用者旁邊的 X。
再製班級
再製班級可建立班級與作業的複本。原始班級的成員並不會成為再製班級的成員。如果非擁有者的教育工作者要再製班級,其身分必須是下列之一:
-
在擁有班級的課堂中的管理員
-
Educator 計畫中教育工作者團隊的成員或管理員 (擁有該班級且以教育工作者的身分被加入至班級中)。
再製班級:
-
在「班級」清單中選擇班級,可以選取多個班級。
-
在班級上按右鍵,然後從環境選單中選擇 [再製班級]:
![在班級上按滑鼠右鍵的選單,其中強調顯示 [再製班級]](Resources/Images/edu/clone-class-new.png)
-
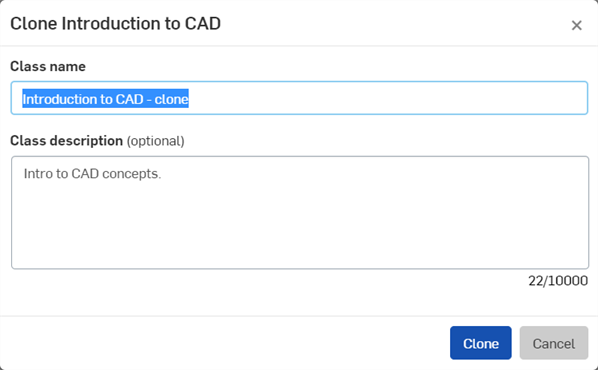
在再製對話方塊中,提供「班級名稱」與可選填的「班級說明」,然後按一下 再製 按鈕:
解除發佈班級
解除發佈班級會讓先前加入班級且可看見班級的使用者 (學生與教育工作者) 看不到班級。在解除發佈之後,班級會出現在教育工作者「班級」清單頁面內的已解除發佈類別中,學生不會在任何地方看到這個班級。可以根據上方發佈班級部分中的指示再次發佈已解除發佈的班級。
解除發佈班級:
-
從「班級」清單中選擇一個班級。
-
在列出作業的「班級」頁面中,按一下右上角的 解除發佈班級:

-
或者是在「班級」頁面中的班級上按右鍵,然後從環境選單中選擇 [解除發佈班級]:
![班級的滑鼠右鍵選單,其中強調顯示 [解除發佈班級] 選項](Resources/Images/edu/class-unpublish-menu.png)
封存班級
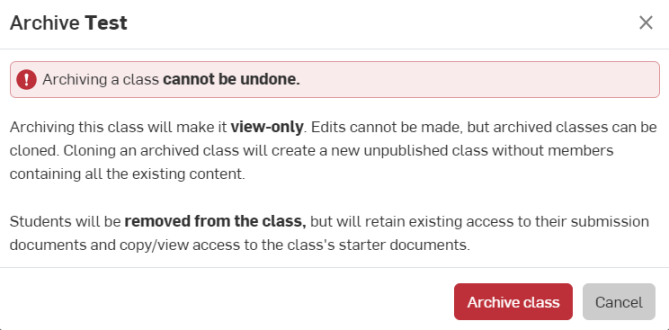
封存班級會將班級與所有的作業從課堂中轉移而不完全地刪除。在封存時會自動將學生從班級中移除,但會保留學生對其繳交文件的現有存取權限,以及對班級初始文件的複製/檢視權限。封存班級會使得班級變為唯檢視的,因此是無法編輯的,但仍可以再製已封存的班級。
封存班級:
-
從「班級」清單中選擇一個班級。
-
在班級上按右鍵,然後從環境選單中選擇 [封存班級]:
![在班級上按滑鼠右鍵的選單,其中強調顯示 [封存]](Resources/Images/educator/archive-class.png)
-
這樣會開啟封存對話方塊,其中的警告會說明關於封存班級的細節:
-
選擇 [封存班級] 來完成封存的過程。班級會出現在「班級」頁面中「已封存班級」部分之下。
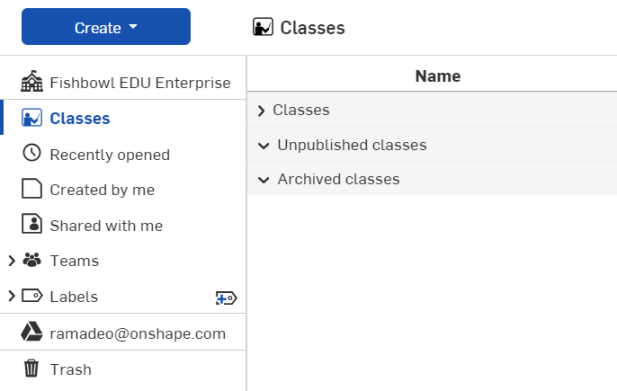
使用者也可以在「班級」頁面中封存已發佈的班級。
刪除班級
刪除班級會刪除班級與所有的作業。班級文件以及其相關的擁有權限會保留在教育工作者與學生的各自帳戶之中而不會被刪除。
刪除班級:
-
在「班級」清單中選擇班級,可以選取多個班級。
-
在班級上按右鍵,然後從環境選單中選擇 [刪除所選的]:
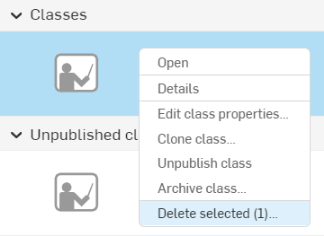
-
「刪除所選的項目嗎?」對話方塊開啟。按一下 刪除 按鈕來確認刪除,或按一下 取消 來關閉對話方塊並保留班級:
