我的帳戶 - 開發人員

使用者可以註冊及管理應用程式、App Store 項目與在其「開發人員」設定中的 API 金鑰 。
在這個頁面中的步驟僅適用於個人使用者。公司、課堂、或企業管理員應按照公司/課堂/企業設定:開發人員中的步驟來操作。
所有在公司/課堂/企業設定中建立的應用程式都會計算在公司的 API 限額內。所有在 Developer Portal 中建立的應用程式則會算在個人使用者的 API 限額內。
所有送交至 Onshape App Store (Onshape Apps) 的應用程式必須按照 API Guide: OAuth2 頁面中的說明操作,並使用 OAuth2 來授權。自動化的指令碼 (或不適用於 Onshape App Store 的應用程式) 可以使用 OAuth2 或 API 金鑰來授權。OAuth2 可允許應用程式代表應用程式使用者呼叫 Onshape API;API 金鑰僅會代表產生 API 金鑰的 Onshape 使用者執行操作。
關於開發與 Onshape 搭配應用程式的詳細資訊,請參考下方的資源:
* Onshape 開發人員文件
* Glassworks API Explorer
* 範例程式碼
若要巡覽您 Onshape 中的「開發人員」設定,請按一下 Onshape 視窗右上角的帳戶使用者圖示 ( )。這樣會開啟一個下拉功能表,然後按一下我的帳戶。
按一下頁面左側清單中的開發人員:
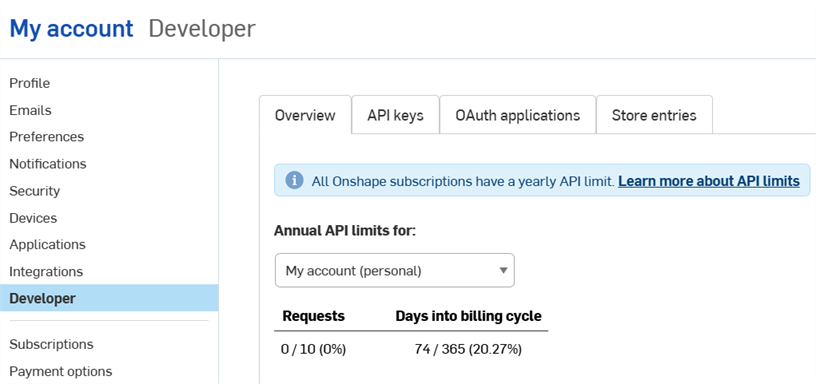
在這個頁面中您可以:
-
在 Onshape 中註冊一個新的 OAuth 應用程式
-
將經正確驗證的應用程式提交至 Onshape App Store
-
檢視、建立和刪除您個人使用的 API 金鑰
-
查看您的 API 使用量
- 關於 API 使用量的詳細資訊,請參考 API Limits。
- 按一下這個項目的年度 API 限制下拉清單來選擇一個不同的帳戶。
-
系統會在使用量達到 25%、50%、75%、與 100% 時,向所有管理員發送電子郵件通知。
 應用程式開發工作流程
若要建立一個可在 Onshape 介面開啟的應用程式,以供內部使用或測試:
- 向 Onshape 註冊該應用程式。
- 為應用程式在 Onshape 介面中建立一個擴充功能。
- 建立一個 App Store 項目並 訂閱它。
將應用程式發佈到 Onshape App Store 中以供終端使用者使用:
- 使用 OAuth2 進行驗證。
- 完成 Launch Checklist
管理 API 金鑰
API 金鑰是建立供個人使用的小型應用程式的有效方法,允許開發人員避免使用 OAuth 工作流程的負擔。
API 金鑰是用來驗證應用程式而不是其使用者的 (OAuth2 透過確保使用者有權存取 Onshape 來驗證應用程式與 應用程式使用者)。
在您建立了 API 金鑰之後,其僅在所建立的 stack 上有效。在您公司 stack 上建立的 API 金鑰 (i.e., companyName.onshape.com) 將無法在生產的 stack (cad.onshape.com) 上作用。管理員也可以為其公司的使用者管理 API 金鑰:請參考公司/課堂/企業設定 - 開發人員。
個人帳戶最多只能擁有兩個 (2) API 金鑰。根據需要刪除 API 金鑰。公司、課堂、與企業帳戶則無上限。
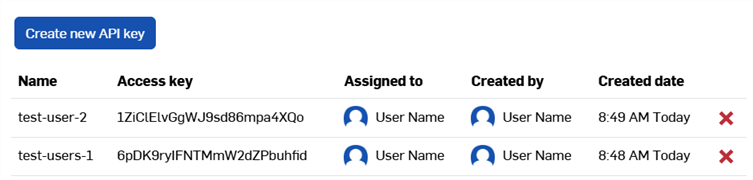
檢視 API 金鑰
- 按一下「開發人員」頁面中的 API 金鑰。
- 檢視您先前建立的 API 金鑰。
建立 API 金鑰
- 按一下 建立新 API 金鑰。
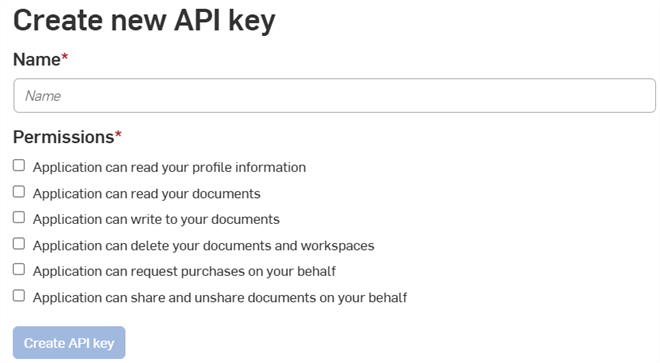
- 在名稱欄位中提供 API 金鑰的名稱。
- 選擇金鑰的權限。請參考下方的權限範圍。
- (Optional) To choose an expiration date for the API key:
- Toggle on the Enable TTL (Time to live) button.
- Enter or select a date in the date field. You will receive an email notification when the key is about to expire.
- 按一下 建立 API 金鑰按鈕。
-
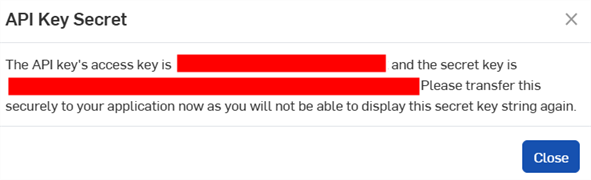
在彈出視窗中,複製顯示的 API 金鑰與金鑰秘密,將其儲存於某處,然後按一下 關閉 按鈕。
您將不會再看到金鑰秘密,因此請將其儲存在安全之處。
刪除 API 金鑰
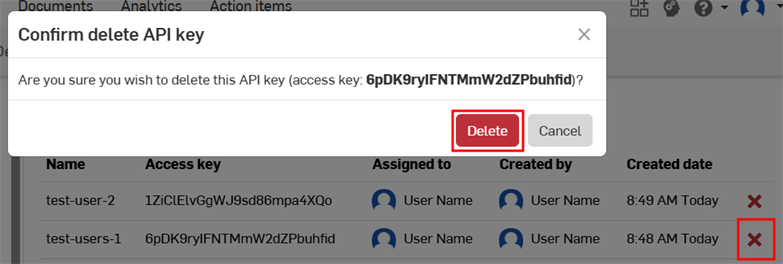
- 按一下您要刪除 API 金鑰右側的 "X" 圖示。
- 確認您要刪除這個 API 金鑰。無法復原這個操作。按一下 刪除來確認。
Moving API keys
API keys cannot be moved between accounts, nor can they be moved from the user level to the company level or vice versa.
If you created an API key on the wrong account:
-
Create a new API key for the correct account:
-
To create an API key at the user level, see Creating API Keys on this page..
-
To create an API key at the company, classroom, or enterprise level, see the Company Settings - Developer docs..
-
-
Replace all references to the original API key throughout your code, and verify the code works as expected.
-
Delete the original API key.
管理 OAuth 應用程式
建立與註冊 OAuth 應用程式
-
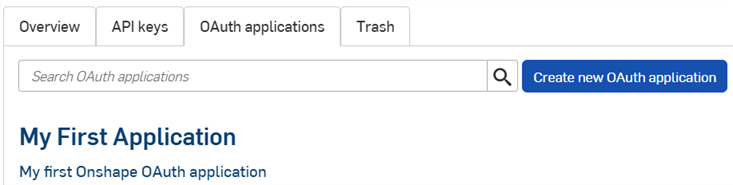
按一下開發人員頁面中的 OAuth 應用程式分頁來查看您所有應用程式的清單:
-
按一下建立新 OAuth 應用程式按鈕。
-
填寫表格:
-
名稱 - 向使用者顯示的應用程式名稱。
-
主要格式 - 辨識您應用程式的獨特字串,是 Onshape 伺服器上可能儲存資料的標記 (例如,com.example.example)。在註冊應用程式之後無法變更,且不會向使用者顯示。
-
摘要 - 應用程式的說明,會在要求使用者授予應用程式存取其資料的權限時向使用者顯示。
-
重新導向 URL - 在認證之後將您重新導向的 URL;您應用程式的登入頁面。
- 您的應用程式必須至少指定一個用於 OAuth 協定交換的 URL。
-
這個 URL 必須同時使用 SSL (以 https 開頭的 URL),但有兩個例外適用於已安裝的桌面應用程式:http://localhost:<port> 和 urn:ietf:wg:oauth:2.0:oob。
-
類型 - 應用程式類型:整合的雲端應用程式、連接的雲端應用程式、或連接的桌面應用程式。
-
OAuth URL - 用來開始 OAuth2 過程以驗證使用者的 URL。詳情請參考 Developer Docs: OAuth2。
-
應包含您已部署應用程式的 URL。
-
這是從 Onshape 應用程式頁面呼叫的第一個 URL。
-
託管這個 URL 的頁面應處理 OAuth 的驗證。一旦您的應用程式伺服器代表使用著通過了驗證,該使用者應被重新導向至您應用程式的內容。
-
如果您尚未部屬您的應用程式,可以將此欄位留為空白以進行本機工作,稍後再進行更新。
所有提交至 Onshape App Store 供公眾使用的應用程式都必須透過 OAuth2 進行適當的驗證。詳情請參考 Developer Docs: OAuth2。
-
-
Settings
-
支援協作 - 如果在開發應用程式時要與其他使用者協同合作,請核取此選項。
-
- 權限 - 請參考下方的權限範圍。
-
-
按一下 建立應用程式。
-
從視窗中複製 OAuth 秘密金鑰。
您將無法再次存取這個秘密金鑰。這個秘密是專屬於您和您的應用程式的。應該像任何敏感密碼一樣保護它,絕不能被提交到原始程式碼中。
-
應用程式的 OAuth 應用程式項目出現,且詳細資料分頁是啟用的。在 OAuth 應用程式分頁中選擇應用程式的名稱會將您帶至這個畫面。
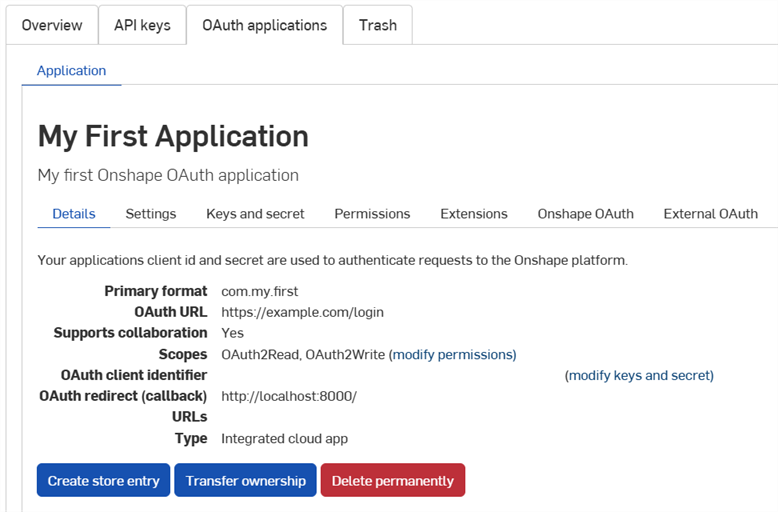
使用這個螢幕上的分頁來:
-
詳細資料:
-
設定:管理應用程式設定
- 金鑰與秘密:
- 複製 OAuth 用戶端識別碼
- 重生成一個新的OAuth 用戶端秘密金鑰
-
權限:修改應用程式的權限範圍
-
擴充功能:管理應用程式的擴充功能
-
Onshape OAuth:管理 Onshape 驗證
-
外部 OAuth:管理第三方的驗證
詳細資訊請參考 Onshape Developer Documentation,其中包括使用 OAuth2 來正確驗證,以及完成 Launch Checklist。請參考 Hello World 教學課程來查看可行的範例。
建立擴充功能
-
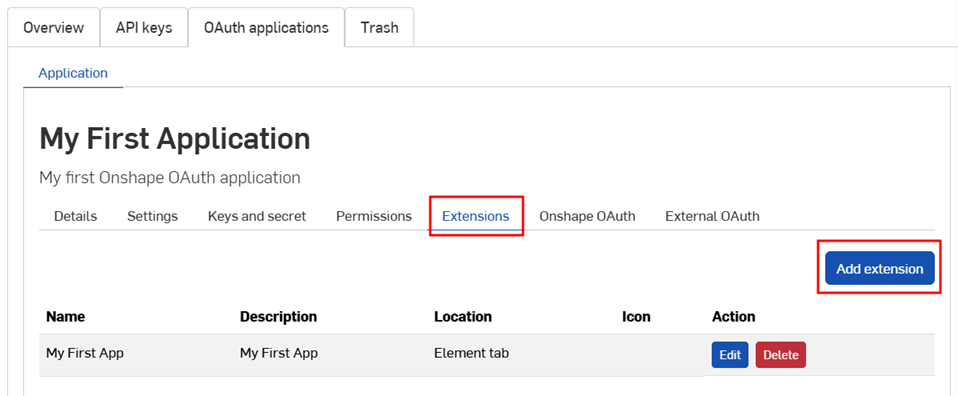
按一下「開發人員」頁面中的 OAuth 應用程式分頁,然後選擇您的應用程式。
-
按一下擴充功能頁籤。
-
按一下加入擴充功能。
-
填寫表格:
-
名稱:如果過長,可以在使用者介面中截短。
-
說明 (選用):不會出現在 Onshape 介面中,但可能會出現在驗證授權過程中。
-
位置:擴充功能在 Onshape 介面中的所在處。
-
請參考在 Developer Docs 中的 Supported Locations and Contexts。
-
您僅能為每個應用程式建立一個元素頁籤擴充功能
-
-
環境:有些位置是在選擇的環境中作用的,例如 Part Studio。
-
請參考在 Developer Docs 中的 Supported Locations and Contexts。
-
-
動作 URL:嵌入介面的位置會使用動作 URL 來定義要顯示頁面的位址。 如果位置是一個動作 (環境選單、工具列項目、對話方塊中的動作等),且動作類型是 GET 或 POST,則動作 URL 會被用來指定 REST 端點。如果位置是一個動作且動作是在新視窗中 Open,則動作 URL 會是要在新視窗中開啟的 URL。
-
請參考在 Developer Docs 中的 Action URL parameters 來了解可用在這個欄位中參數的清單。
-
-
動作類型:適用於不嵌入使用者介面的位置。支援的動作類型有:
-
GET - 會使用動作 URL 來做出 GET API 呼叫。會在動作 URL上進行參數置換。
-
POST - 會使用動作 URL 來做出 POST API 呼叫,動作主體會做為 post 主體。會同時在動作 URL 與動作主體上進行參數置換。
-
在新視窗中開啟 - 這會在新瀏覽器視窗中開啟動作 URL。會在動作 URL上進行參數置換。
-
-
動作主體:只適用於 POST 動作類型。動作主體在 POST API 呼叫中傳遞,且必須是使用有效的 JSON 格式。
-
顯示回應:這僅適用於如果 動作類型是 GET 或 POST。當選取時,使用者介面會等待回應,並在介面的對話方塊中顯示回應。回應必須使用有效的 JSON 格式。
-
圖示:圖示會顯示在擴充功能所在的位置,可以在資訊窗格、環境選單動作、工具列按鈕、對話方塊中動作按鈕、或其他支援的位置上包含圖示。
-
-
按一下確定。
關於建立與管理 Onshape 應用程式的詳細資訊,請參考 Onshape Developer Docs。請參考 Hello World 教學課程來了解可行的範例。
轉移應用程式所有權
- 在您的「開發人員」設定中,按一下 OAuth 應用程式。
- 按一下要轉移應用程式的名稱。
- 按一下詳細資料分頁中的轉移所有權按鈕。轉移所有權對話方塊隨即開啟。
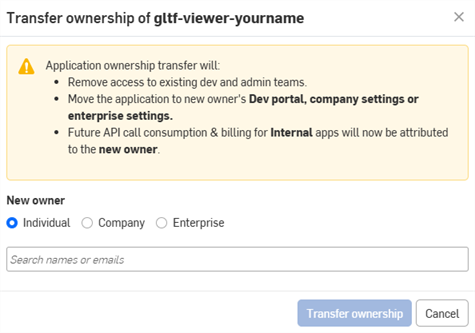
- 選擇將應用程式轉移給個人、公司或企業的選項。
- 若要轉移給個人,請在搜尋欄位中輸入新擁有者的名稱或電子郵件。若要轉移給公司或企業,請從下拉清單中選擇一個選項。
- 按一下轉移所有權。系統會將應用程式從您的 OAuth 應用程式清單中移除。
- 如果應用程式是轉移給個人帳戶,他們將會收到電子郵件通知,且應用程式會出現在其 <Onshape Developer Portal 中。
- 如果應用程式是轉移給公司/課堂/企業中的某人,則所有的管理員會收到電子郵件通知,且應用程式會出現在其「開發人員」設定中。
未來的 API 呼叫消耗和計費將歸屬於新擁有者。詳情請參考 API 限制。
棄用與刪除應用程式
- 在您公司設定的左側窗格中按一下開發人員,接著按一 OAuth 應用程式,然後選擇要棄用的應用程式。
- 按一下狀態按鈕來檢視應用程式目前的狀態,以及任何支援狀態的變更。 支援的狀態包括:
- 啟用 - 在 Onshape App Store 中提供此應用程式。
- 已棄用 - 該應用程式已從 App Store 中下架,但目前的使用者仍保有存取的權限。
- 已丟棄 - 已從 OAuth 應用程式分頁將應用程式移除到垃圾桶分頁中。
只有當所有付費訂閱到期後,才允許移除到垃圾通中
會清除所有的購買與授予權限。
- 已刪除: 永久地從垃圾桶中移除應用程式。無法復原這個操作。
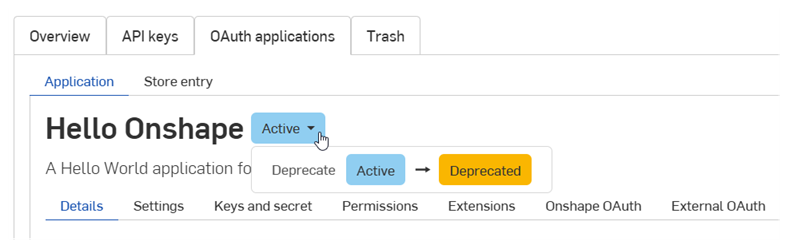
- 選擇所需的狀態變更。
- 在對話方塊中輸入應用程式的名稱,然後再次點按來確認。
管理 Onshape App Store 項目
在將應用程式提交至 Onshape App Store 之前,請參考 Onshape Developer Documentation 來了解要求的條件,包括使用 OAuth2 來正確驗證以及完成 Launch Checklist。
建立 Onshape App Store 項目
為 OAuth 應用程式建立新的商店項目:
-
按一下開發人員頁面中的 OAuth 應用程式,然後選擇您的應用程式。
-
按一下應用程式詳細資料分頁中的建立商店項目按鈕。
![OAuth 應用程式頁面中強調顯示 [建立商店項目] 按鈕](../Resources/Images/accounts/developer-create-store-button-01.png)
-
填寫表格:
- 名稱 - 自動根據註冊時提供的應用程式名稱設定。
-
摘要 - 自動根據註冊時提供的摘要設定。
-
類型 - 應用程式類型:整合的雲端應用程式、連接的雲端應用程式、或連接的桌面應用程式。這應該與註冊 OAuth 應用程式時選擇的類型相符。
-
類別 - 為您的應用程式選擇合適的類別。
-
團隊顯示狀態 - 選擇來讓非公開 App Store 項目對內部使用者不可見 (預設),對所有內部使用者或特定團隊可見。
-
說明 - 使用者看到的應用程式描述。僅允許有限的格式。
-
支援 URL - 您應用程式的使用者可用來尋求協助的 URL 或電子郵件。應對此積極地監控。
-
支援電子郵件 - 用於接收應用程式訂閱通知的電子郵件地址。應對此積極地監控。
-
廠商 - 您的公司名稱。
-
版本 - 這個應用程式目前的版本。
-
影像 - 選擇性地上傳摘要影像、主頁橫幅與其他影像。
-
按一下建立。
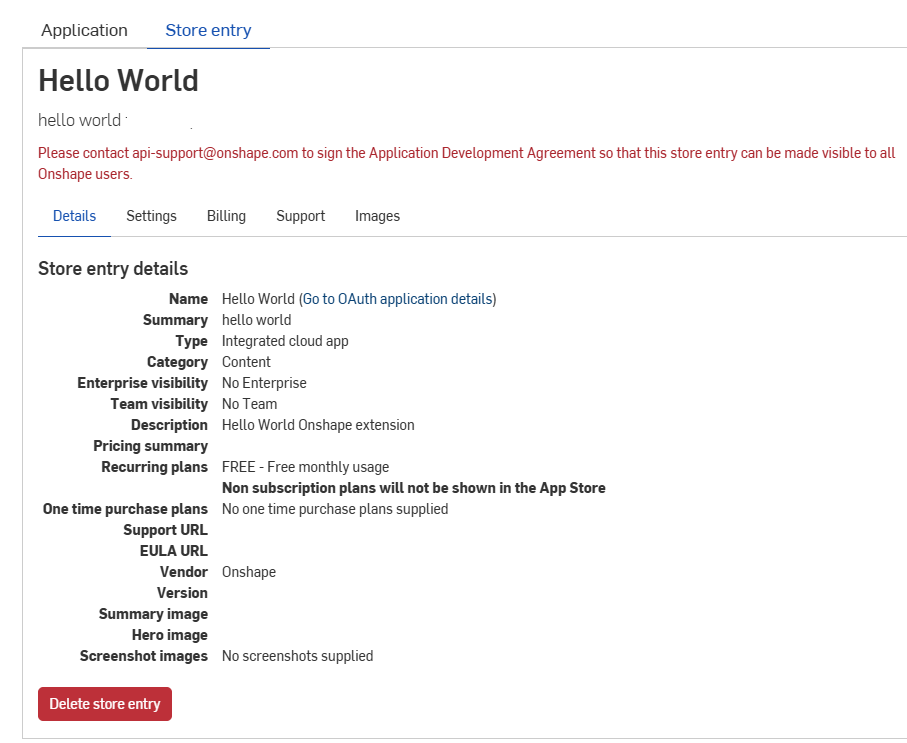
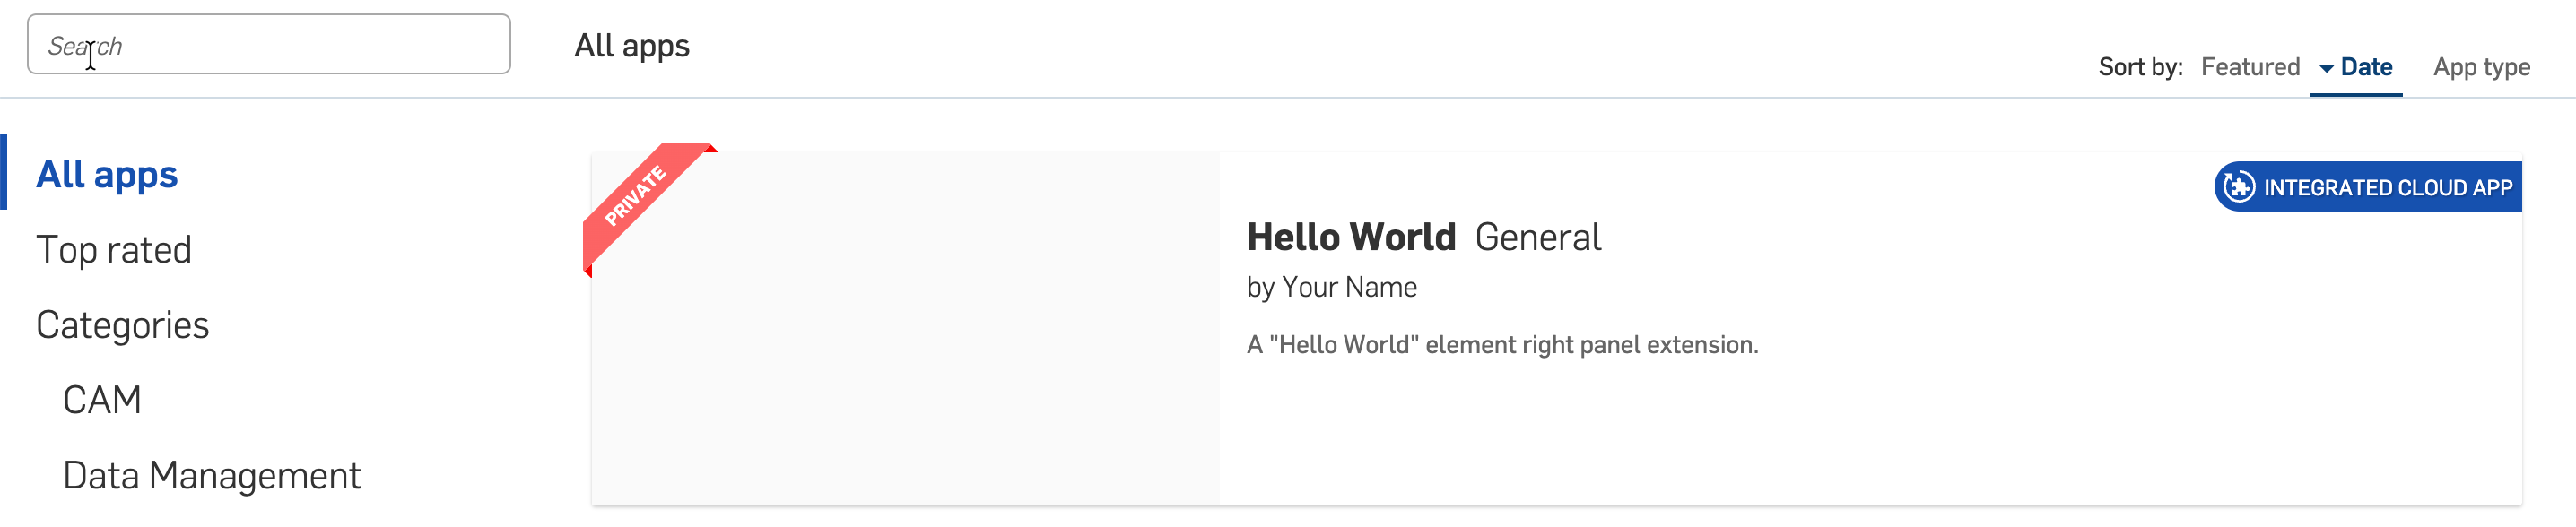
應用程式以私有的出現在 Onshape App Store 中。只有您與在「團隊顯示狀態」設定中指定的內部團隊才能看到。若要將應用程式設定為公開的,請參考 Launch Checklist。
若要回到這個螢幕,按一下應用程式的商店項目頁籤:
訂閱您的 Onshape 應用程式
個人帳戶使用者可以訂閱在 Onshape App Store 中的應用程式:
- 前往 Onshape App Store:https://cad.onshape.com/appstore
- 選擇應用程式。應用程式仍是私有的,只有建立者本人才能看到:
- 按一下訂閱:
![按一下 [訂閱] 來訂閱私有的應用程式](../Resources/Images/accounts/developer-store-subscribe-01.png)
- 依照螢幕提示操作來訂閱應用程式。
- 重新整理您的 Onshape 瀏覽器視窗來測試應用程式擴充功能。
刪除 Onshape App Store 項目
- 按一下開發人員頁面中的 OAuth 應用程式,然後選擇您的應用程式。
- 按一下商店項目分頁。
- 按一下詳細資料分頁中的刪除商店項目。
- 再次按一下刪除來確認。
權限範圍
在建立 OAuth 應用程式時,會有下列的權限範圍:
-
應用程式可以讀取您的個人檔案 (OAuth2ReadPII) - 核取以允許應用程式存取您個人檔案中的資訊。
-
應用程式可以讀取您的文件 (OAuth2Read) - 核取以允許應用程式讀取您的文件。
-
應用程式可以寫入您的文件 (OAuth2Write) - 核取以允許應用程式寫入您的文件。
-
應用程式可以刪除您的文件與工作區 (OAuth2Delete) - 核取以允許應用程式刪除您文件與工作區的存取權限。
-
應用程式可以代表您要求購買 (OAuth2Purchase) - 核取以允許應用程式為您做出訂購。
-
應用程式可以代表您共享與取消文件共享 (OAuth2Share) - 核取以允許應用程式共享與取消共享您的文件。