公司/課堂/企業設定 - 開發人員
![]()
僅為這個計畫提供
Enterprise and Professional admins can register new applications with Onshape, manage and distribute applications to users, and manage API keys for users.
The steps on this page apply only to company, classroom, or enterprise administrators. Individual users should follow the the My Account Settings: Developer steps..
All applications created in the Company/Classroom/Enterprise Settings count towards the company's API Limits. All applications created in the Developer Portal count toward the individual user's API Limits.
All applications submitted to the Onshape App Store (Onshape Apps) must follow the instructions on the API Guide: OAuth2 page and use OAuth2 for authorization. Automation scripts (or applications not meant for the Onshape App Store) may use either OAuth2 or API Keys for authentication. OAuth2 allows applications to call Onshape APIs on behalf of the users of the application; API keys will only perform operations on behalf of the Onshape user who generated the API keys.
For more information on creating and managing Onshape applications, please see the Onshape Developer Docs.
Click your user icon (![]() ) in the top right corner of the Onshape window and select Company/Classroom/Enterprise settings from the dropdown.
) in the top right corner of the Onshape window and select Company/Classroom/Enterprise settings from the dropdown.
Click Developer in the left pane:
-
Register a new OAuth application with Onshape
-
Share applications with users, aliases, and teams within the company
-
Submit properly authenticated apps to the Onshape App Store
-
View, create, and delete API keys for anyone in the company
-
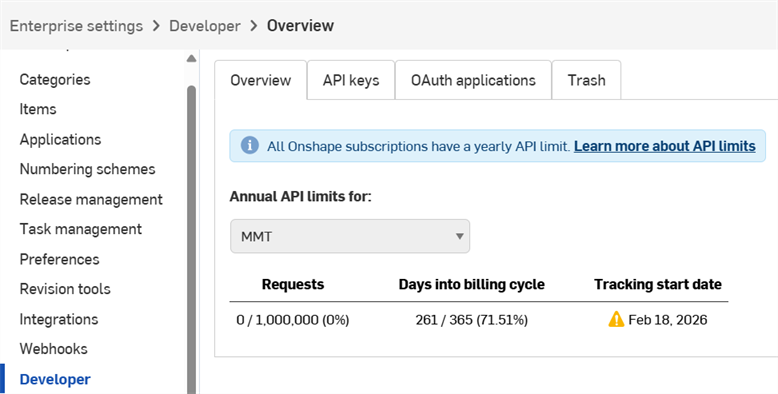
View API usage for the company.
- See API Limits for more information on API usage.
- Click the Annual API limits for dropdown to select a different company, classroom, or enterprise.
-
Notification emails are sent to all admins at 25%, 50%, 75%, and 100% of usage.
To create an app that opens in the Onshape UI for internal use or testing:
- Register the app with Onshape.
- Create an extension for the app in the Onshape UI.
- Assign users to the app.
To publish the app to the Onshape App Store for end users:
- Authenticate with OAuth2.
- Create an app store entry.
- Complete the Launch Checklist
所有送交至 Onshape App Store (Onshape Apps) 的應用程式必須按照 API Guide: OAuth2 頁面中的說明操作,並使用 OAuth2 來授權。自動化的指令碼 (或不適用於 Onshape App Store 的應用程式) 可以使用 OAuth2 或 API 金鑰來授權。OAuth2 可允許應用程式代表應用程式使用者呼叫 Onshape API;API 金鑰僅會代表產生 API 金鑰的 Onshape 使用者執行操作。
API 金鑰是建立供個人使用的小型應用程式的有效方法,允許開發人員避免使用 OAuth 工作流程的負擔。
API 金鑰是用來驗證應用程式而不是其使用者的 (OAuth2 透過確保使用者有權存取 Onshape 來驗證應用程式與應用程式使用者)。在您建立 API 金鑰之後,其僅在建立它的 stack 中有效。在 companyName.onshape.com 上建立的 API 金鑰將無法在 cad.onshape.com 上作用。
並 未與公司或企業相關的API 金鑰可以透過我的帳戶 - 開發人員的頁面來管理。
個人帳戶最多只能擁有兩個 (2) API 金鑰。根據需要刪除 API 金鑰。公司、課堂、與企業帳戶則無上限。
檢視 API 金鑰
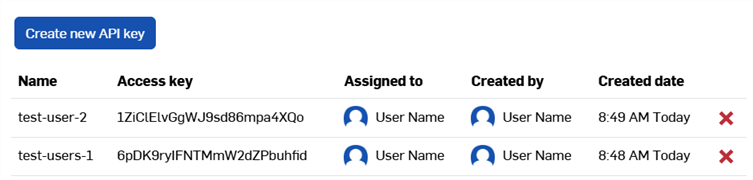
- In your Company/Classroom/Enterprise Developer settings, click the API keys tab.
- 檢閱公司可用的 API 金鑰。
建立 API 金鑰
- 在您的公司/課堂/企業開發人員的設定中,按一下 API 金鑰。
- 按一下 建立新 API 金鑰。

- 在名稱欄位中提供 API 金鑰的名稱。
-
將 API 金鑰分配給公司中的某人。您可以在使用者欄位中根據名稱或電子郵件搜尋。
- 選擇金鑰的權限。請參考下方的權限範圍。
- 按一下 建立 API 金鑰按鈕。
-
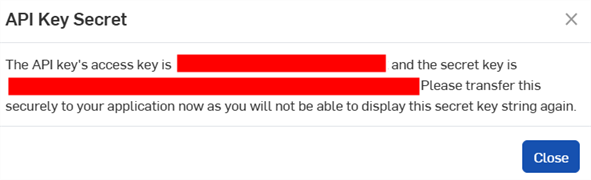
在彈出視窗中,複製顯示的 API 金鑰與金鑰秘密,將其儲存於某處,然後按一下 關閉 按鈕。
You will not be able to access this secret key again. This secret is unique to you and your app. It should be protected like any sensitive password and never checked into source code.
- 關於使用 API 金鑰來授權應用程式的資訊,請參考 API Guide: Authentication。
刪除 API 金鑰
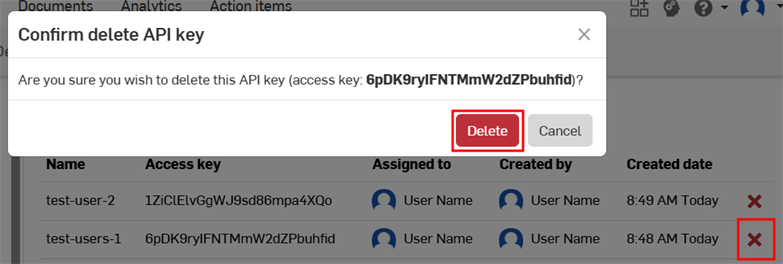
- 按一下您要刪除 API 金鑰右側的 "X" 圖示。
- 確認您要為所有使用者刪除這個 API 金鑰。無法復原這個操作。按一下 刪除 來確認。
-
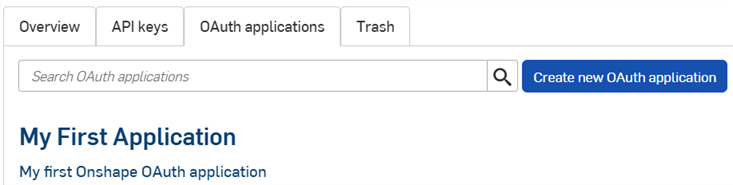
Click the OAuth applications tab on the Developer page to see a list of all your apps:
-
Click the Create new OAuth application button.
-
Fill out the form:
-
名稱 - 向使用者顯示的應用程式名稱。
-
Primary format - String that uniquely identifies your application and is a marker for the data it might store on Onshape servers (e.g.,com.example.example). Cannot be changed after the application is registered. Not displayed to users.
-
Summary - Description of the application, shown to the user when they’re asked to grant the application permission to access their data.
-
Redirect URLs - URL to which you are redirected after authentication; the landing page of your application.
- Your application must specify at least one URL used in the OAuth protocol exchanges.
-
This URL must also use SSL (a URL that begins with https), with two exceptions applicable for installed desktop applications: http://localhost:<port> and urn:ietf:wg:oauth:2.0:oob.
-
Type - Application type: Integrated Cloud App, Connected Cloud App, or Connected Desktop App.
-
OAuth URL - URL used to start the OAuth2 process to authenticate the user. See Developer Docs: OAuth2 for details.
-
Should contain the URL of your deployed application.
-
This is the first URL called from the Onshape Applications page.
-
The page hosted at this URL should handle the OAuth authentication. Once your application’s server has been authenticated on behalf of the user, that user should be redirected to your applications content.
-
If you have not deployed your app yet, you can leave this field blank for local work and update it later.
All applications submitted to the Onshape App Store for public use must authenticate properly with OAuth2. See Developer Docs: OAuth2 for details.
-
-
設定
-
支援協作 - 如果在開發應用程式時要與其他使用者協同合作,請核取此選項。
-
- 權限 - 請參考下方的權限範圍。
-
-
按一下 建立應用程式。
-
Copy the OAuth secret key from the window.
You will not be able to access this secret key again. This secret is unique to you and your app. It should be protected like any sensitive password and never checked into source code.
-
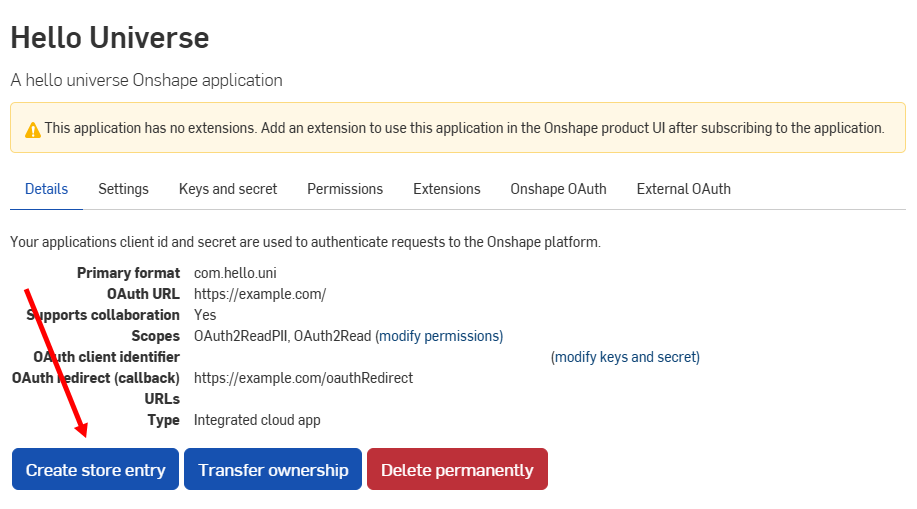
The app's OAuth application entry appears with the Details tab active. Selecting the app name on the OAuth applications tab now brings you to this screen.
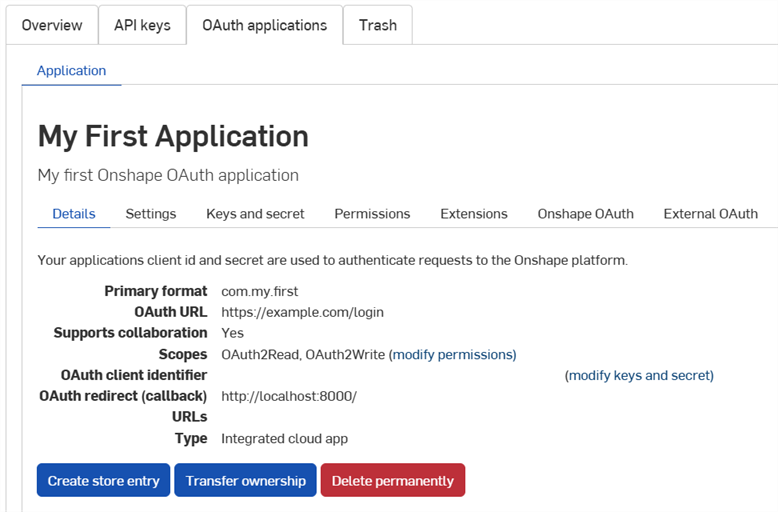
Use the tabs on this screen to:
-
Details:
-
Settings: Manage app settings
- Keys and secret:
- Copy the OAuth client identifier key
- Regenerate a new OAuth client secret key
-
Permissions: Modify app permission scopes
-
Extensions: Manage app extensions
-
Onshape OAuth: Manage Onshape authentication
-
External OAuth: Manage third-party authentication
See the Onshape Developer Documentation for more information, including: properly authenticating with OAuth2 and completing Launch Checklist. See the Hello World tutorial for a working example.
-
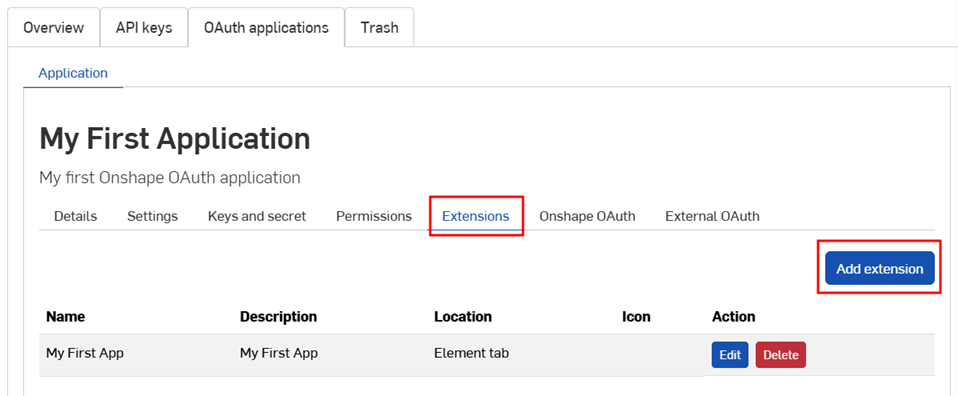
Click the OAuth applications tab on the Developer page, then select your application.
-
Click the Extensions tab.
-
Click Add extension.
-
Fill out the form:
-
Name: Can be truncated in the UI if it is too long.
-
Description (optional): Does not appear in the Onshape UI, but could appear in the authentication grant process.
-
Location: Where the extension exists in the Onshape UI.
-
See Supported Locations and Contexts in the Developer Docs.
-
You can create only one element tab extension per application.
-
-
Context: Some locations work in the context of a selection, such as inside a Part Studio.
-
See Supported Locations and Contexts in the Developer Docs.
-
-
Action URL: Locations that embed a UI use the action URL to define the address of the page to display. The action URL is used to specify the REST endpoint if the location is an action (context menu, toolbar item, action in dialog etc.) and the action type is GET or POST. If the location is an action and the action is Open in new window, the action URL is the URL to open in the new window.
-
See Action URL parameters in the Developer Docs for a list of parameters that can be used in this field.
-
-
Action type: Applicable for locations that do not embed UIs. Supported action types are:
-
GET - This makes a GET API call using the action URL. Parameter replacement is done on the action URL.
-
POST - This makes a POST API call using the action URL and the action body as the post body. Parameter replacement is done on both the action URL and the action body.
-
Open in new window - This opens the action URL in a new browser window. Parameter replacement is done on the action URL.
-
-
Action body: Only applicable for POST action types. The action body is passed in a POST API call and must be in a valid JSON format.
-
Show response: This is only applicable if the action type is GET or POST. When selected, the UI waits for a response and shows the response in a dialog in the UI. The response must be in a valid JSON format.
-
Icon: The icon is displayed where the extension exist, which can include an icon in an Info panel, context menu action, toolbar button, action button in a dialog, or other supported locations.
-
-
Click OK.
For more information on creating and managing Onshape applications, please see the Onshape Developer Docs. Please see the Hello World tutorial for a working example.
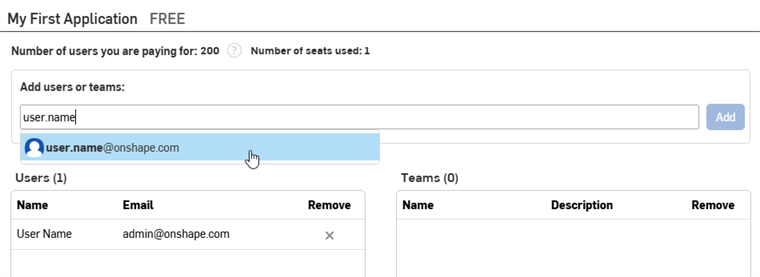
Admins can add internal users to applications for testing before submitting to the Onshape App Store. Users added here automatically see the associated app extensions in their Onshape UI, without having to subscribe via the app store.
-
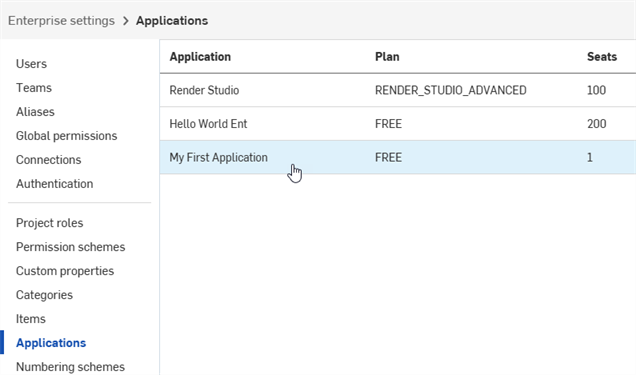
Once your app is registered, click Applications in the left pane.
-
Select the application in the list.
-
Begin typing the name or email of a user, team, or alias in the Add users or teams field, and select a result from the list. The admin who created the app is automatically in the Users list. Continue adding names or emails.
-
Click the Add button.
Light users cannot be added to applications.
To remove a user, alias, or team from the app, click its X icon in the Remove column.
- 在您的「開發人員」設定中,按一下 OAuth 應用程式。
- 按一下要轉移應用程式的名稱。
- Click the Transfer ownership button on the Details tab. The Transfer ownership dialog opens.
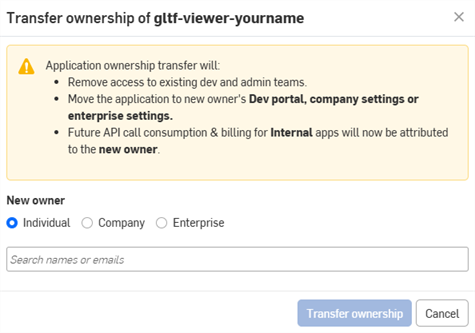
- 選擇將應用程式轉移給個人、公司或企業的選項。
- 若要轉移給個人,請在搜尋欄位中輸入新擁有者的名稱或電子郵件。若要轉移給公司或企業,請從下拉清單中選擇一個選項。
- 按一下轉移所有權。系統會將應用程式從您的 OAuth 應用程式清單中移除。
- If the app is transferred to an individual account, they receive an email notification and the app appears in their Onshape Developer Portal.
- If the app is transferred to someone in a Company/Classroom/Enterprise, all Admins receive an email notification and the app appears in their Developer Settings.
未來的 API 呼叫消耗和計費將歸屬於新擁有者。詳情請參考 API 限制。
- Click Developer in the left pane of your company settings, click OAuth applications, then select the app to deprecate.
-
On the Details tab, click the Delete permanently button.
- Click Delete again to confirm in the dialog.
Before submitting an app to the Onshape App Store, see the Onshape Developer Documentation for requirements, including properly authenticating with OAuth2 and completing Launch Checklist.
To create a new store entry for an OAuth application:
-
Click OAuth applications on the Developer page, then select your application.
-
Click the Create store entry button on the app's Details tab.
-
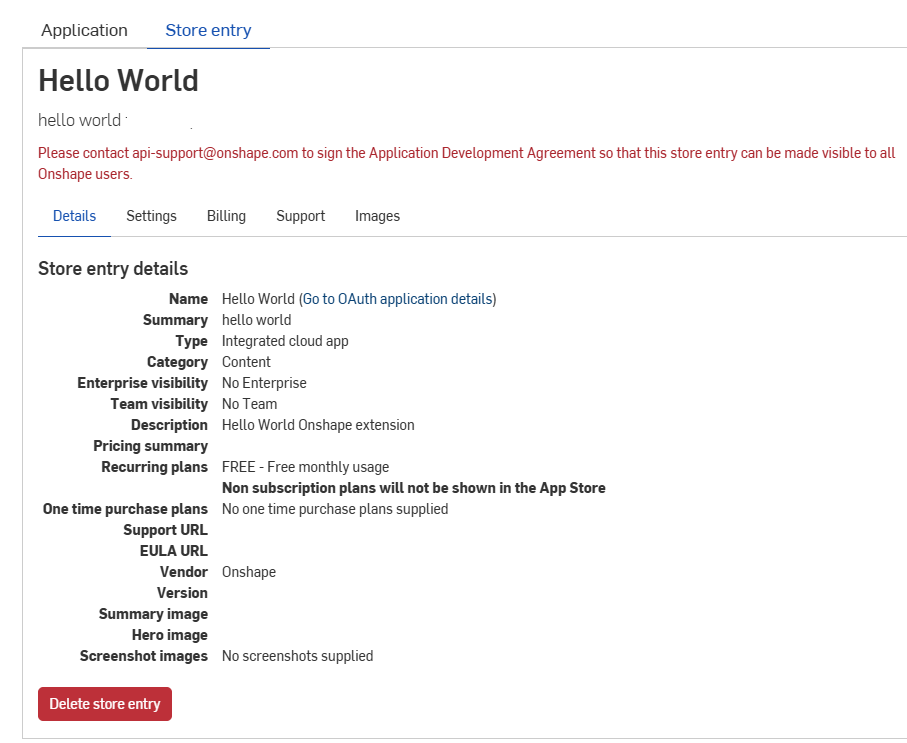
Fill out the form:
- Name - Automatically set from the app name provided during registration.
-
Summary - Automatically set from the summary provided during registration.
-
Type - Application type: Integrated Cloud App, Connected Cloud App, or Connected Desktop App. This should match the Type that was selected when registering the OAuth application.
-
Category - Select the appropriate category for your app.
-
Team Visibility - Choose to make the private app store entry visible to no internal users (default), all internal users, or specific teams.
-
Description - User-facing description of the application. Limited formatting allowed.
-
Support URL - URL or email users of your app should be directed to for assistance. This must be actively monitored.
-
Support Email - Email that should receive app subscription notifications. This must be actively monitored.
-
Vendor - Your company name.
-
Version - Current version of this application.
-
Images - Optionally upload summary, hero, and other images.
-
按一下 建立。
The application appears in the Onshape App Store as private. It is viewable only to you and any internal teams specified in Team Visibility settings. To make the app public, see the Launch Checklist next.
To return to this screen, click the Store entry tab for the application:
- Click OAuth applications on the Developer page, then select your application.
- Click the Store entry tab.
- Click Delete store entry on the Details tab.
- Click Delete again to confirm.
在建立 OAuth 應用程式時,會有下列的權限範圍:
-
應用程式可以讀取您的個人檔案 (OAuth2ReadPII) - 核取以允許應用程式存取您個人檔案中的資訊。
-
應用程式可以讀取您的文件 (OAuth2Read) - 核取以允許應用程式讀取您的文件。
-
應用程式可以寫入您的文件 (OAuth2Write) - 核取以允許應用程式寫入您的文件。
-
應用程式可以刪除您的文件與工作區 (OAuth2Delete) - 核取以允許應用程式刪除您文件與工作區的存取權限。
-
應用程式可以代表您要求購買 (OAuth2Purchase) - 核取以允許應用程式為您做出訂購。
-
應用程式可以代表您共享與取消文件共享 (OAuth2Share) - 核取以允許應用程式共享與取消共享您的文件。