 派生
派生
![]()
![]()
![]()
使用关联链接,将 Part Studio、零件、曲面、曲线、草图、平面、活动钣金模型或嵌合连接器从一个 Part Studio 插入到相同或不同文档中的另一个(从而链接文档)。您也可以将这些图元从同一文档的不同版本插入到 Part Studio 中。
“派生”特征是主模型工作流程的基础。它允许将一个 Part Studio 中的零件、草图、曲面、曲线、平面或嵌合连接器插入到同一文档或具有关联链接的不同文档中的另一个 Part Studio 中。派生实例是一种单向关联,修改原始实例会将更改传播到派生实例。但是,这种关系不会反过来出现;派生实例不会更新其主实例。
“派生”位于特征工具栏中。启动新的“派生”特征,导航到同一文档或其他文档中的草图或零件。选择草图或零件,然后接受对话框。
默认情况下,Onshape 在 Part Studio 的原点插入派生零件。您可以通过在“位置”输入框中选择隐式或显式的嵌合连接器来选择其他位置。Onshape 将派生实例的原点与嵌合连接器对齐。
您并不总是需要使用来源的原点来定位派生实例。也可以通过对齐派生零件的显式嵌合连接器来驱动其位置。将位置从基础原点更改为基础嵌合连接器。选择派生实例的显式嵌合连接器之一,将其与原点或先前选择的嵌合连接器对齐。
选中“包含嵌合连接器”以添加任何与派生实例关联的显式嵌合连接器。加入后,Onshape 会将它们放在“派生”特征下的特征列表中。
若要添加同一零件的多个实例,请将它们添加到同一“派生”特征中。基础嵌合连接器选择适用于派生零件的所有实例。单击嵌合连接器图标编辑每个零件的位置。
从另一个文档插入时,将参考一个版本。如果它没有版本,则可以在“派生”对话框中创建版本。派生与活动 Part Studio 位于同一文档中的零件或草图时,参考工作区或版本。参考工作区时,对主模型的任何更新都会立即更新。参考版本时,对主模型的更新必须进行版本控制,并且参考必须更新到新版本。版本图标会指示参考何时过期。单击版本图标上的蓝色通知以更新到新版本。建议尽可能选择参考某个版本,因为它可以加快整个文档的性能,并允许您决定何时重建更新。
创建派生零件时,最佳做法是使用不太可能被修改的已完成或成熟零件。因此,请避免从大型 Part Studio 派生出会继续编辑的零件。同样重要的是不要创建派生实例链,一定要派生原始实例,而不是从已经派生的实例派生。这确保了数据的可靠重建。为了获得最佳性能,可以考虑派生简单 Part Studio 或草图来代替零件,以减少特征重建量。
派生是主模型工作流程的基本特征,它提供了利用布局草图和空间分配零件的能力。
- 在 Part Studio 中,单击“派生”特征图标 (
 )。
)。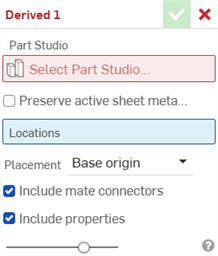
- 单击“选择 Part Studio”输入框打开“选择 Part Studio”对话框,其中包含本文档中的 Part Studio 及其特征的列表:
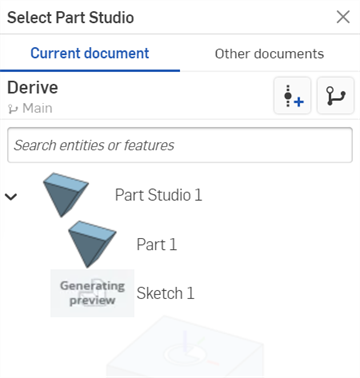
- 您能选择“当前文档”并从其他版本派生,或选择“其他文档”并从其特征和零件中进行选择(如下所示) 。
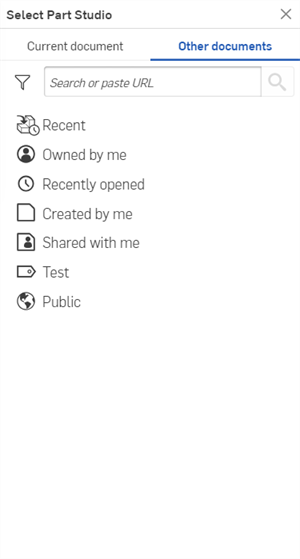
- 使用筛选器和搜索栏查找并选择文档。
- 您可以按零件/装配体名称和其他属性(包括自定义特性)进行搜索。
- 搜索接受多个词以及非字母数字字符,例如标点字符。
- 搜索栏左侧的筛选器
 显示了搜索所依据的常用属性(或所有属性)。您一次可以使用多个筛选器。
 - 每个搜索结果都指出了满足搜索条件的图元类型,搜索条件首先是名称前面的图标,然后是图元的名称。在其下方,是工作区或版本图标、文档名称和工作区名称(或版本名称,属于搜索条件的一部分时)、零件编号和发布管理状态(如下所示)。

- 选择任何 Part Studio、零件、曲面、草图、平面、曲线、活跃的钣金模型或嵌合连接器。
- (可选)选中保留活跃钣金模型将活动钣金模型派生到 Part Studio。钣金模型、展开图样和关联的展开图样草图已派生,您可以继续在此 Part Studio 中处理钣金模型(例如,添加接头、法兰或卷边)。
如果未选中,则任何导入的活跃钣金模型都将被视为派生零件,而不是钣金模型。派生后,不能将其作为活跃的钣金模型进行处理。
- 单击“选择 Part Studio” 对话框右上角的 X 按钮。派生零件/Part Studio 相对于其基础 Part Studio 的原点插入和放置。
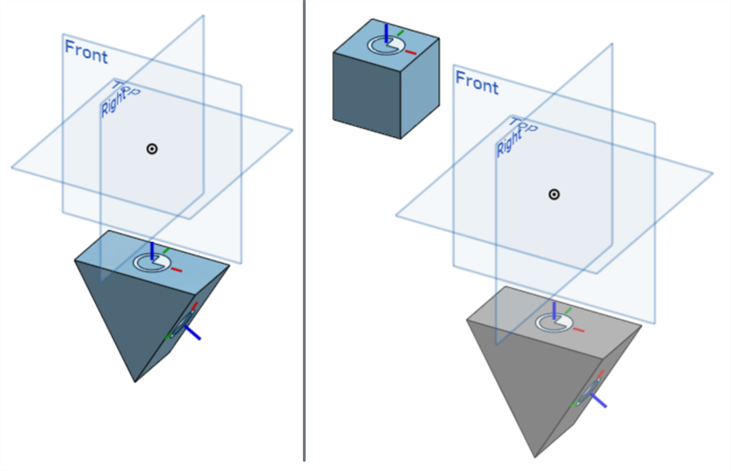
- 单击“位置”输入框并选择一个新位置。在下面的示例中,使用箱零件顶部的嵌合连接器作为位置。可以为该位置选择或创建显式或隐式嵌合连接器(它们的坐标系用于派生零件/Part Studio 方向)。派生零件使用这个新位置作为放置的基础原点(如右下方所示)。
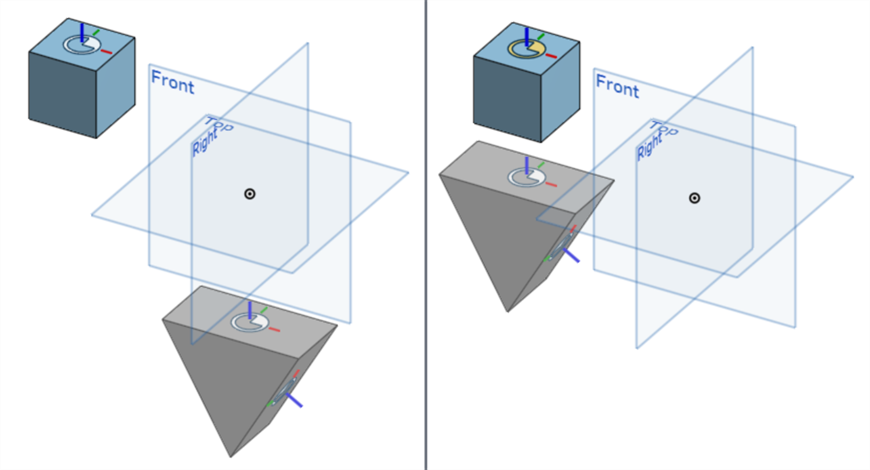
没有位置的默认放置(左图)。使用箱顶部(右图)的嵌合连接器的位置。
-
可以使用显式或隐式嵌合连接器创建其他位置。这会创建额外的派生实例,例如,指向箱右侧嵌合连接器的 z 轴的附加三角形零件。
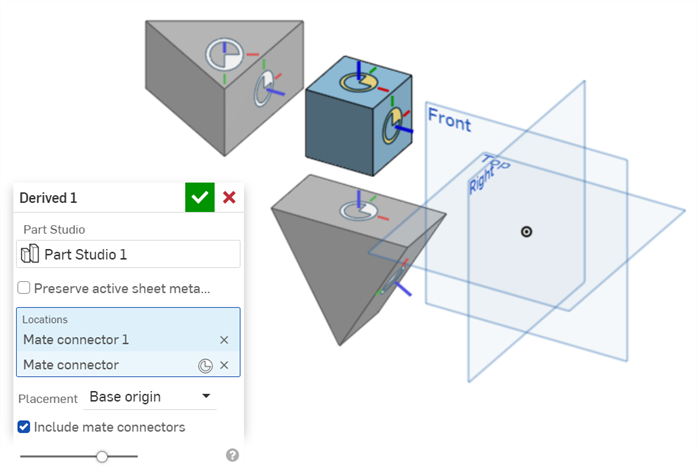
- 选择放置方法:
- 基础原点 - 派生零件/Part Studio 放置遵循基础 Part Studio 的原点。
- 基础嵌合连接器 - 选择此选项可将点选择器添加到派生零件/Part Studio 中包含的嵌合连接器中。选择其中一个嵌合连接器,将派生零件/Part Studio 放置在此嵌合连接器的原点上。
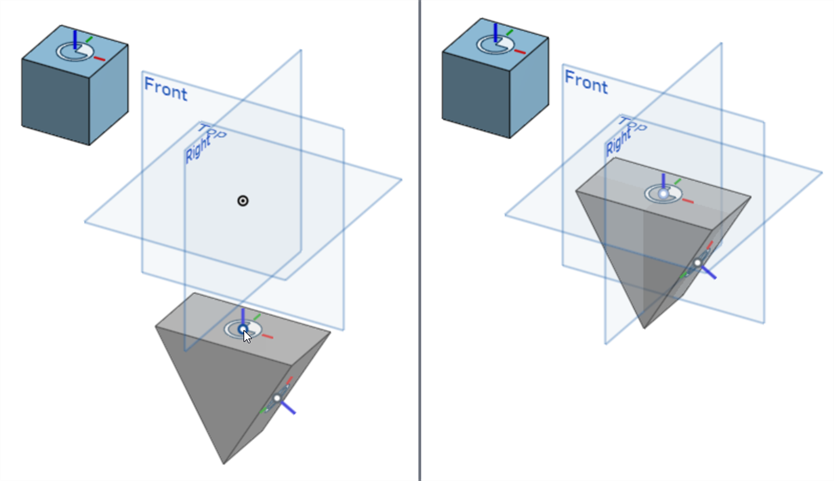
选择“放置:基础嵌合连接器”,派生零件/Part Studio 包含的嵌合连接器已启用点选择器(左图)。单击嵌合连接器点选择器可调整派生零件/Part Studio,使其使用嵌合连接器的坐标系作为基础(右图)。
将“位置”与基础嵌合连接器放置选项结合使用,可以将派生零件和当前 Part Studio 中的零件精确放置在一起:
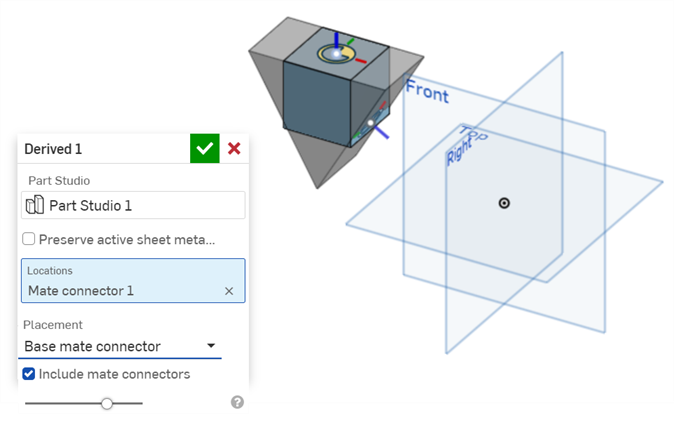
盒顶部嵌合连接器用于定位,派生三角形的顶部嵌合连接器用于放置的基础嵌合连接器。
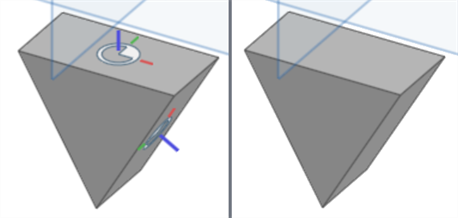
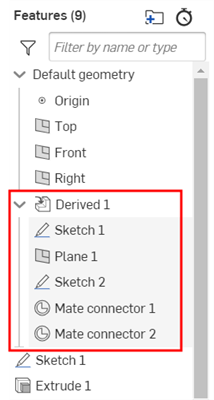
- 选中“包含嵌合连接器”后,所有与派生零件/Part Studio 关联的嵌合连接器也将包含在“派生”特征中(如下左图所示)。取消选中可包含不带任何关联的嵌合连接器的零件/Part Studio(如下右图所示)。
- 默认选中“包含属性”后,源实体中的所有元数据属性都将复制到新的派生实体中。取消选中该复选框将仅保留名称、材质和外观属性。
- 单击复选标记 (
 ) 接受“派生”特征。
如果列表很长,请使用搜索框按名称搜索 Part Studio 或特征。
仅当其他文档具有一个或多个版本时,才能从该文档选择。如果不存在版本或存在较新的版本(必要时可以选择立即创建一个版本),会显示有关文档状态的通知。有关更多信息,请参见链接文档。
如果使用“保留活跃钣金模型”选项导出活跃的钣金模型,然后使用 Part Studio 中的“完成钣金模型”特征(钣金模型就是从该特征派生而来的),则派生的活性钣金模型将还原为零件,其展开图样和任何关联的展开图样草图将被移除,并且任何后续的钣金模型特征(例如添加接头、法兰或卷边)失败。为避免这种情况,要么避免使用“完成钣金模型”特征,要么在完成钣金模型之前先创建从中派生活动钣金模型的文档版本,这样“派生”特征就会使用该版本的活动钣金模型。
原始 Part Studio (左图)。三角形零件作为派生零件(右图)进入当前 Part Studio,放置相对于原始 Part Studio 的原点(默认放置)。
尽管可以选择其他位置来创建其他派生实例,但不建议使用此工作流程,因为它可能导致性能下降。相反,建议创建一个装配体。
如果您派生了零件,请切换眼睛图标以将其隐藏/显示在零件列表中。
如果您派生了一个草图,则关闭/打开派生特征(位于特征列表中)旁边的眼睛图标来隐藏/显示该草图。
如果您已从其他文档派生零件(或草图),那么会在特征列表中的派生特征旁边显示一个链接图标,以指明它已链接至其他文档。![]()
派生的零件来自的文档创建了较新版本时,特征列表中的链接图标会以蓝色亮显,Part Studio 选项卡上也会显示一个完全相同的图标。![]()
请参见链接文档,了解链接的文档以及如何更新的详细信息。
当您使用派生特征时,特征列表中的“派生”特征下方列出了以下子特征:
- 嵌合连接器(如果与嵌合连接器关联的零件已插入或者是基础 Part Studio)
- 草图
- 平面
- 线性、圆形和曲线阵列(如果插入了包含阵列草图的 Part Studio)
- 镜像(如果插入了包含镜像草图的 Part Studio)
- 变换(如果启用了“复制零件”选项并插入了零件副本)
使用派生的自定义特征还将在特征列表中看到这些子特征。
使用派生特征左侧的下拉箭头显示或隐藏派生子特征列表。
使用该特征右侧的眼睛图标 (![]() ) 来显示/隐藏该特征。
) 来显示/隐藏该特征。
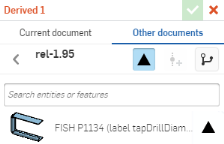
插入从其他 Part Studio 派生的零件时,您可以选择搜索已发布的零件。对话框第二行中的图标(在“其他文档”筛选器下方)还可帮助您查找所需的零件:
![]()
从左向右:筛选已发布的零件,创建新版本,查看版本图形
使用 ![]() 图标可查找已发布的零件(在选定文档中):
图标可查找已发布的零件(在选定文档中):
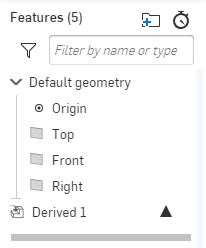
为派生零件插入了已发布的零件后,特征图标会表示其为派生特征,且发布图标指示其为已发布的零件:
- 您可以从同一 Part Studio 中选择多个零件,但不能为每个派生特征选择多个 Part Studio。但是,您可以根据需要为任意数量的零件/Part Studio 创建多个派生特征。
- 您不能在同一个 Part Studio 中两次派生相同的 Part Studio 或 Part Studio 配置。如果您有配置 A 和配置 B,并且为配置 A 创建了派生特征,则无法创建另一个再次插入配置 A 的派生特征。但是,您可以创建 2 个派生特征;一个用于同一 Part Studio 中的配置 A,另一个用于配置 B。
- 您可以将一个派生特征换成另一个,即使第二个派生特征在不同的 Part Studio 中也是如此:
- 在目标 Part Studio 中,双击“派生”特征打开“派生”对话框。(或者在特征列表中右键单击“特征”列表并选择“编辑”。)
- 选择新文档(如有必要)或 Part Studio,然后选择要插入的特征。
- 单击复选标记以接受选择并关闭对话框。
- 请注意,后续特征可能会失败 - 请检查 Part Studio,并做出所有必要的调整。
-
选择草图后,您可以使用该草图在目标 Part Studio 中进行拉伸。在基础 Part Studio 中,当您对草图(例如尺寸)进行更改时,更改会反映在目标 Part Studio 中。您可以在许多 Part Studio 中使用草图作为派生特征。然后,在每个 Part Studio 中,继续进行不同的设计。
- 派生特征进行单向通信:从基础 Part Studio 到目标 Part Studio。如果您在基础 Part Studio 中更改特征,此更改会反映在目标 Part Studio 中,但反之则不然。
- 此特征不接受循环参考。例如,将某个特征从 Part Studio A 插入 Part Studio B 时,不能将任何特征从 Part Studio B 插入 Part Studio A。该操作将会失败,因为尝试从 Part Studio A 到 B 再到 A 是循环参考。
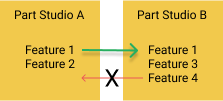
- 插入派生零件时,零件的可见性设置无关紧要 - 派生零件在插入时始终可见,无论它们在原始 Part Studio(工作区或版本)中的设置如何。
-
派生的配合连接器是该零件的刚性特征。如果派生零件的配合连接器与目标 Part Studio 的方向不同,则会导致配合连接器方向不匹配。放置与当前 Part Studio 标准方向对齐的新位置配合连接器会导致两个未对齐的连接器。旋转此连接器也会使零件旋转,因此两个配合连接器保持未对齐。
使用关联的链接将零件、草图、曲面、曲线、平面或嵌合连接器从一个 Part Studio 插入同一文档或不同文档中的另一个 Part Studio(从而链接文档)。您也可以从同一文档的不同版本将这些图元插入到 Part Studio。
- 在 Part Studio 中,选择“派生”工具图标 (
 )。
)。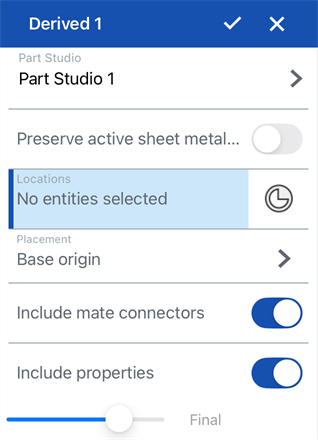
- 或者,如果要将活动钣金模型派生到 Part Studio 中,则可将“保留活跃钣金模型”开启。钣金模型、展开图样和关联的展开图样草图已派生,您可以继续在此 Part Studio 中处理钣金模型(例如,添加联接点、凸缘或卷边)。
关闭后,任何导入的活性钣金模型都将被视为派生零件,而不是钣金模型。派生后,不能将其作为活跃的钣金模型进行处理。
- 轻按“选择 Part Studio ”输入框打开“选择 Part Studio”对话框,其中包含本文档中的 Part Studio 及其特征列表。
请使用搜索框按名称搜索 Part Studio 或特征。
- 轻按以从列表中选择。
- (可选)选择其他文件查看其他文档的 Part Studio。使用筛选器查找和选择文档,然后选择该文档的一个或多个特征。
- 派生零件/Part Studio 相对于其基础 Part Studio 的原点插入和放置。
- 轻按“位置”输入框并选择一个新位置。可以为该位置选择或创建显式或隐式嵌合连接器(它们的坐标系用于派生零件/Part Studio 方向)。派生零件使用这个新位置作为放置的基础原点。
- 选择放置方法:
- 基础原点 - 派生零件/Part Studio 的放置遵循基础 Part Studio 的原点。
- 基础嵌合连接器 - 选择此选项可将点选择器添加到派生零件/Part Studio 中包含的嵌合连接器中。选择其中一个嵌合连接器,将派生零件/Part Studio 放置在此嵌合连接器的原点上。
将“位置”与基础嵌合连接器放置选项结合使用,可以将派生零件和当前 Part Studio 中的零件精确放置在一起:
- 启用“包含嵌合连接器”后,与派生零件/Part Studio 关联的任何嵌合连接器也将包含在派生特征中。取消勾选此选项可仅包含零件/ Part Studio,而不包含任何关联的嵌合连接器。
- 默认选中“包含属性”后,源实体中的所有元数据属性都将复制到新的派生实体中。取消选中该复选框将仅保留名称、材质和外观属性。
- 轻按复选标记。
如果使用“保留活跃钣金模型”选项导出活跃的钣金模型,然后使用 Part Studio 中的“完成钣金模型”特征(钣金模型就是从该特征派生而来的),则派生的活性钣金模型将还原为零件,其展开图样和任何关联的展开图样草图将被移除,并且任何后续的钣金模型特征(例如添加联接点、法兰或卷边)失败。为避免这种情况,要么不要使用“完成钣金模型”特征,要么在完成钣金模型之前先创建从中派生活动钣金模型的文档版本,这样“派生”特征就会使用该版本的活动钣金模型。
只有当该文档有一个或多个版本时,您才能从其他文档进行选择。如果不存在任何版本或存在较新版本,则会显示有关文档状态的通知。如果不存在任何版本,请轻按以在该文档中创建一个版本。
可以使用显式或隐式嵌合连接器创建其他位置。这会创建额外的派生实例。
尽管可以选择其他位置来创建其他派生实例,但不建议使用此工作流程,因为它可能导致性能下降。相反,建议创建一个装配体。
如果您派生了一个零件,零件会列在零件清单(位于特征列表下)中,您可以在零件清单中关闭/打开眼睛图标来隐藏/显示该零件。
如果您派生了一个草图,则可以关闭/打开派生特征(位于特征列表中)旁边的眼睛图标来隐藏/显示该草图。
如果您已从其他文档派生零件(或草图),那么会在特征列表中的派生特征旁边显示一个链接图标,以指明它已链接至其他文档。![]()
派生的零件来自的文档创建了较新版本时,特征列表中的链接图标会以蓝色亮显,Part Studio 选项卡上也会显示一个完全相同的图标。![]()
请参见链接文档,了解链接的文档以及如何更新的详细信息。
插入派生自另一个 Part Studio 的零件时,可以插入已发布的零件。零件右侧的“已发布零件”图标 (![]() ) 表示该零件已发布:
) 表示该零件已发布:
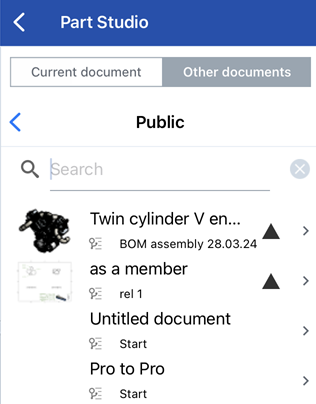
为派生零件插入了已发布的零件后,特征图标会表示其为派生特征,且发布图标指示其为已发布的零件:
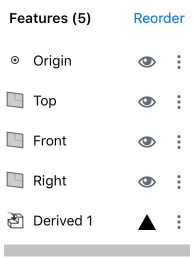
- 您可以从同一 Part Studio 中选择多个零件,但不能为每个派生特征选择多个 Part Studio。但是,您可以根据需要为任意数量的零件/Part Studio 创建多个派生特征。
- 您不能在同一个 Part Studio 中两次派生相同的 Part Studio 或 Part Studio 配置。如果您有配置 A 和配置 B,并且为配置 A 创建了派生特征,则无法创建另一个再次插入配置 A 的派生特征。但是,您可以创建 2 个派生特征;一个用于同一 Part Studio 中的配置 A,另一个用于配置 B。
- 派生特征进行单向通信:从基础 Part Studio 到目标 Part Studio。如果您在基础 Part Studio 中更改特征,此更改会反映在目标 Part Studio 中,但反之则不然。
- 此特征不接受循环参考。例如,不能先将特征从 Part Studio A 插入 Part Studio B,然后再次将其插入 Part Studio A,此操作将会失败。
-
插入派生零件时,零件的可见性设置无关紧要 - 无论基础 Part Studio(工作区或版本)中的设置如何,派生零件在插入时始终可见。
使用关联的链接将零件、草图、曲面、曲线、平面或嵌合连接器从一个 Part Studio 插入同一文档或不同文档中的另一个 Part Studio(从而链接文档)。您也可以从同一文档的不同版本将这些图元插入到 Part Studio。
- 在 Part Studio 中,选择“派生”工具图标 (
 )。
)。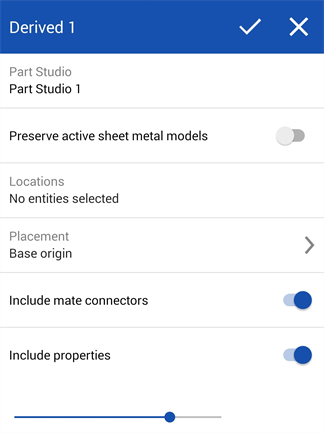
- 轻按“选择 Part Studio ”输入框打开“选择 Part Studio”对话框,其中包含本文档中的 Part Studio 及其特征列表。
请使用搜索框按名称搜索 Part Studio 或特征。
- 轻按以从列表中选择。
- 或者,如果要将活动钣金模型派生到 Part Studio 中,则可将“保留活跃钣金模型”开启。钣金模型、展开图样和展开图样草图已派生,您可以继续在此 Part Studio 中处理钣金模型(例如,添加联接点、凸缘或卷边)。
关闭后,任何导入的活性钣金模型都将被视为派生零件,而不是钣金模型。派生后,不能将其作为活跃的钣金模型进行处理。
如果使用“保留活跃钣金模型”选项导出活跃的钣金模型,然后使用 Part Studio 中的“完成钣金模型”特征(钣金模型就是从该特征派生而来的),则派生的活性钣金模型将还原为零件,其展开图样和任何关联的展开图样草图将被移除,并且任何后续的钣金模型特征(例如添加联接点、法兰或卷边)失败。为避免这种情况,要么不要使用“完成钣金模型”特征,要么在完成钣金模型之前先创建从中派生活动钣金模型的文档版本,这样“派生”特征就会使用该版本的活动钣金模型。
- (可选)选择其他文件查看其他文档的 Part Studio。使用筛选器查找和选择文档,然后选择该文档的一个或多个特征。
- 派生零件/Part Studio 相对于其基础 Part Studio 的原点插入和放置。
- 轻按“位置”输入框并选择一个新位置。可以为该位置选择或创建显式或隐式嵌合连接器(它们的坐标系用于派生零件/Part Studio 方向)。派生零件使用这个新位置作为放置的基础原点。
可以使用显式或隐式嵌合连接器创建其他位置。这会创建额外的派生实例。
- 选择放置方法:
- 基础原点 - 派生零件/Part Studio 的放置遵循基础 Part Studio 的原点。
- 基础嵌合连接器 - 选择此选项可将点选择器添加到派生零件/Part Studio 中包含的嵌合连接器中。选择其中一个嵌合连接器,将派生零件/Part Studio 放置在此嵌合连接器的原点上。
将“位置”与基础嵌合连接器放置选项结合使用,可以将派生零件和当前 Part Studio 中的零件精确放置在一起:
- 启用“包含嵌合连接器”后,与派生零件/Part Studio 关联的任何嵌合连接器也将包含在派生特征中。取消勾选此选项可仅包含零件/ Part Studio,而不包含任何关联的嵌合连接器。
- 默认选中“包含属性”后,源实体中的所有元数据属性都将复制到新的派生实体中。取消选中该复选框将仅保留名称、材质和外观属性。
- 轻按复选标记。
只有当该文档有一个或多个版本时,您才能从其他文档进行选择。如果不存在任何版本或存在较新版本,则会显示有关文档状态的通知。如果不存在任何版本,请轻按以在该文档中创建一个版本。
尽管可以选择其他位置来创建其他派生实例,但不建议使用此工作流程,因为它可能导致性能下降。相反,建议创建一个装配体。
如果您派生了一个零件,零件会列在零件清单(位于特征列表下)中,您可以在零件清单中关闭/打开眼睛图标来隐藏/显示该零件。
如果您派生了一个草图,则可以关闭/打开派生特征(位于特征列表中)旁边的眼睛图标来隐藏/显示该草图。
如果您已从其他文档派生零件(或草图),那么会在特征列表中的派生特征旁边显示一个链接图标,以指明它已链接至其他文档。![]()
派生的零件来自的文档创建了较新版本时,特征列表中的链接图标会以蓝色亮显,Part Studio 选项卡上也会显示一个完全相同的图标。![]()
请参见链接文档,了解链接的文档以及如何更新的详细信息。
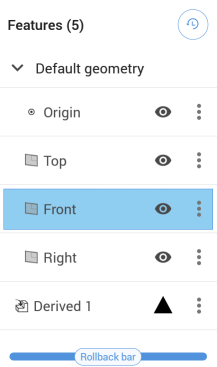
插入派生自另一个 Part Studio 的零件时,可以插入已发布的零件。零件右侧的“已发布零件”图标 (![]() ) 表示该零件已发布。
) 表示该零件已发布。
为派生零件插入了已发布的零件后,特征图标会表示其为派生特征,且发布图标指示其为已发布的零件:
- 您可以从同一 Part Studio 中选择多个零件,但不能为每个派生特征选择多个 Part Studio。但是,您可以根据需要为任意数量的零件/Part Studio 创建多个派生特征。
- 您不能在同一个 Part Studio 中两次派生相同的 Part Studio 或 Part Studio 配置。如果您有配置 A 和配置 B,并且为配置 A 创建了派生特征,则无法创建另一个再次插入配置 A 的派生特征。但是,您可以创建 2 个派生特征;一个用于同一 Part Studio 中的配置 A,另一个用于配置 B。
- 派生特征进行单向通信:从基础 Part Studio 到目标 Part Studio。如果您在基础 Part Studio 中更改特征,此更改会反映在目标 Part Studio 中,但反之则不然。
- 此特征不接受循环参考。例如,不能先将特征从 Part Studio A 插入 Part Studio B,然后再次将其插入 Part Studio A,此操作将会失败。
-
插入派生零件时,零件的可见性设置无关紧要 - 无论基础 Part Studio(工作区或版本)中的设置如何,派生零件在插入时始终可见。