 Altium 365 통합
![]()
다음 용도로만 사용 가능: .
이용 가능 플랫폼: PCB Studio
Altium 365 통합 기능을 사용하면 사용자의 Altium 계정을 Onshape 계정에 연결할 수 있습니다. 통합이 완료되면 사용자는 Altium 작업공간을 탐색하고 파일을 사용하지 않고도 Altium 보드를 PCB Studio로 직접 가져올 수 있습니다. Altium 보드를 가져오면 IDF와 같은 파일 형식에서 가져온 보드에 사용되는 것과 동일한 도구를 사용하여 Onshape에서 해당 보드를 생성할 수 있습니다.
Altium 365 통합은 양방향으로 이루어집니다. 보드 외곽선 모양이나 구성 요소 위치를 Onshape에서 변경한 후 PCB Studio로 다시 가져와 Altium으로 전송할 수 있습니다.
IDF 파일과 달리 Altium에서 PCB Studio로 가져온 보드는 보드의 구리, 솔더 마스크 및 실크스크린을 보여주는 데칼이 포함된 상태로 생성됩니다. Altium에 있는 관련 3D 구성 요소 모델은 모두 가져와 PCB Studio의 구성 요소 매핑 라이브러리에 추가됩니다.
Altium 365를 Onshape와 함께 사용하려면 다음 사항이 필요합니다.
-
Altium 계정(로그인)
-
Altium 작업공간 액세스
-
보드 프로젝트에 대한 편집 권한
Altium에서의 협업은 Altium의 MCAD CoDesigner 확장 프로그램을 통해 이루어집니다.
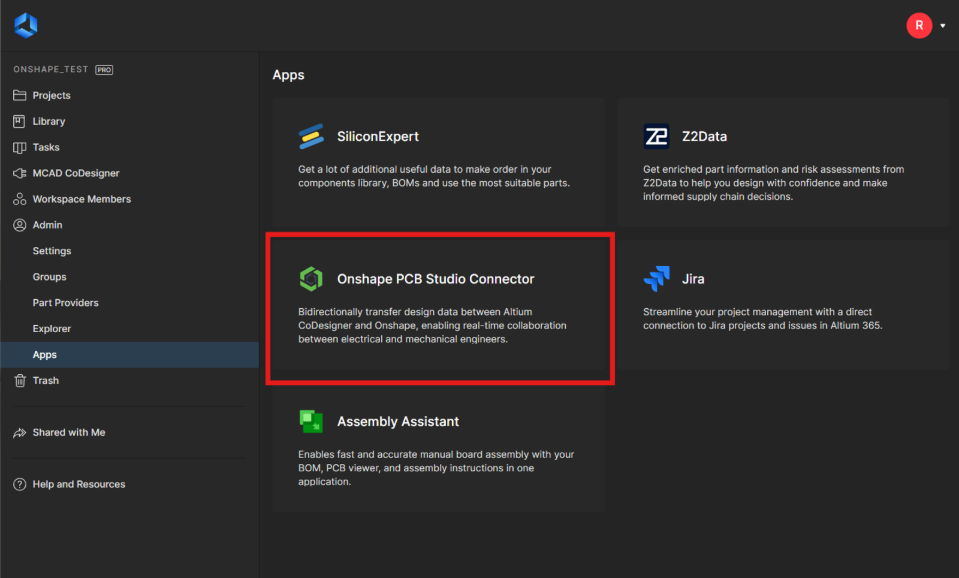
PCB Studio에서 Altium 작업공간에 액세스하려면 Onshape PCB Studio 커넥터 앱을 해당 Altium 작업공간에서 활성화해야 합니다. 이 절차를 완료하려면 Altium 작업공간 관리자 권한이 필요합니다.
-
Altium에 로그인합니다.
-
왼쪽 메뉴에서 관리 > 앱을 선택합니다.
-
Onshape PCB Studio 커넥터 앱을 선택합니다.
-
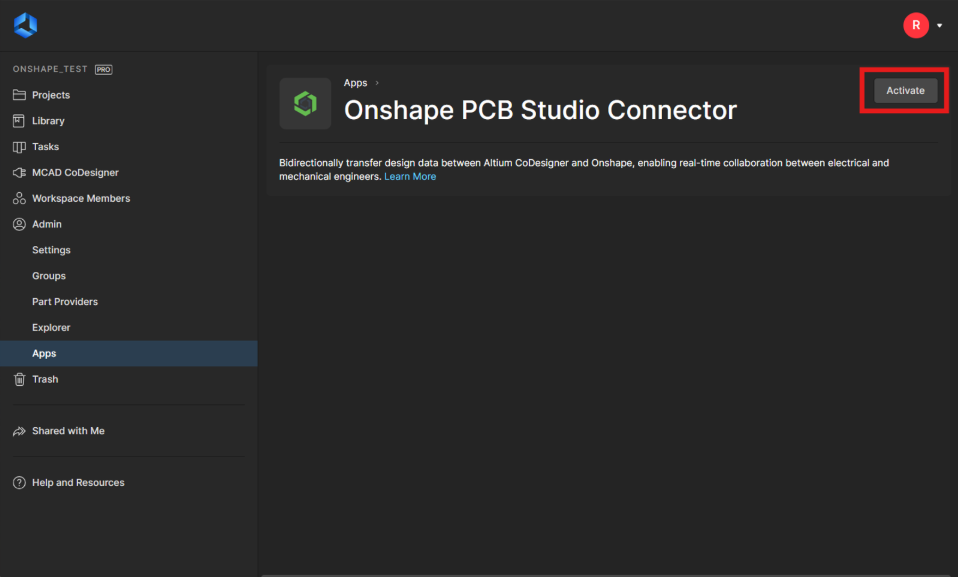
활성화를 클릭합니다.
-
확인 대화상자에서 활성화를 다시 클릭하여 앱을 Altium 작업공간에 추가합니다. 필요한 경우 언제든지 동일한 화면으로 돌아가서 비활성화를 클릭하여 통합을 작업공간에서 제거할 수 있습니다.
Altium 365 통합은 엔터프라이즈 또는 Company 관리자가 관리할 수 있습니다. 엔터프라이즈 또는 Company에서 Altium 365를 관리하는 경우 엔터프라이즈 설정 - 통합을 참조하십시오.
Onshape 정부 회원계정의 경우 Altium 365 통합은 현재 지원되지 않습니다.
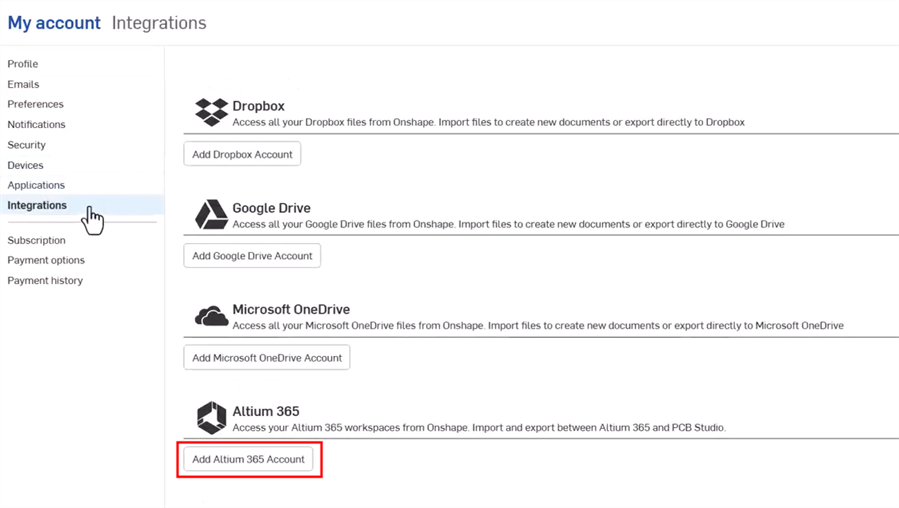
PCB Studio 탭에서 Altium 작업공간 프로젝트에 액세스하려면 Altium 365 계정을 통합하십시오.
-
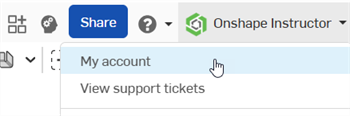
Onshape 창 오른쪽 상단에서 계정 사용자 > 내 계정을 클릭하십시오.
-
페이지 왼쪽 목록에서 통합을 클릭하십시오.
-
Altium 365 계정 추가 버튼을 클릭하십시오.
-
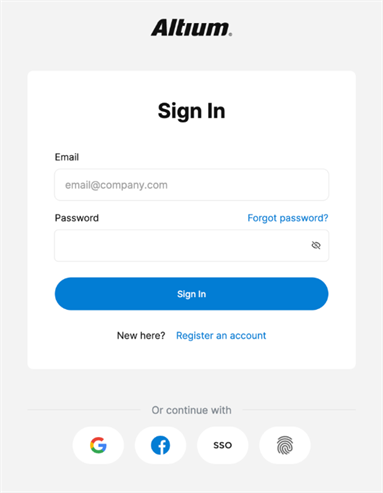
로그인하지 않은 경우 Altium 로그인 페이지가 표시됩니다. 자격 증명을 입력하고 로그인 버튼을 클릭합니다. Altium 이메일 주소는 Onshape 이메일 주소와 동일할 필요가 없습니다.
-
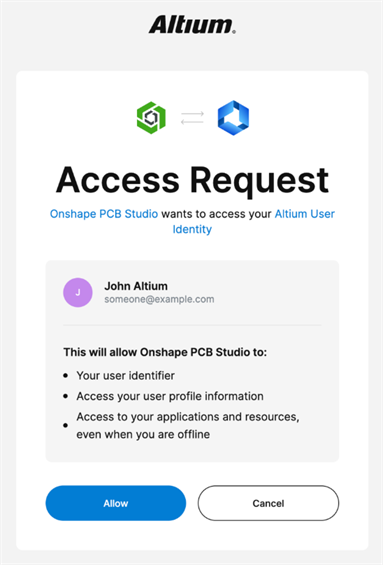
액세스 요청 대화상자가 표시됩니다. 허용 버튼을 클릭하여 Onshape PCB Studio를 Altium 사용자 ID에 연결하도록 요청을 수락합니다.
이제 Altium 통합이 추가된 Onshape 통합 페이지로 다시 이동합니다.

통합을 제거하려면 제거를 클릭하고, 업데이트하려면 새로 고침을 클릭합니다.
Altium 365 계정을 Onshape와 통합한 후(위에서 설명):
-
통합문서 페이지에서 새 통합문서를 만듭니다(통합문서 만들기).
-
새 PCB Studio 탭을 생성합니다. Onshape에서 PCB Studio 생성을 참조하십시오.
-
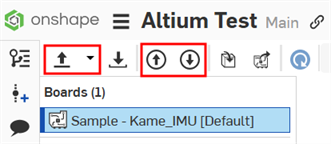
PCB Studio 탭의 왼쪽 상단에는 다음 3개의 아이콘이 있습니다.
-
ECAD 파일 가져오기(
 ) - Altium 365 클라우드 서비스에서 보드를 가져옵니다. 드롭다운 메뉴 버튼(
 )을 사용하여 Altium 365에서 가져오기를 선택합니다.
 -
보드를 클라우드 서비스로 푸시(
 ) - 보드를 Altium 365 클라우드 서비스로 푸시합니다.
 -
클라우드 서비스에서 보드 가져오기(
 ) - Altium 365 클라우드 서비스에서 보드를 가져옵니다.
드롭다운 메뉴 버튼(
)을 클릭하고 Altium 365에서 가져오기를 선택합니다.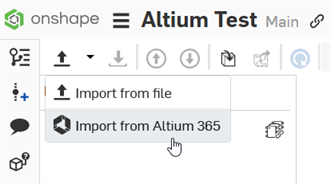
-
-
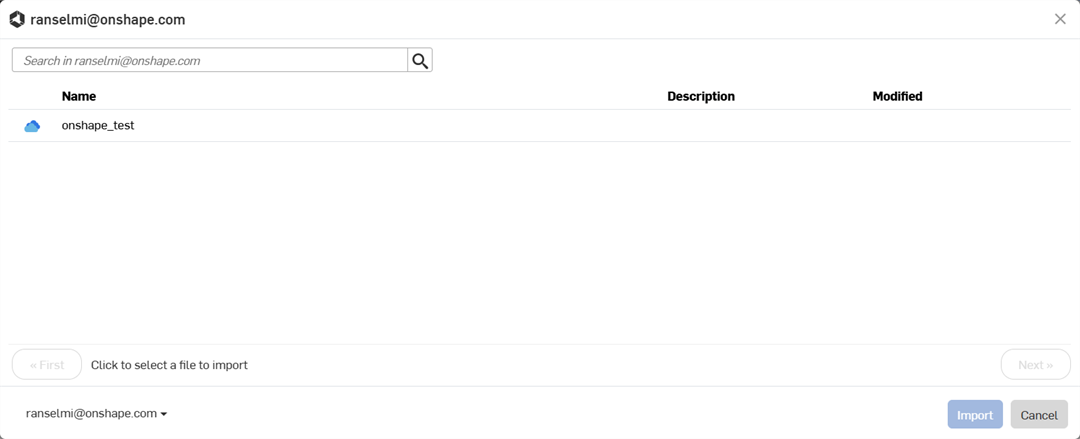
사용자가 속한 모든 Altium 작업공간이 표시되는 대화상자가 열립니다. 필요한 작업공간을 클릭합니다(아래 예시에서는 onshape_test 하나만 있습니다). 또는 취소 버튼을 클릭하여 작업공간을 선택하지 않고 대화상자를 종료할 수 있습니다.
-
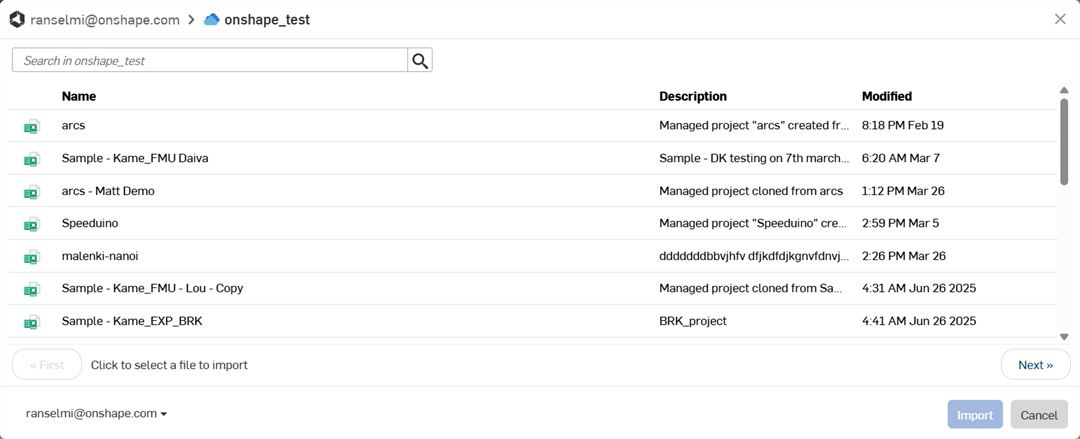
작업공간의 모든 프로젝트가 표시되는 대화상자가 열립니다. 목록에서 프로젝트를 선택하려면 해당 프로젝트를 클릭합니다. 목록 아래에 있는 다음 버튼을 클릭하면 작업공간의 다음 프로젝트 페이지로 이동하고, 처음 버튼을 클릭하면 첫 페이지로 돌아갑니다.
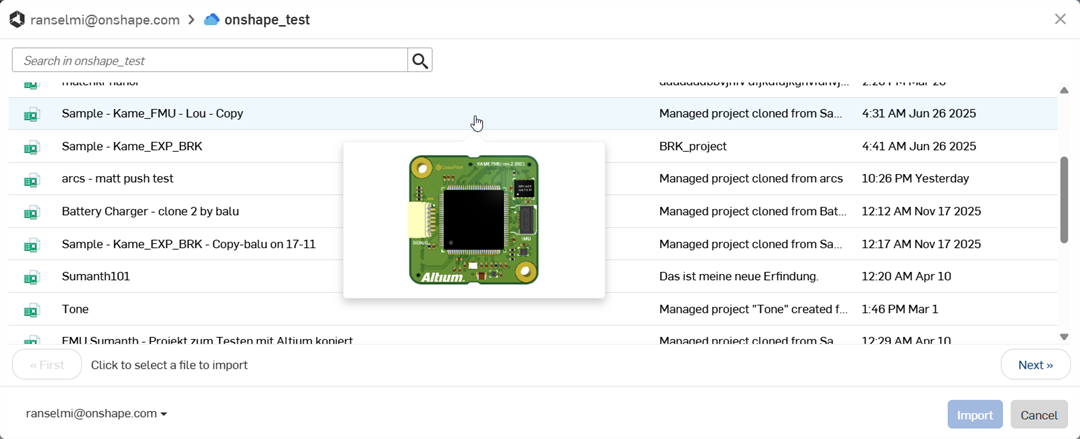
프로젝트 위에 마우스를 올리면 커서 아래에 썸네일이 나타나 프로젝트를 미리 볼 수 있습니다.
프로젝트를 선택하면 모든 프로젝트 변형이 표시되는 대화상자가 열립니다. 클릭하여 프로젝트 변형을 선택한 다음 가져오기 버튼을 클릭합니다. 또는 취소 버튼을 클릭하여 프로젝트 변형을 선택하지 않고 대화상자를 종료할 수 있습니다.

-
상세 모델 구성 요소가 여러 개 다운로드되는 경우, 초기 프로젝트가 화면에 표시된 후에도 추가 시간이 소요될 수 있습니다. 이러한 구성 요소는 백그라운드 프로세스를 통해 다운로드됩니다. 모든 구성 요소가 다운로드되면 도구 모음 오른쪽 상단의 업데이트 아이콘(
 )을 클릭하여 라이브러리 통합문서를 최신 버전으로 업데이트하십시오.
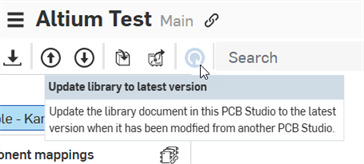
가져오기가 완료되면 프로젝트가 PCB Studio 탭으로 다운로드됩니다.
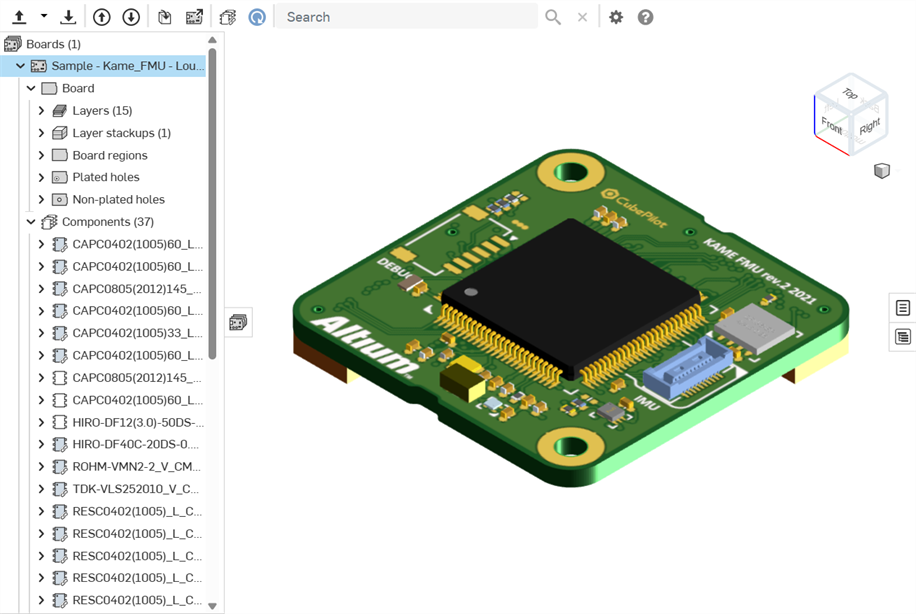
이 시점에서 이 PCB Studio 보드에서 어셈블리를 생성할 수 있습니다. CAD 데이터를 ECAD로 변환을 참조하십시오.
Onshape Part Studio 및 어셈블리에서 보드 편집을 완료하고 PCB Studio와 동기화한 후에는 해당 변경 사항을 Altium으로 다시 푸시해야 합니다.
-
보드를 클라우드 서비스로 푸시 버튼(
)을 클릭합니다.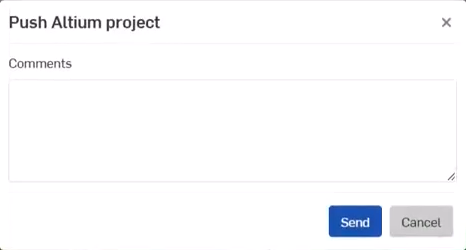
-
Altium 프로젝트 푸시 대화상자가 열립니다. 설명 필드에 ECAD 사용자에게 전달할 메시지를 입력하십시오. 이 필드에는 Onshape에서 보드를 편집하는 동안 보드에 적용된 변경 사항에 대한 정보가 포함됩니다.
-
보내기 버튼을 클릭합니다. 또는 취소 버튼을 클릭하여 보드를 Altium으로 전송하지 않고 대화상자를 종료할 수 있습니다.
-
Altium에서 ECAD 사용자는 다음과 같은 작업을 수행합니다.
-
메시지와 보드에 적용된 모든 변경 사항을 확인합니다.
-
이러한 변경 사항을 보드에 적용할지 여부를 결정합니다.
-
보드에 추가적인 변경 사항을 적용합니다.
-
MCAD로 푸시 버튼을 클릭합니다.
-
MCAD 사용자에게 메시지를 추가합니다.
-
보내기 버튼을 클릭합니다.
-
-
-
PCB Studio에서 MCAD 사용자는 클라우드 서비스에서 보드 가져오기 버튼(
)을 클릭합니다. 보드는 Altium에서 PCB Studio로 가져와지고 ECAD 사용자가 Altium에서 변경한 내용으로 업데이트됩니다.
이 과정은 MCAD 사용자와 ECAD 사용자 간에 보드 구성이 최종 확정될 때까지 원하는 만큼 반복할 수 있습니다.
-
CAD 데이터를 ECAD로 변환할 때, 추가적인 보드 데칼이 문서의 별도 탭에 생성됩니다. 이러한 데칼은 보드 모델의 표면에 매핑됩니다.
-
구리 및 실크스크린 정보는 단방향입니다. Altium에서 Onshape로 정보를 가져오지만 Onshape에서 Altium으로 다시 전송되지는 않습니다.