Company/Classroom/Enterprise 設定 - 開発者
![]()
次にのみ利用可能
Enterprise 管理者と Professional 管理者は、Onshape に新しいアプリケーションを登録し、アプリケーションを管理してユーザーに配布し、ユーザーの API キーを管理することができます。
The steps on this page apply only to company, classroom, or enterprise administrators. Individual users should follow the the My Account Settings: Developer steps..
All applications created in the Company/Classroom/Enterprise Settings count towards the company's API Limits. All applications created in the Developer Portal count toward the individual user's API Limits.
All applications submitted to the Onshape App Store (Onshape Apps) must follow the instructions on the API Guide: OAuth2 page and use OAuth2 for authorization. Automation scripts (or applications not meant for the Onshape App Store) may use either OAuth2 or API Keys for authentication. OAuth2 allows applications to call Onshape APIs on behalf of the users of the application; API keys will only perform operations on behalf of the Onshape user who generated the API keys.
Onshape アプリケーションの作成と管理について詳しくは、Onshape 開発者向けドキュメントを参照してください。
Onshape ウィンドウの右上隅にあるユーザーアイコン (![]() ) をクリックし、ドロップダウンから [Company/Classroom/Enterprise 設定] を選択します。
) をクリックし、ドロップダウンから [Company/Classroom/Enterprise 設定] を選択します。
左側のペインで [開発者] を選択します。
-
Onshape に新しい OAuth アプリケーションを登録する
-
Company のユーザー、エイリアス、チームとアプリケーションを共有する
-
正しく認証されたアプリを Onshape App Store に提出する
-
Company 内の全員の API キーを表示、作成、削除する
-
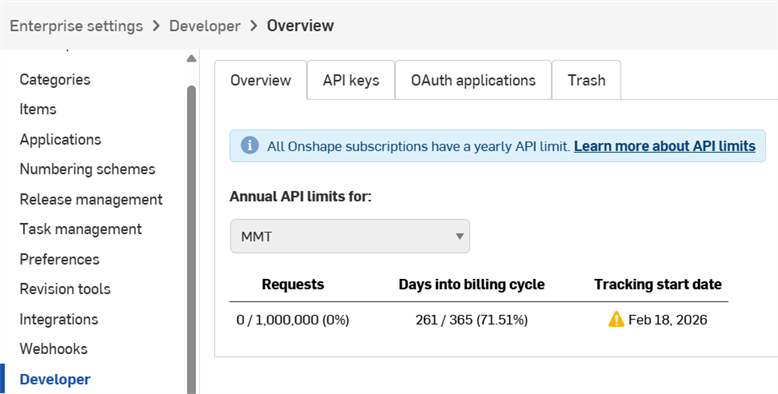
View API usage for the company.
- API の使用量について詳しくは、API の制限を参照してください。
- Click the Annual API limits for dropdown to select a different company, classroom, or enterprise.
-
使用量が 25%、50%、75%、100% になると管理者全員に通知メールが送信されます。
Onshape UI で内部使用またはテスト用に開くアプリを作成するには、次の操作を行います。
- アプリ Onshape に登録します。
- Onshape UI でアプリの拡張機能を作成します。
- ユーザーをアプリに割り当てます。
エンドユーザーのためにアプリを Onshape App Store に公開するには、次の操作を行います。
- OAuth2 で認証します。
- App Store のエントリを作成します。
- ローンチのチェックリストに記入します。
Onshape App Store (Onshape Apps) に提出するすべてのアプリケーションは、API ガイド: OAuth2 ページの説明に従って、OAuth2 を使用して認証する必要があります。自動化スクリプト (または Onshape App Store 向けではないアプリケーション) は、OAuth2 または API キーを認証に使用できます。OAuth2 を使用すると、アプリケーションのユーザーの代わりにアプリケーションで Onshape API を呼び出すことができます。API キーは、API キーを生成した Onshape ユーザーの代わりとしてのみ操作を実行します。
API キーは、個人用の小さなアプリケーションを作成するのに便利な方法です。これにより、開発者は OAuth ワークフローのオーバーヘッドを回避できます。
API キーはアプリケーションの認証のために使用され、ユーザーの認証には使用されません (OAuth2 は、ユーザーに Onshape にアクセスする権限があることを確認することで、アプリケーションとユーザーの両方を認証します)。API キーを作成すると、そのキーは作成されたスタックのみで有効になります。companyName.onshape.com で作成された API キーは、cad.onshape.com では機能しません。
Company や Enterprise に関連付けられていない API キーは、マイアカウント -開発者ページで管理できます。
個々のアカウントは API キーが 2 つまでに制限されています。必要に応じて API キーを削除してください。Company、Classroom、Enterprise のアカウントには上限がありません。
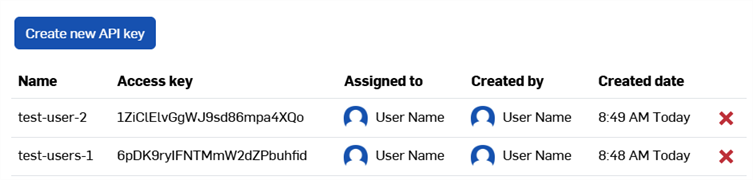
API キーの表示
- In your Company/Classroom/Enterprise Developer settings, click the API keys tab.
- Company で利用できる API キーを確認します。
API キーの作成
- Company/Classroom/Enterprise の開発者設定で、[API キー] をクリックします。
- [新しい API キーを作成] をクリックします。
![[新しい API キーを作成] 画面](../Resources/Images/accounts/developer-apikey-create-01.png)
- [名前] フィールドに API キーの名前を入力します。
-
Comapny 内の任意のユーザーに API キーを割り当てます。[ユーザー] フィールドで名前またはメールアドレスでユーザーを検索できます。
- キーのアクセス許可を選択します。以下のアクセス許可の範囲を参照してください。
- [API キーを作成] ボタンをクリックします。
-
ポップアップウィンドウで、表示される API キーとシークレットキーをコピーしてどこかに保存し、[閉じる] ボタンをクリックします。
このシークレットキーに再度アクセスすることはできません。このシークレットキーはユーザー個人とそのアプリだけのものです。機密性の高いパスワードと同様に保護し、ソースコードにチェックインしないでください。

- API キーを使用してアプリケーションを認証する方法については、API ガイド: 認証を参照してください。
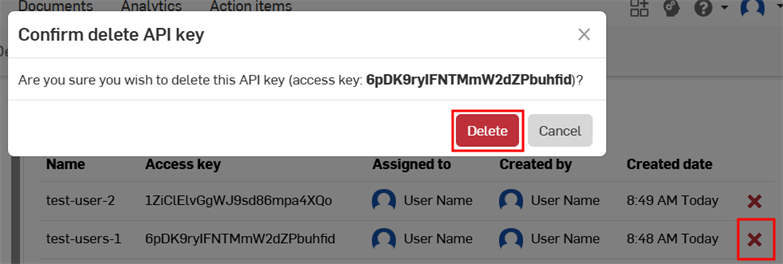
API キーの削除
- 削除したい API キーの右にある「X」アイコンをクリックします。
- この API キーをすべてのユーザーに対して削除することを確認してください。このアクションは元に戻せません。[削除] をクリックして確定します。
-
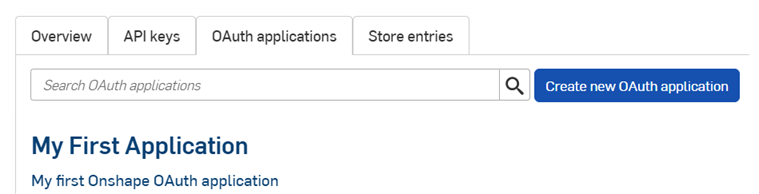
Click the OAuth applications tab on the Developer page to see a list of all your apps:
-
[新しい OAuth アプリケーションを作成] ボタンをクリックします。
-
フォームの次の項目を記入します。
-
名前 - ユーザーに表示されるアプリケーションの名前。
-
プライマリ形式 - アプリケーションを一意に識別し、Onshape サーバーに保存される可能性のあるデータのマーカーとなる文字列 (例: com.example.example)。アプリケーションの登録後は変更できず、ユーザーには表示されません。
-
概要 - データへのアクセス許可をアプリケーションに付与するよう要求された際にユーザーに表示されるアプリケーションの説明。
-
リダイレクト URL - 認証後にリダイレクトされる URL。アプリケーションランディングページ。
- アプリケーションでは、OAuth プロトコル交換で使用される URL を少なくとも 1 つ指定する必要があります。
-
This URL must also use SSL (a URL that begins with https), with two exceptions applicable for installed desktop applications: http://localhost:<port> and urn:ietf:wg:oauth:2.0:oob.
-
タイプ - アプリケーションのタイプ: [統合クラウドアプリ]、[接続されたクラウドアプリ]、[接続されたデスクトップアプリ] のいずれかです。
-
OAuth URL - ユーザーを認証するための OAuth2 プロセスの開始に使用される URL。詳細は、開発者ドキュメント: OAuth2 を参照してください。
-
デプロイしたアプリケーションの URL を含める必要があります。
-
これは、Onshape のアプリケーションページから呼び出される最初の URL です。
-
この URL でホストされているページは、OAuth 認証を処理する必要があります。アプリケーションのサーバーがユーザーに代わって認証されると、そのユーザーはアプリケーションのコンテンツにリダイレクトされます。
-
アプリをまだデプロイしていない場合は、ローカルでの作業用にこのフィールドを空白のままにして、後で更新できます。
一般に公開するために Onshape App Store に提出されるすべてのアプリケーションは、OAuth2 で正しく認証する必要があります。詳細は、開発者ドキュメント: OAuth2 を参照してください。
-
-
設定
-
共同作業をサポート - アプリケーションの開発時に、他のユーザーとの共同作業を行う場合はオンにします。
-
- 権限 - 以下のアクセス許可の範囲を参照してください。
-
-
[アプリケーションを作成] をクリックします。
-
ウィンドウから OAuth のシークレットキーをコピーします。
このシークレットキーに再度アクセスすることはできません。このシークレットキーはユーザー個人とそのアプリだけのものです。機密性の高いパスワードと同様に保護し、ソースコードにチェックインしないでください。
-
The app's OAuth application entry appears with the Details tab active. Selecting the app name on the OAuth applications tab now brings you to this screen.
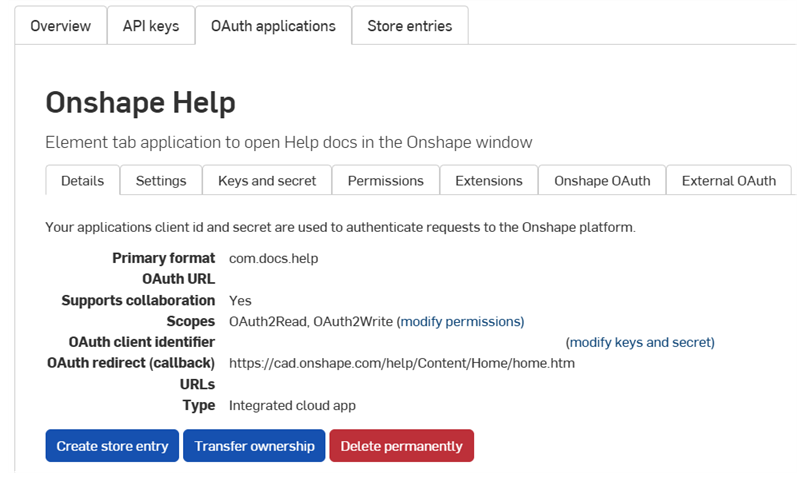
この画面のタブを使って次のことを行います。
-
詳細:
-
設定: アプリの設定を管理する
- キーとシークレット:
- OAuth クライアント識別キーをコピーする
- 新しい OAuth クライアントシークレットキーを再生成する
-
アクセス許可: アプリのアクセス許可の範囲を変更する
-
拡張機能: アプリの拡張機能を管理する
-
Onshape OAuth: Onshape の認証を管理する
-
外部 OAuth: サードパーティの認証を管理する
OAuth2 による適切な認証やローンチのチェックリストの記入について詳しくは、Onshape 開発者向けドキュメントを参照してください。実例については、Hello World のチュートリアルを参照してください。
-
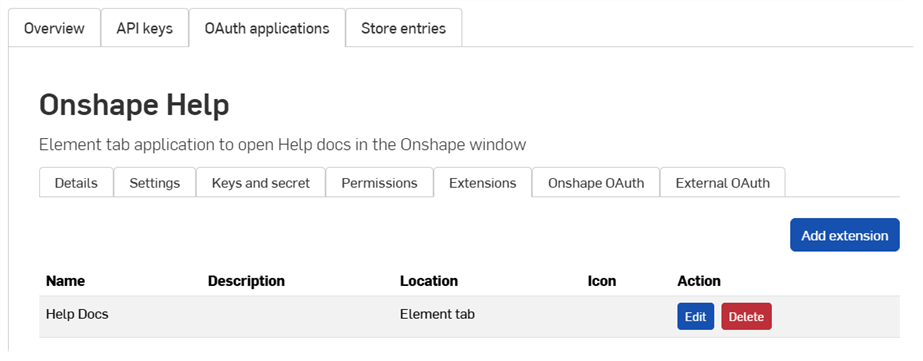
Click the OAuth applications tab on the Developer page, then select your application.
-
[拡張機能] タブをクリックします。
-
[拡張機能を追加] をクリックします。
-
フォームの次の項目を記入します。
-
名前: 長すぎる場合は、UI で切り捨てられます。
-
説明 (オプション): Onshape UI には表示されませんが、認証の許可プロセスでは表示される場合があります。
-
場所: Onshape UI の拡張機能が存在する場所。
-
開発者向けドキュメントのサポートされている場所とコンテキストを参照してください。
-
アプリケーションごとに作成できる要素タブの拡張は 1 つだけです。
-
-
コンテキスト: 一部の場所は、Part Studio の内部など、選択のコンテキストで機能します。
-
開発者向けドキュメントのサポートされている場所とコンテキストを参照してください。
-
-
アクションURL: UI を埋め込む場所では、表示するページのアドレスをアクション URL で定義します。場所がアクション (コンテキストメニュー、ツールバーアイテム、ダイアログ内のアクションなど) で、アクションタイプが GET または POST の場合、アクション URL は REST 終点を指定するために使用されます。場所がアクションで、新しいウィンドウで開くアクションの場合、アクション URL は新しいウィンドウで開く URL です。
-
このフィールドで使用できるパラメータのリストについては、開発者ドキュメントのアクション URL パラメータを参照してください。
-
-
アクションタイプ: UI を埋め込まない場所に適用されます。サポートされているアクションタイプは次のとおりです。
-
GET - アクション URL を使用して GET API を呼び出します。パラメータの置換はアクション URL で行われます。
-
POST - アクション URL とアクションボディを POST ボディとして使用して POST API を呼び出します。パラメータの置換は、アクション URL とアクションボディの両方で行われます。
-
新しいウィンドウで開く - アクション URL が新しいブラウザウィンドウで開きます。パラメータの置換はアクション URL で行われます。
-
-
アクションボディ: POST アクションタイプにのみ適用されます。アクションボディは POST API の呼び出しに渡され、有効な JSON 形式である必要があります。
-
応答を表示: これは、アクションタイプが GET または POST の場合にのみ適用されます。選択すると、UI は応答を待ち、UI のダイアログに応答を表示します。応答は有効な JSON 形式である必要があります。
-
アイコン: アイコンは、拡張子が存在する場所に表示されます。これには、情報パネルのアイコン、コンテキストメニューのアクション、ツールバーボタン、ダイアログのアクションボタン、またはその他のサポートされている場所が含まれます。
-
-
[OK] をクリックします。
Onshape アプリケーションの作成と管理の詳細については、Onshape の開発者向けドキュメントを参照してください。実例については、Hello World のチュートリアルをご覧ください。
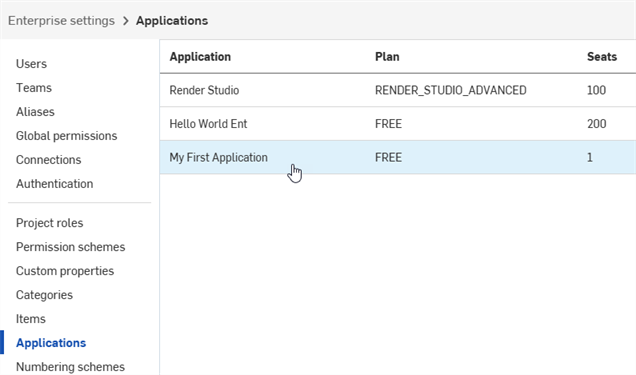
管理者は、Onshape App Store にアプリケーションを提出する前に、内部ユーザーをアプリに追加してテストできます。アプリに追加されたユーザーは、App Store で購読せずに、関連するアプリ拡張機能が Onshape UI に自動的に表示されます。
-
アプリが登録されたら、左ペインの [アプリケーション] をクリックします。
-
リストからアプリケーションを選択します。
-
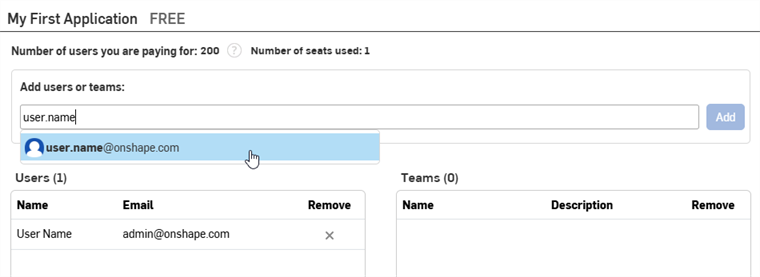
まず、[ユーザーまたはチームを追加] フィールドにユーザー、チーム、またはエイリアスの名前またはメールアドレスを入力し、リストから結果を選択します。アプリを作成した管理者は、自動的にユーザーリストに表示されます。名前やメールアドレスの追加を続けます。
-
[追加] ボタンをクリックします。
ライトユーザーはアプリケーションに追加できません。
ユーザー、エイリアス、またはチームをアプリから削除するには、[削除] 列の X アイコンをクリックします。
- 開発者の設定で、[OAuth アプリケーション] をクリックします。
- 転送するアプリの名前をクリックします。
- Click the Transfer ownership button on the Details tab. The Transfer ownership dialog opens.
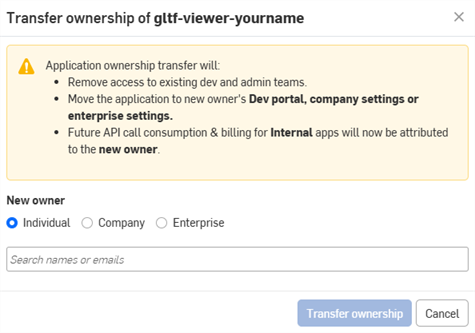
- アプリの引き継ぎ先として個人、Company、または Enterprise のオプションを選択します。
- 個人に引き継ぐには、検索フィールドに新しい所有者の名前またはメールアドレスを入力します。所有権を Company または Enterprise に引き継ぐには、ドロップダウンからオプションを選択します。
- [所有権の引き継ぎ] をクリックします。アプリケーションが OAuth アプリのリストから削除されます。
- アプリを個人のアカウントに引き継いだ場合は、その個人に通知メールが届き、Onshape 開発者ポータルにアプリが表示されます。
- アプリを Company/Classroom/Enterprise のユーザーに引き継いだ場合は、管理者全員に通知メールが届き、それぞれの開発者の設定にアプリが表示されます。
それ以降の API コールの使用量と請求は、新しい所有者に帰属します。詳細は、API の制限を参照してください。
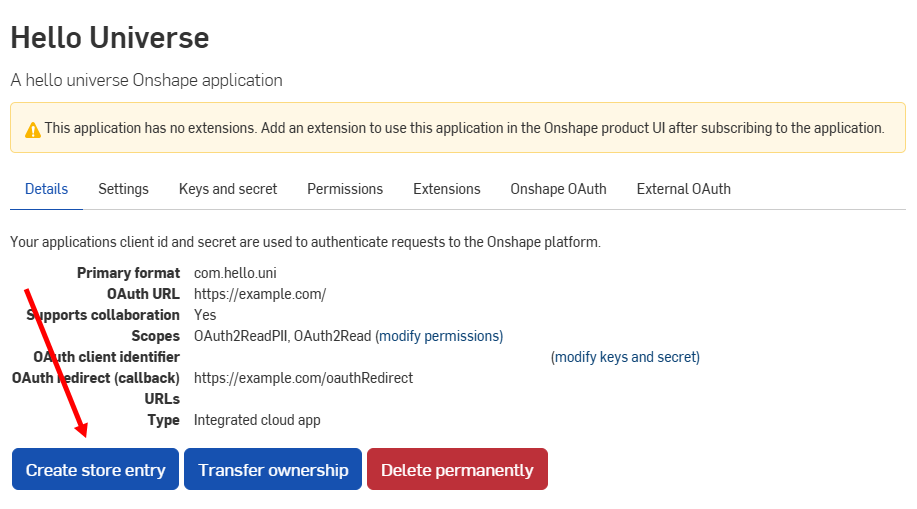
- Click Developer in the left pane of your company settings, click OAuth applications, then select the app to deprecate.
-
On the Details tab, click the Delete permanently button.
- Click Delete again to confirm in the dialog.
Onshape App Store にアプリを提出する前に、Onshape 開発者ドキュメントを参照し、OAuth2 による適切な認証やローンチのチェックリストの記入などの要件を確認してください。
OAuth アプリケーションに新しいストアエントリを作成するには、次の操作を実行します。
-
Click OAuth applications on the Developer page, then select your application.
-
Click the Create store entry button on the app's Details tab.
-
フォームの次の項目を記入します。
- 名前 - 登録時に入力したアプリ名から自動的に設定されます。
-
概要 - 登録時に入力した概要から自動的に設定されます。
-
タイプ - アプリケーションのタイプ: 統合クラウドアプリ、接続されたクラウドアプリ、接続されたデスクトップアプリ。これは、OAuth アプリケーションの登録時に選択したタイプと一致する必要があります。
-
カテゴリー - アプリに適したカテゴリーを選択します。
-
チームの可視性 - プライベート App Store のエントリを内部ユーザー以外に表示しない (既定)、すべての内部ユーザーに表示する、または特定のチームに表示することを選択します。
-
説明 - ユーザー向けのアプリケーションの説明。制限付き書式設定が使用できます。
-
サポート URL - アプリのユーザーがヘルプを必要とした場合に送る URL またはメール。これは定期的に監視する必要があります。
-
サポートメール - アプリのサブスクリプション通知を受け取るメール。これは定期的に監視する必要があります。
-
ベンダー - あなたの Company 名。
-
バージョン - このアプリケーション現在のバージョン。
-
画像 - オプションで、概要、ヒーロー、その他の画像をアップロードします。
-
[作成] をクリックします。
アプリケーションは Onshape App Store にプライベートとして表示され、あなたとチームの可視性設定で指定された内部チームだけに表示されます。アプリを公開するには、次のローンチのチェックリストを参照してください。
To return to this screen, click the Store entry tab for the application:
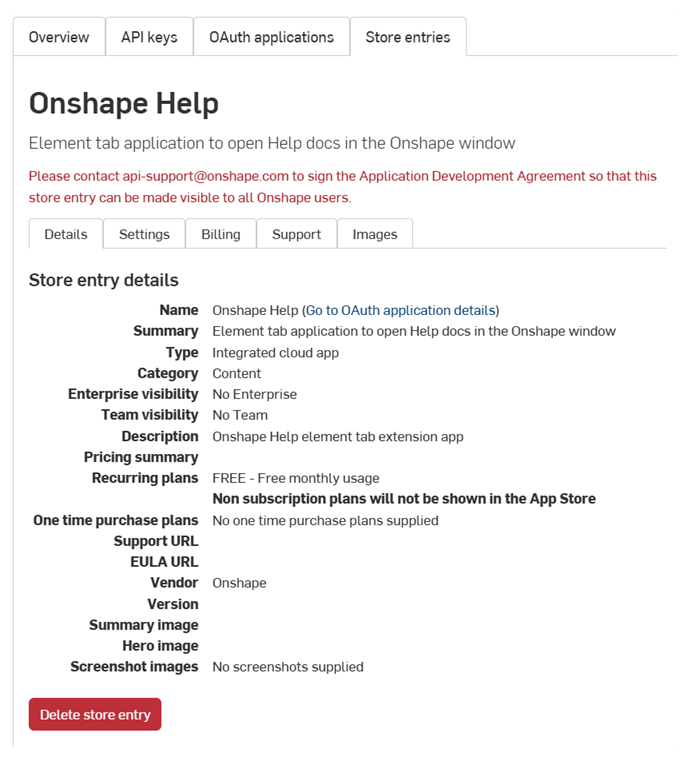
- Click OAuth applications on the Developer page, then select your application.
- Click the Store entry tab.
- Click Delete store entry on the Details tab.
- [削除] をクリックして確定します。
OAuth アプリケーションの作成時には、次のアクセス許可の範囲を使用できます。
-
アプリケーションではプロファイル情報を読み取ることができます (OAuth2ReadPII) - これをオンにすると、アプリケーションにプロファイル上の情報へのアクセスを許可します。
-
アプリケーションではドキュメントを読み取ることができます (OAuth2Read) - これをオンにすると、アプリケーションにドキュメントからの読み取りを許可します。
-
アプリケーションではドキュメントに書き込むことができます (OAuth2Write) - これをオンにすると、アプリケーションにドキュメントへの書き込みを許可します。
-
アプリケーションではドキュメントおよびワークスペースを削除できます (OAuth2Delete) - これをオンにすると、アプリケーションにドキュメントとワークスペースの削除を許可します。
-
アプリケーションではあなたの代わりに購入をリクエストできます (OAuth2Purchase) - これをオンにすると、アプリケーションに購入を許可します。
-
アプリケーションではドキュメントを共有および共有解除できます (OAuth2Share) - これをオンにすると、アプリケーションにドキュメントの共有と共有解除を許可します。