Lavorare con i vincoli
![]()
![]()
![]()
I vincoli sono disponibili e visibili quando uno schizzo viene creato o altrimenti aperto per la modifica.
I vincoli applicati tra entità in due schizzi (ad esempio, quando si utilizza un'entità da uno schizzo in un altro schizzo) sono differenziati da uno sfondo blu. I vincoli possono essere applicati manualmente e alcuni vengono creati quando viene creata la geometria durante lo schizzo. Al passaggio del mouse, lo sfondo del vincolo di riferimento è blu più scuro:
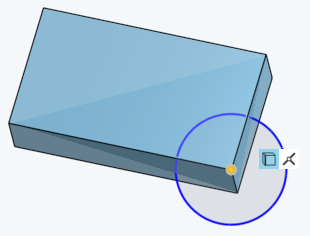
Il vincolo Usa visualizzato sopra (con lo sfondo blu) vincola un vertice nello schizzo del rettangolo con il punto centrale del cerchio nello schizzo del cerchio.
Gli strumenti schizzo Vincoli consentono di visualizzare e modificare i vincoli quando uno schizzo è creato oppure quando è aperto per consentirne la modifica. I vincoli applicati tra le entità in due schizzi (ad esempio, quando si utilizza un'entità da uno schizzo in un altro schizzo) sono differenziati da uno sfondo blu. È possibile applicare manualmente i vincoli e alcuni di essi sono creati quando è creata la geometria durante lo schizzo. Al passaggio del mouse, lo sfondo del vincolo di riferimento assume un colore blu più scuro.
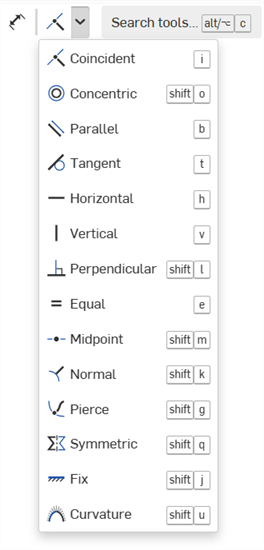
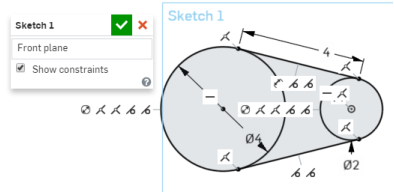
Sono disponibili diversi vincoli: Coincidente, Concentrico, Parallelo, Tangente, Orizzontale, Verticale, Perpendicolare, Uguale, Punto medio, Normale, Perfora, Simmetrico, Fissa e Curvatura. È possibile aggiungere i vincoli a uno schizzo automaticamente, utilizzando la deduzione, oppure manualmente utilizzando la barra degli strumenti.
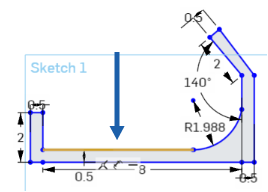
In questo esempio è aggiunto un vincolo del punto medio tra una linea di costruzione verticale e un cerchio. Seleziona il punto medio del cerchio e la linea di costruzione. Fai clic sul vincolo del punto medio nella barra strumenti dello schizzo. È possibile emulare questo processo per i diversi vincoli. In alternativa, puoi prima selezionare lo Strumento vincolo del punto medio nella barra strumenti dello schizzo, quindi selezionare la linea di costruzione e il cerchio.
Per applicare un vincolo di disegno, puoi scegliere una di queste due procedure:
-
Seleziona il vincolo nel menu (o utilizza il tasto di scelta rapida corrispondente) e seleziona le entità a cui il vincolo è applicato nello schizzo.
-
Seleziona le entità dello schizzo e fai clic sul vincolo nel menu dei vincoli della barra degli strumenti.
I seguenti vincoli sono disponibili nel menu dei vincoli della barra degli strumenti:
-
Coincidente: consente a 2 o più entità dello schizzo di condividere la stessa posizione in uno schizzo.
-
Concentrico: rende qualsiasi punto coincidente con il centro di un arco o di un cerchio. Fai in modo che gli archi e i cerchi selezionati condividano un punto centrale.
-
Parallela: rende 2 o più linee parallele.
-
Tangente: crea una relazione tangente tra 2 entità dello schizzo o tra un'entità dello schizzo e un piano.
-
Orizzontale: vincola una o più linee oppure un insieme di punti a essere orizzontali.
-
Verticale: vincola una o più linee oppure un insieme di punti a essere verticali.
-
Perpendicolare: rende 2 linee perpendicolari.
-
Uguale: rende più linee di lunghezza uguale o più archi di raggio uguale.
-
Punto medio: vincola un punto dello schizzo al punto medio di una linea o di un arco.
-
Normale: rende una curva e una linea oppure una curva e un piano perpendicolari.
-
Perforazione: rende un'entità dello schizzo e un'altra entità esterna al piano dello schizzo attivo coincidenti.
-
Simmetrico: rende simmetriche 2 entità dello stesso tipo, rispetto a una linea, un piano o un bordo lineare.
-
Fissa: blocca un'entità dello schizzo sul piano dello schizzo in modo che non si muova.
-
Curvatura: crea transizioni continue di curvatura tra le spline o le coniche dello schizzo e la geometria circostante.
Con uno schizzo aperto, passa il cursore del mouse su un'entità dello schizzo, come una linea o un arco, per vedere i vincoli per tale entità. Mentre sposti il cursore del mouse sulle entità, i vincoli appariranno solo per l'entità evidenziata. Per mantenere visibili tutti i vincoli, usa il tasto Maiusc mentre sposti il mouse.
Le entità sono evidenziate in arancione al passaggio del mouse, a eccezione dei vincoli di riferimento che hanno uno sfondo blu e uno sfondo blu più scuro al passaggio del mouse. Le entità correlate sono evidenziate con il giallo, come quando si seleziona un vincolo e vengono evidenziate anche le entità coordinate.
Questi vincoli non sono disponibili nella sezione Vincolo della barra degli strumenti, ma vengono creati automaticamente durante azioni specifiche come descritto di seguito:
-
 Quadrante: vincola un punto a coincidere con un'ellissi e l'asse maggiore o minore di quell'ellissi. Può essere fatto per deduzione, trascinando qualcosa o posizionando qualcosa su uno dei punti di un'ellissi.
 -
 Usa: vincola un'entità dello schizzo in uno schizzo a un'entità in un altro schizzo; realizzato selezionando lo strumento Usa e quindi un'entità (entità dello schizzo, faccia o bordo) in uno schizzo o una funzione diversi.
 -
 Intersezione: vincola i punti finali di una curva aperta (derivante dall'utilizzo dello strumento Intersezione) con vincoli di perforazione
  in modo che si trovino sui bordi della faccia intersecata; per una curva chiusa, vincola le entità di schizzo con vincoli di intersezione.
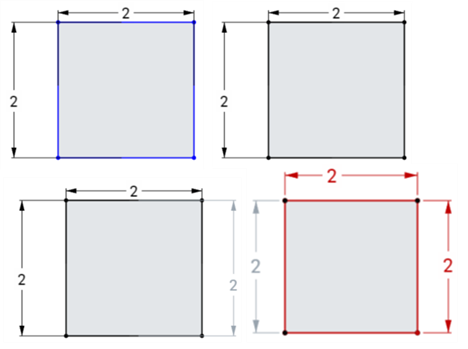
Il colore delle entità schizzo indica lo stato dei limiti:
- Blu significa che il numero di vincoli è insufficiente
- Nero significa che il numero di vincoli è completo.
- Rosso indica un problema relativo ai vincoli (il numero di vincoli è eccessivo).
Il colore dell'icona di un vincolo indica lo stato dei vincoli:
- Nero su grigio significa ben definito.
- Bianco su rosso indica la presenza di un problema.
- Quando effettui una selezione, i punti dello schizzo non completamente vincolati (blu e rosso) hanno la priorità rispetto ai punti dello schizzo sovrapposti e completamente vincolati (nero).
L'aggiunta di più dimensioni o vincoli inserirà ulteriori vincoli nello schizzo. Trascinare le entità può aiutarti a capire quali vincoli o dimensioni potresti voler aggiungere.
Visualizza e filtra i vincoli e le dimensioni dello schizzo per analizzarli e correggere eventuali errori di vincolo dello schizzo.
Accedere a Gestione vincoli
Nella finestra di dialogo Schizzo:
-
Fai clic sull'icona Mostra strumenti per la diagnostica degli schizzi (
 ).
). -
Fai clic su Gestione vincoli.
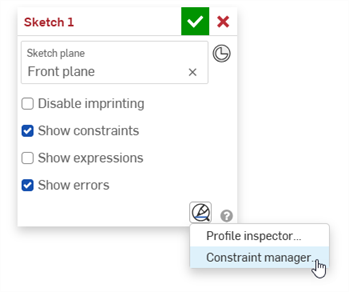
Si apre la finestra di dialogo Gestione vincoli:
Usare Gestione vincoli
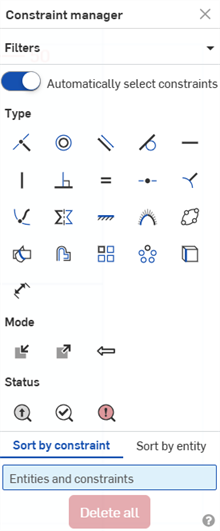
Nella finestra di dialogo Gestione vincoli, è possibile effettuare le seguenti operazioni:
-
Filtri: comprimi/espandi tutte le sezioni della finestra di dialogo contemporaneamente (tipo, modalità, stato).
-
Seleziona automaticamente i vincoli: quando l'opzione è attivata (impostazione predefinita), qualsiasi vincolo selezionato nella finestra di dialogo Gestione vincoli posiziona un riquadro di delimitazione giallo attorno ai vincoli corrispondenti nello schizzo. Quando questa opzione è disattivata, i vincoli non sono circondati da un bounding box (non sono selezionati).
Questa opzione è utile se desideri selezionare solo tali vincoli in una parte specifica dello schizzo. Ad esempio, puoi disattivare questa opzione, quindi selezionare il tipo di vincoli che desideri posizionare nella parte dello schizzo (ad esempio, vincoli coincidenti nell'esempio seguente). Quindi crea una casella di selezione attorno a una parte dello schizzo (un rettangolo nell'esempio seguente). Solo i vincoli di tale sezione sono circondati da riquadri di delimitazione e disponibili nell'elenco Entità e vincoli (vedi sotto).
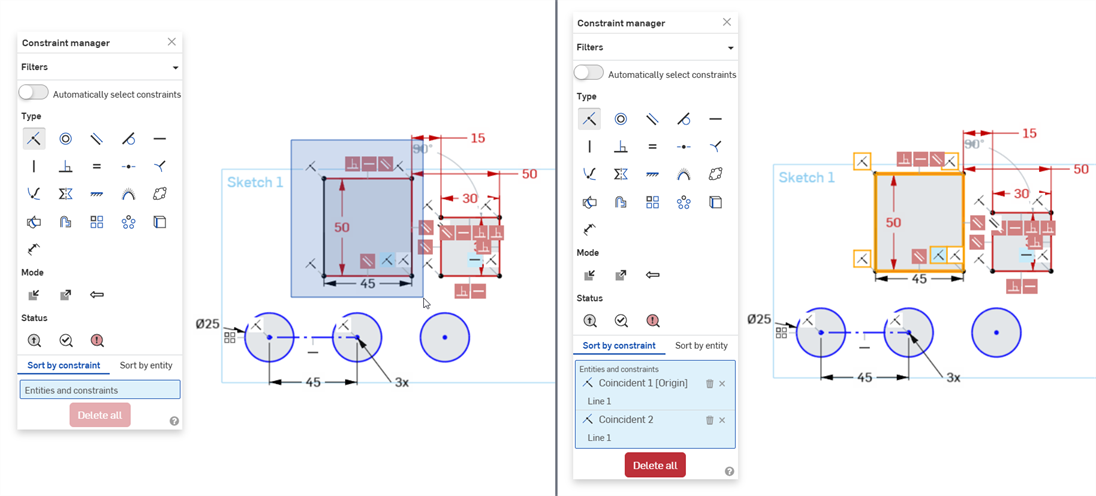
Disabilitazione dell'opzione Seleziona automaticamente i vincoli e quindi selezione con una casella del rettangolo nello schizzo (a sinistra). Una volta effettuata la selezione, i filtri si applicano solo all'entità dello schizzo selezionata. Nell'esempio qui riportato i vincoli coincidenti sono mostrati solo per il rettangolo selezionato in precedenza (a destra).
-
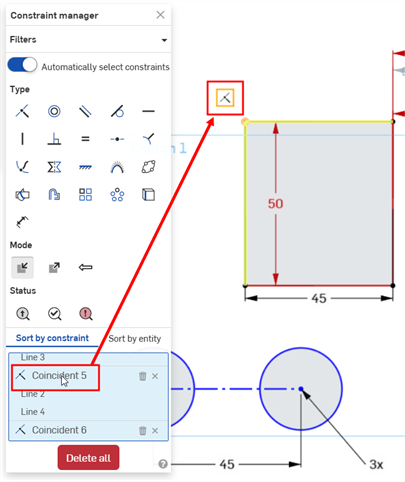
Tipo: seleziona da un elenco di vincoli disponibili. Ad esempio, quando selezioni Coincidente è inserito un bounding box giallo attorno a tutti i vincoli coincidenti nello schizzo (a condizione che sia abilitata la selezione automatica dei vincoli).
-
Modalità: seleziona una delle seguenti 3 modalità:
-
Interno: seleziona i vincoli nello schizzo corrente.
-
Esterni: seleziona i vincoli da fonti esterne.
-
In contesto: seleziona i vincoli a cui si fa riferimento nel contesto
-
-
Stato: seleziona uno dei seguenti 3 stati:
-
Guidati: vincoli guidati. Se l'opzione è selezionata, i vincoli guidati sono evidenziati in giallo. Se sono i vincoli sono insufficienti, sono evidenziati in blu più scuro.
-
Risolto: vincoli risolti. Se l'opzione è selezionata, i vincoli risolti sono evidenziati in giallo. Se i vincoli sono in numero insufficiente, sono evidenziati in blu più scuro.
-
Errori: vincoli con errore. Se l'opzione è selezionata, i vincoli errati sono evidenziati in rosso più scuro,
-
-
Ordina per vincolo: ordina l'elenco Entità e vincoli riportato di seguito in base al vincolo, quindi in base all'entità.
-
Ordina per entità: ordina l'elenco Entità e vincoli riportato di seguito in base all'entità, quindi in base al vincolo.
-
Elenco entità e vincoli: visualizza tutti i vincoli selezionati, a seconda delle selezioni di filtro nella finestra di dialogo. Il passaggio del mouse su un vincolo o un'entità nell'elenco lo evidenzia nello schizzo. In questo elenco, puoi:
-
Elimina vincolo (
 ): elimina il vincolo dallo schizzo.
 -
Rimuovi selezione (
 ): rimuove il vincolo dall'elenco Entità e vincoli.
Ordina per vincolo (a sinistra); Ordina per entità (a destra)
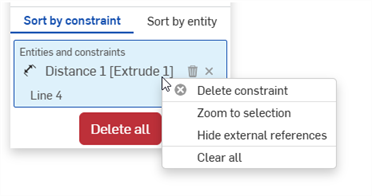
Fai clic con il pulsante destro del mouse su un vincolo o un'entità nell'elenco Entità e vincoli per accedere ai seguenti comandi:
-
Elimina vincolo/entità: elimina la selezione (vincolo o entità)
-
Zoom su selezione: ingrandisce la selezione (vincolo o entità)
-
Nascondi riferimenti esterni: nasconde tutti i vincoli con riferimenti esterni
-
Cancella tutto: cancella tutti i vincoli nell'elenco Entità e vincoli
-
-
-
Elimina tutto: elimina tutti i vincoli selezionati dallo schizzo.
Disattivare Gestione vincoli
Per disattivare Gestione vincoli, puoi scegliere una di queste alternative:
-
Fai clic su X nell'angolo superiore destro della finestra di dialogo Gestione vincoli.
-
Fai clic sull'icona Mostra strumenti per la diagnostica degli schizzi (
) e seleziona Disattiva Gestione vincoli: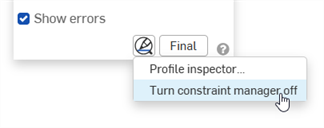
Suggerimenti
-
Seleziona tipi, modalità e stati dalla finestra di dialogo per filtrare i vincoli in base a ciò che è selezionato. È possibile utilizzae questi filtri in qualsiasi combinazione.
-
Se Mostra vincoli e Mostra errori sono disattivati nella finestra di dialogo Schizzo, quando passi il cursore del mouse sul vincolo nell'elenco Entità e vincoli è visualizzato solo tale vincolo (e le entità correlate) nello schizzo:
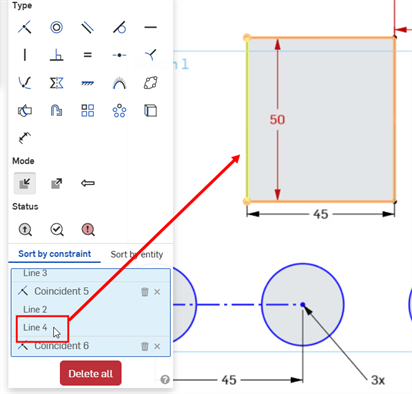
-
La selezione di un'entità nell'elenco Entità e vincoli evidenzia l'entità in giallo chiaro:
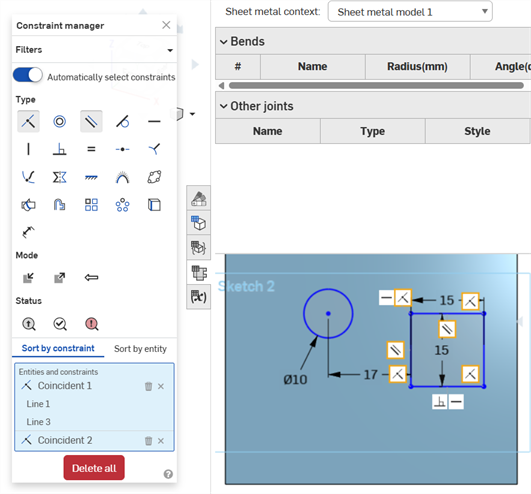
-
Gestione vincoli funziona anche con gli schizzi nella vista ripetizione piatta lamiera:
Puoi interagire con le icone vincolo:
- Fai clic e trascina l'icona o il gruppo di icone in una posizione diversa.
- Passa il cursore del mouse su una singola icona vincolo per vedere quali entità sono evidenziate, cioè hanno il vincolo applicato.
- Elimina un vincolo: fai clic su una singola icona di vincolo e premi Elimina o seleziona Elimina dal menu contestuale.
- Nella finestra di dialogo Schizzo, seleziona Mostra vincoli per visualizzare tutti i vincoli definiti per lo schizzo.
- I vincoli contrastanti vengono visualizzati come simboli bianchi su uno sfondo rosso.
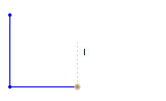
Durante la creazione di uno sketch vengono visualizzati indicatori dei vincoli accanto al cursore del mouse, mentre le curve si agganciano per la modalità snap alle deduzioni.
Aggiungi, applica e modifica i vincoli per definire una parte in Onshape. I vincoli sono elencati nella finestra di dialogo dello schizzo quando si crea uno schizzo o comunque quando lo schizzo è aperto per modifiche.
Puoi applicare vincoli tra entità in uno schizzo o tra entità in due o più schizzi (ad esempio, quando selezioni Usa un'entità di uno schizzo in un altro schizzo). I vincoli possono essere applicati manualmente e alcuni vengono creati quando viene creata la geometria mentre produci schizzi. Vedi Deduzione automatica per ulteriori informazioni sui vincoli creati automaticamente.
Nella finestra di dialogo dello schizzo, tocca un vincolo nell'elenco per evidenziare la geometria dello schizzo pertinente. Ad esempio, se due linee sono vincolate orizzontalmente l'una all'altra e tocchi il vincolo orizzontale, entrambe le linee vengono evidenziate.
Aggiungi, applica e modifica i vincoli per aiutare a definire una parte in Onshape. I vincoli sono disponibili e visibili solo durante la creazione o modifica di uno schizzo.
Per informazioni su come utilizzare vincoli specifici su un dispositivo mobile, vedi l'argomento specifico sui vincoli.