 Interface Render Studio - Panneau Environnement
![]()
Disponible uniquement pour.
Disponible dans : Render Studio
Situé à droite de la page, le panneau Environnement affiche une liste modifiable de paramètres pour l'environnement de la scène. Les paramètres de panneau disponibles changent en fonction de l'environnement sélectionné.
Cliquez sur l'icône du panneau Environnement (![]() ) pour ouvrir le panneau :
) pour ouvrir le panneau :
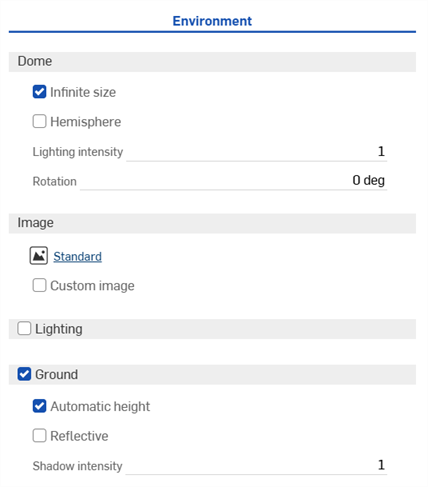
Les paramètres d'environnement sont décrits ci-dessous :
-
Dôme
-
Taille infinie - Définit l'environnement sous la forme d'un dôme de taille infinie. Dans cet environnement, l'horizon est si éloigné que la position de la caméra dans la scène n'a aucun effet, seule la direction dans laquelle la caméra regarde. Cela convient aux scènes extérieures. Lorsque vous n'utilisez pas un environnement infini, une distance par rapport à l'horizon (distance d'horizon) doit être fournie. Cela convient mieux aux scènes intérieures ou aux scènes extérieures confinées où la position de la caméra, et pas seulement l'orientation, doit affecter la vision de l'environnement.
-
Distance d'horizon - La distance entre le centre de l'environnement et l'horizon.
-
-
Hémisphère - Définit l'environnement sur hémisphérique. Dans un environnement hémisphérique, le sol situé à la base de l'hémisphère est projeté depuis l'environnement d'éclairage. Cela peut être utile lorsque vous souhaitez que la scène reste collée au sol plutôt que de flotter dans l'environnement. Lorsque cette option est activée, réglez la hauteur du trépied selon vos spécifications.
-
Hauteur du trépied - La hauteur de la caméra au-dessus du sol lorsque l'image de l'environnement a été capturée. Ceci est utilisé pour projeter la partie inférieure du dôme environnemental sur un plan de masse plat.
-
-
Intensité d'éclairage - Multiplicateur de l'intensité de l'éclairage contenu dans l'image de l'environnement. Les valeurs inférieures à 1 réduisent la luminosité de l'éclairage ambiant, tandis que les valeurs supérieures à 1 l'augmentent.
-
Rotation - Rotation du dôme environnemental autour de l'axe vertical.
-
-
Image
-
Environnement de bibliothèque (
 ) - Environnement de bibliothèque utilisé pour éclairer la scène s'il n'est pas remplacé par une image personnalisée. L’environnement Standard est l'environnement par défaut.
 -
Image personnalisée - Remplacez le dôme de l'environnement par une image de l'environnement HDRI fournie par l'utilisateur. Les images doivent être en latitude/longitude à 360/180 degrés et idéalement au format.hdr ou.exr. Voir Ajouter un environnement personnalisé à la scène pour de plus amples informations.
-
Image - Image d'environnement d'éclairage HDRI personnalisée.
-
-
-
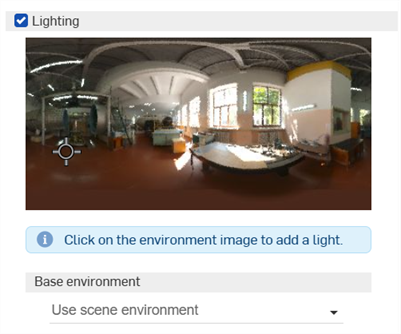
Éclairage (Render Studio Advanced uniquement)
-
Allows placement of area light sources of various shapes directly in the environment, along with the ability to move and resize them. When Lighting is enabled, the unwrapped environment image is displayed as a 2D representation of the 3D graphics area.
Une fois la lumière placée, sélectionnez son point central. Une fois sélectionnée, sa forme peut être modifiée. Cliquez et faites glisser la souris pour déplacer la lumière vers n'importe quel emplacement de l'environnement. Vous pouvez ajouter autant de lumières que nécessaire.
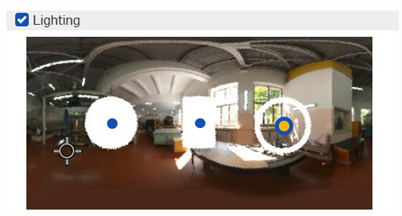
Exemple de 3 formes de lumière : disque (à gauche), rectangle (au centre), anneau (à droite)
A camera direction indicator (crosshair marker) indicates where the center of the viewport is located (where the camera is pointing). This helps you to visually determine where lights should be placed, relative to the model in the graphics area. This marker updates dynamically as the user navigates the model in the graphics area, thereby navigating the camera.
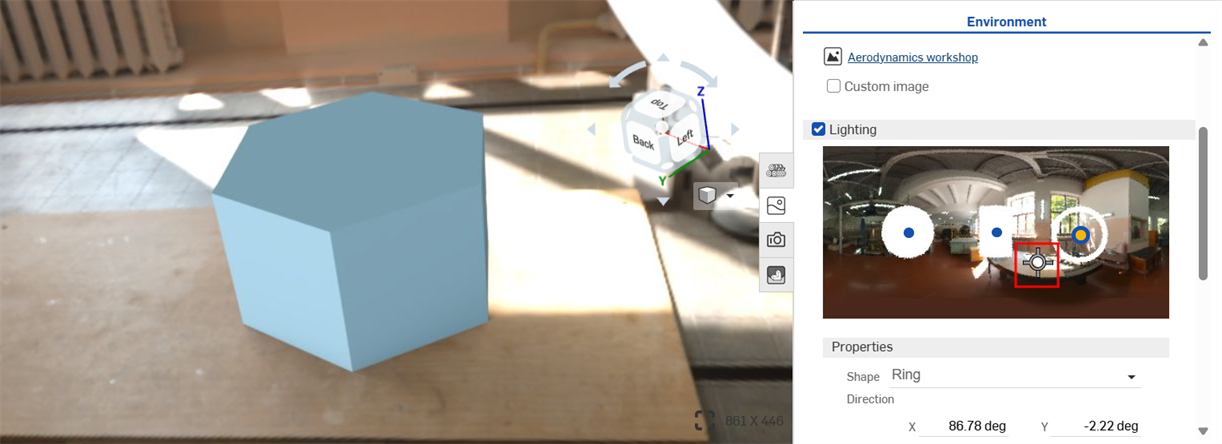
Crosshair center marker in the unwrapped Environment Lighting image on the right indicating the center of the graphics area on the left.
-
Propriétés
-
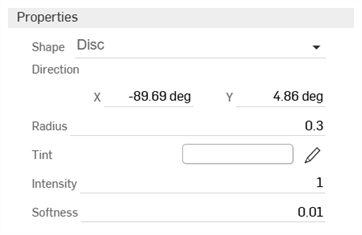
Forme - Forme physique de la lumière : disque, rectangle ou anneau. Cliquez sur l'environnement pour placer une lumière.
-
Direction - Position de la lumière dans l'environnement. L'horizon et le côté droit de la scène sont à 0 degré. Saisissez les valeurs X et Y en degrés.
-
Rayon (pour les formes disque et anneau uniquement) - Rayon du disque ou de la ligne centrale de l'anneau lumineux.
-
Largeur (forme rectangulaire uniquement) - Largeur de la lumière de forme rectangulaire.
-
Hauteur (forme rectangulaire uniquement) - Hauteur de la lumière de forme rectangulaire.
-
Épaisseur (forme d'anneau uniquement) - Largeur de l'anneau lumineux centrée sur son rayon.
-
Couleur - Couleur de la lumière émise. Cliquez sur l'icône en forme de crayon pour modifier la couleur utilisée à partir du sélecteur de couleurs. Les couleurs peuvent être sélectionnées visuellement en cliquant sur la zone chromatique, en saisissant une valeur hexadécimale ou RGB, ou en sélectionnant un échantillon au bas du sélecteur.
-
Intensité - Intensité sans unités de la lumière émise.
-
Densité - Détermine si la lumière présente des contours flous ou nets. Des valeurs élevées adoucissent les contours de la lumière. Des valeurs faibles les accentuent.
-
-
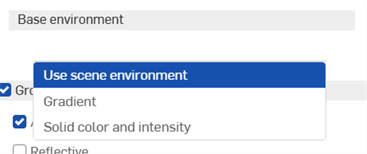
Environnement de base
-
Utiliser l'environnement de la scène - Utilise l'environnement de la scène, généralement sélectionné dans la bibliothèque des environnements, sur lequel la lumière est ajoutée.
-
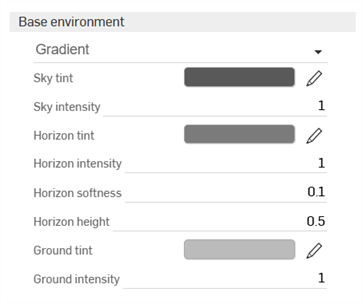
Gradient - Ajoute une lumière graduée. La lumière est ajoutée à l'environnement d'arrière-plan.
-
Couleur du ciel - Couleur de la lumière émise depuis le ciel. Cliquez sur l'icône en forme de crayon pour modifier la couleur utilisée à partir du sélecteur de couleurs. Les couleurs peuvent être sélectionnées visuellement en cliquant sur la zone chromatique, en saisissant une valeur hexadécimale ou RGB, ou en sélectionnant un échantillon au bas du sélecteur.
-
Intensité du ciel - Intensité sans unités de la lumière émise depuis le ciel.
-
Couleur de l'horizon - Couleur de la lumière émise depuis l'horizon. Cliquez sur l'icône en forme de crayon pour modifier la couleur utilisée à partir du sélecteur de couleurs. Les couleurs peuvent être sélectionnées visuellement en cliquant sur la zone chromatique, en saisissant une valeur hexadécimale ou RGB, ou en sélectionnant un échantillon au bas du sélecteur.
-
Intensité de l'horizon - Intensité sans limites de la lumière émise depuis l'horizon.
-
Densité de l'horizon - Détermine si les contours de l'horizon sont flous ou nets. Des valeurs élevées adoucissent les contours de l'horizon. Des valeurs faibles les accentuent. Une valeur de 0 supprime l'horizon.
-
Hauteur de l'horizon - Position de l'horizon dans l'environnement. 0,5 place l'horizon au centre. Des valeurs plus élevées font monter l'horizon dans le ciel. Des valeurs plus basses font baisser l'horizon vers le sol.
-
Couleur du sol - Couleur de la lumière émise depuis le sol. Cliquez sur l'icône en forme de crayon pour modifier la couleur utilisée à partir du sélecteur de couleurs. Les couleurs peuvent être sélectionnées visuellement en cliquant sur la zone chromatique, en saisissant une valeur hexadécimale ou RGB, ou en sélectionnant un échantillon au bas du sélecteur.
-
Intensité du sol - Intensité sans unités de la lumière émise depuis le sol.
-
-
Couleur unie et intensité - Ajoute une teinte unie et une intensité de lumière réglable. La lumière est ajoutée à l'environnement d'arrière-plan.

-
Couleur - Couleur de la lumière émise depuis l'environnement. Cliquez sur l'icône en forme de crayon pour modifier la couleur utilisée à partir du sélecteur de couleurs. Les couleurs peuvent être sélectionnées visuellement en cliquant sur la zone chromatique, en saisissant une valeur hexadécimale ou RGB, ou en sélectionnant un échantillon au bas du sélecteur.
-
Intensité - Intensité sans unités de la lumière émise depuis l'environnement.
-
-
-
-
Sol - Plan de sol virtuel avec commandes de position et de réflectivité.
-
Hauteur automatique - Réglez automatiquement la hauteur du sol en fonction de l'objet le plus bas.
-
Réfléchissant - Permet au plan du sol de refléter la scène.
-
Réflectivité - Degré de réflectivité du plan de masse.
-
Rugosité - Rugosité du plan du sol. Les nombres les plus élevés produisent un reflet semblable à celui d'un miroir. Les chiffres plus faibles rendent le reflet plus flou.
-
-
Intensité des ombres - Intensité des ombres au sol. Une valeur de 1 donne le résultat physiquement correct. Les valeurs inférieures à 1 donnent des ombres plus claires, tandis que les valeurs supérieures à 1 donnent des ombres plus sombres.
-
-
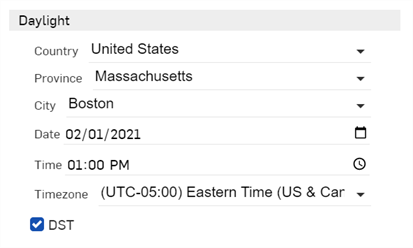
Lumière naturelle - Modifiez les paramètres de lumière naturelle suivants (disponibles pour certains environnements, tels que Preetham).
-
Pays - Choisissez parmi une liste de pays
-
Province - Choisissez parmi les provinces du pays sélectionné
-
Ville - Choisissez parmi une liste des principales villes du monde.
-
Date - Sélectionnez l'année et la date numériquement en cliquant directement sur le mois, le jour et l'année, ou cliquez sur l'icône du calendrier pour sélectionner une date dans la liste de sélection.
-
Heure - Sélectionnez une heure numériquement en cliquant sur l'heure, la minute et la désignation AM/PM, ou cliquez sur l'icône de l'horloge pour la sélectionner dans la liste de sélection des heures.
-
Fuseau horaire - Sélectionnez dans une liste de fuseaux horaires UTC.
-
DST - Lorsque cette option est cochée, le réglage est effectué pour tenir compte de l'heure d'été.
-
Les paramètres de lumière naturelle ne sont disponibles que pour certains environnements (par exemple, Perez et Preetham). Voir Modification d'un environnement avec emplacement et heure
Pour ajuster la largeur du panneau, placez le curseur sur un des bords du panneau. Lorsque le curseur se transforme en flèche double face, cliquez et faites glisser pour redimensionner le panneau.
Consultez la section Exemples et ressources de Render Studio pour plus d'informations.