Paramètres Company/Classe/Enterprise - Développeur
![]()
Disponible uniquement pour
Les administrateurs Enterprise et Professional peuvent enregistrer de nouvelles applications sur Onshape, gérer et distribuer des applications aux utilisateurs et gérer les clés d'API pour les utilisateurs.
The steps on this page apply only to company, classroom, or enterprise administrators. Individual users should follow the Developer Portal steps instead.
All applications created in the Company/Classroom/Enterprise Settings count towards the company's API Limits. All applications created in the Developer Portal count toward the individual user's API Limits.
Pour plus d'informations sur la création et la gestion des applications Onshape, veuillez consulter la Documentation pour les développeurs Onshape.
Cliquez sur votre icône utilisateur (![]() ) en haut à droite de la fenêtre Onshape et sélectionnez les paramètres Company/Classroom/Enterprise dans la liste déroulante.
) en haut à droite de la fenêtre Onshape et sélectionnez les paramètres Company/Classroom/Enterprise dans la liste déroulante.
Sélectionnez Développeur dans le volet gauche.
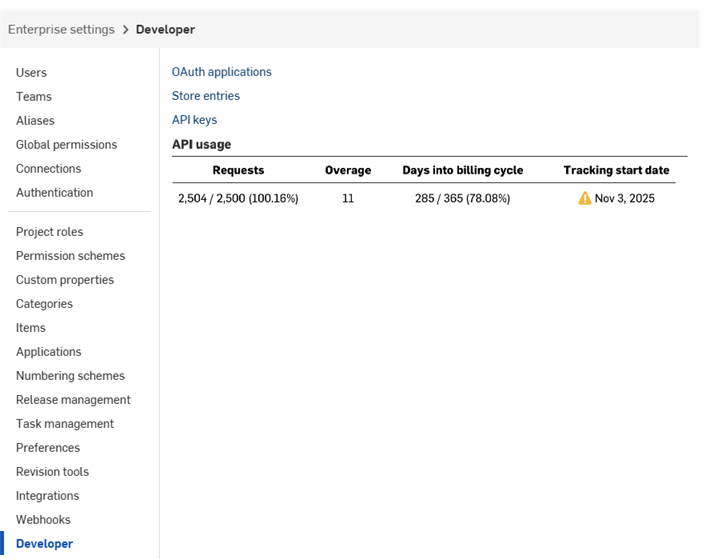
À partir de cet écran, les administrateurs peuvent :
-
Enregistrer une nouvelle application OAuth auprès de Onshape
-
Partager des applications avec des utilisateurs, des alias et des équipes au sein de la société
-
Soumettre des applications correctement authentifiées à l'App Store Onshape
-
Afficher, créer et supprimer les clés API de tout le monde dans la société.
-
Voir l'utilisation des API pour la société
- Consultez la section Limites d'API pour plus d'informations sur l'utilisation des API.
-
Des e-mails de notification sont envoyés à tous les administrateurs à 25 %, 50 %, 75 % et 100 % de l'utilisation.
The steps on this page apply only to company, classroom, or enterprise administrators. Individual users should follow the Developer Portal steps instead.
All applications created in the Company/Classroom/Enterprise Settings count towards the company's API Limits. All applications created in the Developer Portal count toward the individual user's API Limits.
Pour créer une application qui s'ouvre dans l'interface utilisateur d'Onshape à des fins d'usage interne ou de test :
- Enregistrez l'application auprès de Onshape.
- Créez une extension pour l'application dans l'interface utilisateur d'Onshape.
- Attribuez des utilisateurs à l'application.
Pour publier l'application sur l'App Store Onshape pour les utilisateurs finaux :
- Authentifiez-vous avec OAuth2.
- Créez une entrée sur l'App Store.
- Complétez la Liste de contrôle de lancement
-
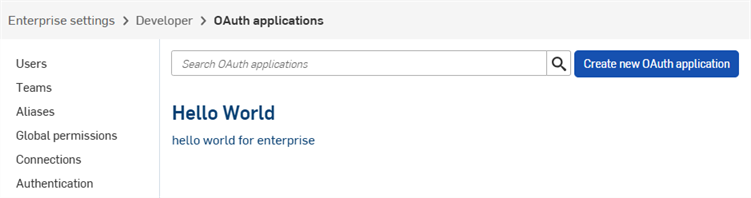
Click the OAuth applications link on the Developer page to see a list of all your apps:
-
Cliquez sur le bouton Créer une nouvelle application OAuth :
-
Remplissez le formulaire :
-
Nom - Nom de l'application affichée aux utilisateurs.
-
Format principal - Chaîne qui identifie de manière unique votre application et qui indique les données qu'elle peut stocker sur les serveurs Onshape (par exemple, com.exemple.exemple). Ne peut pas être modifié une fois l'application enregistrée. Non affiché aux utilisateurs.
-
Résumé - Description de l'application, présentée à l'utilisateur lorsqu'il est invité à autoriser l'application à accéder à ses données.
-
URL de redirection - URL vers laquelle vous êtes redirigé après authentification ; page de destination de votre application.
- Votre application doit spécifier au moins une URL utilisée dans les échanges via le protocole OAuth.
-
This URL must also use SSL (a URL that begins with https), with two exceptions applicable for installed desktop applications: http://localhost:<port> and urn:ietf:wg:oauth:2.0:oob.
-
Type - Type d'application : Application cloud intégrée, Application cloud connectée, ou Application de bureau connectée.
-
URL OAuth - URL utilisée pour démarrer le processus OAuth2 afin d'authentifier l'utilisateur. Voir Documentation pour les développeurs : OAuth2 pour plus de détails.
-
Doit contenir l'URL de votre application déployée.
-
Il s'agit de la première URL appelée depuis la page Onshape Applications.
-
La page hébergée sur cette URL doit gérer l'authentification OAuth. Une fois que le serveur de votre application a été authentifié pour le compte de l'utilisateur, celui-ci doit être redirigé vers le contenu de votre application.
-
Si vous n'avez pas encore déployé votre application, vous pouvez laisser ce champ vide pour le travail local et le mettre à jour plus tard.
Toutes les applications soumises à l'App Store Onshape pour un usage public doivent s'authentifier correctement auprès d'OAuth2. Voir Documentation pour les développeurs : OAuth2 pour plus de détails.
-
-
Réglages
-
Favorise la collaboration - Cochez si vous souhaitez collaborer avec d'autres utilisateurs lors du développement de l'application.
-
- Autorisations - Voir Étendue des autorisations ci-dessous.
-
-
Cliquez sur Créer une application.
-
Copiez la clé secrète OAuth depuis la fenêtre.
Vous ne pourrez plus accéder à cette clé secrète. Ce secret est propre à vous et à votre application. Il doit être protégé comme n'importe quel mot de passe sensible et ne jamais intégrer le code source.
-
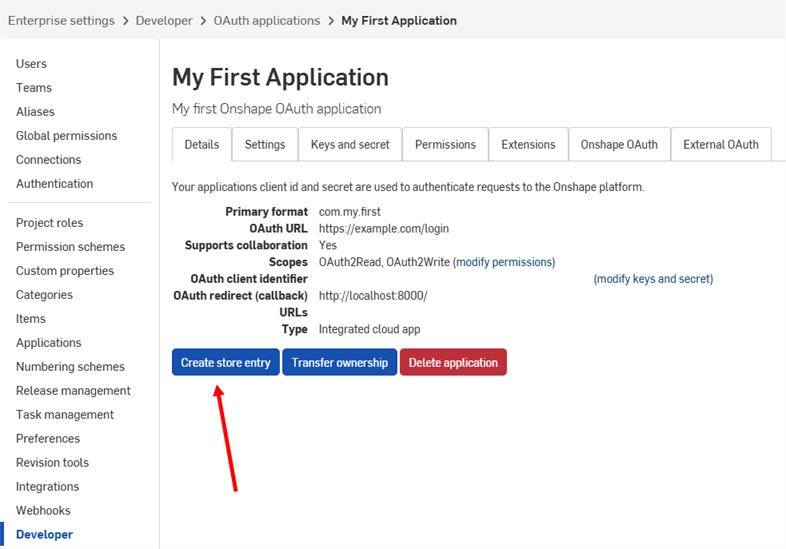
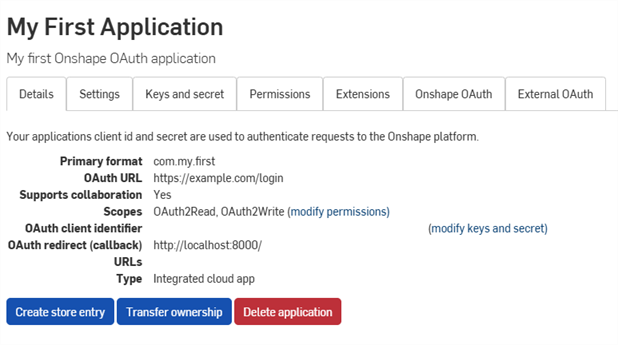
The app's OAuth application entry appears with the Details tab active. Selecting the app name on the OAuth applications page now brings you to this screen.
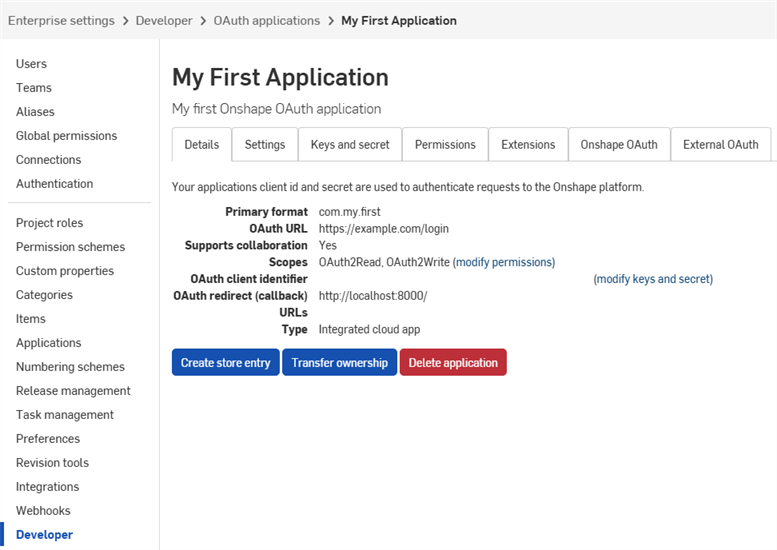
Use the tabs on this screen to:
-
Détails :
-
Paramètres : gérer les paramètres de l'application
- Clés et secret :
- Copier la clé Identifiant client OAuth
- Régénérer une nouvelle clé Secret client OAuth
-
Autorisations : modifiez les limites d'autorisation des applications
-
Extensions : gérez les extensions des applications
-
OAuth Onshape : gérez l'authentification Onshape
-
OAuth externe : gérez l'authentification par des tiers
Consultez la documentation d'Onshape pour les développeurs pour plus d'informations, notamment : s'authentifier correctement avec OAuth2 et remplir la Liste de contrôle de lancement. Consultez le tutoriel Hello World pour découvrir un exemple concret.
-
Click OAuth applications on the Developer page, then select your application.
-
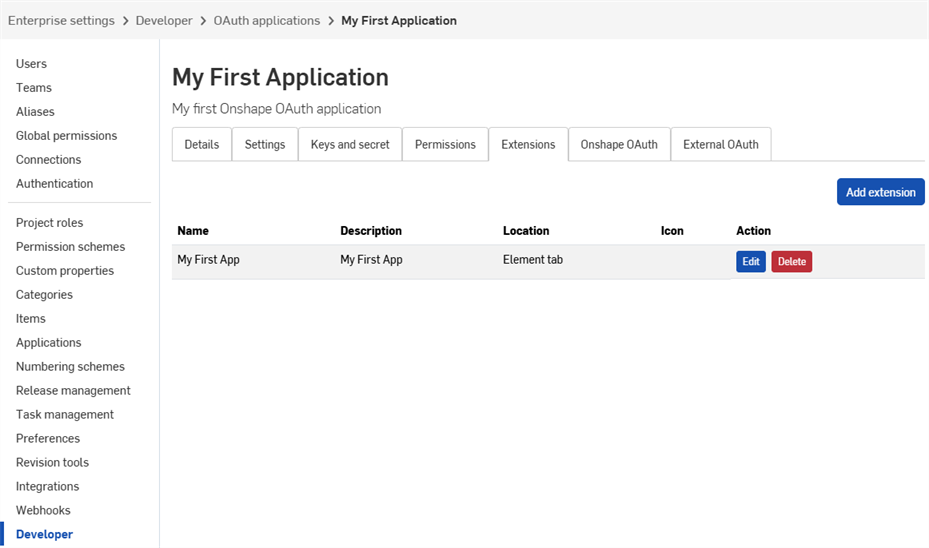
Cliquez sur l'onglet Extensions.
-
Cliquez sur Ajouter une extension.
-
Remplissez le formulaire :
-
Name: Can be truncated in the UI if it is too long.
-
Description (facultatif) : n'apparaît pas dans l'interface utilisateur d'Onshape, mais pourrait apparaître dans le processus d'authentification.
-
Emplacement : où se trouve l'extension dans l'interface utilisateur d'Onshape.
-
Consultez la section Emplacements et contextes pris en charge dans la Documentation pour les développeurs.
-
Vous ne pouvez créer qu'une seule extension d'onglet d'élément par application.
-
-
Contexte : certains emplacements fonctionnent dans le contexte d'une sélection, par exemple dans un Part Studio.
-
Consultez la section Emplacements et contextes pris en charge dans la Documentation pour les développeurs.
-
-
URL de l'action : les sites qui intègrent une interface utilisateur utilisent l'URL de l'action pour définir l'adresse de la page à afficher. L'URL de l'action est utilisée pour spécifier le point final REST si l'emplacement correspond à une action (menu contextuel, élément de la barre d'outils, action dans une boîte de dialogue, etc.) et si le type d'action est GET ou POST. Si l'emplacement correspond à une action et que l'action est Ouvrir dans une nouvelle fenêtre, l'URL de l'action est celle qui s'ouvre dans la nouvelle fenêtre.
-
Consultez la section Paramètres de l'URL de l'action dans la Documentation pour les développeurs afin d'obtenir la liste des paramètres pouvant être utilisés dans ce champ.
-
-
Type d'action : Applicable aux emplacements qui n'intègrent pas d'interface utilisateur. Les types d'actions pris en charge sont les suivants :
-
GET - Cette commande effectue un appel API GET en utilisant l'URL de l'action. Le remplacement des paramètres s'effectue sur l'URL de l'action.
-
POST - Cette commande effectue un appel API POST en utilisant l'URL de l'action et le corps de l'action comme corps de la requête POST. Le remplacement des paramètres s'effectue à la fois sur l'URL de l'action et sur le corps de l'action.
-
Ouvrir dans une nouvelle fenêtre. L'URL de l'action s'ouvre dans une nouvelle fenêtre de navigateur. Le remplacement des paramètres se fait sur l'URL de l'action.
-
-
Corps de l'action - Applicable uniquement aux types d'action POST. Le corps de l'action est transmis lors d'un appel API POST et doit être dans un format JSON valide.
-
Afficher la réponse - Cette option n'est disponible que si le type d'action est GET ou POST. Lorsqu'elle est sélectionnée, l'interface utilisateur attend la réponse et l'affiche dans une boîte de dialogue. La réponse doit être dans un format JSON valide.
-
Icône - L'icône s'affiche là où l'extension est présente, notamment dans un panneau d'informations, une action du menu contextuel, un bouton de la barre d'outils, un bouton d'action dans une boîte de dialogue ou tout autre emplacement pris en charge.
-
-
Cliquez sur OK.
Pour plus d'informations sur la création et la gestion des applications Onshape, veuillez consulter la Documentation pour développeurs Onshape. Consultez le tutoriel Hello World pour découvrir un exemple concret.
Les administrateurs peuvent ajouter des utilisateurs internes aux applications à des fins de test avant de les soumettre à l'App Store Onshape. Les utilisateurs ainsi ajoutés voient automatiquement s'afficher les extensions d'application associées dans leur interface utilisateur Onshape, sans avoir à s'abonner via l'App Store.
-
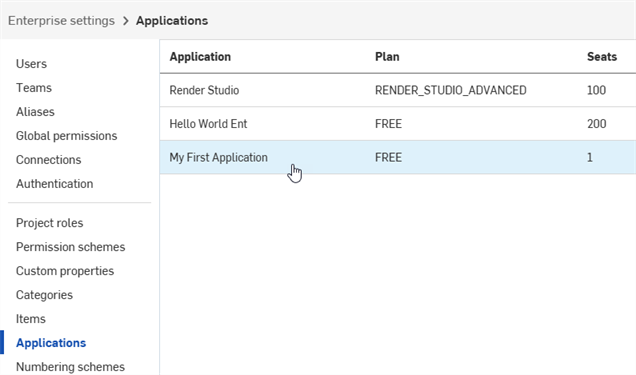
Une fois votre application enregistrée, cliquez sur Applications dans le volet de gauche.
-
Sélectionnez l'application dans la liste.
-
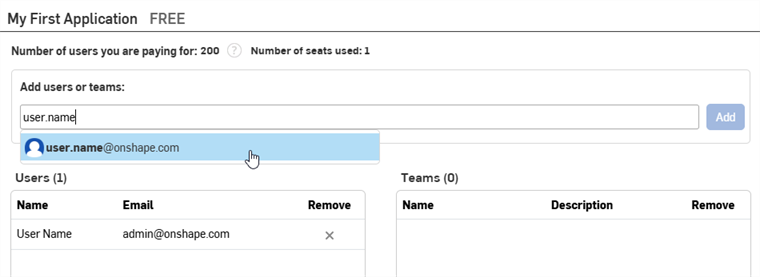
Commencez à saisir le nom ou l'adresse e-mail d'un utilisateur, d'une équipe ou d'un alias dans le champ Ajouter des utilisateurs ou des équipes, puis sélectionnez un résultat dans la liste. L'administrateur qui a créé l'application figure automatiquement dans la liste des utilisateurs. Continuez à ajouter des noms ou des adresses e-mail.
-
Cliquez sur le bouton Ajouter.
Les utilisateurs avec profil restreint ne peuvent pas être ajoutés aux applications.
Pour supprimer un utilisateur, un alias ou une équipe de l'application, cliquez sur son icône X dans la colonne Supprimer.
- In your Developer settings, click OAuth applications.
- Click the name of the app to transfer.
- Click the Transfer ownership button on the Details tab. The Transfer dialog opens.
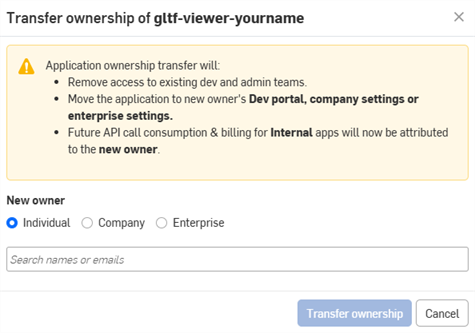
- Sélectionnez une option pour transférer l'application à une personne, une société ou une entreprise.
- Pour transférer la propriété à une personne, saisissez le nom ou l'adresse e-mail du nouveau propriétaire dans le champ de recherche. Pour transférer la propriété à une société ou à une entreprise, sélectionnez une option dans la liste déroulante.
- Cliquez sur Transfert de propriété. L'application est supprimée de votre liste d'applications OAuth.
- Si l'application est transférée à un compte individuel, son titulaire reçoit une notification par e-mail et l'application apparaît dans son Portail Développeur Onshape.
- Si l'application est transférée à une autre personne dans un plan Company/Classroom/Enterprise, tous les administrateurs reçoivent une notification par e-mail et l'application apparaît dans leurs paramètres Développeur.
La consommation et la facturation des futurs appels à une API seront attribuées au nouveau propriétaire. Consultez la section Limites d'API pour plus de détails.
Avant de soumettre une application à l'App Store Onshape, consultez la documentation pour les développeurs Onshape pour connaître les exigences, notamment l'authentification via OAuth2 et la vérification de la Liste de contrôle de lancement.
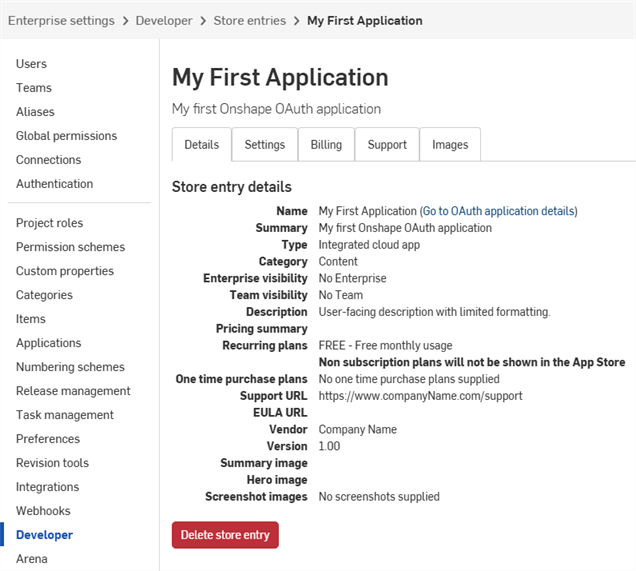
To review, edit, or delete an existing Onshape App Store entry, click Store entries in your Developer settings, then select the entry to modify.
Pour créer une nouvelle entrée de store pour une application OAuth :
-
In your Developer settings, click OAuth applications.
-
Click the app name in the list.
-
Click Create store entry on the app's Details page.
-
Remplissez le formulaire :

- Nom - Déterminé automatiquement à partir du nom de l'application fourni lors de l'enregistrement.
-
Résumé - Paramétré automatiquement à partir du résumé fourni lors de l'enregistrement.
-
Type - Type d'application : Application cloud intégrée, Application cloud connectée ou Application de bureau connectée. Ce type doit correspondre au type sélectionné lors de l'enregistrement de l'application OAuth.
-
Catégorie - Sélectionnez la catégorie appropriée pour votre application.
-
Visibilité pour les équipes - Choisissez de rendre l'entrée du store d'applications privée visible pour aucun utilisateur interne (par défaut), pour tous les utilisateurs internes ou pour des équipes spécifiques.
-
Description - Description de l'application destinée aux utilisateurs. La mise en forme est limitée.
-
URL d'assistance - URL ou adresse e-mail vers laquelle les utilisateurs de votre application doivent être redirigés pour obtenir de l'aide. Cette page doit faire l'objet d'un suivi actif.
-
E-mail d'assistance - Adresse e-mail devant recevoir les notifications d'abonnement à l'application. Elle doit faire l'objet d'un suivi actif.
-
Fournisseur - Nom de votre société.
-
Version - Version actuelle de cette application.
-
Images - Vous pouvez, si vous le souhaitez, mettre en ligne des images de résumé, des images d'en-tête et d'autres images.
-
Cliquez sur Créer.
L'application apparaît dans l'App Store Onshape en tant qu'application privée. Elle n'est visible que par vous et par les équipes internes spécifiées dans les paramètres de visibilité pour les équipes. Pour rendre l'application publique, consultez la Liste de contrôle de lancement ci-dessous.
- Click Developer in the left pane of your company settings.
- If your app has an Onshape App Store entry, delete that first:
- Click Store entries on the Developer page.
- Click the store entry to delete.
- Click Delete store entry on the Details tab.
- Click Delete again to confirm.
- Click Developer in the left pane or breadcrumbs to return the Developer landing page.
- Click OAuth applications in the Developer settings.
- Click the application to delete.
- Click Delete application on the Details tab.
- Cliquez à nouveau sur Supprimer pour confirmer.
Toutes les applications soumises sur l'App Store Onshape (Onshape Apps) doivent suivre les instructions de la page Guide des API : OAuth2 et utiliser OAuth2 pour l'autorisation. Les scripts d'automatisation (ou les applications qui ne sont pas destinées à l'App Store Onshape) peuvent utiliser OAuth2 ou des clés API pour s'authentifier. OAuth2 permet aux applications d'appeler les API Onshape pour le compte des utilisateurs de l'application ; les clés API n'effectueront les opérations que pour le compte de l'utilisateur Onshape qui les a générées.
Les clés API sont un moyen utile de créer de petites applications destinées à un usage personnel, ce qui permet aux développeurs de s’épargner la charge des flux de travail OAuth.
Les clés API sont utilisées pour authentifier une application, et non ses utilisateurs. (OAuth2 authentifie une application et ses utilisateurs en s'assurant qu'ils sont autorisés à accéder à Onshape.) Une fois que vous avez créé une clé API, elle n'est valide que dans la pile sur laquelle elle a été créée. Une clé API créée sur MonEntreprise.onshape.com ne fonctionnera pas sur cad.onshape.com.
Les clés API qui ne sont pas associées à une société ou à une entreprise peuvent être gérées via la page Mon compte - Développeur.
Individual accounts are capped at two (2) API keys. Delete API keys as needed. Company, classroom, and enterprise accounts are not capped.
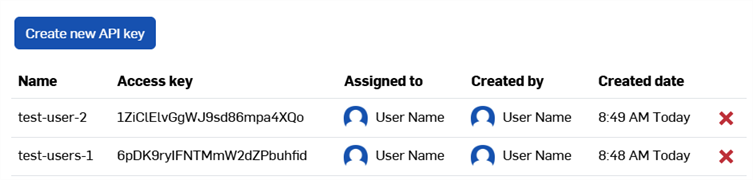
Affichage des clés d'API
- Dans les paramètres Développeur de votre plan Company/Classe/Enterprise, cliquez sur Clés API
- Consultez les clés API disponibles pour la société.
Création de clés d'API
- Dans les paramètres Développeur de votre plan Company/Classe/Enterprise, cliquez sur Clés API
- Cliquez sur Créer une nouvelle clé d'API.
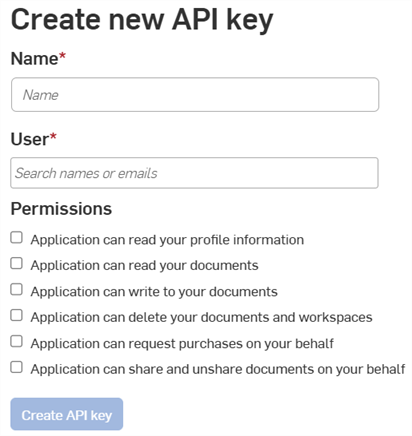
- Entrez le nom de la clé API dans le champ Nom.
-
Assignez la clé API à un membre de la société. Vous pouvez effectuer une recherche par nom ou par adresse e-mail dans le champ Utilisateur.
- Choisissez les autorisations pour les clés. Consultez la section Étendue des autorisations ci-dessous.
- Cliquez sur le bouton Créer une clé d'API.
-
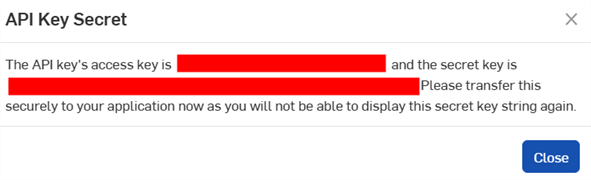
Dans la fenêtre contextuelle, copiez la clé API et la clé secrète affichées, enregistrez-les quelque part, puis cliquez sur le bouton Fermer.
Vous ne pourrez plus accéder à cette clé secrète. Ce secret est propre à vous et à votre application. Il doit être protégé comme n'importe quel mot de passe sensible et ne jamais intégrer le code source.
- Pour plus d'informations sur l'authentification de vos applications à l'aide de clés d'API, consultez le Guide des API : Authentification.
Suppression des clés d'API
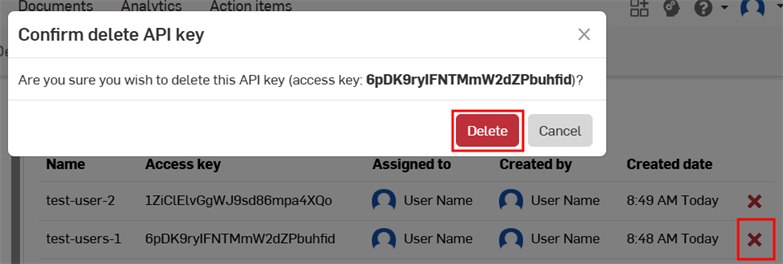
- Cliquez sur l'icône « X » à droite de la clé d'API que vous souhaitez supprimer.
- Confirmez que vous souhaitez supprimer cette clé d'API pour tous les utilisateurs. Cette action ne peut pas être annulée. Cliquez sur Supprimer pour confirmer.
Les étendues d'autorisation suivantes sont disponibles lors de la création d'applications OAuth :
-
L'application peut lire les informations de votre profil (OAuth2ReadPii) - Cochez cette case pour autoriser l'application à accéder aux informations de votre profil.
-
L'application peut lire vos documents (OAuth2read) - Cochez cette case pour autoriser l'application à accéder à vos documents en lecture.
-
L'application peut écrire dans vos documents (OAuth2Write) - Cochez cette case pour autoriser l'application à accéder à vos documents en écriture.
-
L'application peut supprimer vos documents et espaces de travail (OAuth2Delete) - Cochez cette case pour autoriser l'application à accéder à vos documents et espaces de travail.
-
L'application peut demander des achats en votre nom (OAuth2Purchase) - Cochez cette case pour autoriser l'application à effectuer des achats pour vous.
-
L'application peut partager et annuler le partage de documents en votre nom (OAuth2share) : cochez cette case pour autoriser l'application à partager et annuler le partage de vos documents.