Mit Verzweigungen arbeiten
Die Lektion dauert ca. 5 Minuten.
Wenn Sie in Onshape arbeiten, erfolgt das Modellieren in Arbeitsbereichen. Ob Sie nun mit Bauteilen, Baugruppen, Zeichnungen oder importierten Daten arbeiten – alles erfolgt in Arbeitsbereichen. Beachten Sie, dass ein einzelnes Dokument mehrere Arbeitsbereiche enthalten kann und dass die Arbeitsbereiche innerhalb eines Dokuments weiterhin völlig unabhängig voneinander sind. Stellen Sie sich Arbeitsbereiche wie eine Sandbox vor, in der Entwickler und Ingenieure mit neuen Design-Variationen experimentieren können, ohne befürchten zu müssen, die Arbeit anderer Benutzer zu stören.
Diese Lektion behandelt das Anlegen eines neuen Arbeitsbereichs durch Erstellen einer Verzweigung.
Erste Schritte
Zusammenfassend lässt sich sagen, dass jedes Dokument in Onshape zuerst eine Version namens Start und einem Arbeitsbereich namens Hauptarbeitsbereich umfasst. Der Hauptarbeitsbereich ist der Ort, an dem Sie mit der Arbeit beginnen. Die Version „Start“ bezeichnet immer den unveränderten Ausgangspunkt, der keine Daten enthält und immer schreibgeschützt ist. Versionen sind Zeitpunkte der Arbeitsbereiche, die nicht geändert werden können.
Da Sie viele Arbeitsbereiche in einem Dokument erstellen können, können Sie viele Sandboxes haben, in denen Ingenieure mit dem Hauptdesign experimentieren können, ohne die Arbeit anderer zu stören.
Sobald Sie mit einem Design zufrieden sind, können Sie es wieder in einen anderen Arbeitsbereich zurückführen, um es vollständig in das Hauptdesign zu integrieren und für alle anderen Benutzer verfügbar zu machen.
Vor der Erstellung der Verzweigung
Um von einem Dokument eine Verzweigung anzulegen, erstellen Sie zuerst eine Version durch Klicken auf . ![]()
Denken Sie daran, dass eine Verzweigung keine andere Datei oder Kopie ist. Sie befindet sich in einem Dokument und ist ein unabhängiger Arbeitsbereich innerhalb dieses Dokuments. Sie können Designs und Daten in einem Arbeitsbereich ändern, ohne die Daten in einem anderen Arbeitsbereich zu beeinflussen.
Die Erstellung eines weiteren Arbeitsbereichs wird als Verzweigung bezeichnet. Hier geht es darum, was mit dem Versionen- und Historiendiagramm geschieht, wenn Sie einen weiteren Arbeitsbereich anlegen. Sie erstellen eine weitere Verzweigung des Diagramms.
Wichtig ist zu wissen, dass zuerst eine Version vorhanden sein muss, damit eine Verzweigung erstellten werden kann. Verzweigungen werden ausschließlich aus Versionen erstellt.
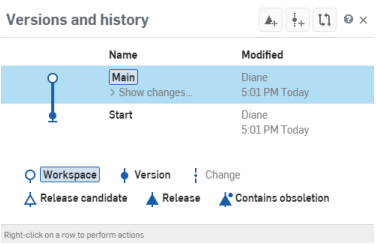
Eine Dokumentversion und ein Historiendiagramm, oben
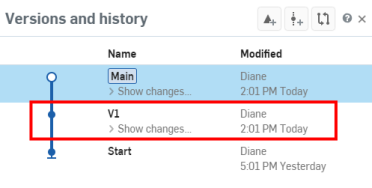
Um eine Version zu erstellen, klicken Sie in der Dokument-Palette auf das Symbol Version erstellen, das rot hervorgehoben ist:
![]()
Geben Sie einen Namen für die Version und optional eine Beschreibung ein. Klicken Sie dann auf Erstellen. Im Versionen- und Historien-Diagramm wird nun die neue Version V1 angezeigt:
Weitere Arbeitsbereiche erstellen: Verzweigung
Sobald eine Version vorliegt, können Sie von dieser Version eine Verzweigung erstellen. Rechtsklicken Sie auf die Version im Versionen und Historie-Diagramm und wählen Sie Verzweigen, um Arbeitsbereich zu erstellen aus. Geben Sie einen Namen und eine Beschreibung für den neuen Arbeitsbereich ein und klicken Sie auf Erstellen.
Die neue Verzweigung B1 wird im Diagramm angezeigt:
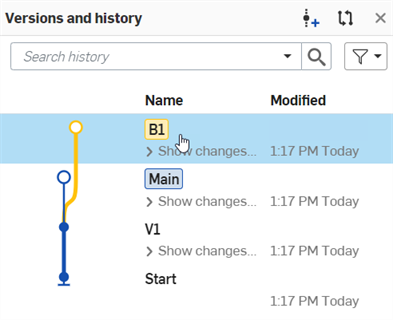
Beachten Sie, dass Verzweigungen farblich gekennzeichnet sind. Folgen Sie der Farbe der Verzweigung, um die gesamte Historie anzuzeigen.
Rechtsklicken Sie dann auf die Version im Diagramm und wählen Sie Folgendes aus:
Verzweigen, um Arbeitsbereich zu erstellen
Nach der Erstellung der neuen Verzweigung und des Arbeitsbereichs gelangen Sie in diesen Arbeitsbereich. Sie erkennen das am neuen Arbeitsbereichsnamen neben dem Dokumentnamen in der Dokumenten-Titelleiste.
Mit mehreren Verzweigungen arbeiten
Da Sie nun mehrere Arbeitsbereiche in Ihrem Dokument haben, ist es wichtig zu wissen, in welchem Arbeitsbereich Sie sich befinden und wie Sie zwischen den Arbeitsbereichen wechseln können. In welchem Arbeitsbereich Sie sich befinden, sehen Sie oben in der Benutzeroberfläche. Neben dem Dokumentnamen wird der Arbeitsbereichsnamen (oder den Versionsnamen, wenn Sie sich in einer Version befinden) angezeigt. Wenn Sie sich in einer Version befinden, sehen Sie keine Symbolleisten oder Feature-Listen, da Versionen nur für die Anzeige bestimmt sind.
Sie können den aktiven Arbeitsbereich auch sehen, indem Sie auf das Symbol „Versionen und Historie“ ![]() in der Dokument-Palette klicken.
in der Dokument-Palette klicken.
Der aktive Arbeitsbereich wird im Diagramm hervorgehoben.
Wie wechselt man zwischen verschiedenen Arbeitsbereichen? Wählen Sie einfach die zu öffnende Verzweigung in dem Diagramm aus. Sie können das Diagramm jederzeit schließen. Es spielt dabei keine Rolle, welchen Arbeitsbereich Sie gerade betrachten.
Denken Sie daran, dass Verzweigungen völlig unabhängige Arbeitsbereiche innerhalb von Dokumenten sind, so dass Sie eine Version in einer Verzweigung genauso erstellen können wie im ursprünglichen Arbeitsbereich.
Zusätzliche Ressourcen
Weitere Ressourcen des Learning Centers finden Sie in den folgenden Kursen zum Selbststudium: Verzweigungen und Zusammenführungen (Onshape-Konto erforderlich). Sie können auch die Artikel zur technischen Einweisung lesen: Arbeiten mit den historischen Daten eines Dokuments und zugehörige Informationen (Onshape-Konto erforderlich) und Gitflow-Versionsverwaltung (Onshape-Konto erforderlich).