 Repairing
![]()
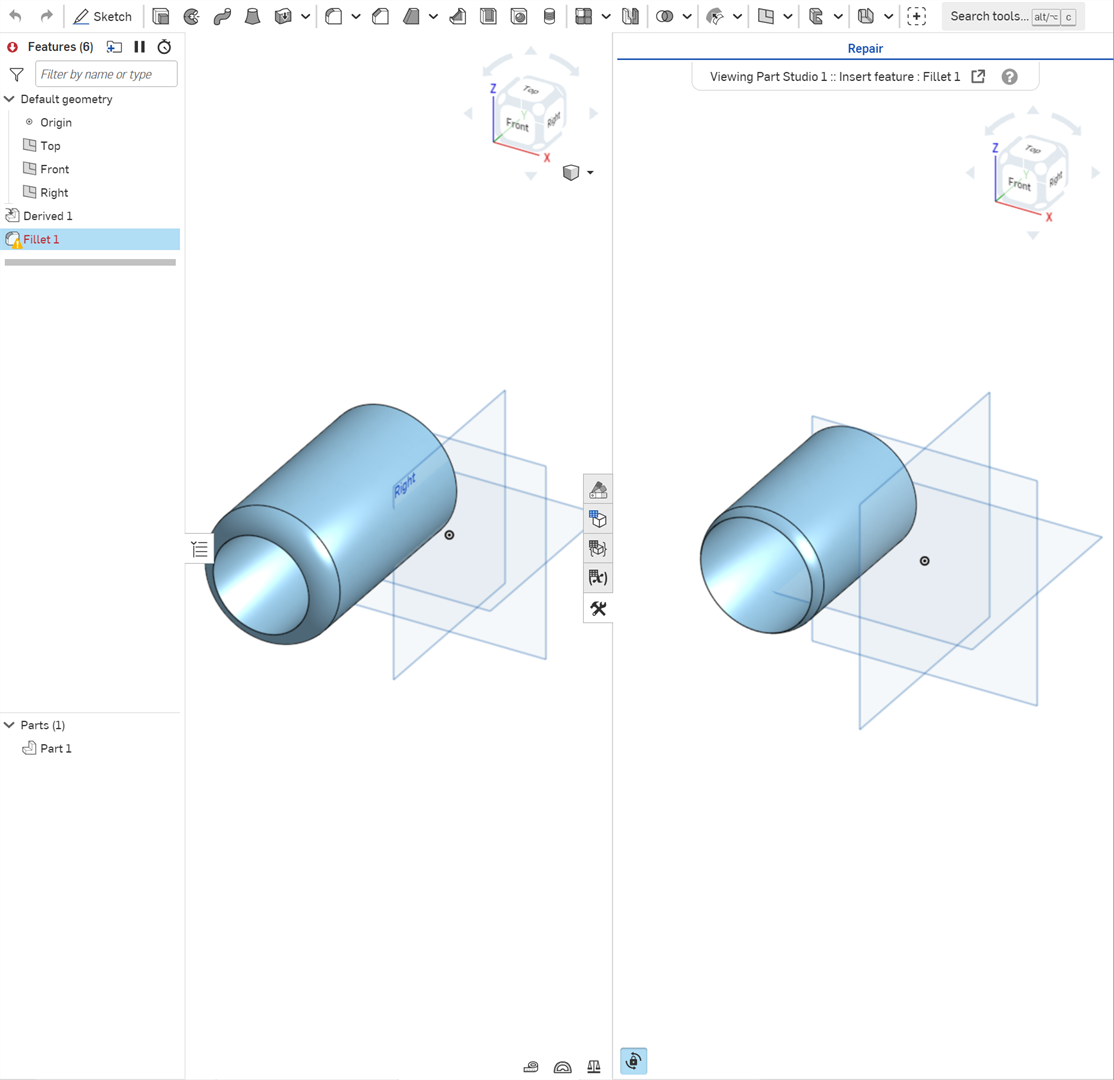
Onshape provides a mechanism for graphically aiding repair of broken references at any history point: View in repair. In most cases, View in repair is initiated after editing a Derived or Import feature to a new base part, causing broken references in the Part Studio. This opens a repair panel to the right of the Part Studio to help guide you to where repairs are needed.
Though View in repair is usually used after editing an existing Derive or Import feature to a new base part, it can be used after any change to the Part Studio causes features to fail further down in the Features list.
Onshape’s Repair visually helps users resolve missing references. In a Part Studio, open the Versions and history panel. Click the Repair icon and select a history entry, or right-click a history entry and select View in repair. Select an entry that shows the Part Studio prior to the missing reference.
The Repair panel displays the view-only history entry for visual reference. To switch the selected entry, click the Repair icon again and make a different selection. By default, the Part Studio and Repair panel update in tandem. When Synchronize view is not selected, the views are independent.
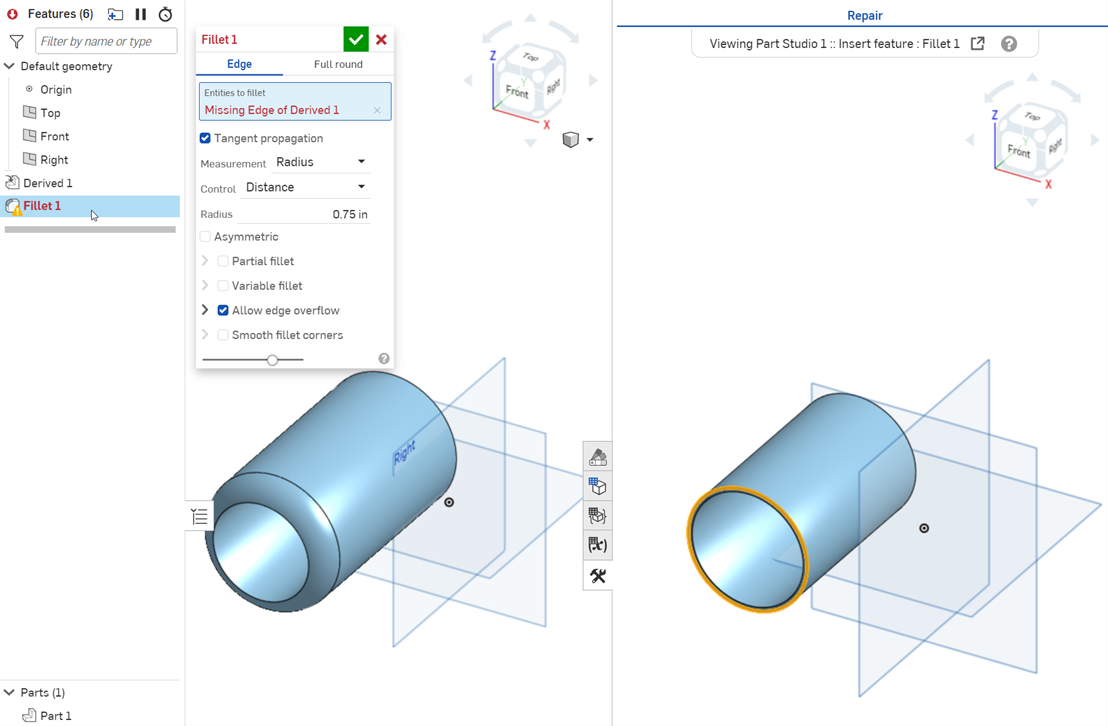
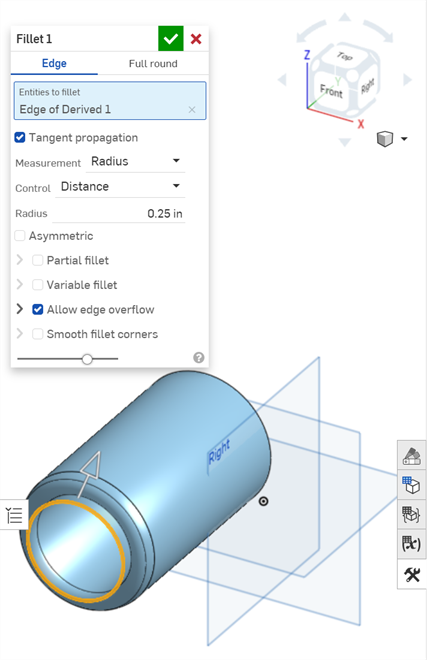
Edit the broken feature in the Part Studio. Hover over the missing reference to highlight it in the Repair panel, showing where the reference pointed previously. Select the two new references. Delete the missing references from the field and any other missing references if needed.
Right-click in the Repair panel for a context menu. Zoom to fit brings the entire model into view. Isometric returns the model to an angled isometric view.
To use View in repair from the Versions and history panel:
-
Open the Part Studio that has the Derived feature reference, or any other broken reference.
-
Click the Versions and history icon (
 ) to open the Versions and history panel.
 -
Right-click on the change where you want the repair to occur, and select View in Repair from the context menu.
Alternately, click the Repair icon (
 ) on the Versions and history panel toolbar, then select the history change. This must be a change where no references were broken (the last known good state). Usually this is the history change immediately before the references broke.
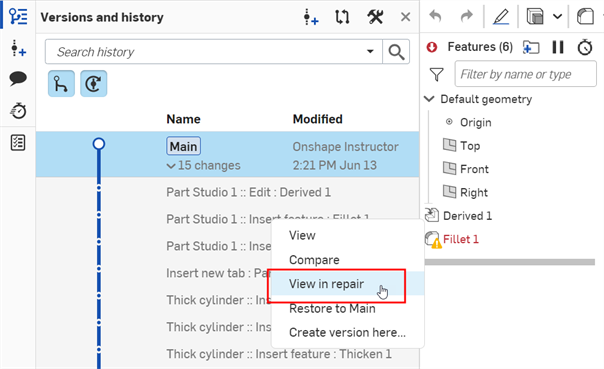
-
The Repair panel opens side by side with the current Part Studio on the left and the base reference in the Repair panel on the right:
-
Open and repair each feature one at a time. As you repair in the Part Studio (left side), both the Part Studio and Repair panel (right side) are synchronized and updated in tandem. Hovering over a broken reference in the Part Studio also highlights it in the Repair panel (where the reference pointed to prior to it breaking).
-
Make the repairs in the Part Studio until there are no more broken references.
-
Click the Repair panel icon (
) to close the Repair panel.
To repair from the feature's last healthy moment:
-
Open the Part Studio that has the Derived feature reference, or any other broken reference.
-
Either:
-
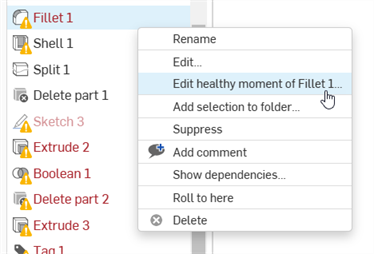
Right-click on the feature with the broken reference and select Edit healthy moment of [Feature] from the context menu:
-
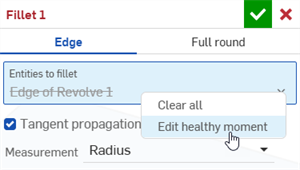
Double-click on the feature with the broken reference, right-click on the broken reference, and select Edit healthy moment from the context menu:
-
-
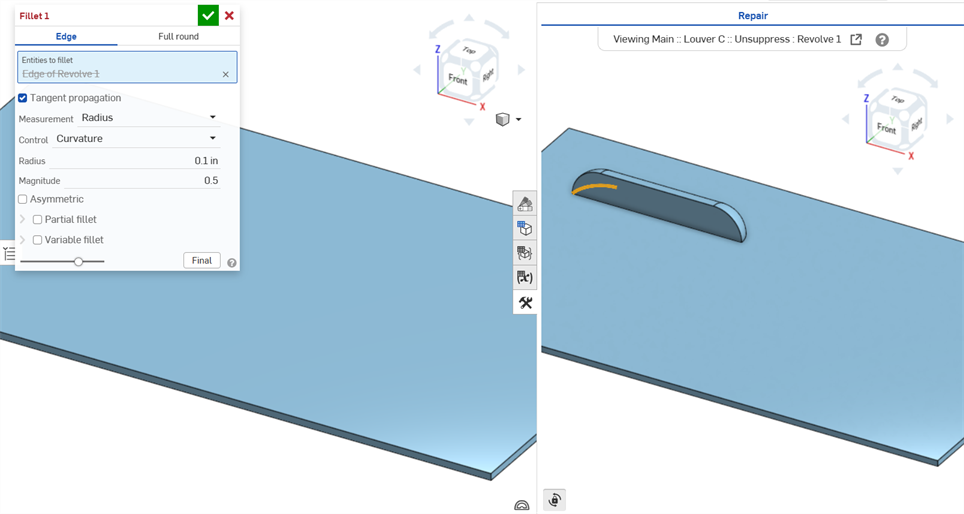
The Repair panel opens side by side with the current Part Studio on the left and the last healthy moment of the Part Studio and feature in the Repair panel on the right:
-
Repair the feature's broken reference in the Part Studio (left side). As you repair, both the Part Studio and Repair panel (right side) are synchronized and updated in tandem. Hovering over a broken reference in the Part Studio also highlights it in the Repair panel (where the reference pointed to prior to it breaking).
-
Click the Repair panel icon (
) to close the Repair panel.
When some of the feature's references are broken, but the feature does not fail, Edit last healthy moment is not available. For example, if there are multiple missing faces or sketch regions to extrude in the Extrude feature dialog. You can still enter Repair manager through the Versions and history panel.
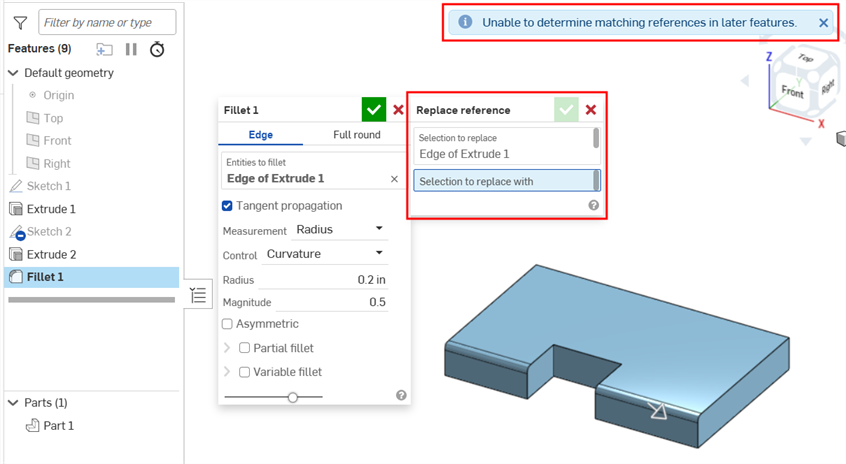
When a feature fails due to a broken reference, all downstream features that use this reference also fail. Replace reference allows you to replace the reference in the first feature where it is used, and have this new reference propagate downstream to all failed features in which it is used. For this to work, one of the model's previous healthy moments must be accessed in the Repair panel.
-
Open the Repair panel, either from the Versions and history panel or Edit healthy moment from the feature's context menu.
-
Double-click the feature with the failing reference from the Features list to open it (if not already open):

-
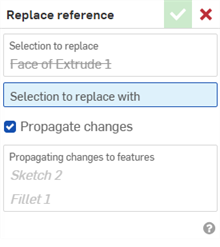
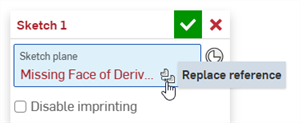
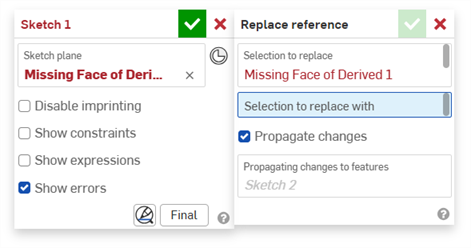
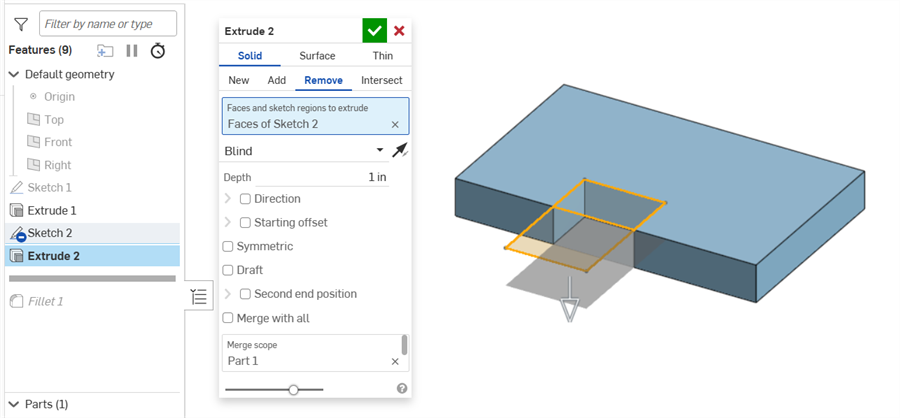
Click the Replace reference icon (
 ) shown in the first image below. The Replace reference dialog opens (second image below):
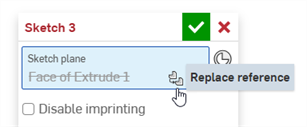
-
Select the reference to replace in the Features list or graphics area.
-
Keep Propagate changes checked in order to have the new reference update in all downstream features (listed in the read-only Propagating changes to features field). Uncheck if you want to replace this reference only in this sketch or feature.
-
Click the checkmark icon (
 ) to accept the new reference.
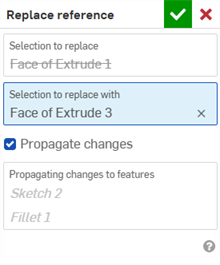
-
The reference is updated in the sketch or feature dialog. Click the checkmark icon (
) to close this dialog. 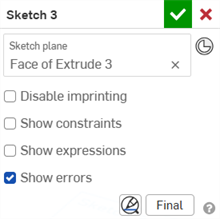
Assuming there are multiple features failing in the Features list, while it is not mandatory to start by opening the first one at the top, it is recommended to fix them in succession, from top to bottom.
Once the reference is replaced in Step 5, click directly on the sketch or feature dialog checkmark (![]() ) to close both dialogs at once.
) to close both dialogs at once.
The following is an example of a casting model that is derived. The derived Casting-1 is replaced by Casting-2. Follow the steps below to repair a failing feature by replacing it. The replaced feature is then propagated downstream to repair additional failing features that use it as a reference.
-
Double-click to open the Derived 1 feature:
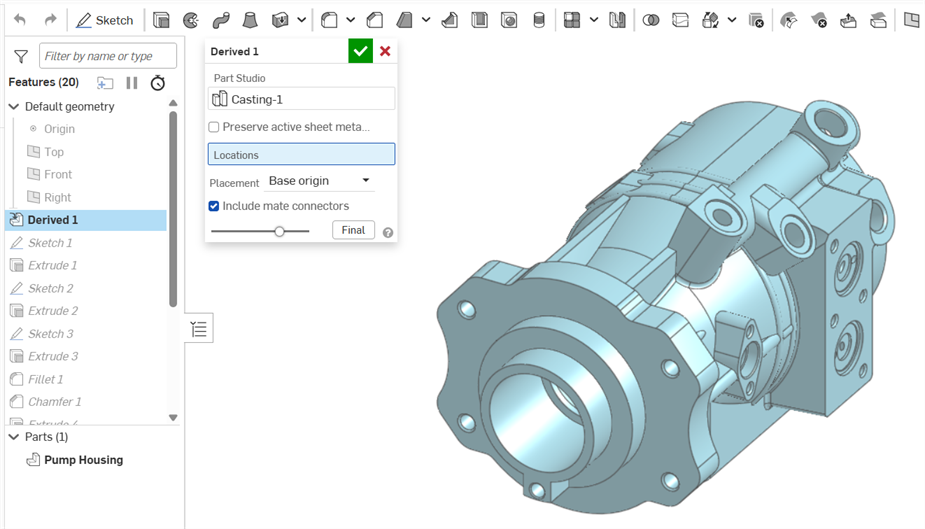
-
Click the Part Studio Casting-1 field to open the Select Part Studio dialog. Locate and select the Casting-2 model to use that as the model replacement in the Derived feature:
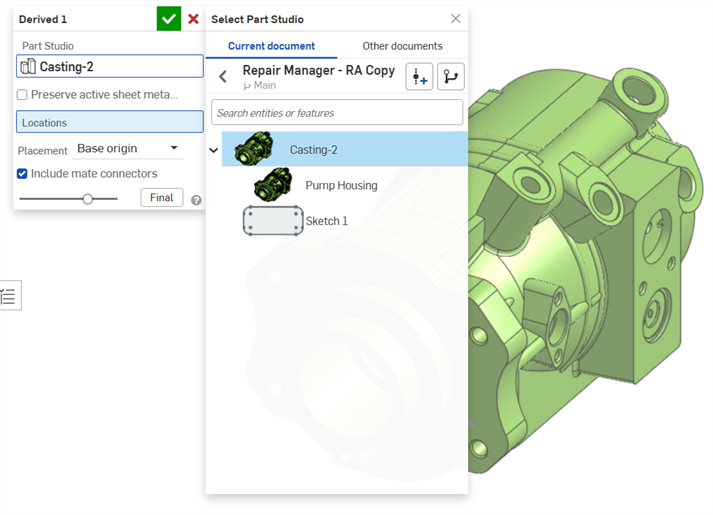
Replacing the derived model results in several failed features in the Features list:
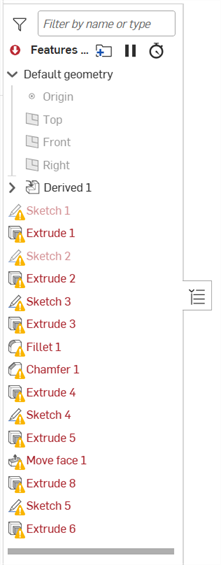
-
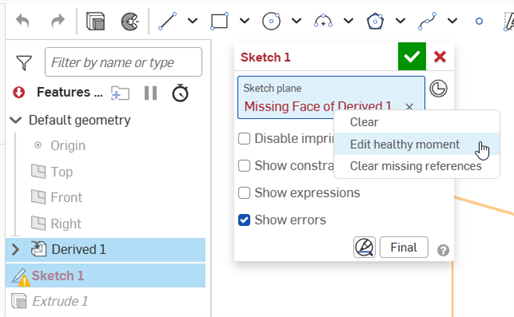
Double-click the first failing Sketch 1 feature to open it.
-
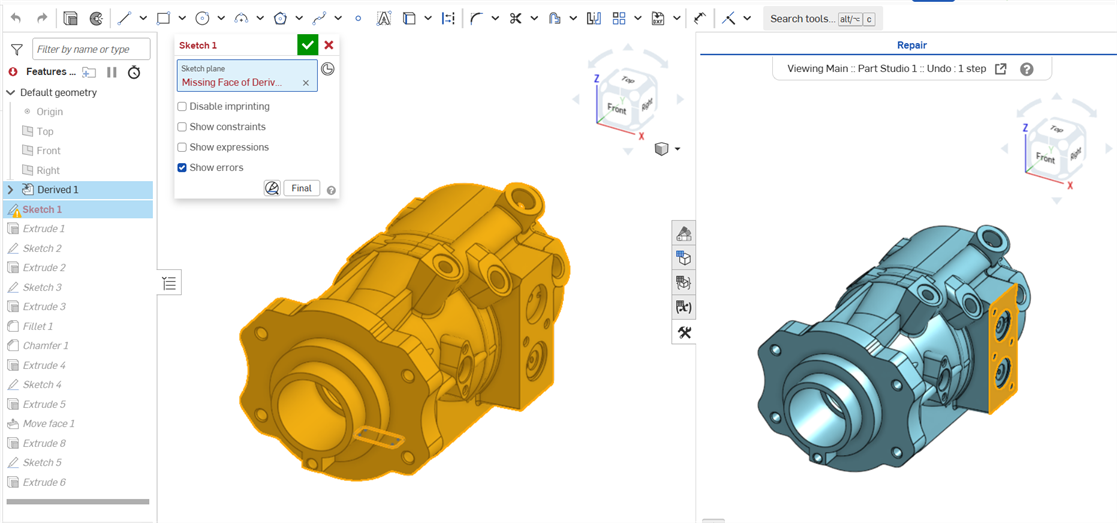
Right-click and select Edit healthy moment (first image below) to open the Repair panel at the point when there was a healthy moment from which to make repairs (second image below).
Alternatively, open the Versions and history panel and locate a change when the model was healthy (before replacing the derived model). Then right-click on the change and select View in repair in the context menu. See Steps: Repair from the Versions and history panel for more information.
-
Hover your mouse over the lower right corner of the Sketch plane field to display the Replace reference button (first image below). Click it to open the Replace reference dialog (second image below):
-
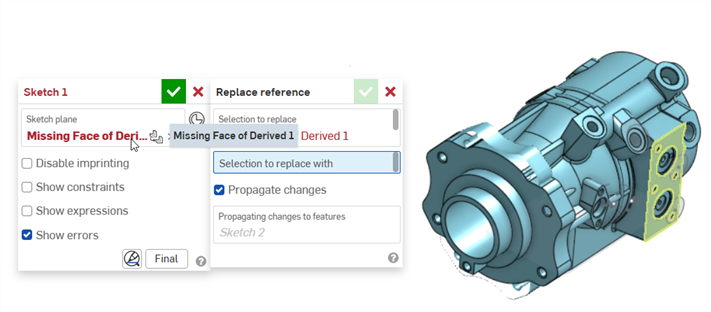
Hover over the Sketch plane reference in the Sketch dialog to highlight the problematic reference in the Repair panel on the right:
-
Select the new replacement in the Part Studio model on the left, ensuring that Propagate changes is checked:
-
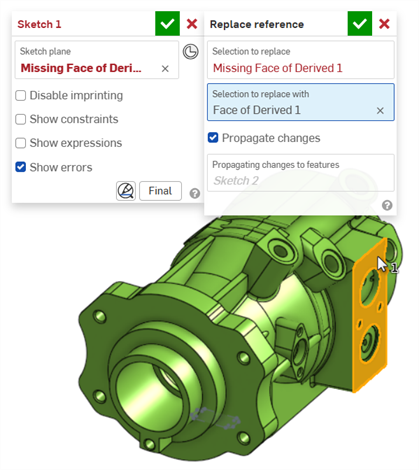
Click the checkmark (
) on the Sketch dialog to close both dialogs at once. The replaced face propagates downward to fix additional feature failures in the Features list. Continue this process until all features are healthy again.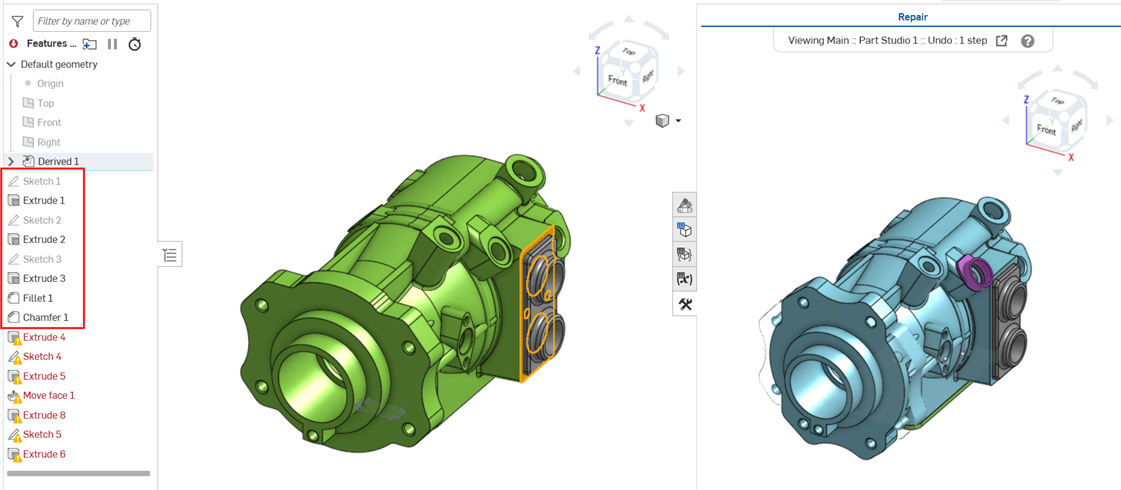
-
The Repair panel must be open and active to replace a reference.
-
Only 1 reference can be replaced per operation (1-to-1 replacement). Multiple reference replacements (1-to-many, many-to-1, or many-to-many) are not supported.
-
If using the Versions and history panel to open the Repair panel, reference propagation is entirely dependent on the change selected and used as the basis for repairs.
-
If the change selected and used as the basis for repairs is not 'healthy', a blue notification appears that recommends selecting a different change which is healthy.
-
-
Selecting Edit healthy moment to access the Repair panel may not always find the best moment in which to perform repairs. This can occur if a version is restored before being used as the basis for repairs.
-
The following are not currently supported:
-
Replacing implicit and explicit mate connectors
-
In-context references
-
External sketch references
-
If, during the process of modeling, a feature creates multiple references from a single reference, these references can no longer be propagated.
For example, a Fillet feature is applied to the edge of the model:

The rollback bar is moved prior to the fillet. An extrusion removes material from the model along the filleted edge:
The rollback bar is moved below the Fillet feature. The model now has 2 filleted edges created by a single Fillet feature selection. When attempting to replace the reference in the Fillet dialog's Entities to fillet field, the Replace references dialog does not display any features to which the replacement can be propagated, and a notification is displayed to indicate a matching reference cannot be determined.
-
Right-click on an empty space in the Repair panel to display a context menu with the following options:
-
Zoom to fit (shortcut: f, double-click scroll wheel) - Select this command or use the shortcut key to zoom the entire model into view. Zooming is synchronized between the Part Studio and the Repair panel; both views are zoomed in tandem.
-
Isometric (shortcut: shift+7) - Displays the model in an angled isometric view. Isometric is synchronized between the Part Studio and the Repair panel; both views are moved in tandem.
-
View in repair can be accessed from any point in history. If using View in repair from one history point does not produce the results you want, try accessing View in repair from an alternate point in the version's history.
-
Using the rollback bar in the Part Studio also rolls back the Repair panel in tandem.
-
Switching configurations is supported. Changing a configuration in the Part Studio updates the Repair panel to match the newly selected configuration.
-
To un-sync the View orientation, scaling, and panning between the Repair panel and the Part Studio, click the Synchronize view toggle (
 ). View adjustments are now independent in each panel. Click the toggle again to synchronize both panel views.
 -
If you delete the active branch while viewing in repair, the Repair panel automatically closes.
-
If you have a part excluded in a section view, the Repair panel does not display the exclusion. All parts sectioned in the Part Studio are sectioned in the Repair panel, even ones that are excluded.
-
Measurements, Analysis tools, Mass properties, and tagged comments are not visible in the Repair panel.
-
The selection color highlight in the Versions and history panel displays in a different color to indicate you are viewing in repair.
-
Reopening the Repair panel opens it to the last remembered state (when it was last opened), unless you access View in repair from the Versions and history panel at a new history point, which overrides the remembered state.
-
Cross-highlighting (when hovering over an entity in the Part Studio highlights it in yellow in the Repair panel) works with mate connectors, in addition to geometry, such as lines and faces.
Whether synced or un-synced, adjustments to the rollback bar remain synchronized between both panels.