 Insert Parts and Assemblies
![]()
![]()
![]()
Insert Parts and Assemblies inserts instances of parts, assemblies, sketches, and surfaces into the active Assembly. You can instance specific parts (released or unreleased), sketches and surfaces defined in a Part Studio (or the entire Part Studio), and assemblies defined in a different Assembly tab, as well as all of these things from other documents (linking documents). Filters for each object type are available in the dialog when the corresponding entities exist in the current document or other documents being browsed.
Shortcut: i
The Assembly toolbar is active when an Assembly tab is active.
During insertion, the default positioning is the alignment of the Part Studio origin (of the part or subassembly being inserted) with the Assembly origin (of the assembly being inserted into) for the first instance, with subsequent instances of the same part being inserted at a slight offset.
Fixing a part is different from applying a mate. Fix (found in the context menu for a part instance) is specific to the assembly in which it is applied; it does not carry over to any other assembly that part is inserted into.
When deleting an instance or feature from an assembly, all related features (Mate connectors, Mates, relations) are also deleted. The only exception is Mate groups, these are not deleted.
Assemblies in Onshape define the structure of inserted part and subassembly instances. In this context, users define and test the degrees of freedom and the relationships between instances.
When a new Document is created, an empty Part Studio and Assembly tab exists within it. Click the Assembly tab to view.
The toolbar contains commands, mates, relations, and everything needed to create an assembly. To add assemblies to the Document, click Insert new tab and then select Create Assembly.
Add instances to the assembly with Insert. Select from the Current document, Other documents, or Standard content. Filter the document with the Part Studios’ and Assemblies’ tabs. Refine results with Search by entering partial words and even non-alphanumeric characters. In the Part Studio tab, filter further with the icons at the top that indicate elements of a Part Studio, such as sketches, surfaces, curves, and parts.
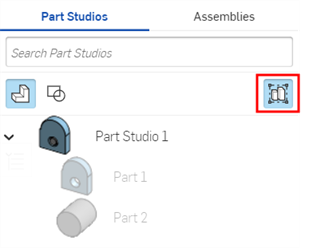
If needed, click the Insert the Part Studio as rigid icon to ensure parts do not move in relation to each other without defining mates. Once a rigid Part Studio is inserted, Edit it from its right-click menu to insert or remove all parts, sketches, and surfaces, or modify the Part Studio configuration.
When inserting instances, if a part or assembly has configurations, define the appropriate options before selecting.
Left-click on an element to insert it. With the cursor inside the dialog, instances appear in the same orientation and location with respect to the origin as they are in the Part Studio. If the cursor is moved outside the dialog, a left-click anywhere on the graphics area places them in the clicked location. Once placed, parts are not locked to their current position.
You can also copy and paste Parts, surfaces, and composite Parts from Part Studios to Assemblies in the same document. Right-click the Part in the Parts list and select Copy Part (or use the Ctrl/Cmd+c keyboard shortcut), then right-click in an Assembly and select Paste Part (or use the Ctrl/Cmd+v keyboard shortcut).
- Click the Insert parts and assemblies tool
 .
.
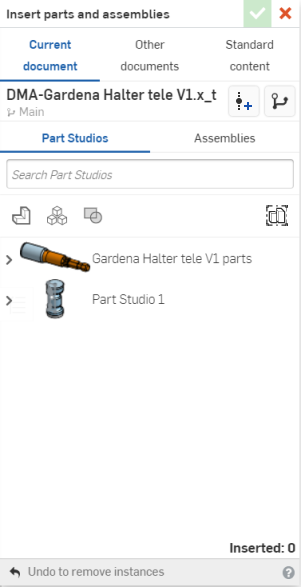
- Select a document:
- Current document to insert from this document
- Other documents to insert from another document
- Standard content to insert Onshape-supplied standard parts.
Onshape remembers this selection and opens the dialog with the last selected option in subsequent operations.
Filtering on parts and surfaces also shows results for meshes and mixed models.
- Select Part Studios or Assemblies.
- Within Part Studios:
- Use the icons in the dialog to filter on sketches
 , surfaces
 , parts
 , and composite parts
 .
. - Use the search field to locate a specific part.
- Use the icons in the dialog to filter on sketches
- Within Assemblies, use the search field to locate an assembly by name.
- You can search by part/assembly name and other properties (including Custom properties).
- Search accepts partial words and multiple words, as well as non-alphanumeric characters, such as punctuation.
- The filter
 to the left of the Search bar shows common properties (or all properties) to search by. You can use more than one filter at a time.
 - Each search result indicates which type of entity fulfills the search criteria by the icon preceding the name, followed by the name of the entity. Below that, the workspace or version icon, the document name and workspace name (or version name, when part of the search criteria), the part number, and the release management state (shown below).

- Within Part Studios:
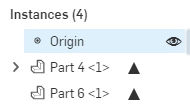
- If available, you can use the View released items filter to insert a particular revision of an object into the assembly. The Instances list in the Assembly will reflect the parts that have been previously released with a solid triangle.
- If available, choose configuration options. Select the desired inputs and then click Generate:
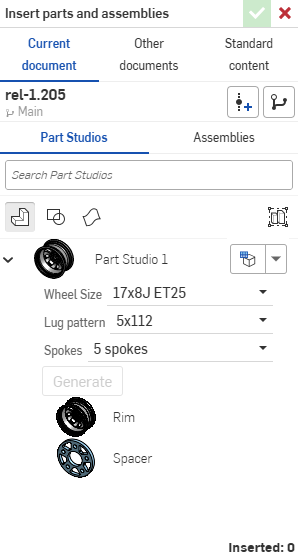
You can click the Set to last viewed configuration dropdown (
 ) to select the last active configuration in the Part Studio or assembly, or select Reset to default to set all inputs to their default values.
 - Select the instances to insert:
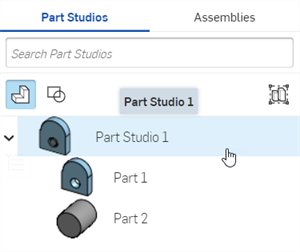
- When viewing Parts in this dialog, you see the default detail view of the Part Studio. Under that, you see the individual parts in that Part Studio. From here, you can:
- Click individual parts to add to the Assembly.
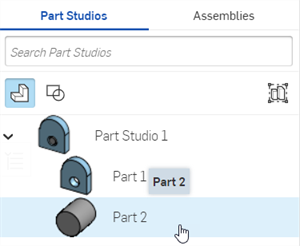
- Click the Part Studio to add all current parts to the Assembly.
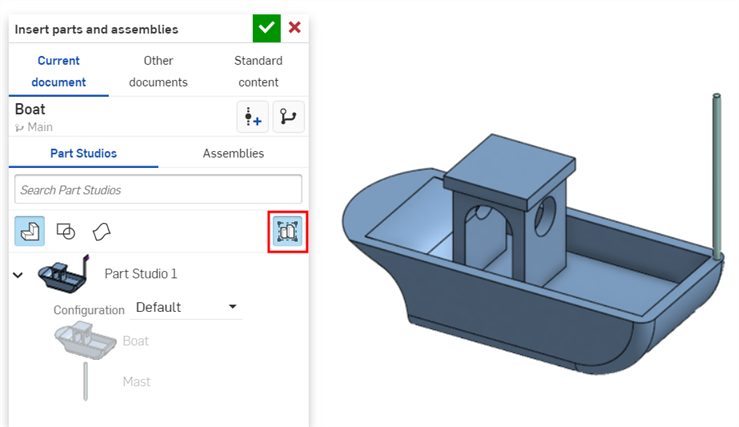
- Select the Insert entire Part Studio as rigid button, then select the Part Studio. This option will automatically update the Assembly with all changes to the Part Studio, including adding new parts.
See Editing an inserted rigid Part Studio.
- Click individual parts to add to the Assembly.
- When viewing Assemblies in this dialog, you can:
- Click individual subassemblies to add to the current Assembly.
- Click an Assembly to add all of its subassemblies to the current Assembly.
- When viewing Parts in this dialog, you see the default detail view of the Part Studio. Under that, you see the individual parts in that Part Studio. From here, you can:
- Click the checkmark to insert the instance.
- Parts are inserted into the Assembly with the Assembly and Part Studio origins aligned.
- When inserting more than one instance of a part, the subsequent instances are inserted at a slight offset from the first. However, if you move the cursor into the graphics area, your selection appears at your cursor.
- Drag to reposition the parts, assemblies, or sketches.
When inserted into an Assembly, sketches can have Mate connectors and be assembled with parts, other sketches, and assemblies.
After a configured part or assembly has been inserted into an assembly, you can change the configuration:
- Right-click on the part or assembly in the Instances list and select
Change configuration.
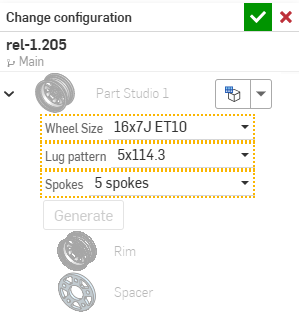
- Select a new configuration option.
-
Click
 when you are satisfied with your selection. (Use
 to cancel the operation.)
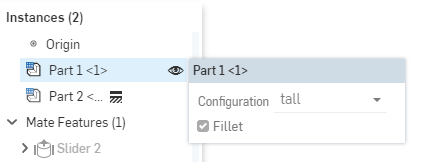
To see which configuration is currently active in the Assembly, hover over a part in the Instances list and a tooltip appears with the configuration information:
-
Insert the Part Studio into the Assembly using the Insert entire Part Studio as rigid button:
-
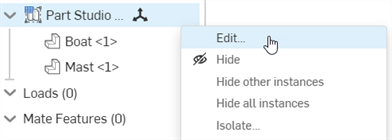
From the Assembly Instances list, right-click on the Part Studio and select Edit from the context menu:
-
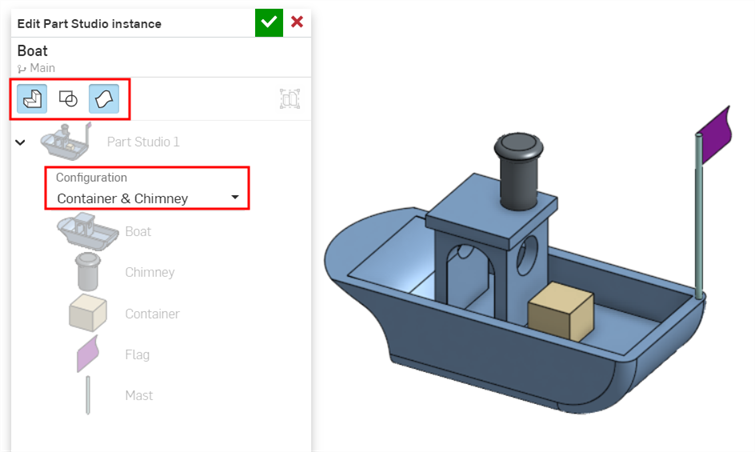
The Edit Part Studio instance dialog opens. From this dialog you can:
-
Insert or remove all parts (
 ), sketches (
 ), and surfaces (
 ).
). -
Switch to an alternate Part Studio configuration from the Configuration dropdown.
-
-
Click the checkmark (
 ) in the dialog to accept your changes in the Assembly.
When a component you are inserting has a Mate connector already defined (from within the Part Studio) and you have Snap Mode
![]() turned on in the Assembly, then:
turned on in the Assembly, then:
- When dragging the component into the Assembly from the Insert dialog, you can snap the source Mate connector on the component to other Mate connectors in the assembly. (These appear upon hover.)
- If the component being inserted has more than one explicitly-defined Mate connector, you can use the Control key to cycle through the Mate connectors and stop on the appropriate one to use as the new Snap Mode source Mate connector.
- If you snap to a target Mate connector and accept the insert (closing the dialog), a Fastened Mate is applied between the source and target Mate connectors.
- You may pan and rotate freely as you insert a part instance (or subassembly), even in Snap mode.
If no explicitly-defined Mate connectors are on the component being inserted, then a normal non-snap free drag is available, even if Snap mode is turned on.
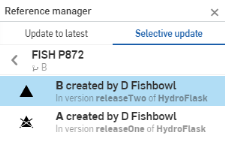
Once inserted into an assembly, a revisioned part can be updated to reflect an updated revision. Click on the icon in the Instances list to open the Reference manager. There you can
Update to the latest, or make a
Selective update. Parts that have a newer version available have this icon in the Instances list:
![]() .
.
Click the icon to drill down to the revision you wish to select:
![]() -
Version graph
to insert from a particular version of the document
-
Version graph
to insert from a particular version of the document
![]() -
Create version
to create a new version of the document on the fly, in order to select a versioned entity
-
Create version
to create a new version of the document on the fly, in order to select a versioned entity
Double-click a part in the Instances list to open a create or edit in-context session for that part.
Tips
- When inserting parts and assemblies, you can search within other documents:
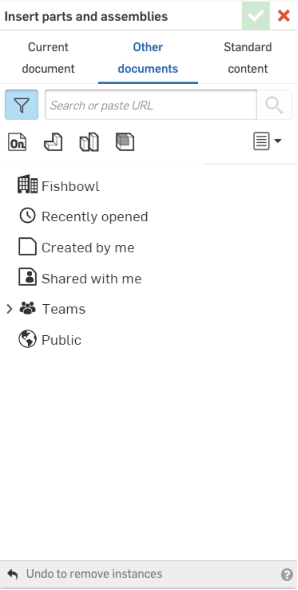
- Notice that the same filters are available here as are on the Documents page, including teams and labels.
- Drill down by selecting a filter, and then a document, or use the Search box if you know the name of the entity you are looking for.
- Once a part, sketch, or surface is inserted into an Assembly, you can change the version of a particular entity: right-click on the entity name in the Instances list and select Change to version... in the context menu.
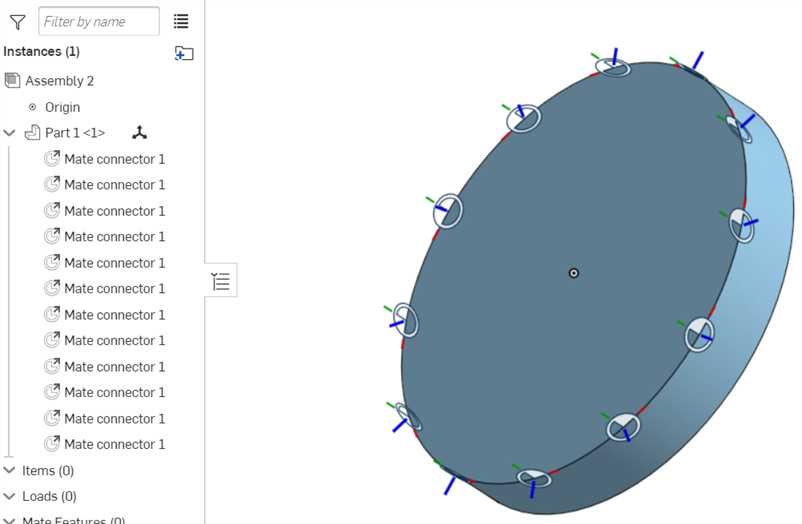
- If Mate connectors are Part patterned in a Part Studio, they will all be added to the Assembly when the Part Studio is inserted. If you don't see your Mate connectors when the Part Studio is inserted into the Assembly, make sure the Part is listed as the Mate connector owner entity.
- Tap the Insert tool.

- Tap Current document
to insert from this document or Other document to find another document from which to select. You can also select to insert Onshape-supplied standard parts from Standard content.
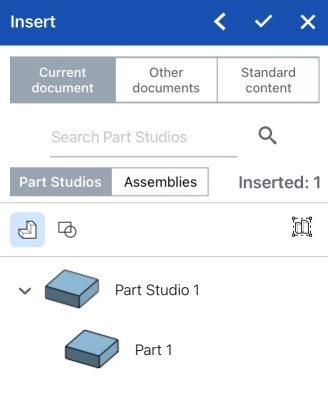
- If you select Browse documents, select a filter or search to find the document from which to insert, then tap to select the document.
You can select from other documents only if that document has one or more versions. A notice is displayed regarding the state of the document if no version exists or if a newer version exists. If no version exists, tap to create a version in that document.
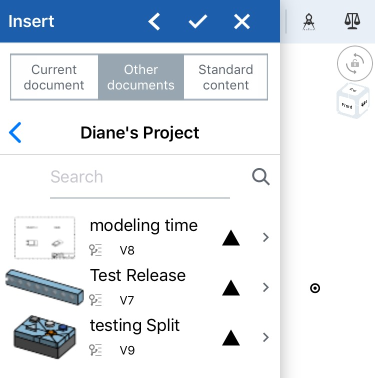
- You can choose to select a previously-released part or assembly to insert. Released objects are indicated by a solid triangle icon to the right:
- Select
Part Studios
or
Assemblies
to view the document's Part Studios or Assemblies.
-
Within Part Studios, tap to insert an entire Part Studio or tap to select specific parts. Use the icons in the dialog to filter on sketches
 , surfaces
 , parts
 , composite parts
 , and sheet metal flat patterns
  . Use the search field to locate a specific part.
 - Within Assemblies, tap to insert an Assembly. Use the search field to locate a specific part.
When viewing Parts, you see the default detail view of the Part Studio. Under that, you see the individual parts in that Part Studio. Tap on the Part Studio name to insert the entire contents of the Part Studio, or tap individual parts. This works the same for assemblies. The insert dialog displays an "Inserted" count that updates with each inserted entity. You can insert multiple entities into an Assembly at a time.
Select the Insert entire Part Studio as rigid icon
 , then select the Part Studio. This option will automatically update the Assembly with all changes to the Part Studio, including adding new parts.
 -
Within Part Studios, tap to insert an entire Part Studio or tap to select specific parts. Use the icons in the dialog to filter on sketches
- Any parts or assemblies that have configurations are shown with their options to select from in order to select the desired configuration at the time of insertion into the Assembly.
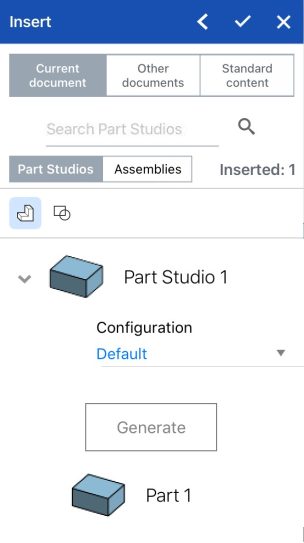
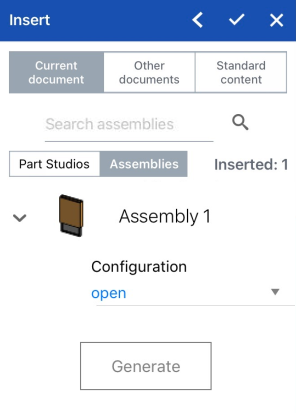
The Insert dialog showing inserting configured parts, on the left above, and showing a configured assembly, on the right.
Configurations are created in the Onshape on a browser, and can be seen and worked with on an iOS device.
- Optionally, tap the left facing arrow (chevron) in the upper right of the Insert dialog to collapse the dialog and view the Assembly.
- Tap the checkmark to close the Insert dialog and save your changes.
The default positioning of the inserted entities is the alignment of the Part Studio origin (of the part or subassembly being inserted) with the Assembly origin (of the assembly being inserted into).
If you have inserted a part or assembly from another document, a linked icon appears next to the Derived feature in the Feature list to indicate that it is linked to another document.
![]()
When a newer version of the document from which you inserted Part Studio or assembly is created, the link icon in the instance list highlights in blue, and an identical icon appears on the Assembly tab.
![]()
See
Linking Documents
for more info on linked documents and how to update them.
- The default positioning of inserted entities is the alignment of the Part Studio origin (of the part or subassembly being inserted) with the Assembly origin (of the assembly being inserted into.
- If a part has been given Mate connectors in a Part Studio, it will have them when it is inserted into the Assembly. A part with Mate connectors explicitly defined in a Part Studio will have a drop down in the Assembly Instance list that contains the Mate connectors which belong to the part.
-
Fixing a part is different from applying a mate. Fix (found in the context menu for a part) is specific to the assembly in which it is applied; it does not carry over to any other assembly that part is inserted into.
- When deleting an instance or feature from an assembly, all related features (Mate connectors, Mates, relations) are also deleted. The only exception is Mate groups, these are not deleted.
- Tap the Insert tool.

- Select Current document to insert from this document workspace or Other documents to find another document from which to select. You can also select to insert Onshape-supplied standard parts from Standard content.
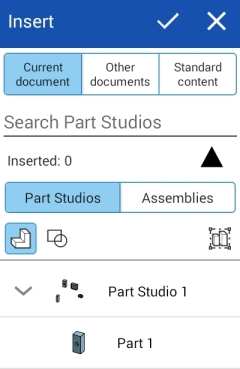
- If you select Browse documents, select a filter or search to find the document from which to insert, then tap to select the document.
You can select from other documents only if that document has one or more versions. A notice is displayed regarding the state of the document if no version exists or if a newer version exists. If no version exists, tap to create a version in that document.
- You can choose to select a previously-released part. Use the solid triangle icon to filter on documents with released Parts or Assemblies.
- Select
Part Studios
or
Assemblies
to view the document's Part Studios or Assemblies.
-
Within Part Studios, tap to insert an entire Part Studio or tap to select specific parts. Use the icons in the dialog to filter on sketches
 , surfaces
 , parts
 , composite parts
 , and sheet metal flat patterns
  . Use the search field to locate a specific part.
 - Within Assemblies, tap to insert an Assembly. Use the search field to locate a specific part.
When viewing Parts, you see the default detail view of the Part Studio, with the individual parts below. Tap on the Part Studio name to insert all parts currently in the Part Studio, or tap individual parts.
The insert dialog displays an "Inserted" count that updates with each inserted entity. You can insert multiple entities into an Assembly at a time.Select the Insert entire Part Studio as rigid icon
 , then select the Part Studio. This option will automatically update the Assembly with all changes to the Part Studio, including adding new parts.
 -
Within Part Studios, tap to insert an entire Part Studio or tap to select specific parts. Use the icons in the dialog to filter on sketches
- Any parts that have configurations are shown with their options to select from in order to select the desired configuration at the time of insertion into the Assembly:
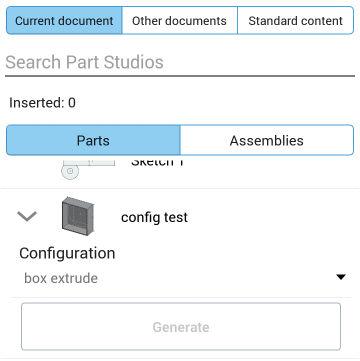
Configurations are created in the Onshape on a browser, and can be seen and worked with on an Android device.
- Optionally, tap the left facing arrow (chevron) in the upper right of the Insert dialog to collapse the dialog and view the Assembly.
- Tap the checkmark.
The default positioning of the inserted entities is the alignment of the Part Studio origin (of the part or subassembly being inserted) with the Assembly origin (of the assembly being inserted into).
If you have inserted a part or assembly from another document, a linked icon appears next to the Derived feature in the Feature list to indicate that it is linked to another document.
![]()
When a newer version of the document from which you inserted Part Studio or assembly is created, the link icon in the instance list highlights in blue, and an identical icon appears on the Assembly tab.
![]()
See
Linking Documents
for more info on linked documents and how to update them.
- The default positioning of inserted entities is the alignment of the Part Studio origin (of the part or subassembly being inserted) with the Assembly origin (of the assembly being inserted into.
- If a part has been given Mate connectors in a Part Studio, it will have them when it is inserted into the Assembly. A part with Mate connectors explicitly defined in a Part Studio will have a drop down in the Assembly Instance list that contains the Mate connectors which belong to the part.
-
Fixing a part is different from applying a mate. Fix (found in the context menu for a part) is specific to the assembly in which it is applied; it does not carry over to any other assembly that part is inserted into.
- When deleting an instance or feature from an assembly, all related features (Mate connectors, Mates, relations) are also deleted. The only exception is Mate groups, these are not deleted.