Administering EDU Enterprise Classes
![]()
Users designated as Administrators or members of the Educators team are the only users enabled to create and administer classes in an EDU enterprise.
Creating a class
Create a class, add members to it (your student roster), and create assignments to go along with lessons. Created a class from the Documents page in your Onshape EDU enterprise account.
-
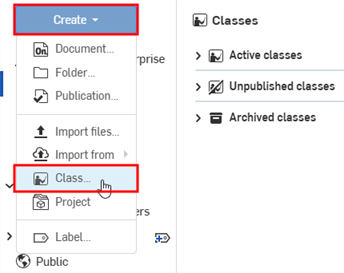
On the Documents page, click the Create button and select Class:
-
In the dialog that opens, enter the name of the class and a class description. Keep in mind this name becomes available to students and must be recognizable as the class for which they registered.
-
Click Create.
-
The Create assignment page opens. For more on creating assignments, see Administering Assignments.
Adding students/educators to the class
When you have created a class, you can add users (students or educators) to the class. This grants access to the class for the users you have added.
-
On the class page (accessed as the last step in the procedure of adding a class, above), click Members.
To access the class page from the Documents page, click the Classes filter in the left pane, then click on a particular class on the Classes page.
The Members page for that particular class opens:

Click and drag the separator between the top and bottom list of students to expand/collapse the bottom viewing area. Click the link to a document submitted by a student to open that document and review the work.
Click the title of a column (Student, Email, Status, Start date, Document, or Submitted on) to change the sorting to ascending or descending. (The arrow indicator will appear next to the title upon clicking.)
-
Click the Invite users icon
 .
.
To populate your member list using a CSV (comma-separate file of names) click the Manage via CSV button
 . See further instructions below.
-
In the Add users dialog:
-
Enter the emails of the users you wish to add.
-
Select whether the users are Students or Educators.
-
Click Invite.
-
-
Click Close when done.
If you are inviting both Students and Educators to a class, first add all the Students using the Step 3 procedure above, then add all the Educators using the same procedure.
Adding students/educators with a CSV file
If you have a comma-separated file with student emails and/or educator emails, you can use that to invite users into the class:
-
Click the Manage via CSV icon
.
-
In the Add users dialog, you have two options for proceeding:
-
Click Select file, then select the CSV file (in spreadsheet format) from your computer.
-
Click Download template to open a spreadsheet with the necessary columns:
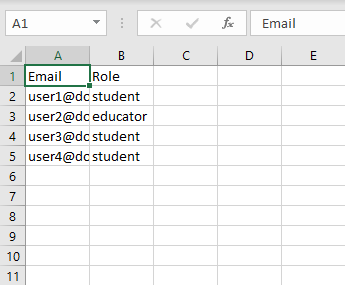
Keep row 1 as it is.
Edit the remaining rows with emails of students and/or educators in Column A, and the appropriate role for each user in Column B. Role must be either "student" or "educator".
-
-
Click Process upload.
When the processing is finished a notification pops up with the status of the added users. The Members list is populated with the names and emails of the new members along with their User type (educator or student), as well as the date added and the last signed in date.
Publish a class
Publishing a class makes the class visible to the users (students and educators) who have been added to the class. Before a class is published, it appears in the Unpublished category on the Classes list page for the educator, and does not appear anywhere for the students.
-
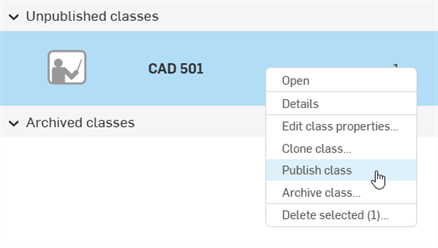
Select the class in the Classes list, and either:
-
Right-click on the class and select Publish class:
-
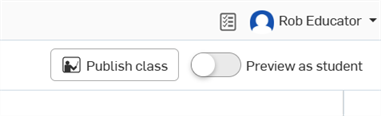
On the Assignments page for that class, click the Publish class button at the top right:
-
Viewing class dashboards
Dashboards show the analytics for each class. To view a class dashboard:
-
Select the class from the Classes list.
-
Click Dashboard.
A dashboard displays, with data categories for:
-
Number of members
-
Assignments
-
Submissions
-
Active students
-
Total students
-
Total hours spent in the assigned workspace across all students
-
A list of all students with their total modeling hours
You can click on any student (or educator) in the list, then click Student (or Educator) dashboard to view a user-specific dashboard containing similar information that you can drill down into.
Removing students
To remove a user (student or educator) from a class:
-
Navigate to the Members tab for the specific class.
-
Click the X on the far right of the row of the user you wish to remove.
Removing students from a class does not remove them from the enterprise. All removed students retain access to their Onshape documents.
Cloning a class
Cloning a class creates a copy of the class and assignments. Members of the original class do not become members of the cloned class.
To clone a class:
-
Select the class in the Classes list. Multiple classes can be selected.
-
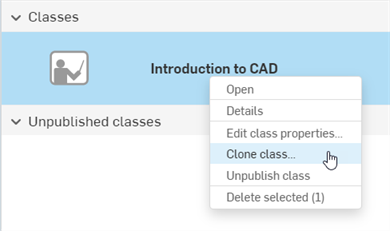
Right-click on the class and select Clone class from the context menu:
-
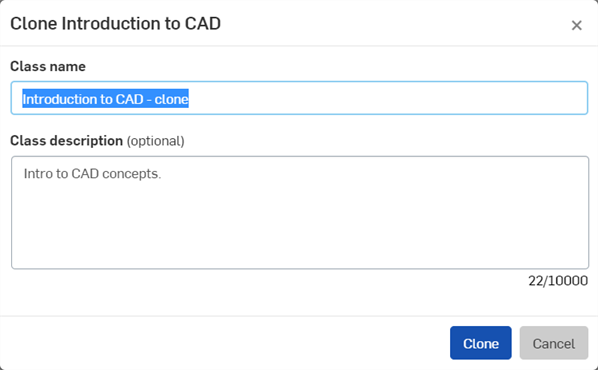
In the Clone dialog provide a Class name and optional Class description, and then click the Clone button:
Unpublish a class
Unpublishing a class makes the class invisible to the users (students and educators) who were added to the class and had previous visibility of the class. Once unpublished, the class appears in the Unpublished category on the Classes list page for the educator, and does not appear anywhere for the students. An unpublished class can be published again following the Publish a class directions above.
To unpublish a class:
-
Select the class in the Classes list.
-
On the Class page where Assignments are listed, click Unpublish class at the top right:

-
Alternatively, right-click on the class on the Classes page, and select Unpublish class from the context menu:

Deleting a class
Deleting a class deletes the class and all assignments. Class Documents and all their related permissions are retained by the Educators and Students under their accounts, and are not deleted.
To delete a class:
-
Select the class in the Classes list. Multiple classes can be selected.
-
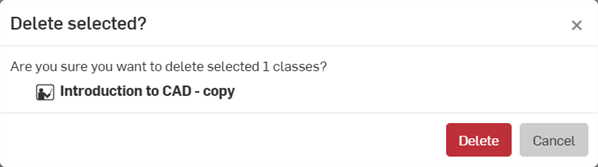
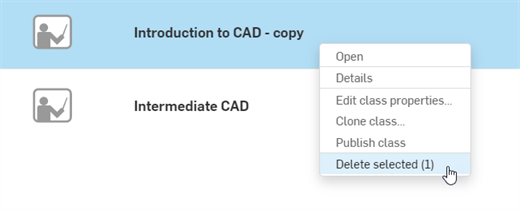
Right-click on the class and select Delete selected from the context menu:
-
The Delete selected dialog opens. Click the Delete button to confirm the deletion or Cancel to close the dialog and keep the class: