Commenting in Workspaces and Versions
![]()
![]()
![]()
Collaborating users can communicate with each other, in workspaces and versions, with comments and mentions. Owners of documents and those the document is shared with directly (and with Edit or Comment permission) can create comments, mention another user, see each others’ comments, assign comments to other users, leave replies, and opt to receive email notifications of comments.
![]()
You can comment generally on the document or modeling space, and you can explicitly tag certain entities directly. The entities you can tag directly are:
- Features in Feature lists
- Mate connectors (including implicit)
- Mates
- Entities in a sub-assembly
The Comments dialog also offers a markup function which enables you to annotate and markup your design space and include it within the comment. See Including markup in comments for more information.
Click
the Comments icon in the
Document panel
on the left side of the interface to open the Comments panel.
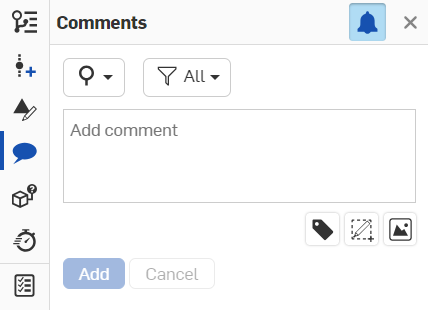
New comments are indicated by a blue dot on the comment icon:
![]()
New comments assigned to you are indicated by a number on the comment icon (the number aligns with however many assigned comments you have):
![]()
Comments have mechanisms that allow you to:
|
|
Filter comments according to: comments in the Entire document or comments in This workspace only. |
|
|
Filter comments according to: All comments, All open tasks, Open tasks assigned to the current user, and Completed tasks. |
|
|
Tag an entity by clicking this icon first, then an entity either in the graphics area, the Feature list, or the Parts list (in a Part Studio) or the Instances list (in an Assembly). |
|
|
Insert an image that will be included in the comment as an attachment. |
|
|
Toggle comment notifications on or off. When notifications are turned on, you will receive email notifications of comments you are mentioned in. |
|
|
Initiate the markup tool. |
Click
![]() in the upper right corner of the panel to close it.
in the upper right corner of the panel to close it.
While you are in a specific tab, open Comments from the Document panel, click Add comment, and enter a comment. Any collaborators who have email notifications turned on will receive an email notifying them of the comment with a link to that document. The link brings the collaborator to the first tab of the document.
Click the Add button and an email is sent to the user containing the comment text and a link to the document. If the user mentioned does not have permission to the document, you are notified and prompted to share:
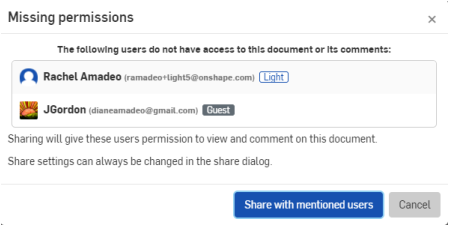
If the mentioned user has the document open at the time, the Comment opens automatically.
Once the document is shared, an email is sent to the user containing the comment and a link to the document. An additional email is also sent to notify the user that the document has been shared.
Adding URLs to Comments
URL locations are automatically converted into an HTML link once the Comment is saved.
If this link targets an Onshape location in this or another document, it opens in a new browser tab. The link is prefaced by the Onshape logo and converted into easily readable text displaying the document, version/worskspace, and/or tab.
If the link is external to Onshape, it opens in a new browser tab. The link is suffixed with an external link icon and a warning message that the target location is outside Onshape (shown below).
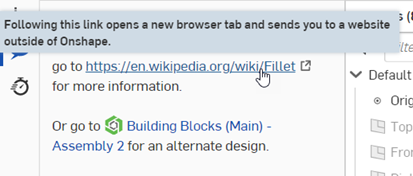
An external link (top) and an internal Onshape link (below).
Users should be aware that external links can pose security risks. Only click on links whose source you have first verified.
Tagging entities (adding comments on features) in Feature lists
To add a comment on an entity in a Feature list (in Part Studios and Assemblies), select the feature in the list and access the context menu. Select Add comment:
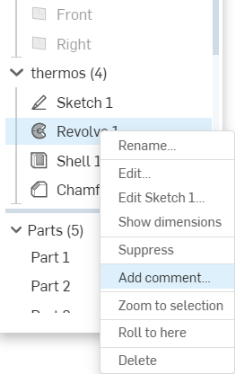
Or you can use the Tag entity icon in the Comments dialog on the Document panel, shown below to the right of the red arrow:
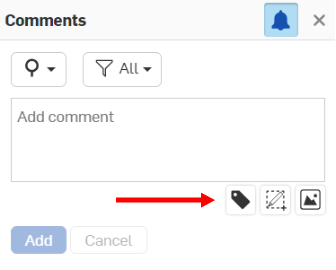
Then select the entity: part, edge, face, etc.
You are also able to tag entities in replies to comments.
Use the “@” sign to specify that a specific user receive an email directing them to the comment. When you click
Add
in the Comment dialog (above), a comment icon
 appears next to the feature in the list (below) or on the entity in the graphics area (both shown below):
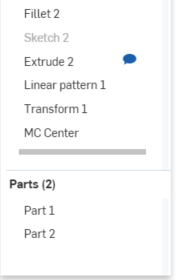
![]()
When the Comments panel is closed, the comment icons in the Feature list disappear. The icons are visible only when the Comments panel is open.
Features in the Feature list will not have comment icons in the graphics area. Their comment icons are displayed in the Feature list.
Adding comments on implicit Mate connectors
You can attach a comment directly to an implicit Mate connector.
- Hover to activate implicit Mate connectors, then right-click to access the context menu.
- Select Add comment to open a new comment on the Comment panel.
When you click Add the Comments panel opens, and a comment icon appears on the implicit Mate connector:
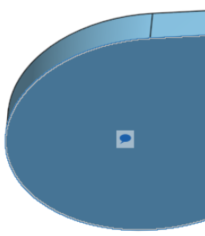
When the Comments panel is closed, the comment icons in the graphics area disappear. The icons are visible only when the Comments are open in the Document panel.
To delete the comment, click
![]() in the upper right corner of the Comments panel; then confirm the action.
in the upper right corner of the Comments panel; then confirm the action.
Notice that your collaborator icon is shown (because you are active in the document). If you have shared this document with another user, they also see the collaborator icon, and you see theirs. When a user closes the document, the icon disappears, but the comments remain.
Documents that are shared with external enterprise connections show a banner in the Comments panel. See Connections for more details.
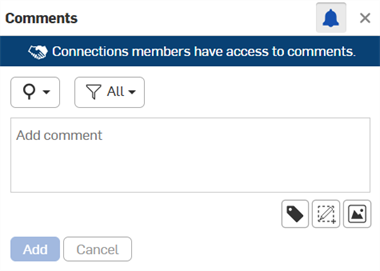
Owners of documents automatically have comment permission on their documents. When an owner shares a document directly with another user, the owner may grant Comment permission to that user (and also revoke it). All of the permissions that allow editing automatically also allow commenting. The Can view permission also allows commenting.
When users have Comment permission on a document, they are automatically opted in to receive notification emails when:
- A new comment is made
- A reply to a comment thread they have participated in is posted
Users who receive access to a document through a team share are not automatically opted-in for email notifications. You may, however, elect to receive email notifications by checking the box in the Comments panel.
You can assign tasks to other users in Onshape using the Comments panel. When a user mentions other users in a comment, the mentioned user will be displayed below the comment box preceded with Assign to and a check box, as shown below:
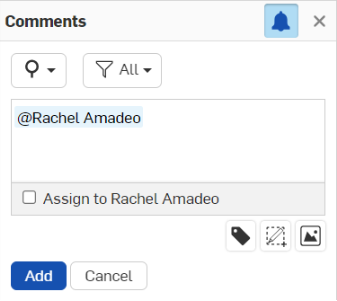
To assign a task to that user, click the check box next to Assign to at the bottom of the dialog. The action button changes from Add to Assign.
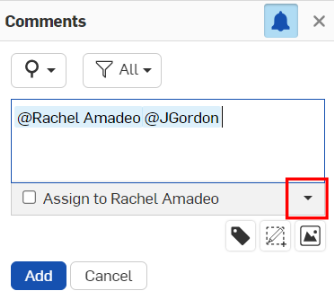
If there are multiple user mentions in the comment, the first user is shown on the assigned section, and a dropdown arrow to the right allows you to select another mentioned user. You can only assign a task to one user at a time.
Once assigned, the task indicates the assigned user at the top (as shown below). The assigned user gets an email notification, as well as a desktop notification, that a task has been assigned to them.
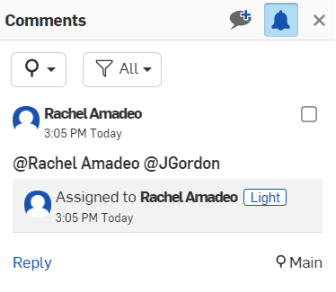
Once the assigned user finishes the assigned task, they can resolve the task by clicking on the check box in the upper right corner.
New comments are indicated by a blue dot on the comment icon:
![]()
New comments assigned to you are indicated by a number on the comment icon (the number aligns with however many assigned comments you have):
![]()
Only new comments can be assigned to users.
Filter comments
To filter comments or tasks in the Comments panel, click the filter icon in the top of the panel
![]() .
.
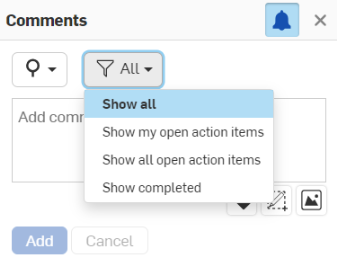
Click on the option you wish to view and the Comments panel list will adjust accordingly.
To use markup to annotate and make notes directly in the graphics area (and then include that as an image attached to the comment):
-
Once the Comments panel is open, click
 Markup.
-
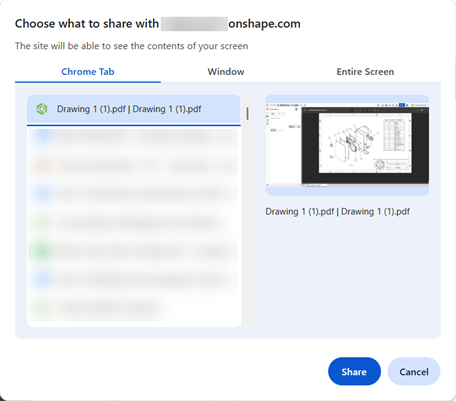
If the markup is initiated from a PDF tab, a browser-based dialog opens to ask what part of your screen you wish to share with Onshape. Select the PDF tab:
-
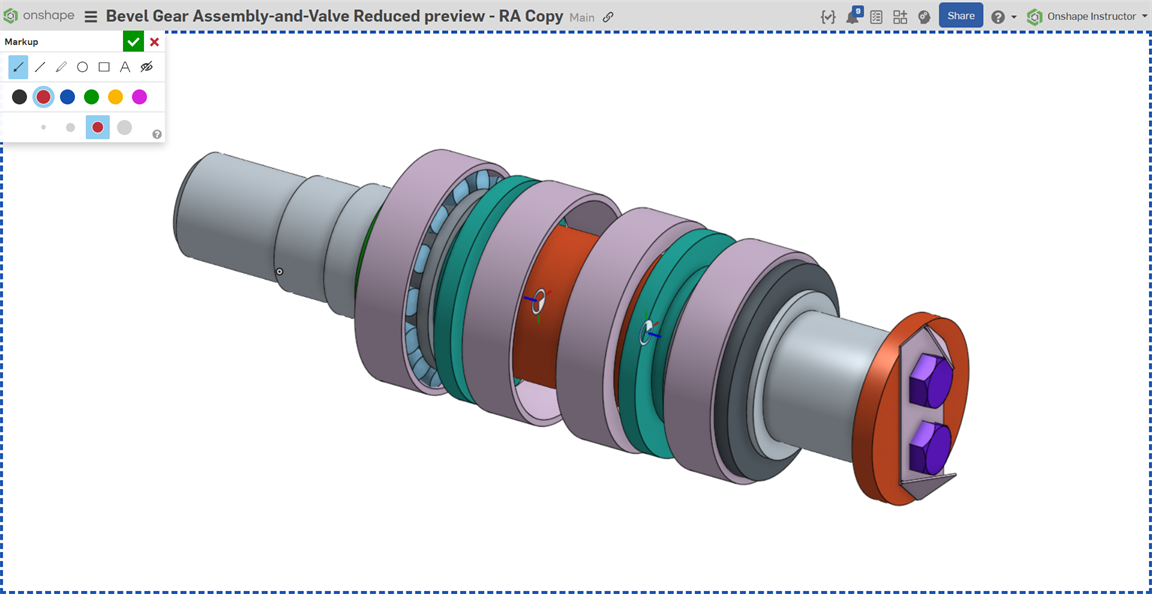
The markup area is outlined with a blue dashed line and the markup tools appear:
-
Use the tools as you would any graphics tools, to draw arrows, lines, free form, circles, squares, text. Select a color and a size for the graphics.
-
When a tool is selected, the cursor changes to a cross-hair symbol. Click and drag in the graphics area to draw the selected shape, or to draw a text box.
-
To undo an action in markup, use Ctrl+z. You can also single select an item for deletion: click on the item, then press the Delete key, or click the Delete
 button.
-
While you can click and drag to create a markup symbol anywhere and in any direction, you can also use Shift+drag to create the symbol at a 45 degree angle:
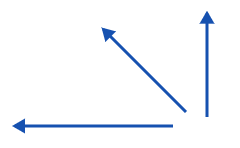
To center an ellipse/circle or square/rectangle about the initial click point, use Ctrl+click while dragging.
To create a circle or square (instead of an ellipse or rectangle), use Shift+click while dragging.
Use Ctrl+Shift+click while dragging to create a circle or square centered about the initial click point.
-
When Text is selected, you first draw a text box, then click in the box to set the cursor, and then type. You can change the color and size while the text box is active.
-
-
To cancel without saving your markup, click the X in the Markup dialog.
-
To save your markup, click the check mark in the Markup dialog.
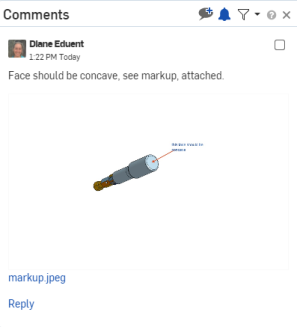
Once saved, the markup is uploaded as an attachment to the currently active comment. Once you have added the comment (clicked Add), the markup appears as a thumbnail in the comment:
The markup icon is also available for replies to comments.
-
Click the link in a comment to navigate directly to the tab for which the comment was created.
Once in the tab, the link changes to reflect the entity the comment was created on, if appropriate.
Click the new link to highlight that part in the graphics area.
- Comments are associated with a specific document and one of its workspaces, so the set of comments will vary depending on which workspace is active.
- Click the Comment icon again to close the Comments/Document panel, or click the small x in the upper right corner of the panel to close it.
- Click Add comment to add another comment.
- Click x replies to create a reply to a comment; click Reply to save it.
-
Hover in the box of a comment to access the edit and delete icons
 .
.
- If a user doesn't have edit rights to the workspace (which is inherently true for versions), then there is no access to the Comments panel.
- Comments are not recorded in the workspace history.
- When an assembly is moved to a new sub-assembly, the comments follow and remain attached.
- In the user's Action Items page, they can see all comments assigned to them, along with who assigned the task, the document version from which the comment was created, and the date the comment was created.
Collaborating users can communicate with each other in a workspace with comments. Owners of documents and collaborators (with Edit or Comment permission) can create comments, see each others’ comments, leave replies, and opt to receive email notifications of comments.
Comments are labeled with each user’s username.
On mobile, you can comment on:
- Documents
- Faces and edges
- Features in Features lists
- Mates, including implicit mates
- Entities in a sub-assembly
On a browser, you can comment on:
- Features in Feature lists
- Mate connectors
- Mates, including implicit mates
- Entities in a sub-assembly
- Drawings (currently there is no collaboration allowed on drawings; only one user at a time may view the drawing)
Click
the Comment icon in the
Document panel
on the left side of the interface to open the Comments panel.
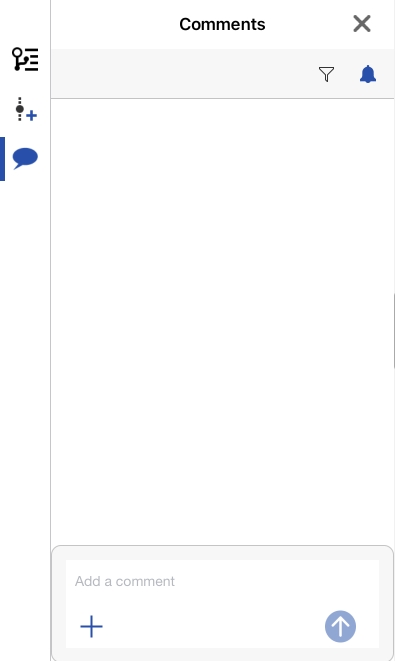
Comments have mechanisms that allow you to:
-
Filter comments according to: All comments, Open tasks assigned to the current user, All Open tasks, and Completed tasks using the Filter icon
 .
.
-
Toggle comment notifications on or off using the notifications icon
 .
.
-
Tag an entity by tapping the plus sign icon in the Comment text box, then tapping Tag entity. Select an entity in the graphics area to add the tag to the current comment.
-
Insert an image by tapping the plus sign icon in the Comment text box, then tapping Add from Photo Library or Add from Camera.
-
Initiate the markup tool by tapping the plus sign icon in the Comment text box, then tapping Create markup.
Click
![]() in the upper right corner of the panel to close it.
in the upper right corner of the panel to close it.
You can assign tasks to other users in Onshape using the Comments panel. When a user mentions other users in a comment, the mentioned user will be displayed inside the comment box with an Assign to option, as shown below:
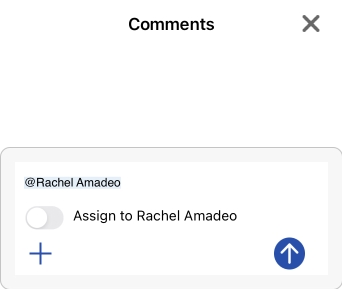
To assign a task to that user, tap the Assign to option.
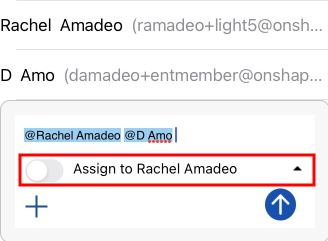
If there are multiple user mentions in the comment, use the dropdown arrow to the right of the Assign to option to select which user to assign (shown below outlined in red). You can only assign a task to one user at a time.
Once assigned, the task indicates the assigned user at the top (as shown below). The assigned user gets an email notification, as well as a desktop notification, that a task has been assigned to them.
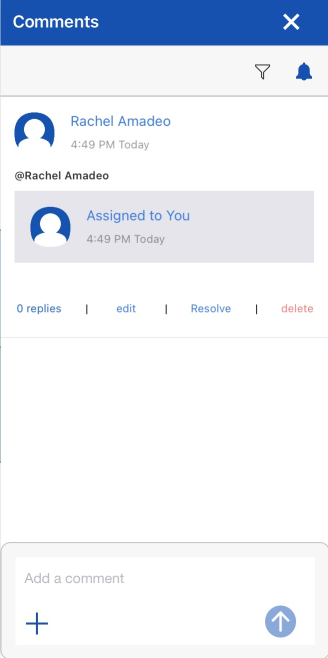
Once the assigned user finishes the assigned task, they can resolve the task by tapping the Resolve option below the comment.
Filter comments
To filter comments or tasks in the Comments panel, click the filter icon in the top right corner of the panel
![]() .
.
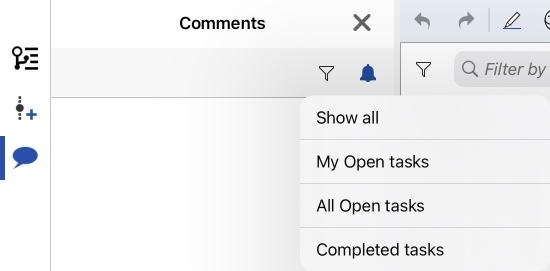
Click on the option you wish to view, and the Comments panel list will adjust accordingly.
While you are in a specific tab, open the Comments panel and enter a comment. Any collaborators who have email notification turned on will receive an email notifying them of the comment, with a link to that document. The link brings the collaborator to the first tab of the document.
Use @<username> to look up a specific user to direct a comment to.
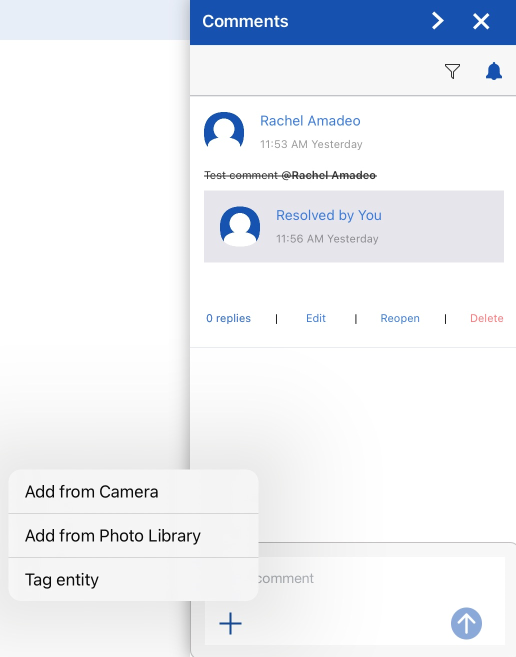
To add an image to a comment, tap the plus sign icon on the left side of the comment box, and select Add from Photo Library or Add from Camera:
Tagging entities (adding comments on features)
To add a comment on an entity in the Feature list (in Part Studios and Assemblies), tap the feature in the list and then two-finger tap in the graphics area to access the context menu. Tap Add comment:
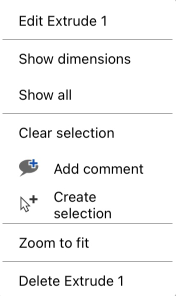
This opens the Comments panel with the tagged entity attached (Part 1 in the image below):
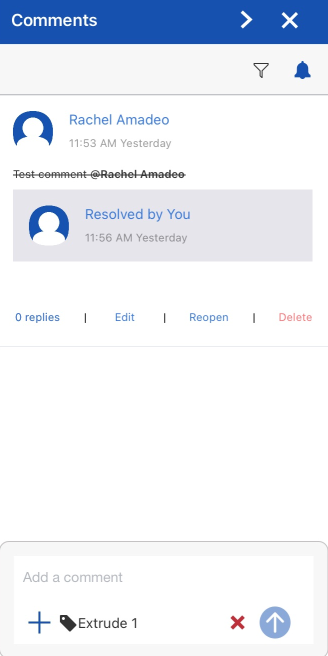
You can also tag entities through the Comments panel. With the panel open, tap the plus sign icon in the bottom left, then tap Tag entity:
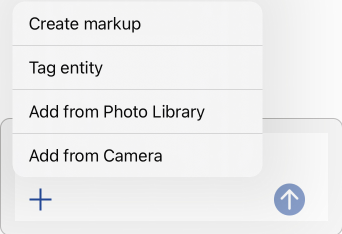
Select an entity in the graphics area or Feature list to tag. This reopens the Comments panel with the tagged entity attached.
To use markup to annotate and make notes directly in the graphics area (and then include that as an image attached to the comment):
-
Once the Comments panel is open, tap the plus sign icon in the bottom of the dialog, then tap Create markup:

-
This opens the markup area, and the markup tools dropdown in the upper left side of the area:
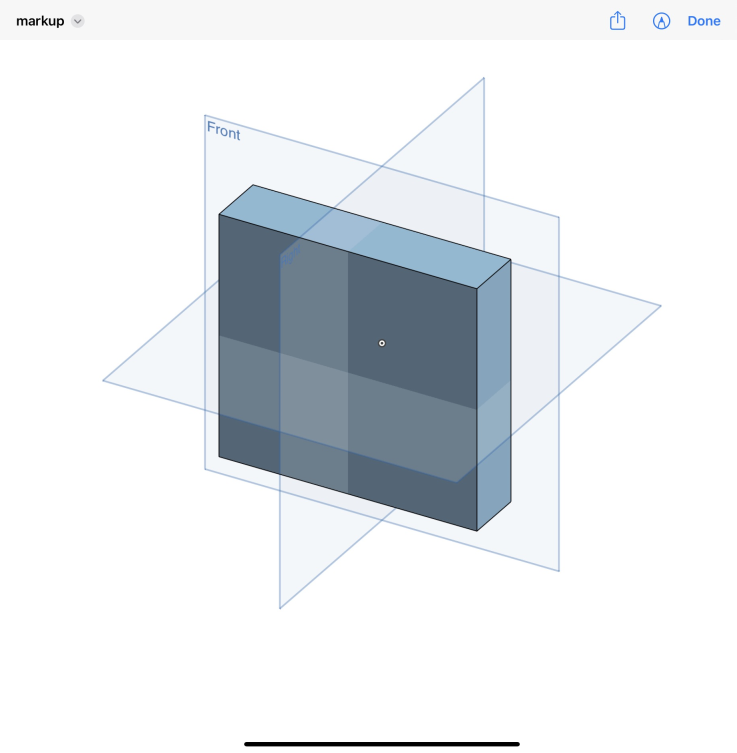
-
Use the tools as you would any graphics tools, to draw arrows, lines, free form, circles, squares, text. Select a color and a size for the graphics.
-
When Text is selected, first draw a text box, then tap in the box to set the cursor, and then type. You can change the color and size while the text box is active.
-
To cancel without saving your markup, tap the X in the Markup dialog.
-
To save your markup, tap the check mark in the Markup dialog.
Once saved, the markup is uploaded as an attachment to the currently active comment. Once you have added the comment (clicked Add), the markup appears as a thumbnail in the comment.
Onshape sends notifications when:
- A document is shared with you
- You are specifically mentioned in a comment
- A document that has been shared with you or a document you own has been commented on
Tap on a notification to open the comment panel in the document.
In your device settings you can specify how, or if, Onshape sends you notifications.
- All comments show the name of the collaborator and a timestamp of when the comment was sent.
- Comments are associated with a specific document and one of its workspaces, so the set of comments will vary depending on which workspace is active.
- A user must have any edit or comment permissions to the document or there is no access to the Comments panel.
- Comments are not recorded in the workspace history.

Collaborating users have the ability to communicate with each other in a workspace with comments. Owners of documents and collaborators (with Edit or Comment permission) can create comments, see each others’ comments, leave replies, and opt to receive email notifications of comments.
Comments are labeled with each user’s username.
On mobile, you can comment on:
- Documents
On a browser, you can comment on:
- Features in Feature lists
- Mate connectors
- Mates, including implicit mates
- Entities in a sub-assembly
- Drawings (keep in mind, however, that currently there is no collaboration allowed on drawings; users may view the drawing one at a time)
Tap the Comments icon in the upper right of the screen to open the Comments panel.

While in a specific tab, open the Comments panel and enter a comment. Any collaborators who have email notifications turned on will receive an email notifying them of the comment, with a link to that document. The link brings the collaborator to the first tab of the document.
Use @<username> to look up a specific user to direct a comment to.
To add an image to a comment, tap the plus sign icon on the left side of the comment box, and select Add image from Library or Add image from Camera:
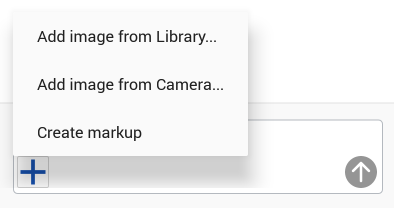
Allow Onshape to access photos, media, and files on your device (if you haven't already), then select an image to upload.
Tagging entities (adding comments on features)
To add a comment on an entity in the Feature list (in Part Studios and Assemblies), tap the feature in the list and then two-finger tap in the graphics area to access the context menu. Tap Add comment:
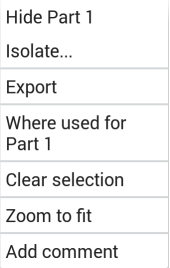
This opens the Comments panel with the tagged entity attached (Extrude 1 in the image below):
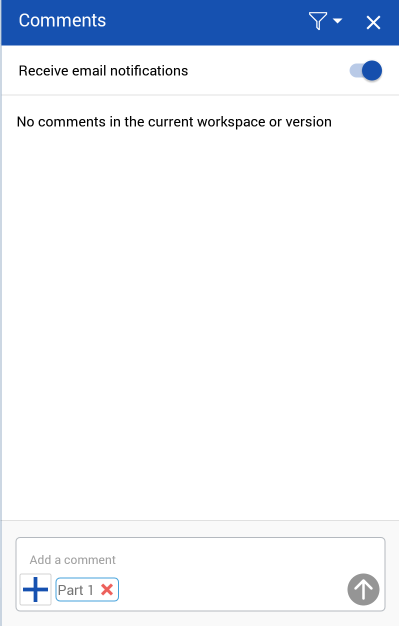
You can also tag entities through the Comments panel. With the panel open, tap the plus sign icon in the bottom left, then tap Tag entity:
![]()
Select an entity in the graphics area or Feature list to tag. This reopens the Comments panel with the tagged entity attached.
Features in the Feature list will not have comment icons in the graphics area. Their comment icons are displayed in the Feature list.
To use markup to annotate and make notes directly in the graphics area and then include that as an image attached to the comment:
-
Once the Comments panel is open, tap the plus sign icon in the bottom of the dialog, then tap Create markup:

-
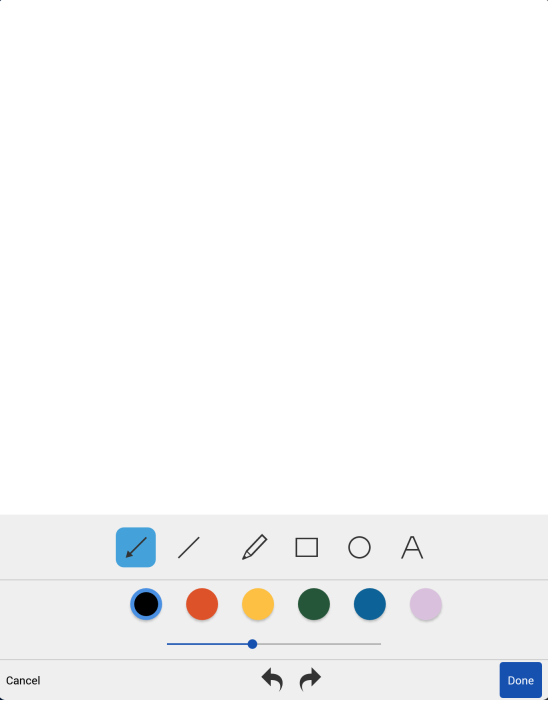
This opens the markup area and the markup tools:
-
Use the tools as you would any graphics tools, to draw arrows, lines, free form, circles, squares, text. Select a color and a size for the graphics.
-
When Text is selected, first draw a text box, then tap in the box to set the cursor, and then type. You can change the color and size while the text box is active.
-
To undo an action, tap the left arrow at the bottom of the dialog. To redo an action, tap the right arrow.
-
To cancel without saving your markup, tap Cancel.
-
To save your markup, tap Done.
Once saved, the markup is uploaded as an attachment to the currently active comment. Once you have added the comment (clicked Add), the markup appears as a thumbnail in the comment.
You can assign tasks to other users in Onshape using the Comments panel. When a user mentions other users in a comment, the mentioned user will be displayed below the comment box preceded with Assign to and a check box (as shown below):

Once assigned, the task indicates the assigned user at the top (as shown below). The assigned user gets an email notification, as well as a desktop notification, that a task has been assigned to them.
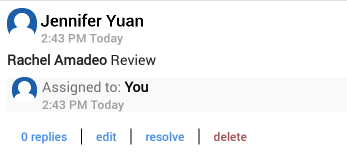
To resolve the assigned task, click the resolve option at the bottom of the comment.
Onshape sends notifications if:
- A document is shared with you
- You are specifically mentioned in a comment
- A document that has been shared with you or a document you own has been commented on
Tap on a notification to open the comment panel in the document.
From the Documents Page, go to Settings to enable or disable notifications from Onshape.
- All comments show the name of the collaborator and a time stamp when the comment was sent.
- Comments are associated with a specific document and one of its workspaces, so the set of comments will vary depending on which workspace is active.
- A user must have any edit or comment permissions to the document or there is no access to the Comments panel.
- Comments are not recorded in the workspace history.
- Tap the Comments icon to open and close the Comments panel.