Enterprise Settings - Authentication
![]()
Only available for
Configure and manage two-factor authentication (2FA), single sign on (SSO), and domain verification.
To navigate to your Authentication settings in Onshape, click on your Account user icon (![]() ) in the top right corner of your Onshape window. This opens a dropdown menu. Click Company/Classroom/Enterprise settings.
) in the top right corner of your Onshape window. This opens a dropdown menu. Click Company/Classroom/Enterprise settings.
Click Authentication in the list on the left side of the page:
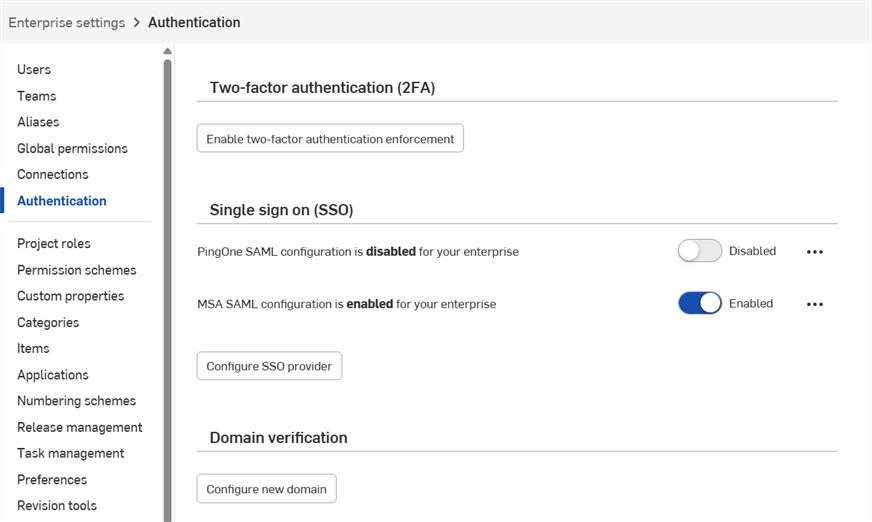
Onshape highly recommends taking advantage of our two-factor authentication functionality. Two-factor authentication (2FA) allows you to configure your Onshape account to require more than a single password to sign in. Using one password to sign into a website makes you more susceptible to security threats because one piece of static information may be easy to guess or acquire. With 2FA, a second piece of information is required, and that second piece of information is generated dynamically during the sign in process, and may be different each time you sign in.
We highly recommend you use 2FA for Onshape and for all websites you use that support it.
Download a two-factor authentication app (like Google Authenticator) to your phone and set it up with Onshape through the Onshape user interface. This enables the app to generate a one-time code that Onshape is able to recognize. Once you enable 2FA in Onshape, Onshape will prompt you for the 2FA code after you sign in with your password.
You can allow the 2FA mechanism to remember the devices on which you sign in so that once you use 2FA authentication to sign in to Onshape from a specific device, you won't need a 2FA code to sign in on that device for 30 days.
- Download a two-factor authentication app to your device.
- Sign in to your Onshape account.
- In the menu under your username, select My account.
- In the list on the left side of the page, click Security.
- To the right of Two-factor Authentication, click Enable.
- Click Set up two-factor authentication.
- Confirm password.
- Click OK.
Google Authenticator is one example.
Continuing from the instructions above:
- Use the Authenticator app on your device to scan the QR code presented in the Onshape user interface.
- Enter either the six-digit code that the 2FA app generates or the code supplied by Onshape.
- Click Enable.
- When the recovery codes are displayed, copy them to a safe place; you need access to them in the event you do not have your phone or the authentication app.
- Click OK.
Once registration is complete, the phone app will list a code for each registration you create. It is these codes that you enter into Onshape when presented with the 2FA sign in page.
If you are not able to use the QR code, click the enter this text code link provided in the Onshape interface to obtain a code.
Onshape provides you with 5 active recovery codes at a time. Keep these codes in a place accessible to you separate from your device or the authentication app.
Onshape cannot help you if you delete the app or lose your phone.
You can generate these Recovery codes at any time through the Onshape interface, but only the most recently generated series are active at any one time. Once you use a code it is no longer valid. When you generate a new list of codes, all previous codes (used or unused) become invalid.
When two-factor authentication is enabled, Onshape prompts you for a code upon sign in:
- After you enter the password to your Onshape account, you are prompted for the authentication code.
- Open the two-factor authentication app on your device to view the code; enter the code in Onshape.
- Click Verify.
In the event that you don't have access to the app, click the Enter a two-factor recovery code link to enter one of your current recovery codes.
You may disable (and re-enable) two-factor authentication at any time.
- On the Security tab of the User Profile page in Onshape click Manage, and then Disable:
- Confirm password.
- Click OK.
Should you need to replace a device on which you have 2FA enabled for Onshape:
- Before replacing the device, disable 2FA through the Onshape interface.
- Enable 2FA once the new device is online.
Note that Onshape doesn't support the Replace 2FA option.
For security reasons, Onshape does not allow adding an existing Onshape account to a new Enterprise.
New users who have never been in Onshape are added to the Enterprise immediately.
If a user was added manually to the Enterprise by an Administrator or uses Single sign on (SSO), and they are a "known to Onshape" user, when they first sign in they are not immediately added to the Enterprise. Instead, they are sent an email containing a Join Enterprise link to click and confirm being added to the Enterprise. They cannot sign in to the Enterprise until they click this link.
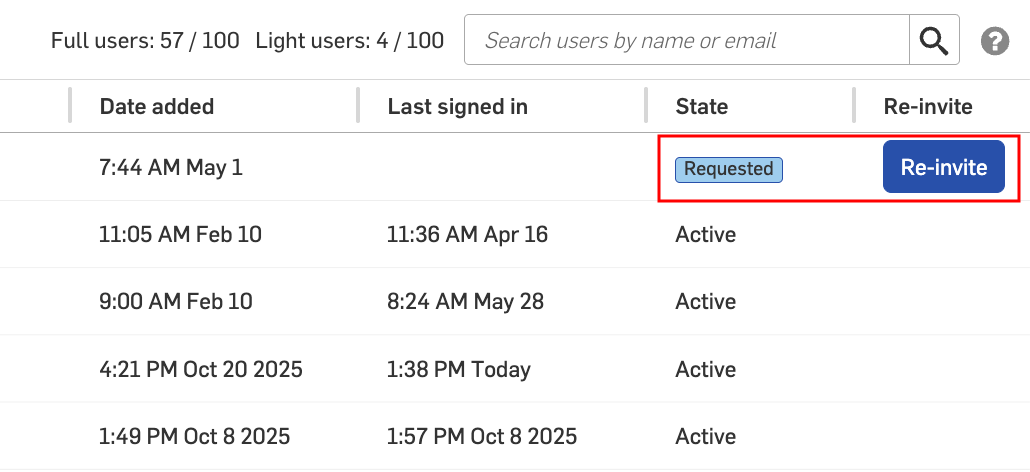
Administrators can view users that were sent a request to join the Enterprise on the Users tab. The status of the user is listed as Requested under the State column.
Invitations are only valid for 48 hours. After this time, Administrators can send a new invitation by clicking the Re-invite button:
When domain verification is in place, users are added to the Enterprise automatically and placed in an Active state. Users do not need to join the Enterprise.
If you are using Google SSO with domain whitelisting, there is no need to set up Domain verification. Users are immediately added and placed in an Active state.
Creating a domain verification
-
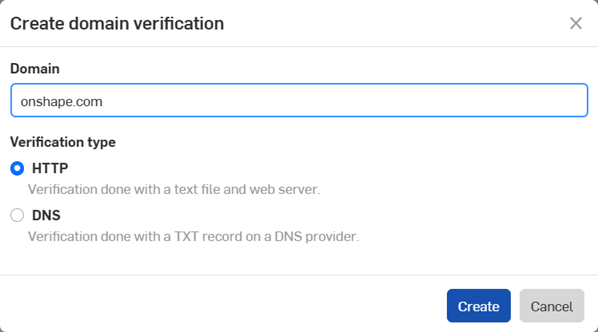
Click the Configure new domain button. The Create domain verification dialog opens:
-
Enter the Enterprise domain.
-
Select a Verification type:
-
HTTP - Verification is completed with a text file and web server.
-
DNS - Verification is completed with a TXT record on a DNS provider.
-
-
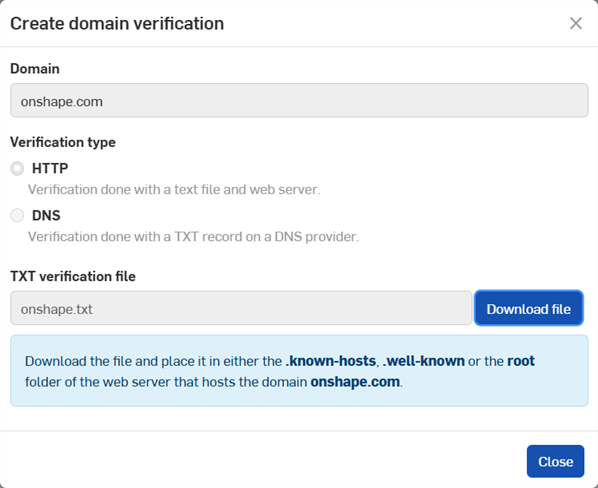
Click the Create button.
-
Click the Download file button to save the file.
-
Click the Close button.
-
For HTTP verifications, place the downloaded text (.txt) file in the .known-hosts, .well-known, or root folder of the domain. For DNS verifications, create a TXT record for this domain in the DNS settings.
-
Click the overflow menu icon (
 ), then select Validate to validate the domain.
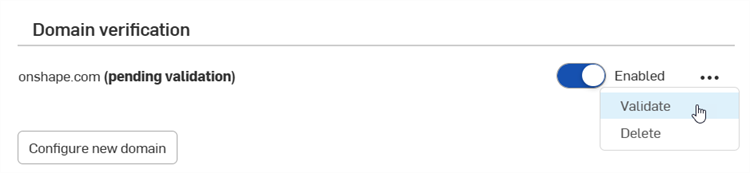
Use the toggle switch to the left of the overflow menu to Enable/Disable the domain.
To delete a domain, click the overflow menu icon (![]() ), then select Delete.
), then select Delete.
Multiple domains can be configured and enabled.