Company/Classroom/Enterprise Settings - Properties/Custom Properties
![]()
Only available for
Access the metadata definitions for Onshape objects (what drives the data displayed in object Properties dialogs and Bill of materials (BOM)), view these metadata definitions, and create new properties for use in Company/Classroom/Enterprise-owned documents, as well as provide Display names for existing Onshape properties. Administrators can add, modify and retire properties for all users. Users can only view these metadata definitions.
To navigate to your Properties/Custom properties settings in Onshape, click on your Account user icon (![]() ) in the top right corner of your Onshape window. This opens a dropdown menu. Click Company/Classroom/Enterprise settings.
) in the top right corner of your Onshape window. This opens a dropdown menu. Click Company/Classroom/Enterprise settings.
Click Properties (Professional or Educator subscriptions) or Custom Properties (Enterprise subscriptions) in the list on the left side of the page:
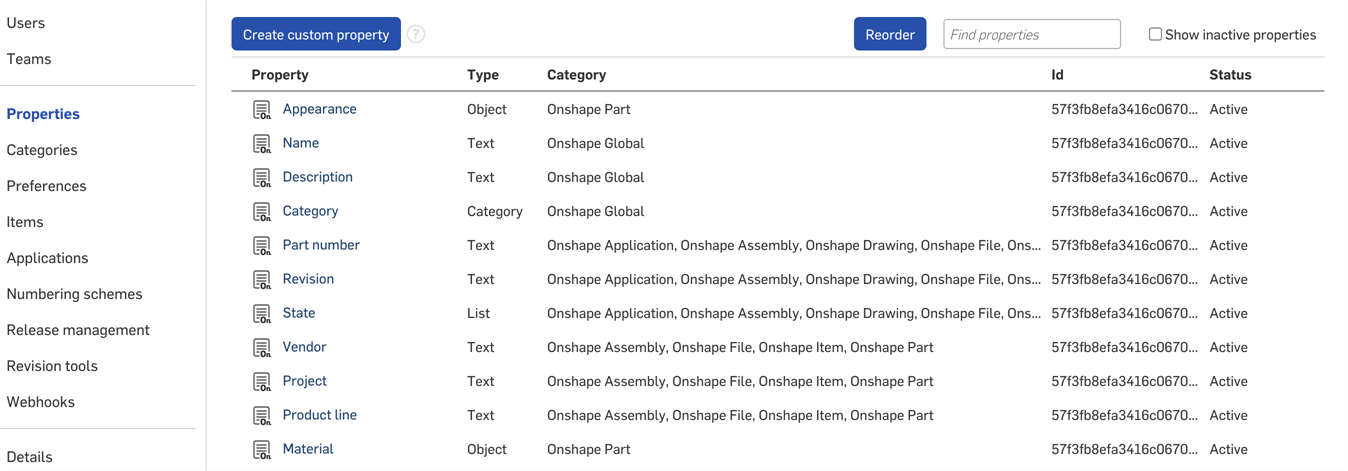
Company settings > Properties
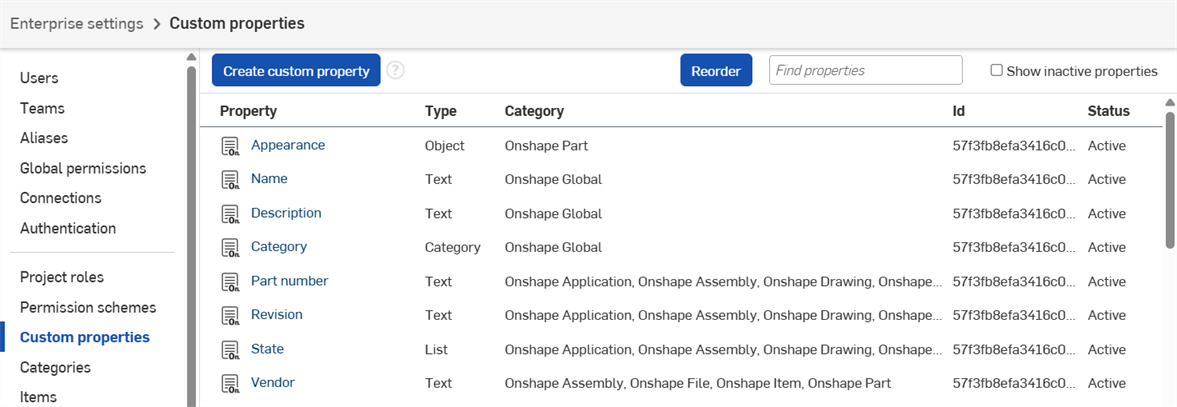
Enterprise settings > Custom properties
Users with permission to create and edit properties see a Create custom property button at the top of the page.
Properties may be associated with these Onshape objects:
- Onshape Part
- Onshape Assembly
- Onshape Drawing
- Onshape Part Studio
- Onshape Document
- Onshape File
- Onshape Application
- Onshape Item
- Onshape Folder
- Onshape Project
Default Onshape Properties are indicated with an Onshape properties icon (![]() ). Custom properties are indicated with the custom properties icon (
). Custom properties are indicated with the custom properties icon (![]() ).
).
On the Properties/Custom properties page:
- Click Create custom property.
- Specify a Name for the property. The name should be unique among Onshape and existing properties. When testing for uniqueness, Onshape uses the Company/Classroom/Enterprise name and the name of the property.
- Optionally, specify a Display name for the property. If a Display name is specified, that is what is used in all user-facing situations. If the Display name is left blank, the value is shown. The value is used as an internal reference, and therefore cannot be changed. Display name gives the user the ability to alter the name of a property without having to remove it and create a new property.
- Select a property type:
- Text
- Boolean
- Integer
- Double
- Date
- List
When defining lists and values, you can copy/paste values or enter them separately. You can also specify display names (they may not duplicate the Value, however). You can reorder the values with drag/drop, and select whether each is active/inactive at any time.
- User
- Value with units
- The initial Publish state is Pending (not yet available to users). When you want this property to be available to users, select Active (available to users and values entered are recorded in the database). To retire this property from use, select Inactive. Inactive values are available only through the Onshape API.
- Supply the rest of the property’s attributes, a red asterisk indicates a required field. Depending on the property type you selected above, different attributes may be available.
- Default value - (Available for all types) Enter a default value here, if desired. This value serves as the default if the user doesn’t specify a value.
When entering values for the User property type, it must be a valid Onshape user’s email who already belongs to the company in which the property was created.
- Description - (Available for all types) Enter an optional Description for the property .
- Unit type - Available for Value with units type only. Select from the list of unit types for the custom property, including:
Any Acceleration Angle Angular velocity Area Energy Force Length Mass Moment Pressure Time Volume - Indicate where the property may be edited and whether it is required:
- Required - Indicates that the property value is required.
- Edit value in version - Indicates that this property value may be edited in a document version; allow the user to supply a value for this property in any document version. Also indicate if the value should be edited only through the API and not through the Onshape user interface.
- Edit value in workspace - Indicates that this property may be edited in a workspace; allow a user to supply a value for this property in any document workspace. Also indicate if the value should be edited only through the API and not through the Onshape user interface.
The Edit value in version and Edit value in workspace default Onshape properties cannot be edited. The Required option in some default properties also cannot be edited.
- Default value - (Available for all types) Enter a default value here, if desired. This value serves as the default if the user doesn’t specify a value.
- Enter optional validation criteria for properties, including those that can have a pattern:
- Check Multiline if the value can have multiple lines of text (for example, a Description may require multiple lines of text).
- Enter a minimum length and/or a maximum length, if desired.
- Indicate the pattern in the Pattern field, such as any regular expression including:
- [A-Z]+ which requires 1 or more uppercase alphabetical characters
- [0-9]+ which requires 1 or more numeric characters
- [a-z]+ which requires 1 or more lowercase alphabetical characters
- ONS-[0-9]+ which requires the prefix ‘ONS-’ followed by 1 or more numeric characters. You could put the required prefix in the Default value attribute so it appeared automatically. Users receive an error notification specifying the required pattern if the value is invalid.
- Select a category (or categories) in which the property will be available. The category must already be defined through the Categories tab by an administrator of the company or enterprise. You may select more than one category, and also remove a category by clicking the X to the far right of the category line. For more information on Categories, see below.
- Custom properties assigned to the Part and/or Assembly category can be set to a computed function in order for the property to be a computed property. For more information, see Creating computed properties, below.
- To make the property available to all users in the Company, make sure the Publish state is set to Active.
- Click Create.
- A message appears reminding you that if you make this property active, all users in the Company/Classroom/Enterprise are able to see it. Click Confirm publish to continue to activate the property. You can publish later instead.
- You can also organize custom properties by selecting Reorder. This allows you to select any custom property (the dots next to the
 icon) and rearrange its order by dragging and dropping. Click Confirm to save the change(s) or Cancel to undo the change(s).
You can create a custom property that uses FeatureScript to compute a value. Once you have a property like this, you can use it through a custom property in your Company/Classroom/Enterprise settings to compute a property. These computed properties can be used with Part categories. Once you have a computed part property defined, you can create another custom property that uses the computed part property to aggregate it for Assemblies and include the information in the Assembly and Drawings bill of materials tables.
The property types that can be aggregated for assemblies are: Boolean, Integer, Double, and Value with units so long as the units are a type other than 'Any.'
-
On the Properties/Custom properties page in your Onshape settings (as described above), create the custom property to use in conjunction with a computed property.
-
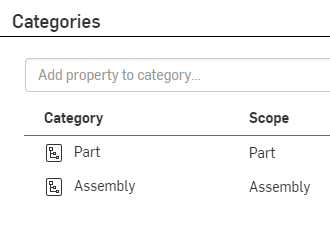
In the Categories section of the definition, add a category of Part to indicate to apply the property to Parts, and the Assembly category to apply the property to Assemblies.
-
To create a computed part property, in the Computed part properties section, check the box for Compute part property.
-
Click Select computed part property function to open the Select computed part property function dialog.
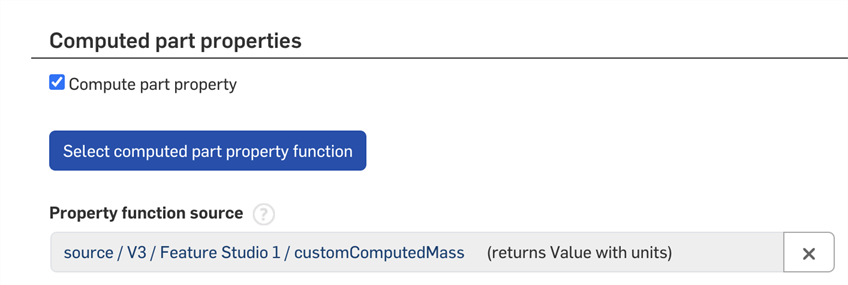
-
Navigate to the document that contains the FeatureScript function.
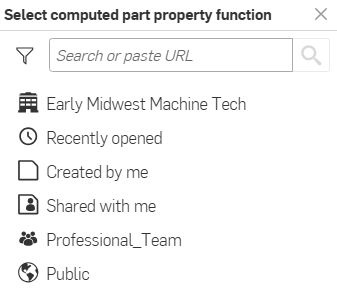
-
Select the function from the list displayed.
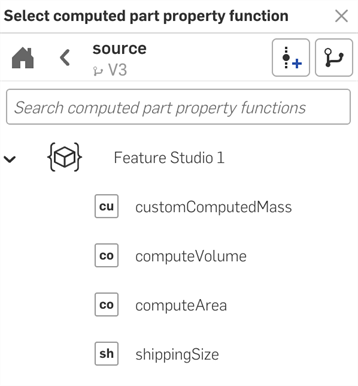
-
Click Create to create the property (or Cancel to close the page without creating the property). Confirm the Create action when prompted.
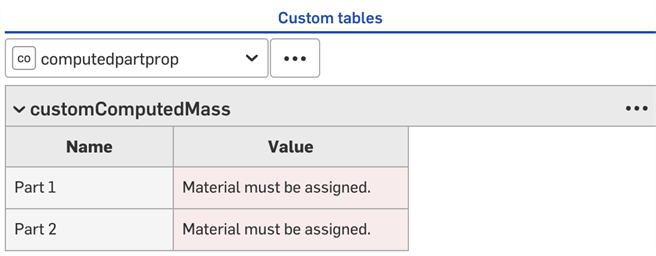
To test that your computed properties are behaving as expected, you can add them as a custom table to a Part Studio. Any notes or warning you've added to your FeatureScript will be visible in the custom table. Note that the Feature Studio where the property is computed and the Part Studio with the custom table do NOT need to live in the same document.
Make sure you have the computed Part property defined (as described above) that you want to use to create aggregated data for an Assembly.
-
Add the Assembly category to the computed part property through the Categories field:
-
Notice that a new area appears on the page, at the bottom, called Aggregated assembly properties. (This is available only for types of: Boolean, Integer, Double, List, and Value with units so long as the units are a type other than 'Any'.)

-
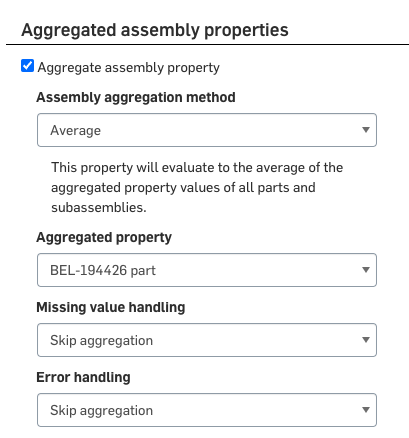
Check the box and the following fields appear with which to define the aggregate data:
-
Define the desired Assembly aggregation method to compute and display:
-
Value with units, Integer, and Double types
-
Sum, Minimum, Maximum, Average, Weighted Sum, or Weighted Average
-
-
Boolean type
-
Any - Return true if at least one item is true
-
All - Return true if all items are true
-
Not any - Return false if at least one item is true
-
Not all - Return false if all items are true
-
-
List type
- First - Return the first of the aggregated property values for all parts and subassemblies. You can adjust the order of values with drag/drop in the List values section of the Custom properties page.
- Last - Return the last of the aggregated property values for all parts and subassemblies. You can adjust the order of values with drag/drop in the List values section of the Custom properties page.
-
-
Select the Aggregated property to compute and display:
-
Value with units, Integer, Double, and List types
-
The same property
-
-
Boolean type
-
The same property (Boolean)
-
Not revision managed
-
Exclude from all BOMs
-
-
-
In the Missing value handling field (not available for List types), specify how to handle the aggregation when a value is missing:
-
Skip aggregation (ignore and do not aggregate)
- Treat as zero (treat the missing value as a zero)
-
-
In the Error handling field, specify how to handle errors when they occur:
-
Skip aggregation
-
Treat the error as a zero (not available for List)
-
Treat as true/false (for Boolean)
-
Propagate the error into the computation
-
-
Check the Filter aggregation box to filter the aggregation (ignore it using a boolean property as the filter) and then select the method for filtering:
-
Boolean filter property - Select from Not revision managed and Exclude from all BOMs, or a custom boolean property
-
Filter behavior - Select from Include when true and Exclude when true
-
-
Click Create to create the property (or Cancel to close the page without creating the property).
Create the following FeatureScript (or similar), in a Feature Studio named Custom mass:
annotation { "Property Function Name" : "Custom mass"}export const mass =
defineComputedPartProperty(function(context is Context, part is Query, definition is map) returns ValueWithUnits
{const volume is ValueWithUnits = evVolume(context, { "entities" : part });const material is Material = getProperty(context, {"entity" : part,
"propertyType" : PropertyType.MATERIAL
});
return material.density * volume;
});
Create a custom property in your company settings > Custom properties page, called Custom mass:
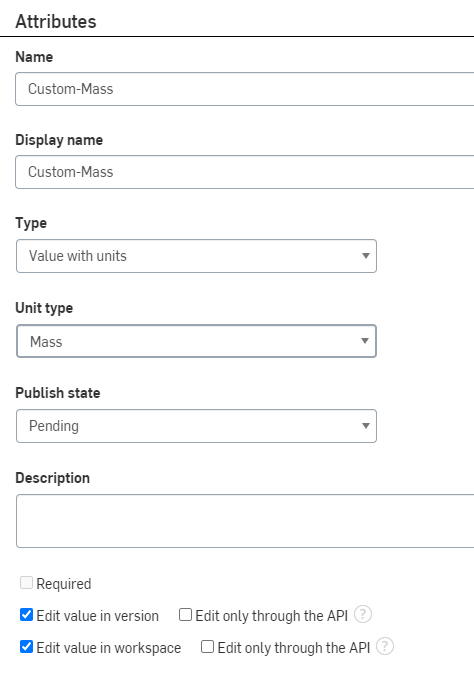
Assign the custom property to the Part category and the Assembly category:

Select the FeatureScript under the Compute part property: check the box, click Select computed part property function:
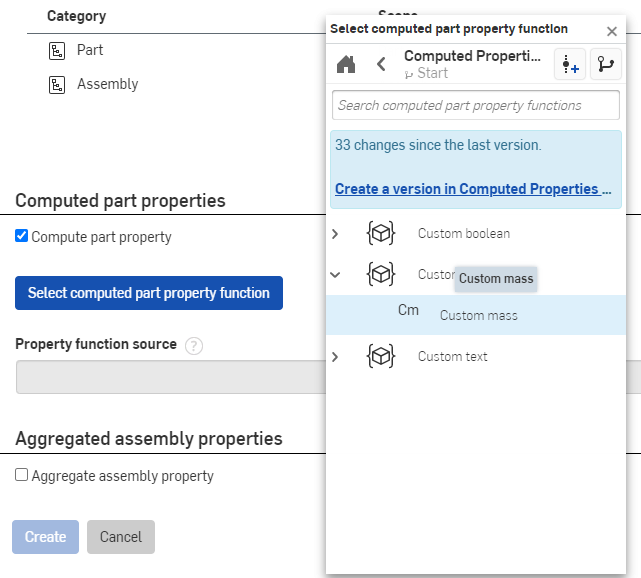
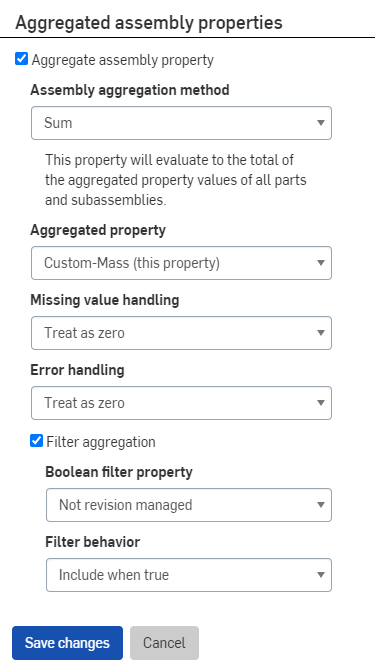
Select the checkbox for Aggregate assembly property, and specify how to include the information in the Bill of materials:
In an assembly, you can add the property to the BOM:
-
Open the BOM.
-
Click Add column and select the custom property you created in the procedure above.
-
The property is added to the BOM:
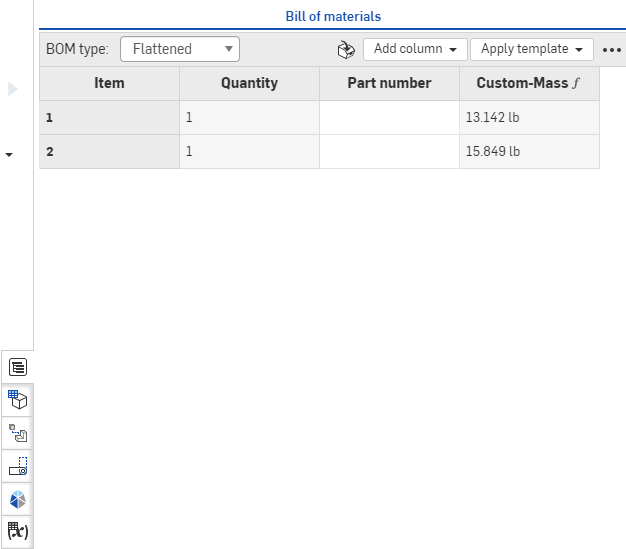
Onshape metadata and Properties/Custom properties are only able to be edited by Administrators.
On the Properties/Custom properties page, you have the ability to:
- Search for properties. Use the search box to enter a property id, name, or partial name; check the box to search for inactive properties.
The list presents Onshape metadata properties first, then custom properties in alphabetical order. Custom properties can be organized in any order by selecting the Reorder button.
- Click a Property name to open it for editing.
- You may make any changes desired to a property with a Publish state of Pending, including deleting that property. If the property is already set to Active, you can set its state to Inactive and change its display name, but you will not be able to delete the property.
- Active properties with List type can be reordered and added with additional values/display names. Existing list values can be made inactive and its display names can be edited.
- The Properties dialog alerts you if the update you're making causes any errors.
- Inactive properties are not visible in any Properties dialogs, but are still associated with the objects. Any other changes made to an Active property are immediately available and effective upon Save. An Inactive property is able to be made Active again.
See Creating and activating a new Property/Custom property for information on modifying fields.
Onshape metadata definitions may be made Inactive (retired) but may not be edited.
You can access properties and custom properties in different areas in Onshape depending on their attributes.
Right-click on an entity (for example, a Part, Part Studio, Assembly, Drawing, etc.) to access the context menu, then click Properties to open the Properties dialog. If there are custom properties accessible, they will appear listed in the dialog.
You can also access custom properties with the Advanced search feature on the Documents page. Expand the Advanced search dropdown, then expand the Add criteria dropdown:
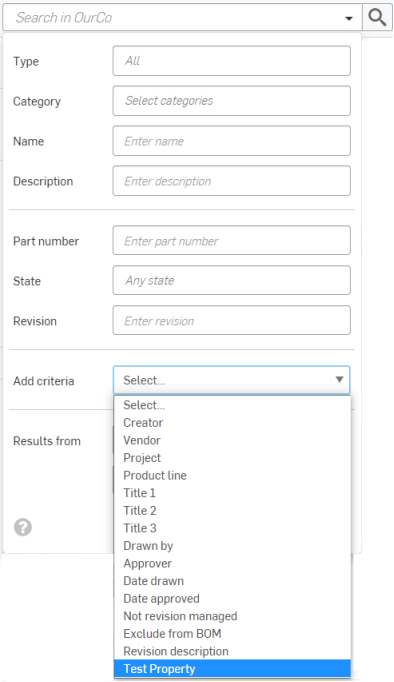
If there are custom properties accessible, they will appear listed in the dropdown (see Test Property highlighted in the image above).
When using the User custom property type, the current user cannot be searched for. You have to select Current user, located at the top of the list.
When a property becomes obsolete, or an error in the definition is discovered after the property was made Active, you can retire the property. Retiring a property removes it from all Properties dialogs but keeps the property associated with the objects and preserves the data in the database. To retire a property:
On the Properties page:
- Search to locate the property, if necessary.
- Click the property name to open for editing.
- Select the dropdown for Publish state and select Inactive.
- Click Save changes.
Inactive properties may be made Active again.
Onshape metadata definitions may be made Inactive (retired) but may not be edited.