![]()
除了可讓您從頭建立自訂範本之外,Onshape 同時提供好幾個公開的工程圖範本來讓您使用與自訂。這些範本是大部分使用者常用的範本,直接使用對與許多使用者來說也是足夠的。要在 Onshape 中使用來自不同 CAD 套裝軟體的工程圖做為範本,請參考在 Onshape 中使用傳統 CAD 工程圖為範本。
可以將工程圖範本視為工程圖格式項目的組成,這些項目包括標題區塊、邊框與區域;如果需要,也可以將在工程圖屬性面板中說明工程圖功能的屬性包括在範本中。工程圖範本僅就是讓您格式化想要的外觀並定義工程圖屬性與行為,以供之後的工程圖重新使用。
關於建立原生 Onshape 工程圖範本的最佳實踐,請參考學習中心內的 Best practices for creating native onshape drawing templates (需要有 Onshape 帳戶)。
如果您需要自訂的工程圖範本以使用公司規定的工程圖範本,請遵循下列步驟操作:
- 建立一個新文件。這是用來儲存您所有工程圖範本檔案的文件。
- 按一下插入新分頁圖示 (
 ) 然後選擇建立工程圖。
 - 從左側的篩選器清單中選擇 Onshape。
- 從上方的水平功能表中選擇標準:
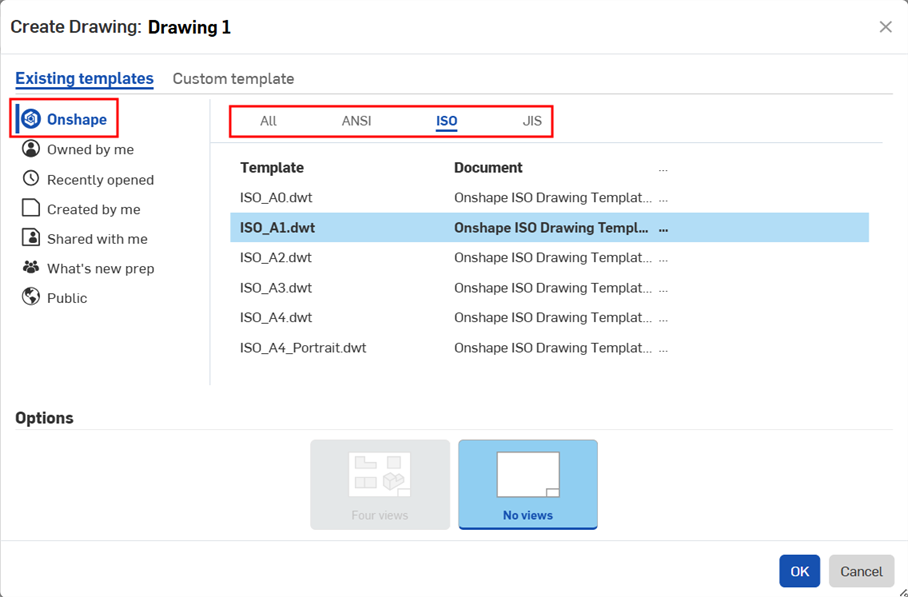
- 從可用範本的清單中選擇範本大小。
- 按一下 確定。
- 在工程圖中自訂範本以符合您的需求。
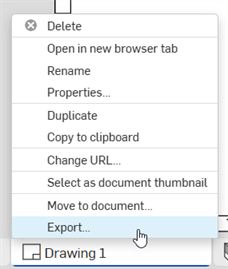
- 在工程圖分頁上按右鍵然後選擇匯出:
- 在匯出工程圖對話方塊中:
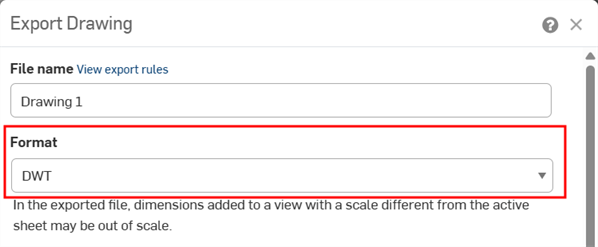
- 在格式之下選擇 DWT:
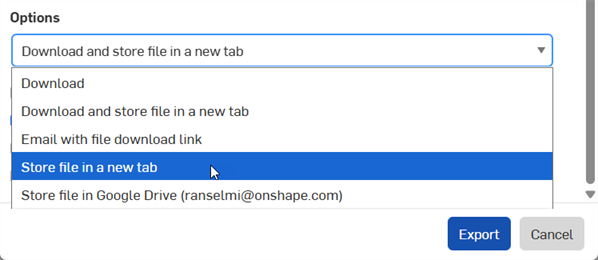
在選項之下選擇在新分頁中存放檔案:
按一下匯出。
- 在格式之下選擇 DWT:
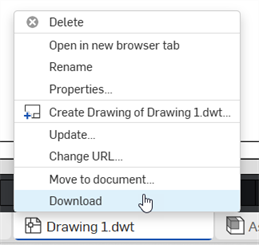
- (選用) 在 .dwt 分頁上按右鍵,然後選擇下載來將其儲存在您的本機磁碟中:
使用範本:
- 在文件中使用「插入新分頁」圖示 (
 ),然後選擇匯入。
 - 選擇工程圖範本。
- 當建立工程圖時,選擇本人所建立的篩選器。
- 選擇您要建立的範本。
- 按一下 確定。
當您一開始在 Onshape 中建立零件的工程圖時,馬上可以選擇要使用現有的範本或建立自訂的範本:
- 在 Part Studio 中從零件的環境選單內選擇 [建立工程圖] 來存取「建立工程圖」對話方塊:
![在零件環境選單中強調顯示 [建立工程圖] 的螢幕擷取畫面範例](Resources/Images/Createdrawing_highlighted.png)
![在零件環境選單中強調顯示 [建立工程圖] 的螢幕擷取畫面範例](Resources/Images/drawings-tools/template-1new-01.png)
- 選擇對話方塊最上方的 [自訂範本] (如上圖中紅色箭頭所指左側) 來存取自訂範本對話方塊:
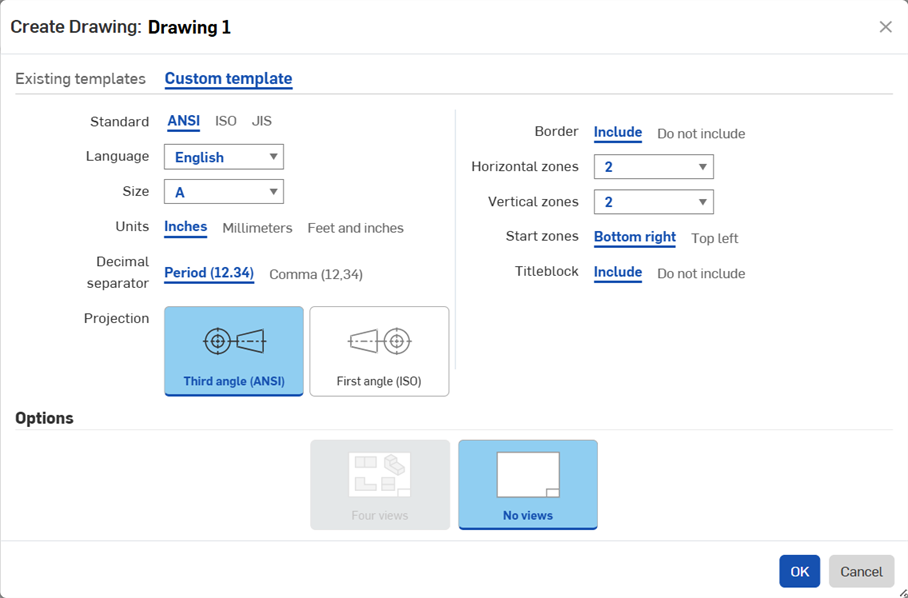
- 設計您的範本:
- 標準 - ANSI、ISO、或 JIS
- 語言 - 標題方塊文字應顯示的語言。
- 大小 - 根據選取的標準而提供不同的選擇。
- 單位 - 英吋、毫米、或英呎與英吋 (預設會根據標準而有所不同,但您可以根據需要來選擇)。
- 對工程圖單位的管理是與 Part Studio 和組合件的工作區單位獨立的 。
- 英呎與英吋僅可於工程圖中使用;不可用於工作區的單位。
- 小數分隔符號 - 英文句號或逗號 (預設會根據標準而有所不同,但您可以根據需要來選擇)
- 投影 - 第三角或第一角法 (預設會根據標準而有所不同,但您可以根據需要來選擇)
- 邊框 - 包括邊框,或建立完全沒有邊框的工程圖。
- 橫式區域 - 指定在邊框中橫式區域的數量。
- 直式區域 - 指定在邊框中直式區域的數量。
- 開始區域 - 指定要從工程圖的哪個角落開始標示區域。
- 標題區塊 - 包括標題區塊或不包括標題區塊 (一旦在工程圖模式中時,您仍可以建立自己的標題區塊)
- 選擇是否要自動包括四個標準視角或將工程圖留為空白(無視角圖)
- 按一下 確定 (或 取消)。
當您有編輯好的理想工程圖時,可以用來建立範本以供之後的工程圖使用。
當將工程圖匯出為 DWT 檔案時,請注意:
- 僅會將第一張圖頁與第二張圖頁 (如果有的話) 匯出為 DWT 檔案,並不會匯出其他的圖頁。
- 會刪除所有的視圖,僅保留非視圖的幾何與文字。
- 檔案格式將是 DWT,版本則為 2013。第一張工程圖頁會是主要的範本,如果有第二張圖頁的話,則會是延續的範本。
步驟
- 在「工程圖」分頁上按右鍵,然後選擇 [匯出] 來開啟「匯出工程圖」對話方塊:
![在工程圖分頁環境選單中強調顯示 [匯出] 的螢幕擷取畫面範例](Resources/Images/Export_highlighted.png)
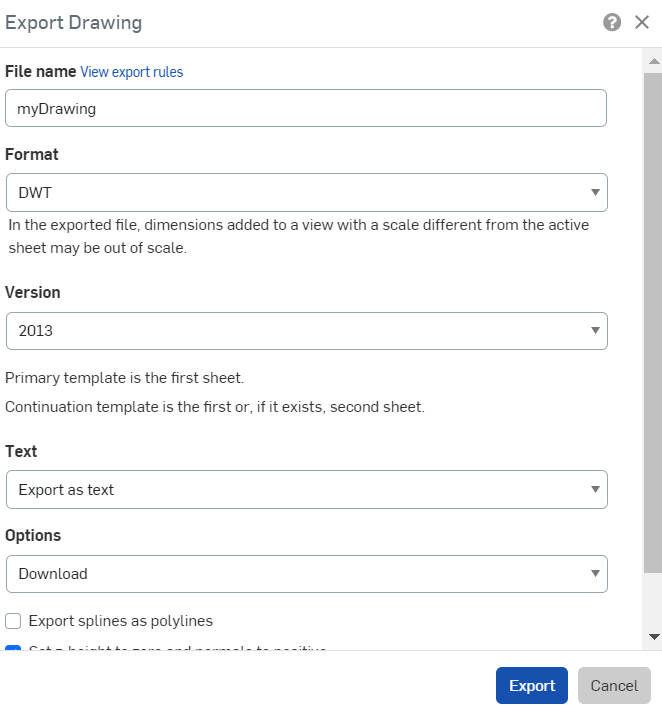
- 若要建立工程圖範本,請選擇 DWT 的格式 (如上圖所示)。
- 按一下匯出。
使用範本:
- 在文件中使用「插入新分頁」圖示 (
 ),然後選擇匯入。
 - 選擇工程圖範本。
- 當建立工程圖時,選擇本人所建立的篩選器。
- 選擇您要建立的範本。
- 按一下 確定。
根據上方指示操作建立 Onshape 工程圖範本,然後在 Onshape 中建立空白的工程圖:
- 在範本的步驟中,選擇 [自訂範本]。
- 選擇 [不要包括邊框]。
- 選擇 [不要包括標題區塊]。
- 根據需要設定大小、標準與其他特點。
- 按一下 確定 並關閉工程圖中的開啟對話方塊。
- 將您已匯出的傳統 CAD 工程圖 (DWG/DXF 格式) 匯入至 Onshape (使用
 功能表 > [匯入] ) 中。
 - 開啟您建立的空白工程圖。
- 使用「插入 DWG/DXF」
 工具來插入剛上傳的檔案。
 -
若要調整字型,請選擇文字然後選擇所要使用的支援字型。
- 加入修訂表格或圖塊的功能:
- 產生一個使用新近上傳的 DWG/DXF 檔案的工程圖。
- 在需要處放置表格 (例如右上角)。
- 在工程圖範本中加入公司標誌:
- 使用插入圖片的指令來上傳標誌。
- 插入新上傳的圖片,將其放在工程圖中適當的位置並調整大小。
- 在您工程圖中適當的區域插入所需的工程圖欄位:
- 將註解加入工程圖中。
- 選擇插入欄位的按鈕。
- 加入修訂表格或圖塊的功能:
-
使用視圖環境選單 (按右鍵存取) 的 [移動至] 指令來加入這些元素:「標題區塊」、「邊框框架」、與「邊框區域」。系統不會輸出在工程圖圖層上的任何項目;僅會是這三個圖層。
會將元素加入至相對應的圖層中:標題區塊、邊框框架、或邊框區域。
- 在工程圖分頁上按右鍵然後選擇 [匯出]。
- 選擇 DWT 的格式。
- 選擇 [在新分頁中存放檔案] 的選項。
- 按一下匯出。
- 在為之後的工程圖選擇範本時,這個範本會出現在建立工程圖對話方塊中「本人所建立」與「與本人共享」的篩選器內。
- 使用工程圖範本之前請先測試。
- 在匯出的過程中會加入至相對應圖層的元素:標題區塊、邊框框架、或邊框區域。
- 不會將工程圖圖層包括在工程圖的 DWT 匯出中。
- 當格式是設定為已鎖定時,會鎖住邊框框架、邊框區域、與標題區塊圖層。
- 邊框框架、邊框區域、與標題區塊圖層可以有不同的預設色彩與線條粗細。
- 當匯出至 DWG/DXF 時,在邊框框架、邊框區域、與標題區塊圖層中的內容會位在特定的圖層中 (例如,BORDER_FRAME, BORDER_ZONES, TITLE_BLOCK)。
- 請注意,較舊版本的 DWG/DXF 格式可能不會完全支援圖層。
- 當工程圖圖頁大小變更時,標題區塊不會改變。不過,邊框框架與邊框區域會以較大/較小的大小或是更多或更少的區域來重新繪製。
- 在圖頁大小變更或圖頁格式置換時,並不會取代工程圖圖層中的所有內容。