 肋材
肋材
![]()
![]()
![]()
依據一個草圖在零件的多個位置上建立肋材。
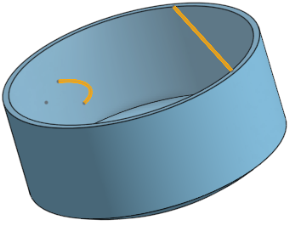
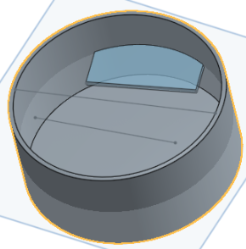
「肋材」特徵工具可讓您根據草圖在零件的多個位置上建立肋材。在建立肋材之前,請先建立肋材所依據的草圖線。此處範例中的 Sketch 2。草圖會使用方盒的正面做為草圖平面。
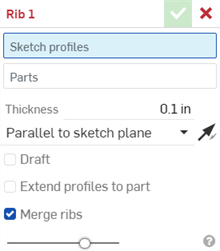
按一下工具列中的「肋材」特徵工具。選擇草圖輪廓。按一下對話方塊中的「零件」欄位,然後選擇要套用肋材的零件。
為肋材的擠出方向選擇「垂直於草圖平面」。在對話方塊中輸入肋材的「厚度」值。
核取「拔模」來在肋材的兩側套用錐形拔模。在「拔模角度」欄位中指定度數。按一下「相反方向」圖示來反轉拔模的方向。
在草圖曲線並未與零件相交的情況下,選擇「延伸輪廓至零件」來將草圖曲線延伸至零件上。
按一下核取記號來接受新的肋材。
- 按一下「肋材」圖示 (
 )。
)。
- 選擇要用來建立肋材的草圖曲線。
- 選擇要吸收肋材的零件。
- 指定所需的肋材厚度。
- 指定肋材延伸的方式:垂直 (正交) 於肋材草圖平面,或平行於草圖平面。如果需要,使用方向箭頭
 來反轉方向。
 - 核取「拔模」來在肋材的兩側套用錐形拔模。在「拔模角度」欄位中指定度數。按一下「相反方向」圖示 (
 ) 來反轉拔模的方向。
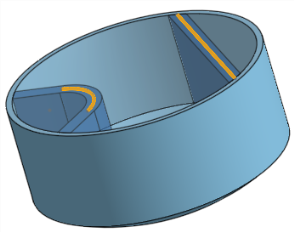
- 在草圖曲線並未與零件相交的情況下,選擇延伸輪廓至零件來將草圖曲線延伸至零件上。會延伸直線,弧則是從尾端以直線延伸:
- 使用合併肋材來將肋材加至現有的零件中。取消核取此方塊則會產生肋材的單獨新零件。
- 按一下核取記號圖示 (
 )。
)。
肋材必須完全在零件的邊界之內,否則操作會失敗。
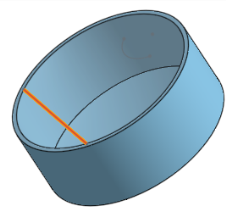
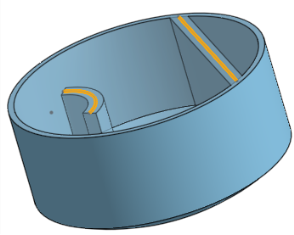
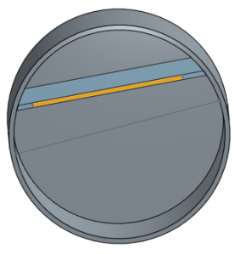
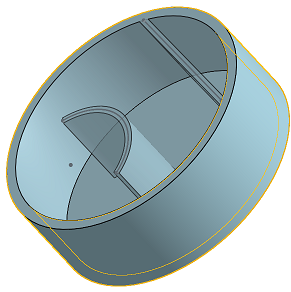
將肋材延伸垂直於草圖平面:
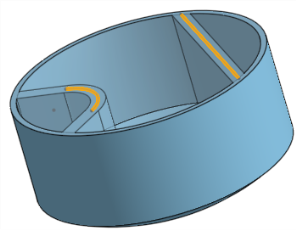
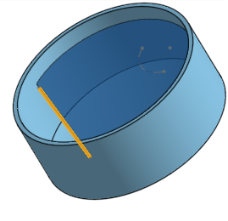
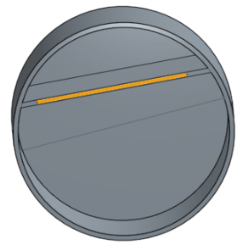
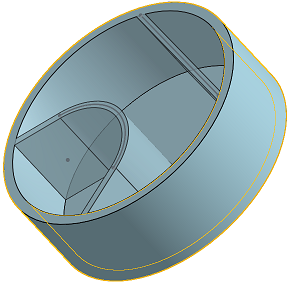
將肋材延伸平行於草圖平面:
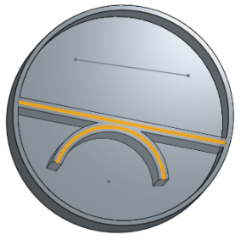
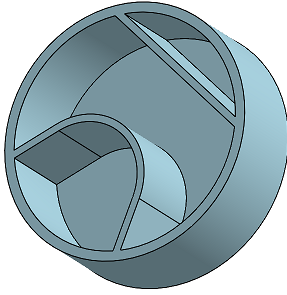
將草圖輪廓延伸至零件邊線:
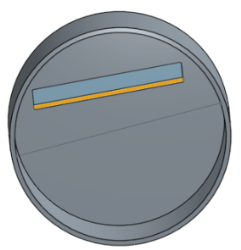
將肋材與零件及其他相交的項目合併:
依據一個草圖在零件的多個位置上建立肋材。
步驟
- Tap Rib tool

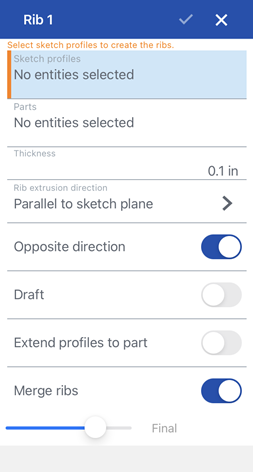
- 選擇要用來建立肋材的草圖曲線。
- 選擇要吸收肋材的零件。
- 指定所需的肋材厚度。
- Indicate how to extend the rib:
- 垂直於草圖平面 - 垂直正交於草圖平面
- Parallel to sketch plane - parallel to the sketch plane
- 選擇性地切換相反方向來變更肋材的方向。
- 選擇性地切換拔模在肋材的兩側套用錐形拔模。在「拔模角度」欄位中指定度數。切換相反方向來反轉拔模的方向。
- 選擇性地切換延伸輪廓至零件 - 在草圖曲線並未與零件相交的情況下,會將草圖曲線延伸至零件上。會延伸直線,弧則是從尾端以直線延伸。
- 選擇性地切換合併肋材來將肋材加至現有的零件中。將合併肋材保留為關閉則會產生肋材的單獨新零件。
範例
- 輕觸「肋材」工具。
- 選擇要用來建立肋材的草圖曲線。

- 選擇要吸收肋材的零件。
- 指定所需的肋材厚度。
- 指定肋材延伸的方式:垂直 (正交) 於肋材草圖平面,或平行於草圖平面。如果需要,使用相反方向的切換。
- 選擇性地切換拔模在肋材的兩側套用錐形拔模。在「拔模角度」欄位中指定度數。切換相反方向來反轉拔模的方向。
- 在草圖曲線並未與零件相交的情況下,選擇延伸輪廓至零件來將草圖曲線延伸至零件上。會延伸直線,弧則是從尾端以直線延伸:
- 切換開啟合併肋材來將肋材加至現有的零件中。
- 輕觸核取記號。
肋材必須完全在零件的邊界之內,否則操作會失敗。
依據一個草圖在零件的多個位置上建立肋材。
步驟
- 輕觸「肋材」工具。
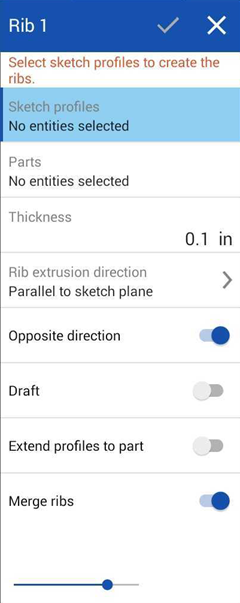
- 選擇要用來建立肋材的草圖曲線。
- 選擇要吸收肋材的零件。
- 指定所需的肋材厚度。
- Indicate how to extend the rib:
- 垂直於草圖平面 - 垂直正交於草圖平面
- Parallel to sketch plane - parallel to the sketch plane
- 選擇性地切換相反方向來變更肋材的方向。
- 選擇性地切換拔模在肋材的兩側套用錐形拔模。在「拔模角度」欄位中指定度數。切換相反方向來反轉拔模的方向。
- 選擇性地切換延伸輪廓至零件 - 在草圖曲線並未與零件相交的情況下,會將草圖曲線延伸至零件上。會延伸直線,弧則是從尾端以直線延伸。
- 選擇性地切換合併肋材來將肋材加至現有的零件中。將合併肋材保留為關閉則會產生肋材的單獨新零件。
範例
- 輕觸「肋材」工具。
- 選擇要用來建立肋材的草圖曲線。
- 選擇要吸收肋材的零件。
- 指定所需的肋材厚度。
- 指定肋材延伸的方式:垂直 (正交) 於肋材草圖平面,或平行於草圖平面。如果需要,使用相反方向的切換。
- 選擇性地切換拔模在肋材的兩側套用錐形拔模。在「拔模角度」欄位中指定度數。切換相反方向來反轉拔模的方向。
- 在草圖曲線並未與零件相交的情況下,選擇延伸輪廓至零件來將草圖曲線延伸至零件上。會延伸直線,弧則是從尾端以直線延伸:
- 切換開啟合併肋材來將肋材加至現有的零件中。
- 輕觸核取記號。
肋材必須完全在零件的邊界之內,否則操作會失敗。