与 ClassLink 集成
![]()
![]()
![]()
在开始整合过程之前,您必须已经申请并核准了 Onshape Enterprise 帐户或试用版,并且拥有 Onshape Enterprise 域名。
Enterprise 域名的一个例子可能是:MyCompanyName.onshape.com。
请注意,您一次只能使用一个 SSO 提供程序。
如果没有为您的组织自定义参数值,此配置过程可能会失败。使用您的自定义 SSO 身份提供商(例如:Okta、PingOne 或 ClassLink)仪表板将 Onshape 添加为应用程序,并记录特定于您的组织的值。以下过程需要这些值。
Onshape 签署所有发出的 SAML 认证申请。您无需上传任何证书(例如,SAML 签名证书),ADFS 集成除外,因为 ADFS 会验证传入的 SAML 请求。请注意,Microsoft 还建议从最新版本的 ADFS 迁移到微软 Entra ID。有关更多信息,请参阅 ADFS 概述。
通常,SSO 提供商为单一企业进行配置。若需采用多租户配置(即一个 SSO 服务商对应多个企业)并使用 SAML 2.0 协议时,管理员必须使用 com.onshape.saml2.sp.<域前缀> 作为 OnShape 图元 ID,同时选中“使用带有公司域名前缀的 entityId”方框。具体操作请参阅下文“在 Onshape 中配置 SSO 提供商”部分。
将 Onshape 添加到您的 ClassLink 单点登录帐户
-
导航到 ClassLink SAML 控制台,然后在 CompanyName 输入框中输入以下值:
-
元数据 URL 或文本 - 客户必须提供 ClassLink IDP 元数据 URL。
-
登录 URL - 分区代码将添加到“登录 URL”框中,或将此输入框留空以使用默认登录 URL
-
图标 URL - 单击此处,搜索应用程序,单击鼠标右键,然后复制链接地址以输入框中(如下所示)。

-
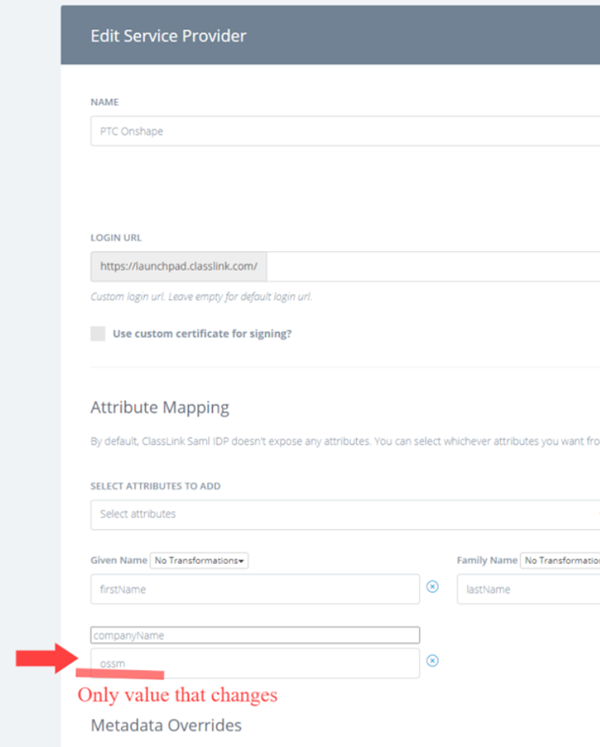
属性映射 - 输入以下属性:
-
选择“给定名称”并在框“firstName”中重命名。
-
选择族名称并在“lastName”框中重命名
-
选择“电子邮件”并在“电子邮件”框中重命名
-
选择“自定义特性”并重命名为“companyName”,然后输入您的公司名称。
公司名称与您的 Education Enterprise 的域名前缀相同。例如,如果您的 Onshape Enterprise 名称为 Fishbowl.onshape.com,请在输入框中输入 Fishbowl。
-
-
元数据替代
-
从输入框中选择要替代的 NameID 格式,然后选择“emailAddress”
-
从输入框中选择要替代的签名算法,然后选择“RSA_SHA256”
-
从输入框中选择要替代的 NameID 值,然后选择“电子邮件”
-
从输入框中选择要替代的 Saml NotBefore,然后添加 3
-
-
更新以进行保存。
选择并复制 IDP 初始登录 URL 以在本地库中添加应用程序。

Onshape 需要一个带有 Classlink 的 SSO 的元数据配置文件。请咨询 ClassLink 以获取和下载完成以下步骤所需的元数据文件。
在 OnShape 中配置 SSO提供程序
在身份提供程序中配置了 Onshape 并下载了身份提供程序的元数据文件(在 Onshape 中称为配置文件)后,即可在 Onshape 中配置 SSO提供程序。
下面的示例图像显示了正在配置的通用身份提供程序,但所有身份提供程序的步骤都相同。
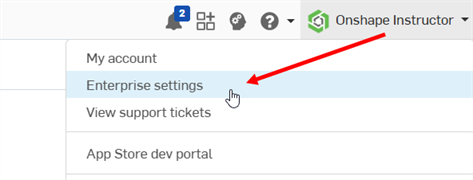
- 以管理员身份使用专门的域名登录您的 Onshape Enterprise 帐户。从帐户中选择“Enterprise 设置”:
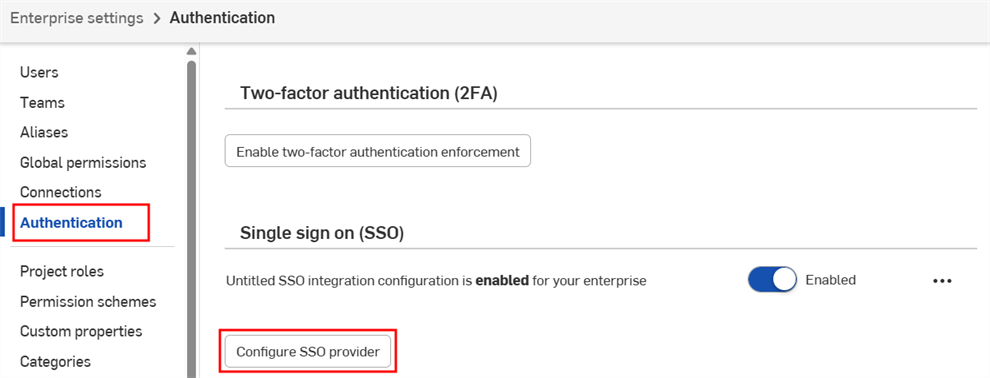
- 从左侧导航菜单中选择“身份验证”。
-
在单点登录 (SSO) 子部分中,单击“配置 SSO 提供程序”按钮:
-
“创建 SSO 提供程序”对话框打开:

-
在“名称”输入框中,输入名称,例如“自定义 SSO”
-
在“提供程序类型”下拉列表中,从列表中选择您的 SSO 提供程序。
-
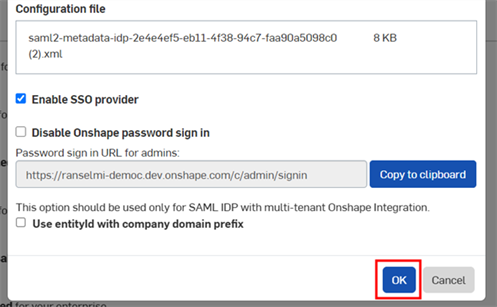
选中“启用 SSO 提供程序”。
-
暂时取消选中“禁用 Onshape 密码登录”。
-
如果您有多租户设置(具有多个企业的 SSO 提供程序),请选中使用带公司域前缀的实体 ID。
-
单击“上传配置文件”按钮:
禁用 Onshape 密码登录会禁用您和您的用户使用典型的 Onshape 密码登录。对于 Onshape URL,仅显示 SSO 提供程序登录提示。在选中此选项之前,请确保您可以自己(以管理员身份)登录 Onshape。您可以稍后返回此处,并在验证通过 SSO 提供程序登录后将其启用。
选择通过 SSO 强制登录到 Onshape 还会导致用户无法直接登录到非企业域,例如 cad.onshape.com。
通常,SSO 提供商是为一个 Enterprise 设置的。如果使用 SAML 2.0 设置多租户配置(具有多个企业的 SSO 提供商),则管理员必须使用 com.onshape.saml2.sp.<domain prefix> 作为 OnShape 实体 ID,并选中“使用带公司域前缀的 entityid”复选框。
-
-
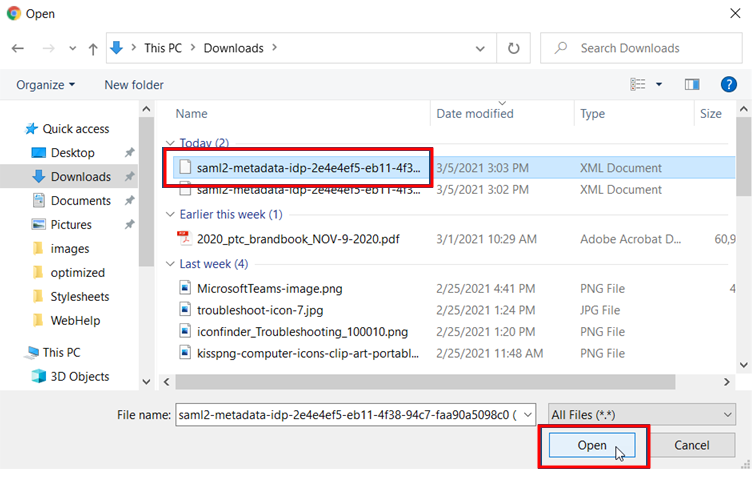
找到并选择之前下载的元数据配置文件,然后单击“打开”。
-
单击“确定”:
-
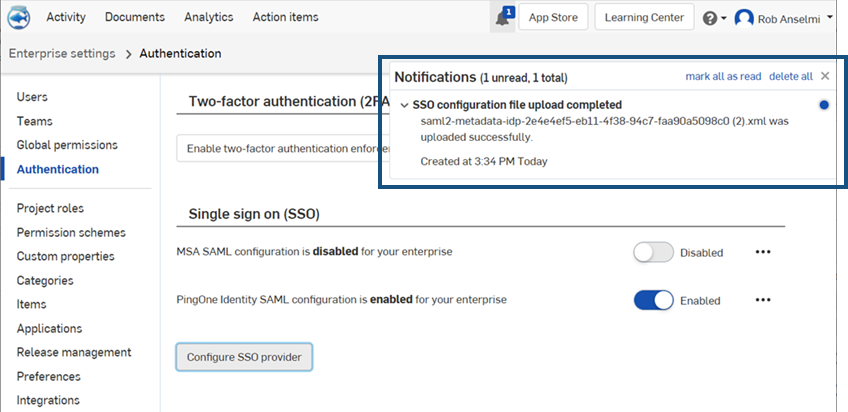
将上传该文件。上传完成后,系统会显示通知:
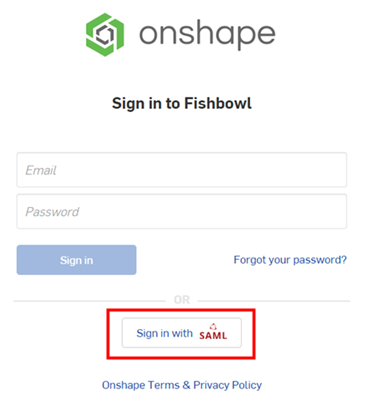
- 退出登录 Onshape 和SSO 身份提供程序帐户。请确保针对两个帐户页面执行硬刷新。再次到达 Onshape 登录页面时,该页面的底部有一个用于单点登录提供程序的新登录链接。
要登录到 Onshape,管理员必须(在其单点登录帐户中)将其用户配置为使用 Onshape 应用程序。