 使用
使用
![]()
![]()
![]()
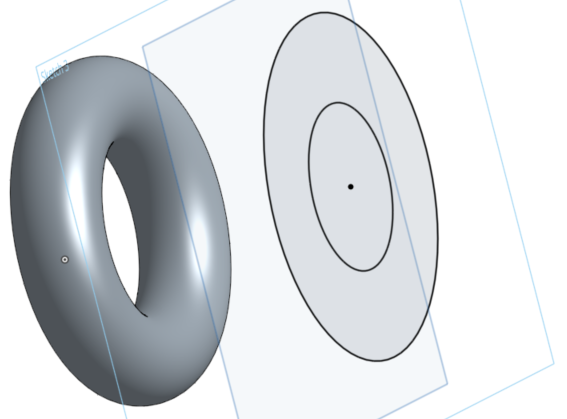
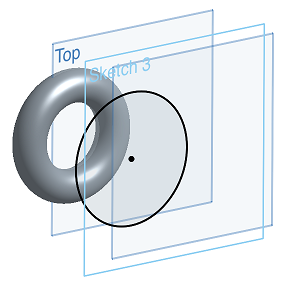
将零件或草图的边、边和侧面影像边缘投影(或转换)到活动草绘平面上。
快捷键:u
步骤
- 创建一个草图或零件。
- 开始再绘制一个草图。
- 点击
 ,然后是第一个草图或零件的边、边或侧面影像边。
在本例中,选择的是零件的亮显边,要将其用(投影)到草图平面上,从而得到亮显的水平线。
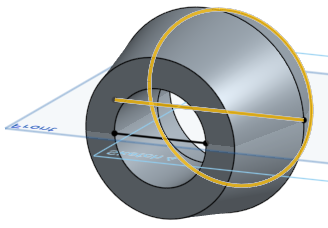
将光标悬停在图元上时,将显示投影线的预览。
使用側影輪廓邊線
当查看垂直于草图的模型时,任何不是边的可见边界都是侧面影像边;曲面从面向你过渡到朝向远离你。
如何使用剪影边缘?
- 单击 。
请注意,侧面影像边没有预选行为。
- 将鼠标悬停在你想要剪影边缘的脸上。
你应该看到亮点。如果实际的侧面影像边缘不在草图平面内,则会看到两个。一个是 “真实” 的剪影边缘,一个是草图平面中的投影。两者都是可选的。
- 将光标悬停在亮显轮廓上方,然后单击以投影该轮廓。(在上图中,为了选择而将光标悬停在其上方的轮廓以黄色亮显。)
请注意,当有多个轮廓边可用时,您可以单击一个面来选择所有轮廓边,或者将鼠标悬停在单个轮廓边上,然后单击仅选择要使用的轮廓边:
悬停光标时亮显如下所示:
选择并投影到其他平面上后:
将光标悬停在图元上时,将显示投影线的预览。
如果未看到亮显,可能遇到了限制,请参见下文的提示。
提示
- 当底层几何图元发生变化时,使用的所有边都会更新。但是,这不会对因模型变化而引起的几何图元类型变化(圆到线等)做出很好的反应。
- Onshape 的“使用”功能在某些方面可能与其他系统不同,包括:
- Onshape 不限制轮廓边的末端。您可以选择如何修复末端。
- Onshape 不区分轮廓的曲率变化,如此示例中有孔穿过的圆柱:

- Onshape 不使用面,比如上面有孔的圆柱体,它会自动提取边缘或轮廓边缘并将它们全部缝合在一起。
- Onshape 仅使用可追踪的轮廓边。这样可以确定轮廓边稍后仍可以更新。
- 支持的侧面影像边缘包括:圆柱体、圆锥体、圆锥体、球体、挤出曲面以及任何具有一条侧面影像边缘的曲面。
- 投影后自相交的轮廓边不可用。
Project (or convert) an edge, edges, and silhouette edges of a part or sketch onto the active sketch plane.
Steps
- Create a sketch or part.
- Start another sketch.
- Tap , then select an edge, edges, or silhouette edge from the first sketch or part.
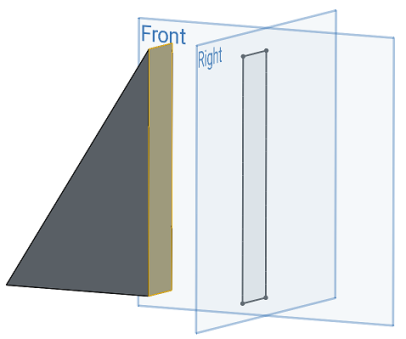
Here, the highlighted face was selected to use (project) onto the Right sketch plane, resulting in the black sketch lines that form a rectangle on the Right sketch plane.
Using silhouette edges
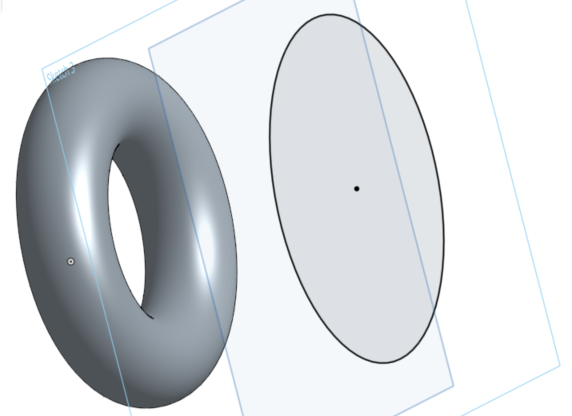
When viewing a model normal to a sketch any visible boundary that isn't an edge is a silhouette edge; where the surface transitions from facing you to facing away from you.
How does using a silhouette edge work?
- Tap .
- Use the Precision selector to hover over the face for which you want a silhouette edge. See Selection for more info.
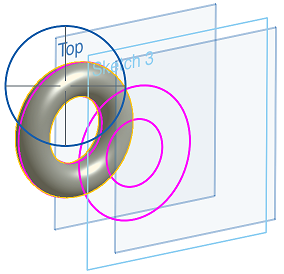
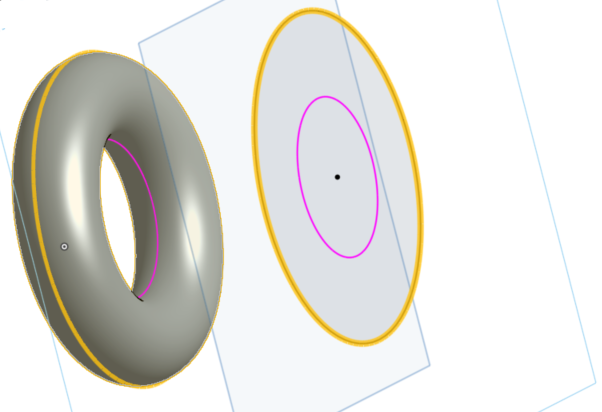
The projection of the silhouette edge appears in pink on the active sketch plane.
- Hover over (line the cross-hairs up with) a specific pink silhouette edge section and it turns yellow to indicate that it is selected. Release to select it and that silhouette edge is now projected onto your current sketch plane.
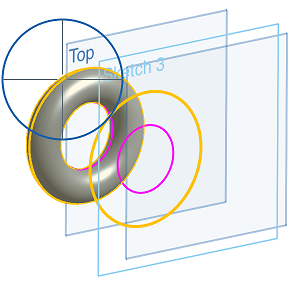
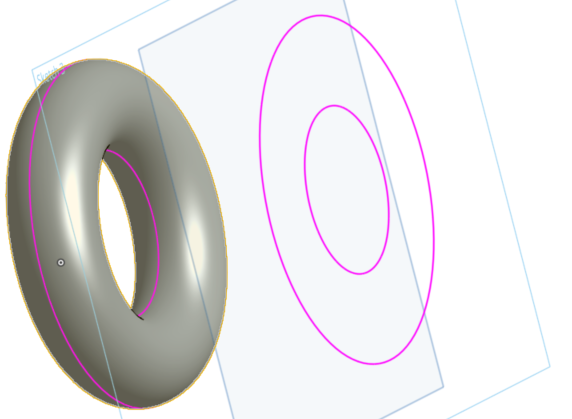
- If you do not specify a selection by hovering over a pink silhouette edge to turn it yellow, then releasing to select will project all of the silhouette edge options.

This may be used as a more efficient way of projecting an entire silhouette edge at once.
There is NO pre-select behavior for silhouette edges.
Tips
- All used edges update when the underlying geometry changes. However, this doesn't react well to changes of geometry type (circle to line, etc.) causes by model changes.
- Some things about Onshape Use may be different from other systems, including:
- Onshape does not constrain the ends of the silhouette edge. You are able to choose how to fix the ends.
- Onshape does not distinguish between "bits" of silhouette edges, like in this example of a cylinder with a hole through it:
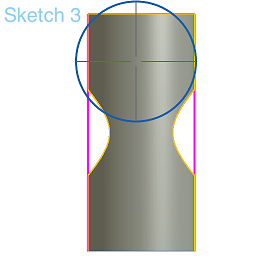
- Onshape does not use a face, like the cylinder above with a hole through it, and automatically extract either edges or silhouette edges and sew them all together.
- Onshape only uses silhouette edges that are trackable. This enables that the silhouette edge can still be updated later.
- Supported silhouette edges include cylinders, cones, tori, spheres, extruded surfaces, and any surface with one silhouette edge.
- Silhouette edges that are self-intersecting after projection are not usable.
Project (or convert) an edge, edges, and silhouette edges of a part or sketch onto the active sketch plane.
Steps
- Create a sketch or part.
- Start another sketch.
- Tap , then select an edge, edges, or silhouette edge from the first sketch or part.
Here, the highlighted face was selected to use (project) onto the Right sketch plane, resulting in the black sketch lines that form a rectangle on the Right sketch plane.
Using silhouette edges
When viewing a model normal to a sketch any visible boundary that isn't an edge is a silhouette edge; where the surface transitions from facing you to facing away from you.
How does using a silhouette edge work?
- Tap .
- Use the Precision selector to hover over the face for which you want a silhouette edge. See Selection for more info.
The projection of the silhouette edge appears in pink on the active sketch plane.
- Hover over (line the cross-hairs up with) a specific pink silhouette edge section and it turns yellow to indicate that it is selected. Release to select it and that silhouette edge is now projected onto your current sketch plane.
- If you do not specify a selection by hovering over a pink silhouette edge to turn it yellow, then releasing to select will project all of the silhouette edge options.
Use this as a more efficient way of projecting an entire silhouette edge at once.
There is NO pre-select behavior for silhouette edges.
Tips
- All used edges update when the underlying geometry changes. However, this doesn't react well to changes of geometry type (circle to line, etc.) causes by model changes.
- Some things about Onshape Use may be different from other systems, including:
- Onshape does not constrain the ends of the silhouette edge. You are able to choose how to fix the ends.
- Onshape does not distinguish between "bits" of silhouette edges, like in this example of a cylinder with a hole through it:
- Onshape does not use a face, like the cylinder above with a hole through it, and automatically extract either edges or silhouette edges and sew them all together.
- Onshape only uses silhouette edges that are trackable. This means that the silhouette edge may still be updated later.
- Supported silhouette edges include cylinders, cones, tori, spheres, extruded surfaces, and any surface with one silhouette edge.
- Silhouette edges that are self-intersecting after projection are not usable.