企业设置 - 身份验证
![]()
仅适用于
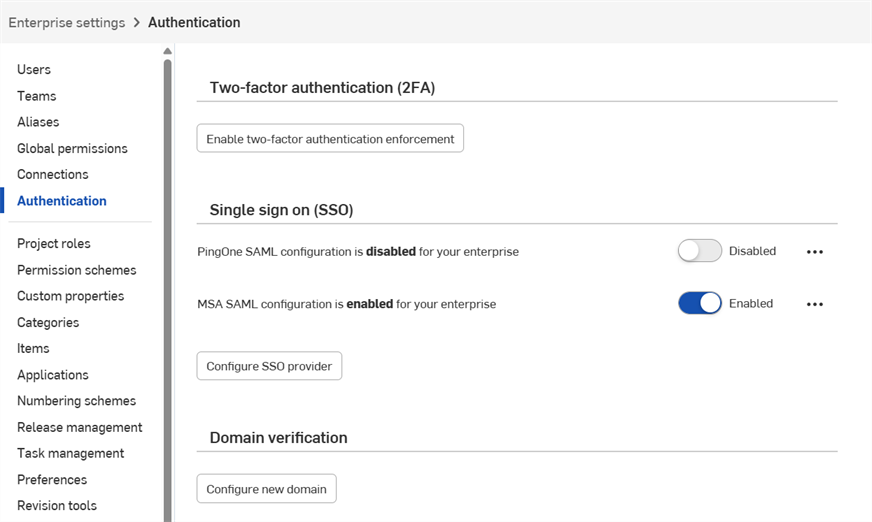
配置和管理双重身份验证 (2FA)、单点登录 (SSO) 和域验证。
若要在 Onshape 中导航到您的“认证”设置,请单击您位于 Onshape 窗口的右上角的帐户用户图标 (![]() )。这将打开一个下拉菜单。单击“公司/教室/企业设置”。
)。这将打开一个下拉菜单。单击“公司/教室/企业设置”。
在页面左侧的列表中单击“身份认证”:
Onshape 强烈建议利用双重身份验证功能。通过双重身份验证 (2FA),您可以将 Onshape 帐户配置为要求输入多个密码才能登录。使用一个密码登录到网站使您更容易受到安全威胁,因为一条静态信息可能很容易猜测或获取。有了双重身份验证,要求输入第二条信息,这第二条信息在登录过程中动态地生成,并且在您每次登录时可以不同。
我们强烈建议您对 Onshape 以及您使用的所有支持双重身份验证的网站使用双重身份验证。
将双重身份验证应用程序(如 Google Authenticator)下载到您的手机上,然后通过 Onshape 用户界面对其进行设置。这样可使该应用程序生成 Onshape 可以识别的一次性代码。一旦您在 Onshape 中启用双重身份验证,Onshape 便会在您使用密码登录后提示您输入双重身份验证代码。
您可以允许双重身份验证机制记住您登录时所在的设备,以便在您从特定设备上使用双重身份验证登录到 Onshape 后,30 天内无需双重身份验证代码即可在该设备上登录。
- 将双重身份验证应用程序下载到您的设备上。
- 登录到您的 Onshape 帐户。
- 在用户名下的菜单中,选择我的帐户。
- 在页面左侧的列表中,单击安全。
- 在双重身份验证的右侧,单击启用。
- 单击设置双重身份验证。
- 确认密码。
- 单击确定。
Google Authenticator 就是一个例子。
从上面的说明继续:
- 使用您设备上的 Authenticator 应用程序扫描 Onshape 用户界面中显示的二维码。
- 输入双重身份验证应用程序生成的六位数代码或由 Onshape 提供的代码。
- 单击“启用”。
- 显示恢复代码时,将其复制到一个安全的地方。如果您的手机或身份验证应用程序不在身边,您需要访问这些代码。
- 单击确定。
注册完成后,手机应用程序将为您创建的每个注册列出一个代码。当显示双重身份验证登录页面时,您要在 Onshape 中输入的就是这些代码。
如果您无法使用二维码,请单击 Onshape 界面中提供的输入此文本代码链接以获取代码。
Onshape 一次为您提供 5 个有效的恢复代码。请将这些代码存放在一个可与您的设备或身份验证应用程序分开访问的地方。
如果您删除了应用程序或丢失了手机,Onshape 将无法帮助您。
您可随时通过 Onshape 界面生成这些恢复代码,但是在任何时间都只有最近生成的序列是有效代码。一旦您使用了某个代码,它便不再有效。生成新的代码列表时,所有之前的代码(已用或未用)都会变为无效。
启用双重身份验证后,Onshape 会在您登录时提示输入代码:
- 输入 Onshape 帐户的密码后,系统会提示您输入身份验证代码。
- 打开设备上的双重身份验证应用程序以查看代码,然后在 Onshape 中输入代码。
- 单击“验证”。
如果无法访问应用程序,请单击输入双重恢复代码链接以输入当前的恢复代码之一。
您可随时禁用(并重新启用)双重身份验证。
- 在 Onshape 中“用户个人资料”页面的安全 选项卡上,单击“管理”,然后单击“禁用”:
- 确认密码。
- 单击确定。
如果您需要更换为 Onshape 启用了双重身份验证的设备:
- 在更换设备之前,通过 Onshape 界面禁用双重身份验证。
- 在新设备联机后启用双重身份验证。
请注意,Onshape 不支持“更换双重身份验证”选项。
请参见“配置与身份提供商的集成”。
出于安全原因,Onshape 不允许将现有的 Onshape 帐户添加到新的 Enterprise 中。
从未使用过 Onshape 的新用户会被立即添加到 Enterprise 中。
如果用户由管理员手动添加到 Enterprise,或者使用单点登录 (SSO),并且该用户是“Onshape 已知用户”,那么他们在首次登录时并不会立即被添加到该 Enterprise。相反,他们会收到一封包含“加入 Enterprise”链接的电子邮件,需要单击该链接以确认加入该 Enterprise。在单击此链接之前,他们将无法登录该 Enterprise。
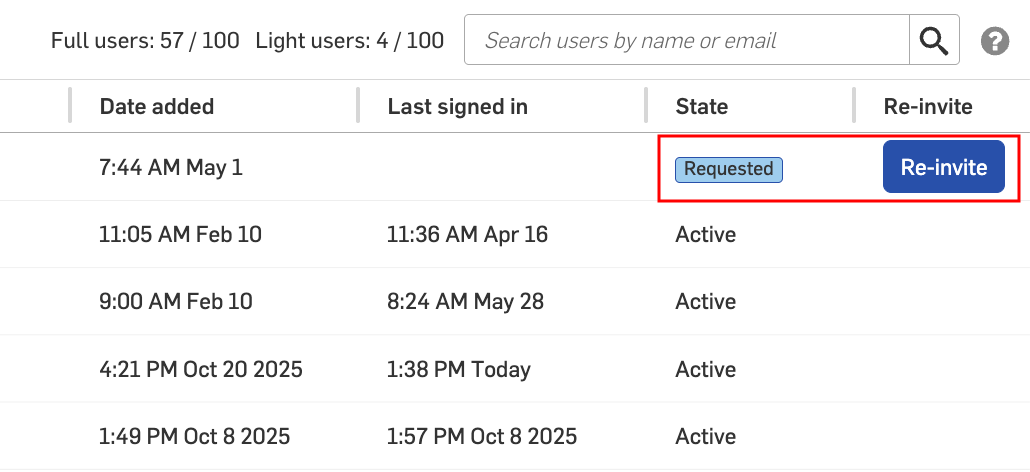
管理员可以在“用户”页签中查看已收到加入企业请求的用户。用户的状态会在“状态”列中显示为“已请求”。
邀请仅在 48 小时内有效。此时间过后,管理员可以单击“重新邀请”按钮发送新的邀请:
当域验证设置完成后,用户会被自动添加到 Enterprise 中,并处于“活跃”状态。用户无需自行加入 Enterprise。
如果您使用的是带有域白名单的 Google SSO,则无需设置域验证。用户会被立即添加并处于“活跃”状态。
创建域验证
-
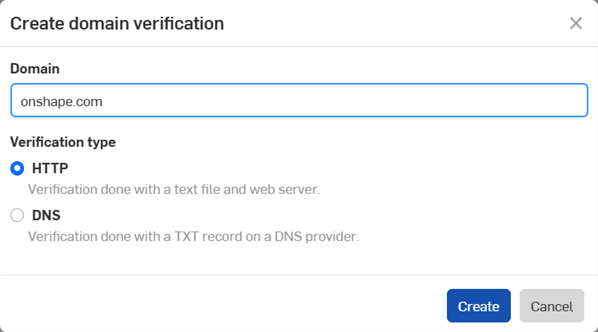
单击“配置新域”按钮。“创建域验证”对话框打开:
-
进入 Enterprise 域。
-
选择验证类型:
-
HTTP - 使用文本文件和 Web 服务器完成验证。
-
DNS - 使用 DNS 提供商上的 TXT 记录完成验证。
-
-
单击“创建”按钮。
-
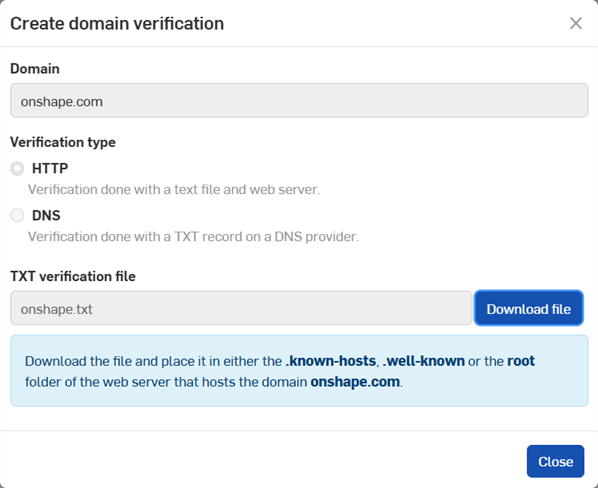
单击“下载文件”按钮以保存文件。
-
单击关闭按钮。
-
对于 HTTP 验证,请将下载的文本 (.txt) 文件放置在域的 .known-hosts、.well-known 或 root 文件夹中。对于 DNS 验证,请在 DNS 设置中为此域创建一个 TXT 记录。
-
单击“溢出菜单”图标 (
 ),然后选择“验证”以验证域。
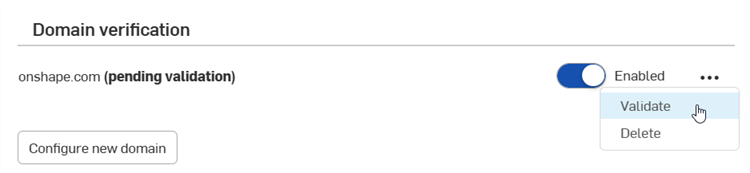
使用溢出菜单左侧的切换开关来启用/禁用域。
要删除域,请单击溢出菜单图标 (![]() ),然后选择“删除”。
),然后选择“删除”。
可以配置和启用多个域。