 扫掠
扫掠
![]()
![]()
![]()
可用于:Part Studio
创建、添加至、从零件中减去或相交零件和曲面(通过沿路径扫掠草图区域、平面、线或曲线),或创建薄壁零件(通过沿路径扫掠草图区域、平面、线或曲线)。添加可选的轮廓控制(通过方向、锁定面或锁定方向)、扭曲(通过圈数、角度或螺距)和缩放。
“扫掠”特征沿路径扫掠轮廓,以创建经过扫掠的实体、曲面或薄层实体。
要创建扫掠,需要路径和轮廓。
路径可能由一个或多个草图图元、整个草图、曲线或模型边组成。
轮廓可以关闭或打开。使用闭合轮廓草图或零件面创建实体扫掠。
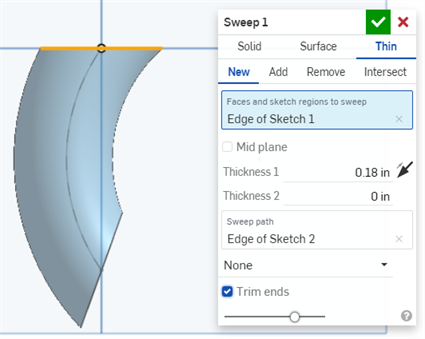
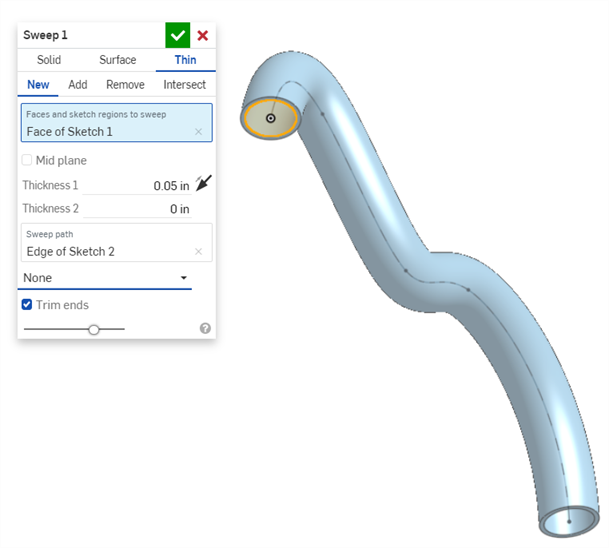
使用开放式轮廓时,可以扫掠曲面或薄层实体。对于薄层实体,“厚度 1”和“厚度 2”定义任一方向的厚度。此外,选中“中间平面”可将 2 个独立的厚度值替换为对称的厚度值,并使绘制的轮廓草图保持在薄层扫掠的中心位置。
您也可以使用“薄层”选项扫描闭合轮廓。结果是一个空心的、经过扫掠的实体。
要创建扫掠曲面,请选择曲面选项,并选择闭合或开放式草图作为扫掠轮廓。
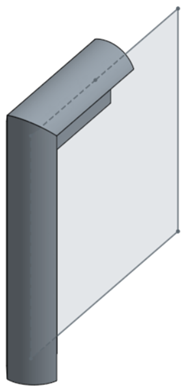
此处以 U 型螺栓为例。
首先,创建并完全约束草图路径。然后,为要沿路径扫掠的轮廓创建草图。
创建轮廓草图时,最佳做法是选择垂直于路径尽头的草图平面。在此示例中,路径草图的终点是前平面,因此不需要构造平面。在其他情况下,创建垂直于路径尽头的曲点构造平面将有助于对齐轮廓。
绘制扫掠轮廓草图。在这个 U 形螺栓示例中,一个圆沿着路径横过。绘制一个圆并添加一个尺寸。
扫掠时的另一种最佳做法是通过定义重合约束或穿孔约束将轮廓草图约束到路径草图中。例如,使用圆心和路径草绘端点之间的重合约束来约束此草图。
现在,路径和轮廓草图已经完成,创建一个“扫掠”特征。接受草图,然后从工具栏中选择“扫掠”工具。选择圆形草图区域作为轮廓,选择 U 形草图作为路径。
选择路径时,您可以左键单击路径的各个部分,逐一选择它们,或者通过在特征列表中选择整个草图来选择整个草图。
如果轮廓草图位于路径沿线的某个位置而非路径的尽头,则“扫掠”特征会沿所选路径的整个长度向双向扫掠轮廓。
- 单击
 打开“扫掠”对话框:
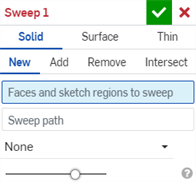
- 选择实体创建类型。
- 选择结果操作类型:
- 新建 - 创建新实体
- 添加 - 添加到现有实体
- 移除 - 从现有实体中减去
- 相交 - 保持两个(或更多)实体的交点
- 选择要扫掠的面和/或草图面域。
- 单击以激活扫掠路径输入框。选择草图上的一条线段或曲线或者零件上的一条边。
- 选择“轮廓控制类型”:
- 无 - 没有轮廓控制(保持与全局平面的轮廓关系)。
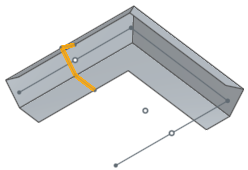
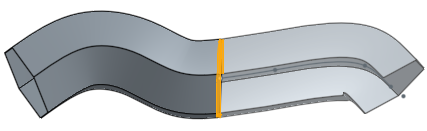
- 保持轮廓方向 - 保持扫掠路径上的轮廓关系。
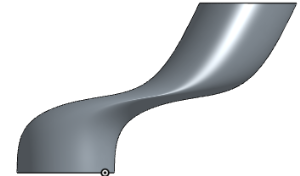
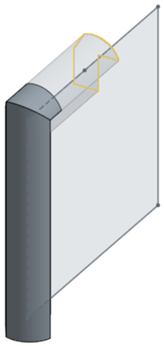
选择“保持轮廓方向”的“扫掠”示例(上图)。
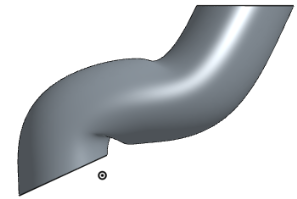
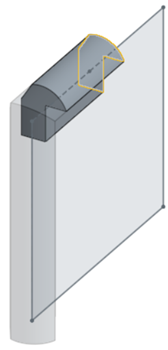
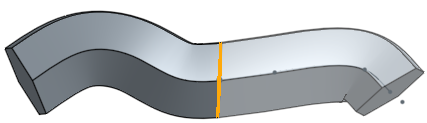
在未选择“保持轮廓方向”的情况下进行扫掠的示例(上图)。
-
锁定轮廓面 - 将选定的一个或多个轮廓面锁定到位。
-
锁定轮廓方向 - 将扫掠的轮廓方向锁定到位。(选择锁定方向。)
- Optionally, select the Twist checkbox and select the following Twist type and additional options:
- Turns - Allows you to specify how many total rotations the profile should make before the end of the sweep path.
- Angle - Allows you to specify the angle in which the profile should rotate at the end of the sweep path.
- Pitch - Allows you to specify the frequency in which the profile should make a full revolution around the path.
- Opposite direction - Click the Opposite direction arrow to the right of the Sweep path field to create a sweep that starts from the opposite end of the Sweep path.
- Extend to full path - When enabled, this creates a sweep along the entire path.
- (可选)选中“缩放”复选框并输入“比例因子”。这允许您在扫掠结束时按比例变换扫掠轮廓的整体大小。
- 如有必要,请选择“合并范围”(或“全部合并”),以选择与新(其他)零件合并的零件。
- 单击
 。
。
- 单击 打开“扫掠”对话框:
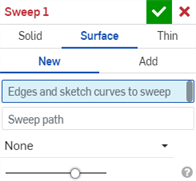
- 选择曲面创建类型。
- 选择结果操作类型:
- 新建 - 创建新曲面
- 添加 - 添加到现有曲面
- 选择要扫掠的边和草图曲线。
- 单击以激活扫掠路径输入框。选择草图或边上的一条线段或曲线。
- 选择“轮廓控制类型”:
- 无 - 没有轮廓控制(保持与全局平面的轮廓关系)。
- 保持轮廓方向 - 保持扫掠路径上的轮廓关系。
-
锁定轮廓面 - 将选定的一个或多个轮廓面锁定到位。
-
锁定轮廓方向 - 将扫掠的轮廓方向锁定到位。(选择锁定方向。)
选择“保持轮廓方向”的“扫掠”示例(上图)。
在未选择“保持轮廓方向”的情况下进行扫掠的示例(上图)。
- Optionally, select the Twist checkbox and select the following Twist type and additional options:
- Turns - Allows you to specify how many total rotations the profile should make before the end of the sweep path.
- Angle - Allows you to specify the angle in which the profile should rotate at the end of the sweep path.
- Pitch - Allows you to specify the frequency in which the profile should make a full revolution around the path.
- Opposite direction - Click the Opposite direction arrow to the right of the Sweep path field to create a sweep that starts from the opposite end of the Sweep path.
- Extend to full path - When enabled, this creates a sweep along the entire path.
- (可选)选中“缩放”复选框并输入“比例因子”。这允许您在扫掠结束时按比例变换扫掠轮廓的整体大小。
- 如有必要,请选择“合并范围”(或“全部合并”),以选择与新(其他)零件合并的零件。
- 单击 。
- 单击 打开“扫掠”对话框:
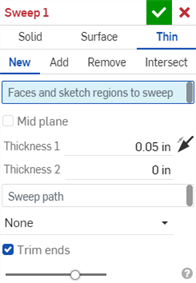
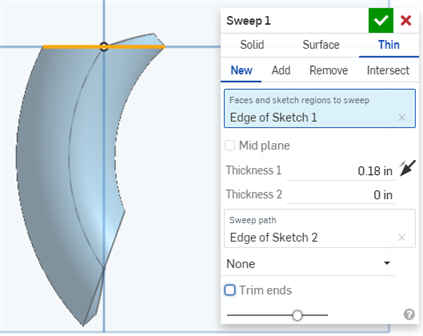
- 选择薄层创建类型。
- 选择结果操作类型:
- 新建 - 创建新的薄层扫掠
- 添加 - 添加到现有实体
- 移除 - 从现有实体中减去
- 相交 - 保持两个(或更多)实体的交点
- 选择要扫掠的面、单条曲线、草图面域和/或草图轮廓。
- 执行以下操作之一:
- 要创建具有对称厚度的扫掠,请选中中间平面选项,然后输入厚度值。
- 若要指定单个壁厚,取消选中“中间平面”选项。然后,输入厚度 1 的壁值和厚度 2 的壁值。单击反转壁箭头以将“厚度 1”与“厚度 2”反转。
- 单击以激活扫掠路径输入框。选择草图上的一条线段或曲线或者零件上的一条边。
- 选择“轮廓控制类型”:
- 无 - 没有轮廓控制(保持与全局平面的轮廓关系)。
- 保持轮廓方向 - 保持扫掠路径上的轮廓关系。
锁定轮廓面 - 将选定的一个或多个轮廓面锁定到位。
锁定轮廓方向 - 将扫掠的轮廓方向锁定到位。(选择锁定方向。)
选择“保持轮廓方向”的“扫掠”示例(上图)。
在未选择“保持轮廓方向”的情况下进行扫掠的示例(上图)。
- Optionally, select the Twist checkbox and select the following Twist type and additional options:
- Turns - Allows you to specify how many total rotations the profile should make before the end of the sweep path.
- Angle - Allows you to specify the angle in which the profile should rotate at the end of the sweep path.
- Pitch - Allows you to specify the frequency in which the profile should make a full revolution around the path.
- Opposite direction - Click the Opposite direction arrow to the right of the Sweep path field to create a sweep that starts from the opposite end of the Sweep path.
- Extend to full path - When enabled, this creates a sweep along the entire path.
- (可选)选中“缩放”复选框并输入“比例因子”。这允许您在扫掠结束时按比例变换扫掠轮廓的整体大小。
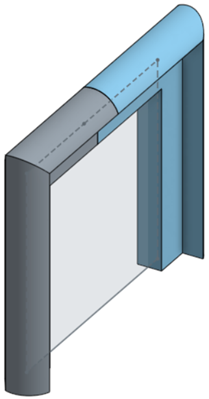
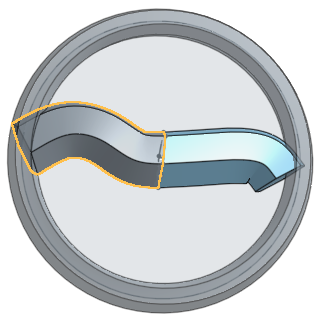
- 选中“修剪末端”选项,在扫掠路径的端点处开始和终止扫掠。取消选中该选项可创建与扫掠路径相切的端面。
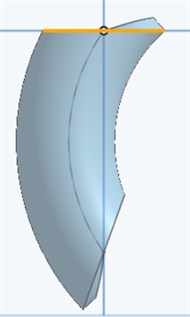
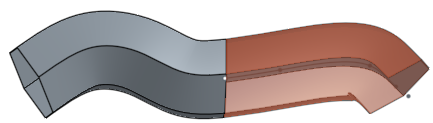
取消选中“修剪末端”选项的扫掠示例。
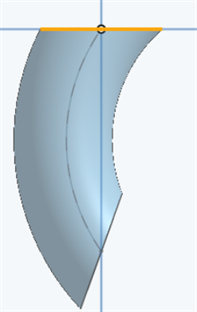
选中“修剪末端”选项的扫掠示例。
- 如有必要,请选择合并范围(或全部合并),以选择与新(其他)零件合并的零件。
- 单击 。
新建 - 创建新材料,从而产生新零件:
添加 - 向现有材料添加材料:
添加材料时,您可以选择将该材料和与其几何图元接触或相交的其他零件合并:
- 如果几何图元只与一个零件接触或相交,则该零件将自动添加到合并范围。
- 如果多个零件与几何图元接触或相交,则有不明确之处,您必须选择要与哪些零件合并(合并范围)。
- 作为选择多个接触的零件或相交零件的一种快捷方式,您可以选中“全部合并”以将所有接触的零件或相交零件添加到合并范围。
如果将布尔运算设置为“添加”、“移除”或“相交”而未在合并范围中设置任何选项,此特征将出错。对于“新建”,没有合并范围可用,因为“新建”不对结果进行布尔运算。
从现有材料中移除材料;不适用于曲面。
仅在几何图元相交的地方保留材料;不适用于曲面。
-
If the sweep feature references a face or sketch region that is along the sweep path (not at an end) the path is broken where the profile plane touches it and the sweep is created in both directions, for the length of the sweep path.
-
Profiles can be twisted and scaled, even if the profile being swept is not coincident to the end point of the Sweep path.
-
Onshape 会记住选择(“实体”、“曲面”或“薄壁”),并在后续操作中让打开的对话框中显示上次选择的选项。