変数スタジオコンフィギュレーション
![]()
![]()
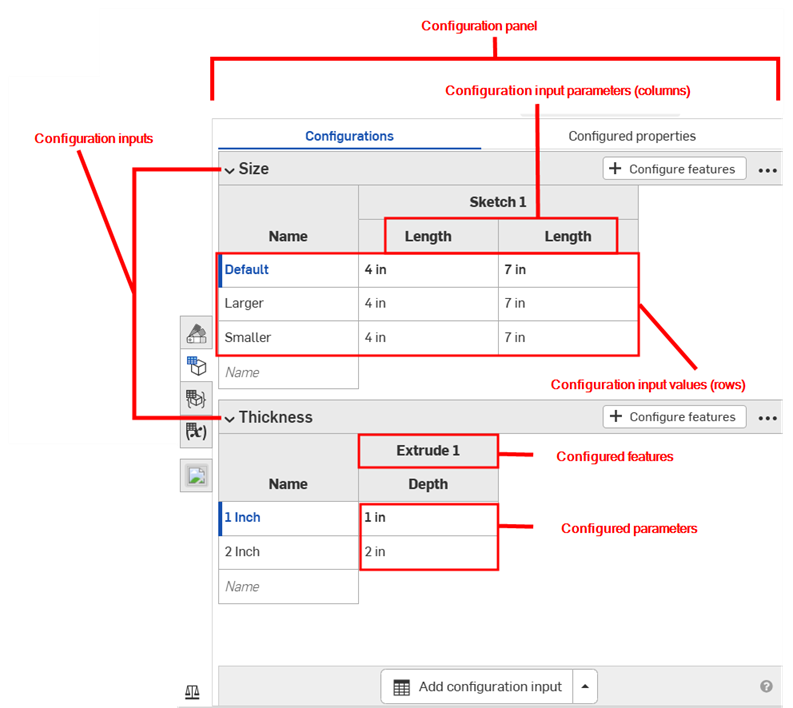
Onshape では、Part Studio やアセンブリを構成するのと同じ方法で変数スタジオを構成できます。
任意の変数の値または説明を構成できます。1 つの変数スタジオで構成したすべての値と説明はコンフィギュレーションと呼ばれます。1 つのコンフィギュレーションに複数のコンフィギュレーション入力を含めることができます。
変数スタジオで定義したコンフィギュレーション入力は、タブまたはドキュメントに変数スタジオを挿入するときに、[挿入] ダイアログのオプションになります。
- 変数スタジオウィンドウの右側にある
 アイコンをクリックして、コンフィギュレーションパネルを開きます。
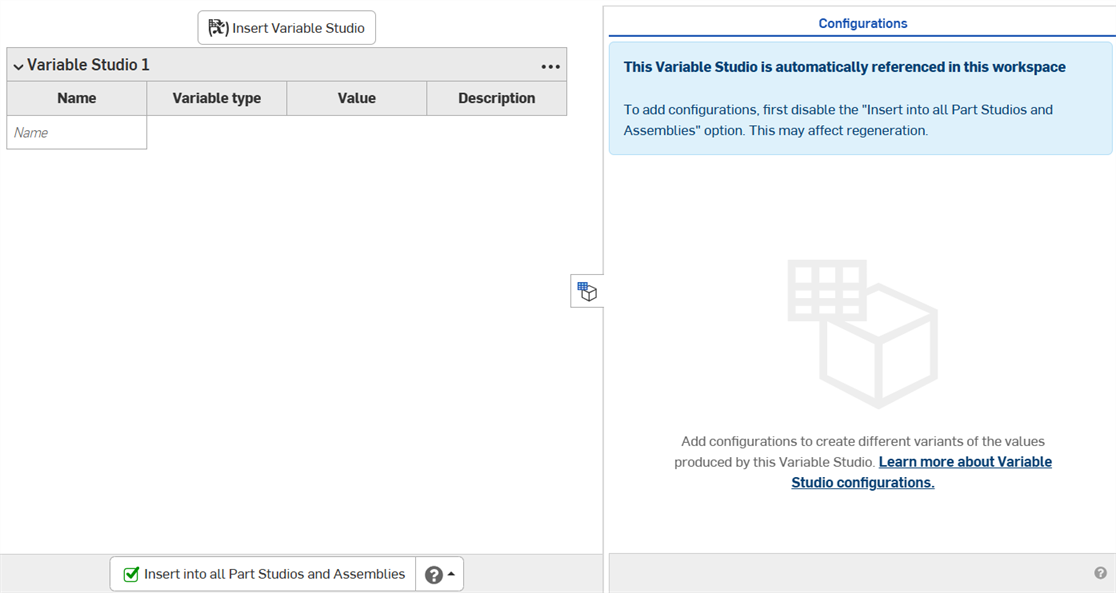
- 変数スタジオは、自動的に参照されている間は構成できません。[すべての Part Studio とアセンブリに挿入] チェックボックスをオフにしてください (構成済み変数テーブルを Part Studio またはアセンブリに挿入する場合は、挿入するコンフィギュレーションを選択する必要があります)。
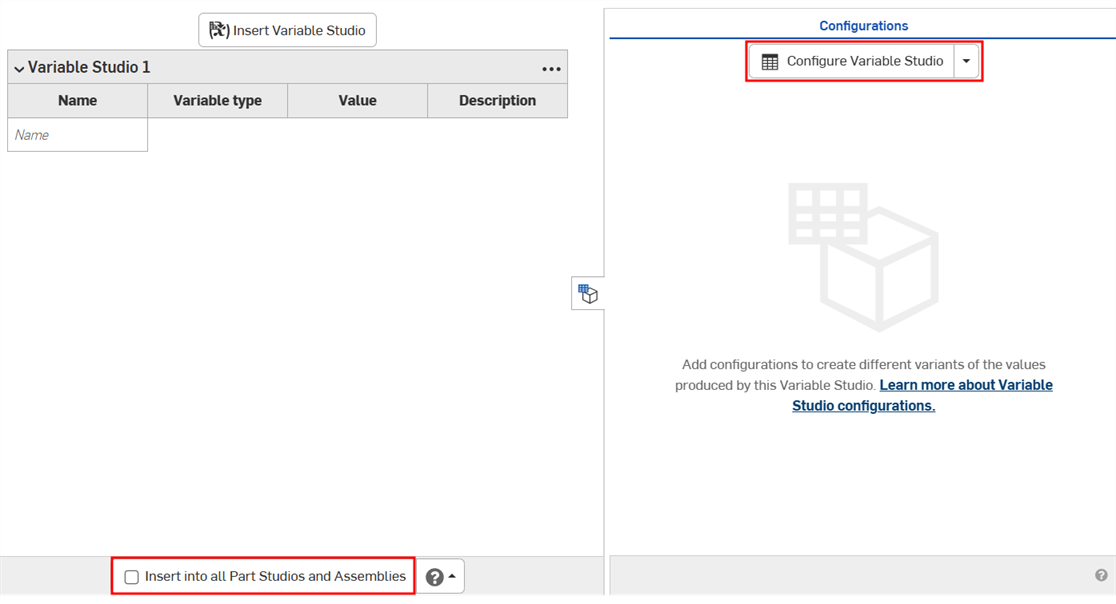
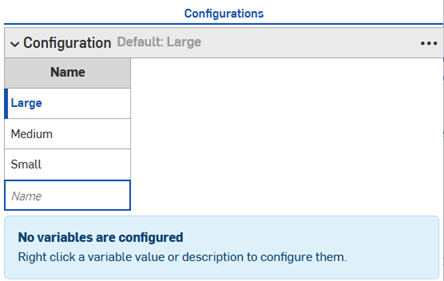
- [変数スタジオを構成] をクリックします。コンフィギュレーションパネルにコンフィギュレーション入力テーブルが表示されます。
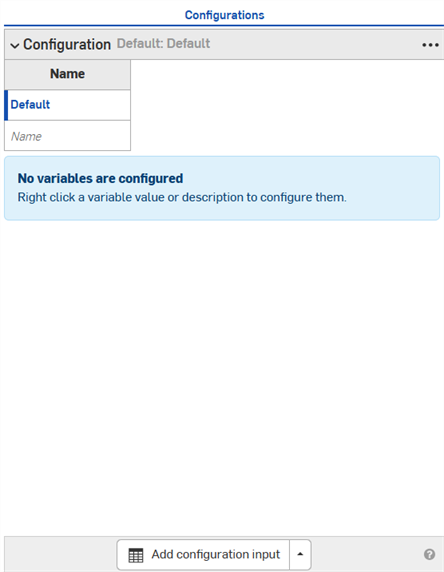
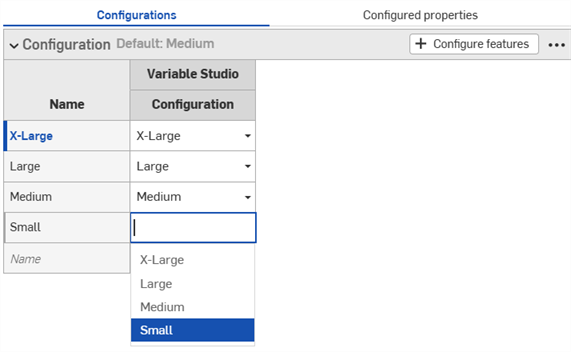
- 最初の行をクリックしてアクティブにし、最初の列に入力値の名前を入力します。次の行に移動するには Tab キーを押します。行の左側にある青いバーは、変数スタジオで現在選択されているコンフィギュレーションを示します。
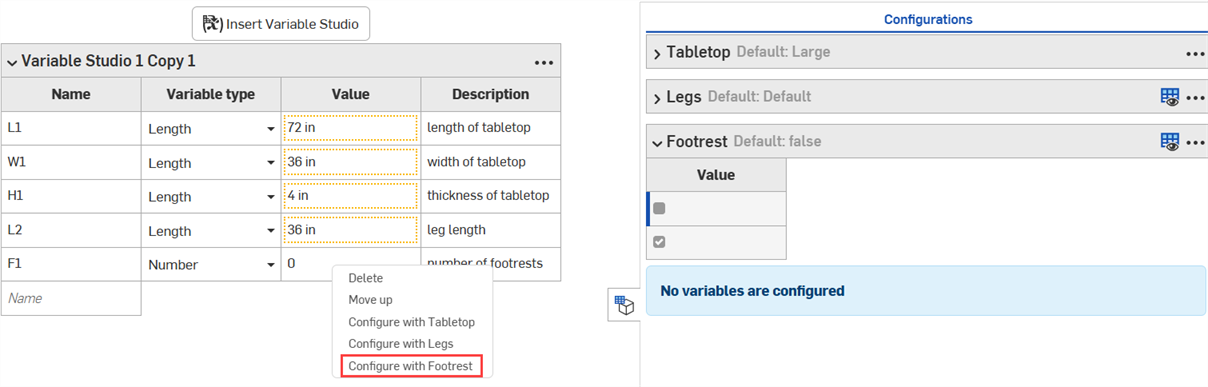
- 変数の値または説明を右クリックし、コンテキストメニューで [構成] をクリックしてコンフィギュレーションテーブルに追加します。
![変数値または説明を右マウスボタンで選択し、[構成] をクリック](Resources/Images/variabletables/config-rmb-configure-01.png)
- 続けて右クリックして [構成] を選択し、テーブルに値や説明を追加します。選択内容は既定値でテーブルに追加され、変数スタジオではオレンジ色で強調表示されます。
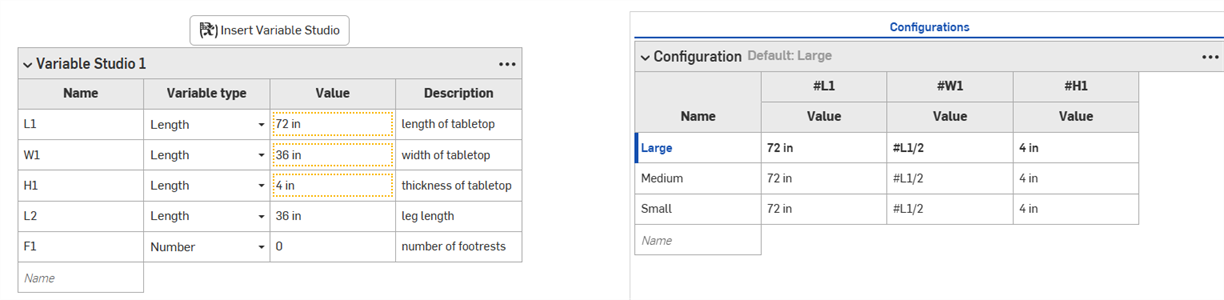
- 必要に応じてダブルクリックして、コンフィギュレーションテーブルの値を編集します。

- コンフィギュレーションパネルの下部にある [コンフィギュレーション入力を追加] 矢印をクリックし、追加するコンフィギュレーションのタイプを選択します。矢印の代わりにボタンをクリックすると、[リスト] タイプのコンフィギュレーションが自動的に挿入されます。
![[コンフィギュレーション入力を追加] メニュー](Resources/Images/variabletables/config-add-input-01.png)
- メニューからオプションを選択します。
- リスト - 挿入時に表示される選択可能な値のリストを作成します。
チェックボックス - 挿入時にオン/オフを切り替えるためのチェックボックスを作成します。
コンフィギュレーション変数 - 任意のフィーチャーや FeatureScript で使用できる変数を作成します。
-
必要に応じてコンフィギュレーション入力テーブルの値を編集します。
- [コンフィギュレーション入力を追加] 矢印をクリックし、[チェックボックス] をオンにします。
- 表示されるダイアログに入力の名前を追加します。
![既定の [チェックボックス入力] ダイアログ](Resources/Images/variabletables/config-checkbox-dialog-01.png)
- [既定] オプションを使用して、コンフィギュレーションを既定でオンにするかオフにするかを指定します。これは後で変更できます。
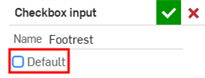
- 緑のチェックマークをクリックして、コンフィギュレーションパネルに入力を追加します。
- 変数スタジオで構成する値または説明を右クリックし、[以下で構成] をクリックして入力に値を追加します。
- 必要に応じて、入力の値を編集します。
- [コンフィギュレーション入力を追加] 矢印をクリックし、[コンフィギュレーション変数] を選択します。
- 表示されるダイアログに変数の名前を追加します。

- [長さ]、[角度]、[整数]、[実数]、または [テキスト] から変数のタイプを選択します。
- 変数の値を入力します。
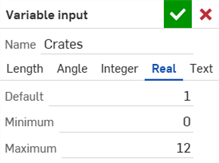
- 緑のチェックマークをクリックして、コンフィギュレーションパネルに入力を追加します。
- 変数の値を入力します。
- 変数スタジオで構成する値または説明を右クリックし、[設定...] をクリックします。
![[右マウスボタン] > [設定]](Resources/Images/variabletables/config-variable-set-01.png)
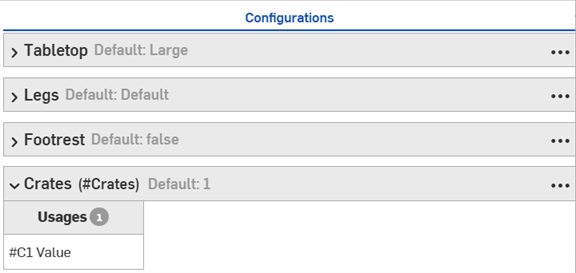
コンフィギュレーションパネルに値が追加されます。
構成された変数スタジオはリリースできません。
-
[変数スタジオを挿入] ダイアログで、構成済み変数スタジオを選択します。
-
ダイアログで必要なコンフィギュレーションを選択し、[生成] をクリックします。
![構成済みの変数スタジオが選択された [変数スタジオを挿入] ダイアログ](Resources/Images/variabletables/config-insert-vs-01.png)
[前回表示したコンフィギュレーションに設定]ドロップダウン (
 ) をクリックして、変数スタジオ内で最後にアクティブだったコンフィギュレーションを選択するか、[既定にリセット] を選択して、すべての入力を既定値に設定します。
 -
変数スタジオをクリックして変数テーブルに挿入するか、生成されたリストから個々の変数を選択します。
![[生成] をクリックして、指定されたコンフィギュレーションに変数を設定します](Resources/Images/variabletables/config-insert-variables-01.png)
- 前のセクションで説明された手順で、構成済み変数スタジオを変数テーブルに挿入します。
- 変数テーブルで、3 点メニューボタンをクリックし、[参照を編集] を選択します。
![変数テーブルの 3 点メニューで [参照を編集する] を選択します](Resources/Images/variabletables/config-edit-ref-01.png)
- [変数スタジオを更新] ダイアログで、[コンフィギュレーション] を右クリックします (または、Part Studio またはアセンブリに複数のコンフィギュレーション入力が存在する場合は [構成] を選択します)。
![[変数スタジオの更新] ダイアログでコンフィギュレーションを右マウスボタンで選択し、[構成] または [以下で構成] を選択します](Resources/Images/variabletables/config-edit-config-01.png)
- 変数スタジオが Part Studio またはアセンブリのコンフィギュレーションに追加されたことが通知されます。チェックマークをクリックしてダイアログを閉じます。
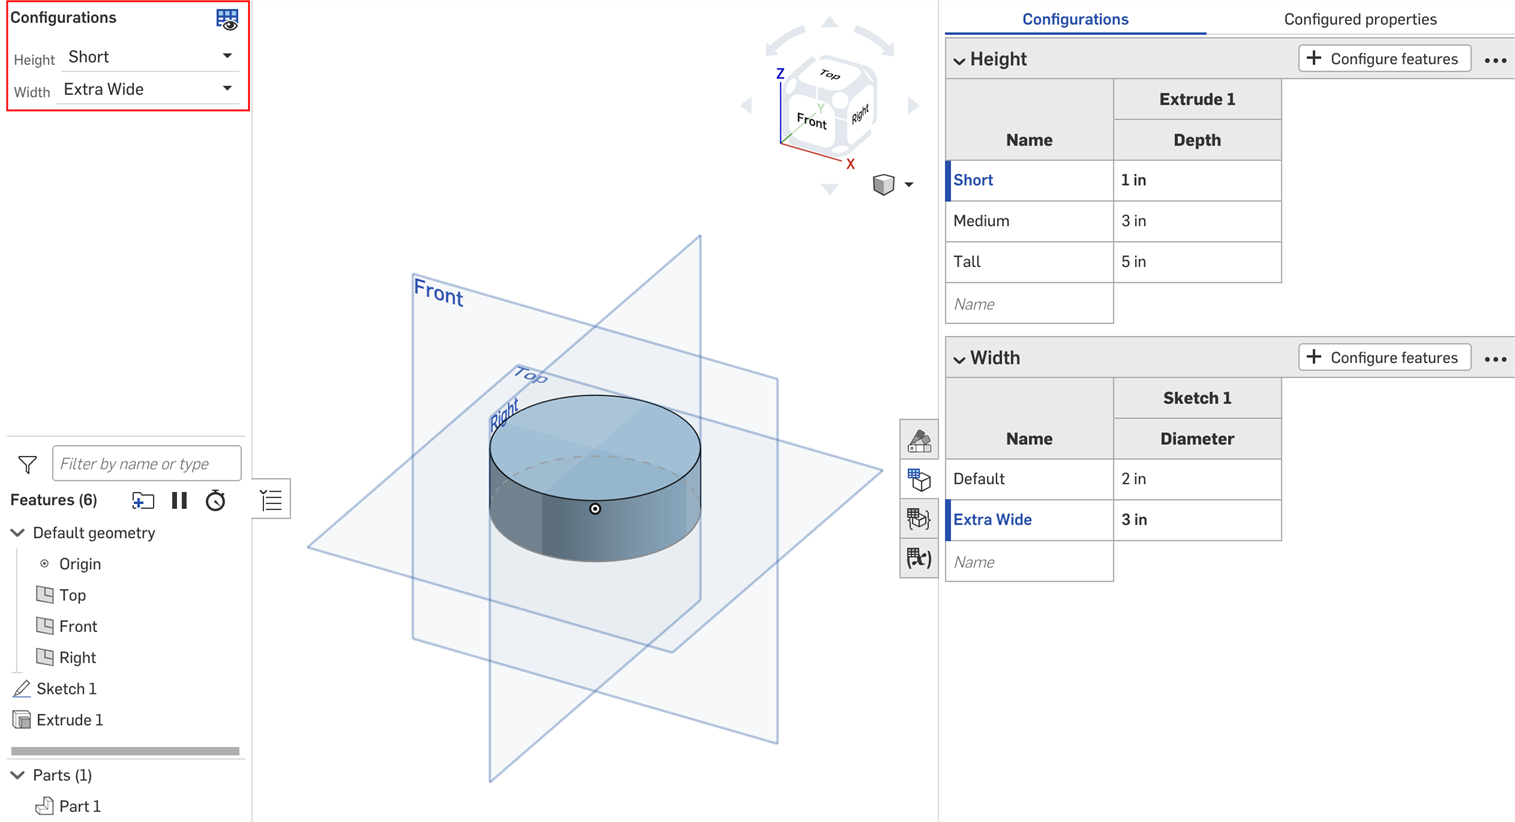
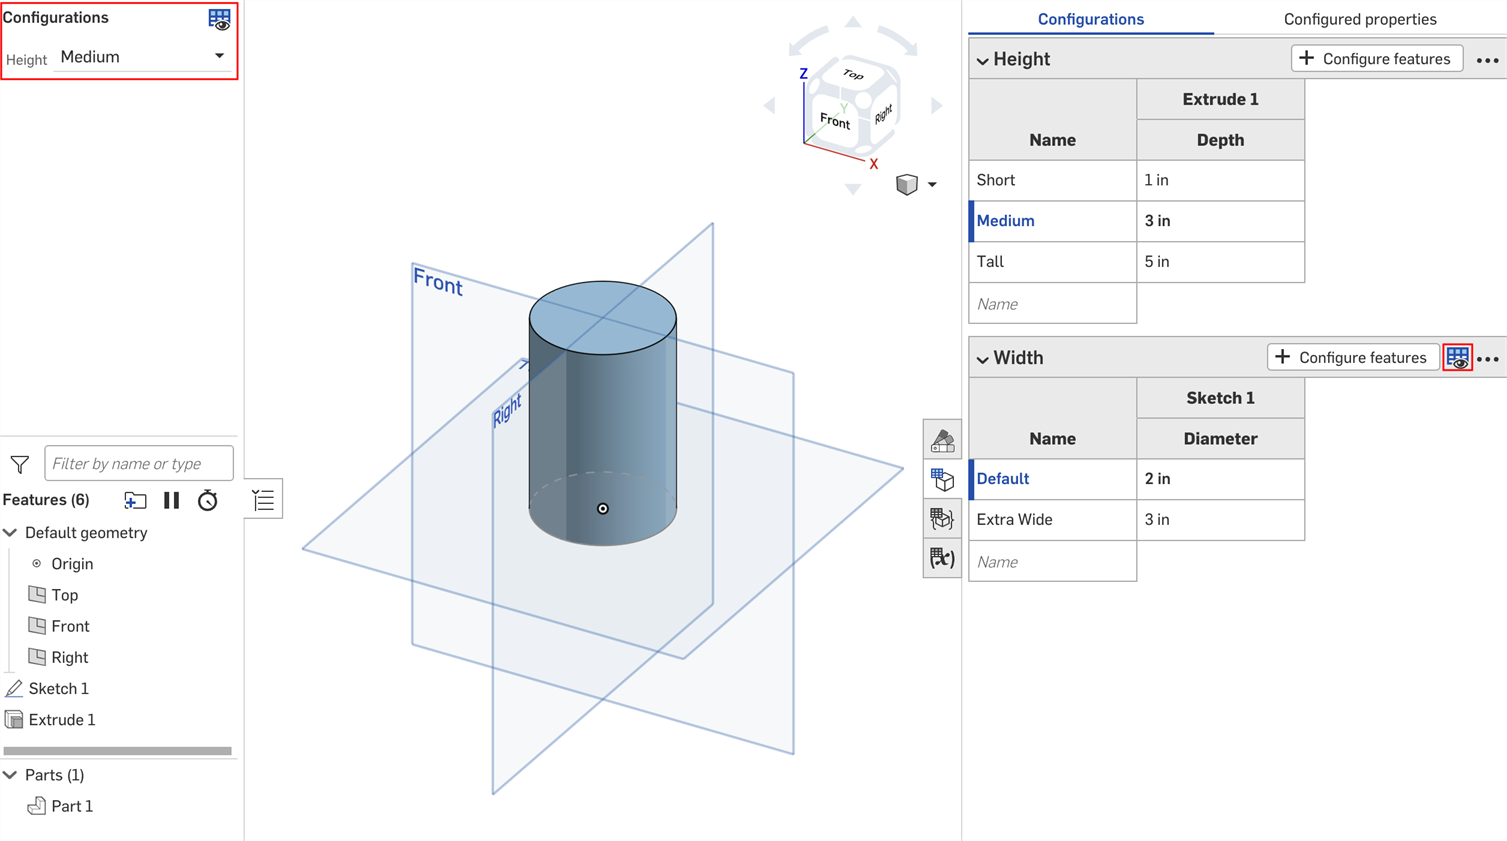
- Part Studio またはアセンブリでコンフィギュレーションパネルを開きます。変数スタジオのコンフィギュレーションは、コンフィギュレーションパネルのフィーチャー (列) になります。
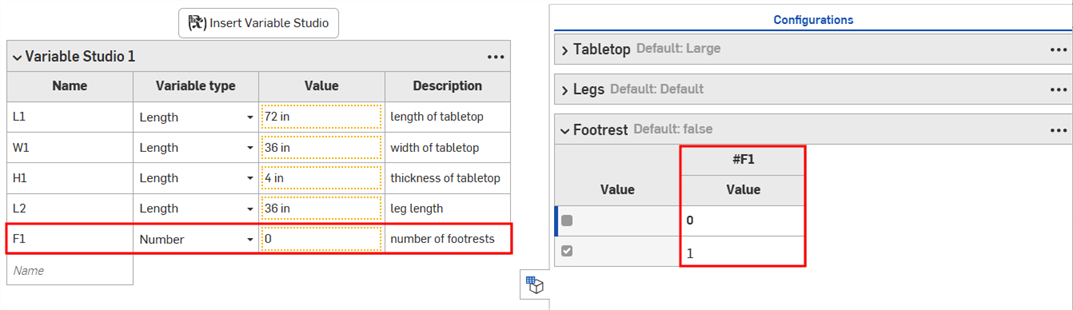
このセクションの例は、構成済みの Part Studio を示しています。構成済みの変数スタジオを使用する場合も、機能は同じです。
[コンフィギュレーションの可視性条件] ダイアログでは、コンフィギュレーションにロジックを追加できるため、特定の入力やオプションをいつ利用可能にするかを制御できます。
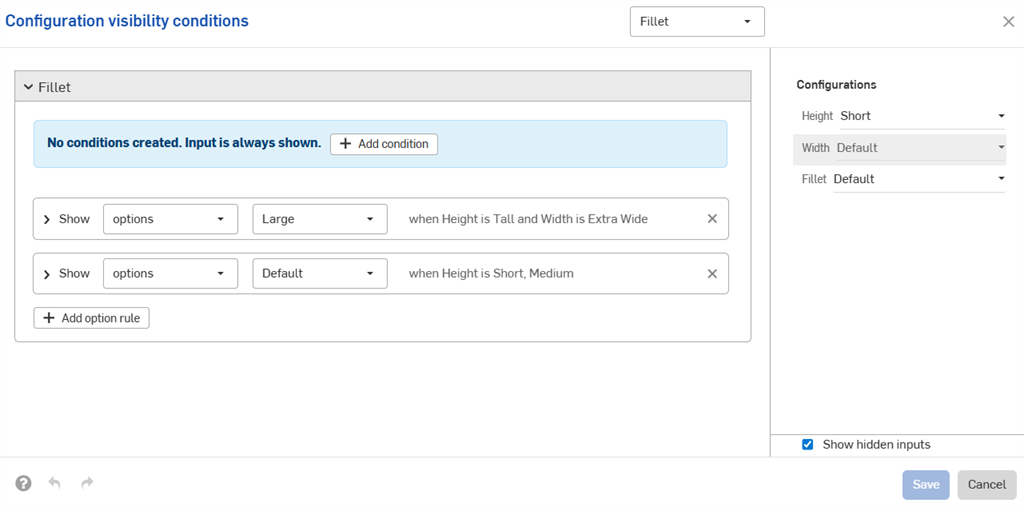
![入力の 3 つのオプションルールを表示する [コンフィギュレーション可視条件] ダイアログ](Resources/Images/feature-tools/config-visibility-option-range-03.png)
[高さ] と [幅] の 2 つの入力があるパーツを考えてみましょう。
既定では、どの高さのパーツにも任意の幅を設定できます。ただしここでは、高さを [高い] に設定した場合にのみ、幅を [エキストラワイド] に設定できるよう限定するには、[幅] の入力を表示する条件を設定できます。
- [コンフィギュレーション] パネルで、入力の 3 点ボタンをクリックし、メニューから [可視性条件] を選択します。
[コンフィギュレーションの可視性条件] ダイアログが開きます。右側のパネルには、現在選択しているコンフィギュレーションのプレビューが表示されます。このパネルで選択したオプションを直接変更して、設定をプレビューできます。![可視性条件が強調表示された [コンフィギュレーション] パネルのその他のオプションメニュー](Resources/Images/feature-tools/config-visibility-dropdown-05.png)
![既定の [コンフィギュレーションの可視性条件] ダイアログ](Resources/Images/feature-tools/config-visibility-dialog-03.png)
- [条件を追加] をクリックします。
- 最初のドロップダウンをクリックし、この入力の可視性を制御する入力を選択します。この例では、高さの入力を選択します。
- 2 番目のドロップダウンで、特定のオプションを選択する場合は [が次の場合]、オプションの範囲を選択する場合は [が次の間の場合] します。
- が次の場合: 表示される 3 番目のドロップダウンをクリックし、入力に許可するオプションを選択します。
- が次の間の場合: 3 番目のドロップダウンをクリックし、範囲内で最初に使用可能なオプションを選択します。4 番目のドロップダウンをクリックし、範囲内で最後に使用可能なオプションを選択します。
この例では、幅の入力は高さを [高い] にした場合のみ使用できます。右側のプレビューが更新され、選択内容が反映されます。下の画像では、高さを既定値に設定すると幅の入力が使用できないことがわかります。![1 つの条件が追加された [コンフィギュレーションの可視性条件] ダイアログ](Resources/Images/feature-tools/config-visibility-dialog-withCondition-03.png)
- [保存] をクリックします。これで、幅の入力は高さを [高い] にした場合にのみ表示され、幅の入力テーブルには可視性条件アイコン
 が表示されます。
![可視性条件が強調表示された [コンフィギュレーション] パネルのその他のオプションメニュー](Resources/Images/feature-tools/config-visibility-ex-short-01.png)
![両方の幅が表示されており高さが [高い] に設定された可視性条件の例](Resources/Images/feature-tools/config-visibility-ex-tallDefault-01.png)
![幅が [エキストラワイド] で高さが [高い] に設定された可視性条件の例](Resources/Images/feature-tools/config-visibility-ex-tallWide-01.png)
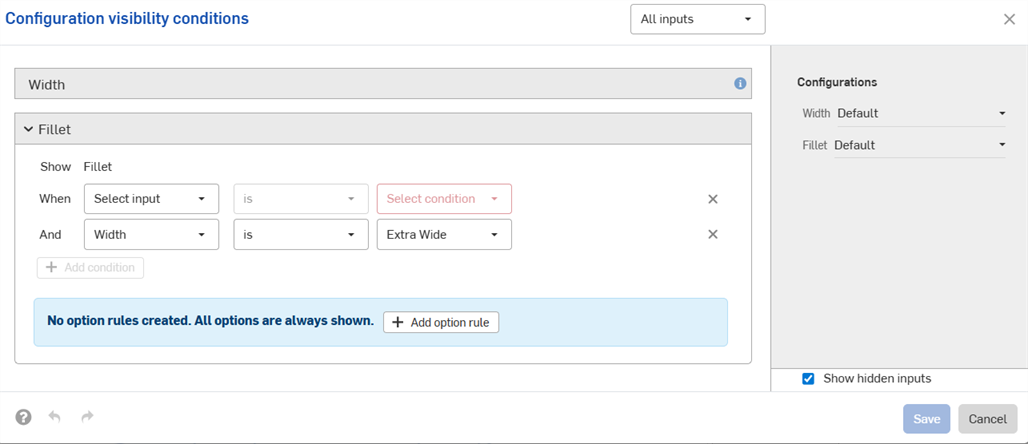
[コンフィギュレーションの可視性条件] ダイアログのオプションルールの設定を使用して、特定のオプションを表示する条件を指定できます。
オプションルールのロジックはリスト入力にのみ設定できます。
- [コンフィギュレーションの可視性条件] ダイアログで、入力内容を展開して [オプションルールを追加] をクリックします。ダイアログに新しいセクションが表示されます。
![[オプションルールを追加] が追加された既定の [コンフィギュレーションの可視性条件] ダイアログ](Resources/Images/feature-tools/config-visibility-default-options-02.png)
- [表示] 行に、制御するオプションを選択します。
- オプション: 表示されるドロップダウンをクリックし、条件を設定するオプションを選択します。
- 範囲: 最初のドロップダウンをクリックし、範囲の最初のオプションを選択します。2 番目のドロップダウンをクリックして、範囲内の最後のオプションを選択します。範囲は特定のオプションが含まれます。範囲は重複していてもかまいません。
- [条件] 行で [条件] ドロップダウンをクリックし、[常に] を選択します (オプションが常に表示されます)。または、[条件] を選択します (オプションの条件を設定します)。[条件] を選択した場合は、次のことも必要です:
- 2 つ目のドロップダウンから入力を選択します。
- 特定のオプションを選択する場合は [が次の場合]、オプションの範囲を選択する場合は [が次の間の場合] を選択します。
- が次の場合: 表示されるドロップダウンをクリックし、オプションに指定可能な値を選択します。
- が次の間の場合: 最初のドロップダウンをクリックし、範囲内で最初に許可するオプションを選択します。2 番目のドロップダウンをクリックして、範囲内で最後に許可するオプションを選択します。
-
[条件を追加] をクリックし、この一連の手順を繰り返して、コンフィギュレーション内にロジックを追加していきます。
オプションルールの各条件は AND ステートメントで組み合わされます。すべての条件が満たされなければ、制御されたオプションは表示されません。
- もう一度 [オプションルールを追加] をクリックして、他のオプションの条件を追加します。
- [保存] をクリックします。
下の例では、穴のサイズが 0.8 インチの場合にのみ [薄い] オプションを使用できます。[既定] オプションは常に許可されます:
![[常に] と [特定の条件が満たされたとき] に表示するように設定されたオプションルールを表示する [コンフィギュレーションの可視性条件] ダイアログ](Resources/Images/feature-tools/config-visibility-options-03.png)
次の例では、重複する範囲を使用して可視性条件を指定しています。
以下の例では、オプション制御と範囲制御を組み合わせて必要なロジックを設定しています。
![追加のオプションルールを表示する [コンフィギュレーションの可視性条件] ダイアログ](Resources/Images/feature-tools/config-visibility-option-and-03.png)
入力条件は付加的です。上の例に 3 つ目のコンフィギュレーションを追加し、下図のように条件を設定した場合、[大きなフィレット] オプションは高さを [高い] に、幅を [エキストラワイド] に設定したパーツに限定して使用できます。
![複数の条件を含む [コンフィギュレーションの可視性条件] ダイアログ](Resources/Images/feature-tools/config-visibility-dialog-additive1-03.png)
[高い] に対して既定の幅を設定すると、フィレットのコンフィギュレーションは非表示になります。
![複数の条件を含む [コンフィギュレーションの可視性条件] ダイアログ](Resources/Images/feature-tools/config-visibility-dialog-additive2-03.png)
コンフィギュレーション入力は、コンフィギュレーションパネルでその下に表示される入力の可視性のみ制御できます。この例では、[幅] の入力は [高さ] の入力で制御できますが、[フィレット] の入力では制御できません。![パラメータはその上位パラメータのみで制御できることを示す [コンフィギュレーションの可視性条件] ダイアログ](Resources/Images/feature-tools/config-visibility-dialog-control-03.png)
必要な入力またはオプションが見つからない場合、可視性条件は自動的に修復 (削除) されます。
たとえば、[幅] の入力の可視性が [高さ] の入力に依存しており、[高さ] の入力が削除された場合、[幅] の可視性条件は自動的に削除されます。同じことが、削除または移動された個々のオプションにも当てはまります。この例では、[高さ] の入力も [フィレット] オプションから削除されます。
ワークスペースに警告が表示され、ダイアログから条件が削除されます。

-
設定した可視性条件とオプションルールは、すべての [挿入] ダイアログ (つまり、構成したパーツをアセンブリに挿入する際) で使用できます。可視性条件の変更は、構成された要素を参照する既存のすべてのドキュメントに自動的に反映されます。
-
非表示の入力には常に既定値があります。このページの最初の例では、[幅] オプションを設定しなくても、[高さ] が低いパーツと中程度のパーツは [幅] は [既定] になります。
-
コンフィギュレーション入力に可視オプションがない場合、その入力は非表示となり、既定値になります。
-
-
入力またはオプションを折りたたむと、可視性条件の概要がダイアログに表示されます。

-
(パーツと Part Studio のみ): プロパティから除外されたコンフィギュレーション入力は、その下にある他の入力のうち、同じくプロパティから除外された可視性のみ制御できます。以下の例では、プロパティから幅が除外されている場合 (
 アイコンで表示)、フィレットもプロパティから除外されている場合にのみ、フィレットの可視性を制御できます。
![可視性条件が強調表示された [コンフィギュレーション] パネルのその他のオプションメニュー](Resources/Images/feature-tools/config-visibility-dialog-excluded1-03.png)
![可視性条件が強調表示された [コンフィギュレーション] パネルのその他のオプションメニュー](Resources/Images/feature-tools/config-visibility-dialog-excluded2-03.png)
-
(パーツと Part Studio のみ): プロパティから除外されたコンフィギュレーション入力は、リリースパッケージおよびリビジョン参照値では既定値として扱われます。可視性条件により既定値を使用できない場合は、最初に表示された値が使用されます。
- 他の入力を表示するには、[コンフィギュレーションの可視性条件] ダイアログで [入力] ドロップダウンを使用します。[すべての入力] を選択すると、使用可能なすべての入力が表示されます。
![[入力] ドロップダウンをクリックした [コンフィギュレーションの可視性条件] ダイアログ](Resources/Images/feature-tools/config-visibility-input-dropdown-02.png)
- ダイアログに複数の入力が表示されている場合は、3 点ボタンをクリックしてすべての入力を展開または折りたたみます。
![3 点ボタンをクリックして、[コンフィギュレーションの可視性条件] ダイアログのすべての入力を展開または折りたたみます。](Resources/Images/feature-tools/config-visibility-expand-collapse-02.png)
- [コンフィギュレーションの可視性条件] ダイアログのプレビューセクションは、コンフィギュレーションをテストするためのプレイグラウンドとして使用できます。
- グレーで表示されている入力をダイアログから削除するには、[非表示の入力を表示] チェックボックスをオフにします。
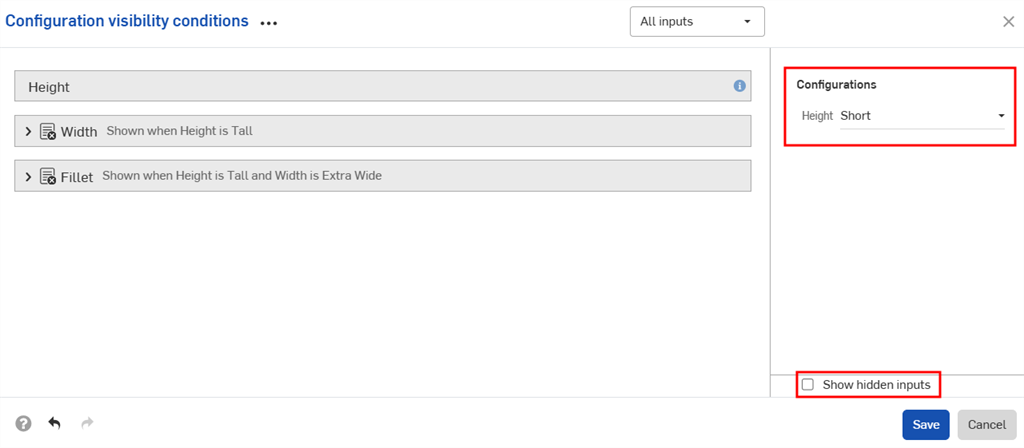
- グレーで表示されている入力をダイアログから削除するには、[非表示の入力を表示] チェックボックスをオフにします。
-
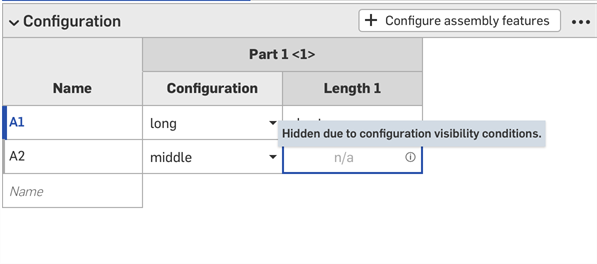
構成済みパーツをアセンブリに追加すると、非表示の入力は [コンフィギュレーション] パネルにグレーで表示されます。
-
コンフィギュレーションセレクタで
をクリックして、すべての入力の [コンフィギュレーションの可視性条件] ダイアログを開きます。設定パネルで をクリックして、その入力のダイアログを開きます。
このセクションの例は、構成済みの Part Studio を示しています。構成済みの変数スタジオを使用する場合も、機能は同じです。
Part Studio、アセンブリ、変数スタジオとの間でコンフィギュレーション入力をコピーして貼り付けることができます。これにより、設計間でコンフィギュレーションをすばやく簡単に共有できます。
-
コピーする入力を含む Part Studio、アセンブリ、または変数スタジオでコンフィギュレーションパネルを開きます。
-
入力の 3 点メニューをクリックして、[入力をコピー] または [すべての入力をコピー] を選択します。
![[入力をコピー] と [すべての入力をコピー] が強調表示されたコンフィギュレーション入力の 3 点メニュー](Resources/Images/feature-tools/config-copy-inputs-02.png)
-
入力の貼り付け先のタブでコンフィギュレーションパネルを開きます。
-
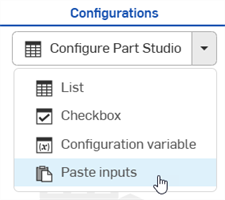
[Part Studio を構成]/[アセンブリを構成]/[変数スタジオを構成] の横の矢印をクリックして、[入力を貼り付け] を選択します。
入力は [コンフィギュレーション] パネルに挿入されます。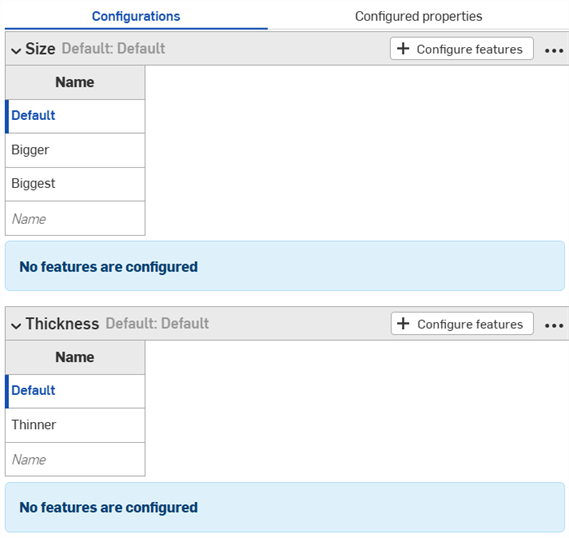
-
新しいタブで、構成するパラメータを選択します。入力値とパラメータを入力テーブルにコピーする方法については、この後説明します。
注記:
- Part Studio 間、アセンブリ間、および変数スタジオ間、同じドキュメント内、および異なるドキュメント間で、コンフィギュレーション入力をコピーして貼り付けることができます。
- すべての名前、表示条件、FeatureScript ID、および変数定義が入力とともにコピーされます。
- コピーした入力は、ユーザーがログアウトするまで使用できます。
- コピーした入力と貼り付けた入力の間の参照は保持されません。貼り付け後、元のコンフィギュレーション入力への変更は貼り付け先の入力に反映されません。
- 貼り付けた可視条件は、ターゲットコンフィギュレーションに可視性の計算に必要なすべての入力がない場合、自動的に修復 (削除) されます。
- 同じ内部 FeatureScript ID を持つコンフィギュレーション入力は貼り付けられません。これを修正するには、同じ内部 FeatureScript ID を持つコンフィギュレーション入力を削除して、再度貼り付けます。
コンフィギュレーションのコピーや貼り付けを行うことで、値の入力や編集の手間を省けます。
値とパラメータをコピーするには、次の手順を実行します。
- コンフィギュレーションパネルの右上隅にある
 メニューを開きます。
 - [テーブルをコピー] を選択します。
![コンフィギュレーション入力テーブルの横にある [詳細] ボタンをクリックします](Resources/Images/feature-tools/config-copy-table-02.png)
- テーブルをコピーしたら、スプレッドシートに貼り付けることができます。
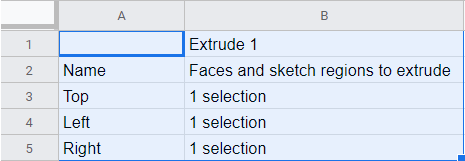
上記のように、列名もテーブルに付属していることに注意してください。これで、テーブルを編集してからコピーして貼り付けることで Onshape に戻すことができます。
- 下の青で示すように、データのある行と列 (列名や見出しではなく) のみを選択します:
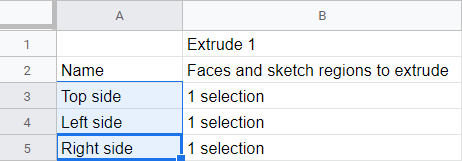
必要に応じて、テーブルに追加の空の行を追加することもできます。コピーコマンドを選択するときに、スプレッドシートの追加の行をコピーするだけで済みます。
- [コピー] コマンドを発行します。
- Onshape コンフィギュレーションテーブルで、テーブルの左上のセルをクリックします。
- キーボードの [貼り付け] コマンドを発行します。
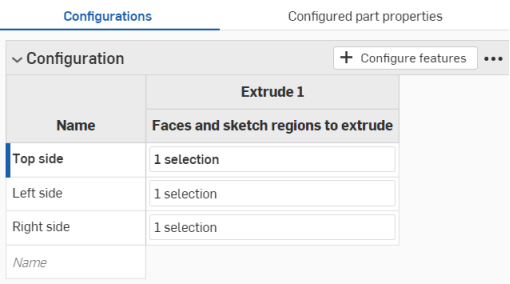
Onshape では、データがコンフィギュレーション入力テーブルの行および列にある場合には、コピーされたデータに自動的に置き換えます。Onshape には、各入力の既定の単位も自動的に含まれます。
スプレッドシートからコピーした行が Onshape コンフィギュレーション入力テーブルからの行より多い場合、それらの行は貼り付けには含まれることに注意してください。Onshape はその場で行を作成します。
ただし、スプレッドシートからコピーした列が Onshape コンフィギュレーション入力テーブルの列より多い場合、それらの列は貼り付けに含まれません。Onshape はその場で列を作成しませんが、貼り付ける前に、コンフィギュレーションテーブルに追加の列 (パラメータ) を作成できます。
- 名前を変更するには、入力名をクリックします。
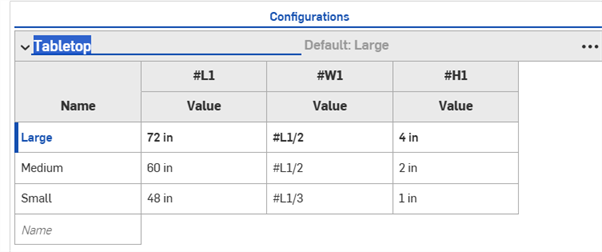
- コンフィギュレーションから値や説明を削除するには、変数スタジオで右クリックし、 [構成解除] または [...から構成解除] をクリックします。
- コンフィギュレーション入力のオプションを変更するには、行を右クリックします。
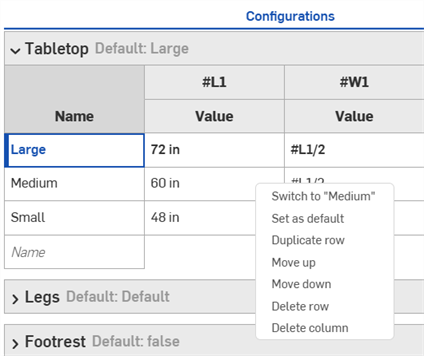
次のオプションから 1 つを選択します。
- 切り替え先 - 選択した行で指定したオプションにコンフィギュレーションを設定します。
- 既定として設定 - 選択した行を入力の既定として設定します。
- 行を複製 - 選択した行をコピーし、それをテーブルに挿入します。
- 上に移動/下に移動 - テーブルの行を並べ替えます。
- 行を削除 - テーブルから行を削除します。
- 列を削除 - テーブルから列を削除します。最初の列は削除できません。
- コンフィギュレーション入力テーブルを変更するには、コンフィギュレーションパネルの右側にある3点メニューをクリックします。
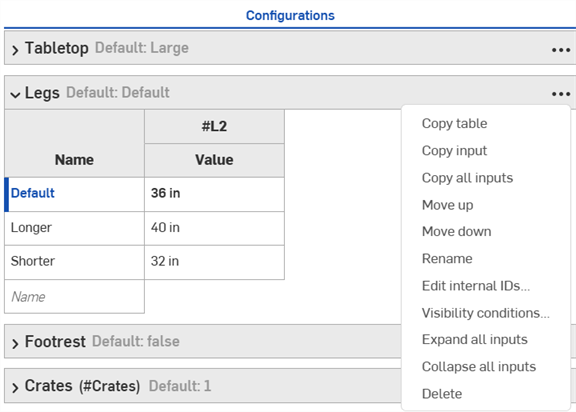
次のオプションから 1 つを選択します。
- テーブル/入力/すべての入力をコピー - 入力テーブルと値をコピーして貼り付けます。コンフィギュレーションのコピーを参照してください。
- 上に移動/下に移動 - コンフィギュレーションパネルのテーブルを並べ替えます。
- 名前を変更 - コンフィギュレーション入力の名前を変更します。コンフィギュレーションパネルの入力名をクリックして名前を変更することもできます。
- 内部 ID を編集 - コンフィギュレーション入力の内部 FeatureScript 識別子を変更するダイアログが開きます。終了したら、[参照を解除] を選択し、ID を変更します。
![[内部 ID を編集] ダイアログ](Resources/Images/variabletables/config-edit-ids-01.png)
- 可視性条件 - 可視性条件の設定を参照してください。
- すべての入力を展開/折りたたむ - コンフィギュレーションパネルのすべての入力を展開または折りたたみます。
- 削除 - コンフィギュレーション入力テーブルを削除します。
iOS における Variable Studio コンフィギュレーションのサポートは、デスクトップ (ブラウザ) プラットフォームで作成したコンフィギュレーションのみの表示と使用に限定されています。