ClassLinkとの統合
![]()
![]()
![]()
統合プロセスを開始する前に、Onshape Enterprise アカウントまたは試用版を要求し、承認され、Onshape Enterprise ドメイン名を持っている必要があります。
Enterprise ドメイン名は、たとえば MyCompanyName.onshape.com のような形になります。
一度に使用できる SSO プロバイダーは 1 つだけであることに注意してください。
このコンフィギュレーションプロセスは、組織用にカスタマイズしたパラメータ値がないと失敗することがあります。カスタム SSO ID プロバイダー (Okta、PingOne、ClassLink など) ダッシュボードを使用して、Onshape をアプリケーションとして追加し、組織に固有の値を記録します。次の手順では、これらの値が必要です。
Onshape は、送信されるすべての SAML 証明書リクエストに署名します。ADFS は受信した SAML リクエストを検証するため、ADFS 統合の場合を除き、証明書 (SAML 署名証明書など) をアップロードする必要はありません。Microsoft では、最新バージョンの ADFS から Microsoft Entra ID への移行も推奨しています。詳細は、ADFS の概要を参照してください。
通常、1 つの Enterprise に 1 つの SSO プロバイダーを設定します。SAML 2.0 を使用してマルチテナントコンフィギュレーション (複数の Enterprise がある SSO プロバイダー) を設定する場合、管理者は com.onshape.saml2.sp.<ドメインプレフィックス> を Onshape エンティティ ID として使用し、[entityId を Company のドメインプレフィックスに使用] チェックボックスをオンにする必要があります。以下の「Onshape での SSO プロバイダーの構成」セクションを参照してください。
Onshape を ClassLink シングルサインオンアカウントに追加する
-
ClassLink SAML コンソールに移動し、[会社名] フィールドに次の値を入力します。
-
メタデータ URL またはテキスト - お客様は ClassLink IDP メタデータ URL を提供する必要があります。
-
ログイン URL - 地区コードがログイン URL のボックスに追加されるか、既定のログイン URL の場合はこのフィールドを空のままにします。
-
ICON URL - ここをクリックしてアプリケーションを検索し、右クリックしてリンクアドレスをコピーして、ボックスに入力します (下図参照)。

-
属性マッピング - 次の属性を入力します。
-
[名前] ボックスで指定した名前を選択し、名前を変更します。
-
姓を選択し、[姓] ボックスで名前を変更します。
-
[Eメール] ボックスで [Eメール] を選択し、名前を変更します。
-
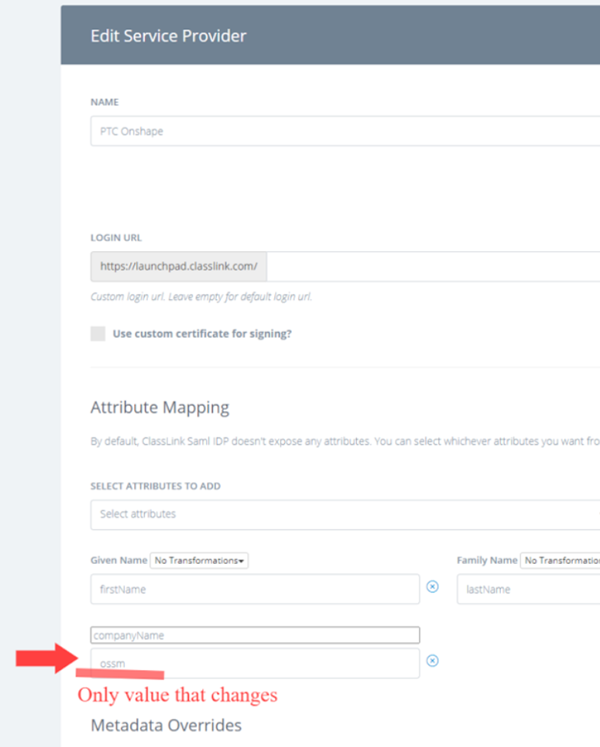
カスタム属性を選択し、名前を「CompanyName」に変更します。次に、会社名を入力します。
会社名は、教育機関のドメインプレフィックスと同じです。たとえば、Onshape Enterprise の名前が Fishbowl.onshape.com の場合は、Fishbowlと入力します。
-
-
メタデータのオーバーライド
-
オーバーライドするフィールドから [名前 ID 形式] を選択し、[emailAddress] を選択します。
-
オーバーライドするフィールドから [署名アルゴリズム] を選択し、[RSA_SHA256] を選択します。
-
オーバーライドするフィールドから NameID 値を選択し、Eメールを選択します。
-
オーバーライドするフィールドから Saml NotBefore を選択し、3 を追加します。
-
-
更新して保存します。
IDP 開始ログイン URL を選択してコピーして、ローカルライブラリにアプリを追加します。

Onshape には、ClassLink を使用する SSO のメタデータコンフィギュレーションファイルが必要です。ClassLink に問い合わせて、次のステップを完了するのに必要なメタデータファイルを入手してダウンロードしてください。
Onshape での SSO プロバイダーの構成
ID プロバイダーで Onshape を構成し、ID プロバイダーのメタデータファイル (Onshape ではコンフィギュレーションファイルと呼びます) をダウンロードしたら、Onshape で SSO プロバイダーを構成できます。
以下の画像の例は、構成中の汎用 ID プロバイダーを示していますが、手順はすべての ID プロバイダーで同じです。
- 専用のドメイン名を使用して、管理者として Onshape Enterprise アカウントにサインインします。アカウントから Enterprise 設定を選択します。
![[マイアカウント] メニューに移動し、[Enterprise 設定] ボタンをクリックする](Resources/Images/SSO/azure-sso-025-02-01.png)
- 左側のナビゲーションメニューから [認証] を選択します。
-
[シングルサインオン (SSO)] サブセクションで、[SSO プロバイダーを構成] ボタンをクリックします。
![[シングルサインオン (SSO)] 設定の [SSO プロバイダーを構成] をクリックする](Resources/Images/SSO/azure-sso-027-02.png)
-
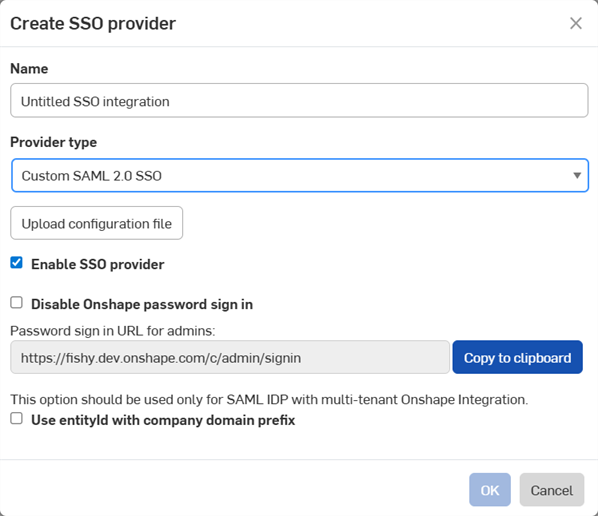
SSO プロバイダーを作成ダイアログが開きます。
-
[名前] フィールドに、カスタム SSO などの名前を入力します。
-
[プロバイダータイプ] ドロップダウンで、一覧から SSO プロバイダーを選択します。
-
[SSO プロバイダーを有効化] はオンのままにします。
-
今のところ、[Onshape パスワードによるサインインを無効にする] チェックはオフのままにしておきます。
-
マルチテナント設定 (複数の Enterprise を持つ SSO プロバイダー) を使用している場合は、[Company ドメインプレフィックス付きのエンティティ ID を使用] をオンにします。
-
[コンフィギュレーションファイルをアップロード] ボタンをクリックします。
[Onshape パスワードによるサインインを無効にする] をオンにすると、自分とユーザーの通常の Onshape パスワードサインインが無効になります。Onshape の URL には SSO プロバイダーのサインインプロンプトのみが表示されます。このオプションをチェックする前に、管理者として Onshape にサインインできることを確認してください。SSO プロバイダーからのサインインが正しく機能することが確認されたら、後でここに戻って有効にできます。
SSO を介した Onshape サインインの強制を選択すると、ユーザーは cad.onshape.com などの Enterprise 以外のドメインに直接サインインできなくなります。
通常、1 つの Enterprise に SSO プロバイダーをセットアップします。SAML 2.0 を使用してマルチテナントコンフィギュレーション (複数の Enterprise がある SSO プロバイダー) をセットアップする場合、管理者は com.onshape.saml2.sp.<ドメインプレフィックス> を Onshape エンティティ ID として使用し、[entityId を Company のドメインプレフィックスに使用] チェックボックスをオンにする必要があります。
-
-
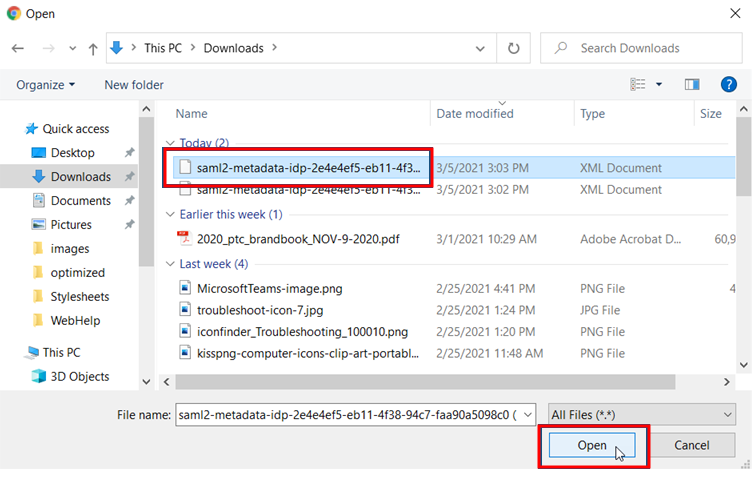
以前にダウンロードしたメタデータコンフィギュレーションファイルを探して選択し、[開く] をクリックします。
-
[OK] をクリックします。
![[OK] をクリックして SSO プロバイダーの作成を完了させる](Resources/Images/SSO/custom-sso-03-02.png)
-
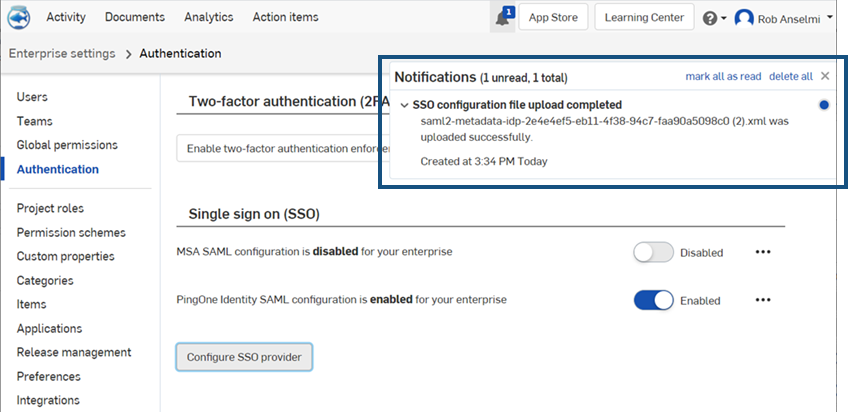
ファイルがアップロードされます。アップロードが完了すると、通知が表示されます。
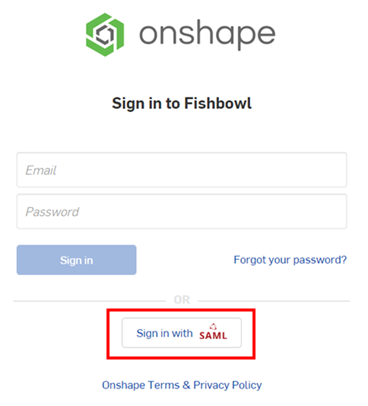
- Onshape アカウントと SSO プロバイダーアカウントの両方からサインアウトします。両方のアカウントを必ず更新してください。Onshape のサインインページに再度アクセスすると、ページの下部に SSO プロバイダー用の新しい [サインイン] リンクが表示されます。
Onshape にサインインするには、管理者は Onshape アプリケーションを使用するために (シングルサインオンアカウントで) ユーザーをプロビジョニングする必要があります。