 画像を挿入
画像を挿入


利用可能: スケッチ
インポートした画像をスケッチの基準として使用します。現在アクティブなドキュメント、その他のドキュメント、または画像ライブラリから画像をドキュメントに挿入し、その画像をスケッチで開きます。画像をガイドとして使用して、スケッチジオメトリを作成します。サポートされている画像の種類には、PNG、JPEG、GIF、BMP が含まれます。
 手順
手順
-
 をクリックして [画像を挿入] ダイアログを開きます。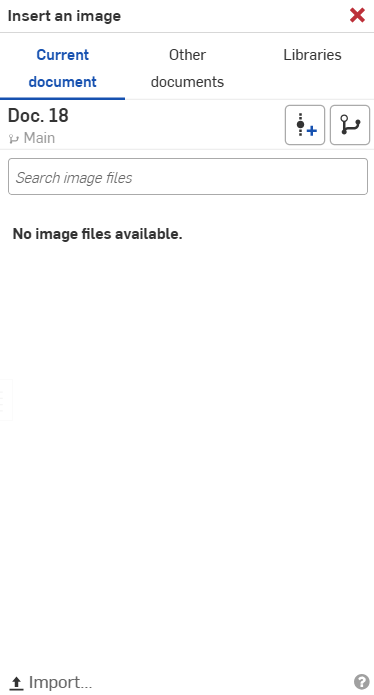
- 現在のドキュメント、他のドキュメント、または画像ライブラリから画像を挿入します。画像ファイルがリストされていない場合は、ダイアログの下部にあるインポートリンクを使用します。
現在のドキュメント - 現在アクティブなドキュメントから画像を選択します (または検索バーを使って画像を検索します)。バージョンを作成することも、ドキュメントのバージョングラフを表示することもできます。
他のドキュメント - Company 内のその他のドキュメントから画像を選択します (または検索バーを使って検索します)。
ライブラリ - 画像ライブラリから画像を選択します (または検索バーを使って検索します)。ドロップダウンメニューからライブラリを選択し、画像を選択します。
- ダイアログボックスの下部にある [完了] をクリックし、グラフィック領域に画像を配置します。画像の縦横比は維持され、ドラッグすると破線で示されます。
既定では、ボックスの下部エッジに水平拘束が適用されます。
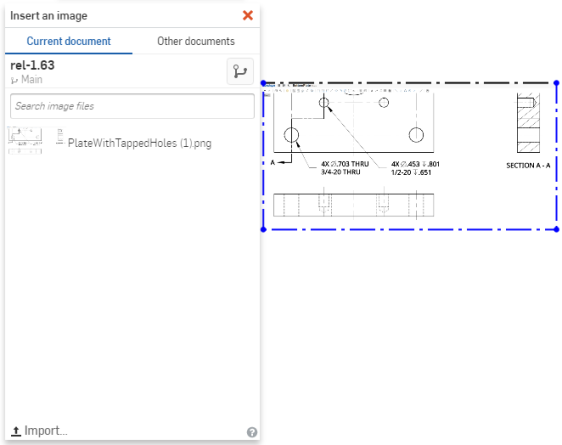
移動中の画像は半透明になり、配置時の視認性が向上します。
画像を回転させるには、まず既定で適用されている水平拘束を削除し、次に画像の一方の角を固定してもう一方の角をドラッグします。
画像の上にスケッチすることができます。スケッチジオメトリの寸法を初めて指定すると、画像の尺度も変更されます。
画像ライブラリ
画像ライブラリは、画像を含む特別なフォルダです。Company は 1 つの画像ライブラリを持ち、管理者が所有します (Company への共有アクセス許可を持ちます)。さらに、個人ユーザーは自分が使用するための画像ライブラリを 1 つ設定でき、特別なアクセス許可はありません。
画像ライブラリの作成
画像ライブラリは、次のようにドキュメントページで作成し、Onshape フォルダに保存されます。
-
フォルダを作成します (Company のライブラリはルートフォルダに作成する必要があります)。
-
プロジェクトとフォルダリスト内のフォルダを右クリックし、コンテキストメニューの [ライブラリを設定] にカーソルを合わせると、サブメニューオプションが表示されます。
-
サブメニューオプションから、[マイ画像] をクリックします。これにより、このフォルダが画像ライブラリとして設定されます。
フォルダを画像ライブラリとして設定したら、フォルダを右クリックして [画像ライブラリ] オプションにカーソルを合わせると、次の追加のコンテキストメニューオプションが表示されます。
-
マイライブラリを更新 - 画像ライブラリを更新します (画像ライブラリ内のドキュメントに変更を加えた場合に便利です)。
-
マイライブラリの設定を解除 - 選択したフォルダの画像ライブラリとしての設定を解除します (フォルダやその内容は削除されませんが、ユーザーまたは Company のライブラリとしてのフォルダの指定が削除されます)。
-
<company> のライブラリとして設定 - 選択したフォルダを Company 全体の画像ライブラリとして設定します。
サポートされているファイル形式
-
JPEG
-
PNG
-
GIF
-
BMP
注記
- 最大画像サイズはデバイスの GPU によって異なります。GPU はhttps://webglreport.com で確認できます。画像の幅と高さが最大テクスチャサイズのピクセル制限と同じかそれ以下であることを確認してください。
- 画像を回転させるには、水平拘束を削除し、一方のコーナーを固定し、別のコーナーをドラッグします。
- 画像を移動するには、すべての拘束を削除し、画像をクリックして目的の場所までドラッグします。
- 画像の上にスケッチすることができます。
- スケッチジオメトリの寸法を指定すると、画像のサイズにも反映されます。ただし、画像に反映されるのは、寸法を最初に適用したときのみです。画像のサイズを変更するには、追加の寸法を削除して、残り 1 つの寸法を調整します。
- スケッチの表示と非表示を切り替えると、画像の表示と非表示が切り替わります。
- このフィーチャーはアルファチャンネルを維持するため、透明であれば Onshape でも透明になります。
- 画像は、Part Studio 内および Part Studio から別の Part Studio に (スケッチエンティティとして) コピーしたり貼り付けることができます。
- コンテキストメニューと [画像の編集] コマンドを使用して、別の画像ファイルを選択するか、新しい画像をアップロードできます。
- 画像のソースが変更された場合、タブのコンテキストメニューの [更新] オプションを使用して、そのタブのソースを更新できます。これにより、ドキュメント内で使用されているすべての画像も更新されます。
詳細は、ラーニングセンターコースのスケッチ入門 (Onshape アカウントが必要です) を参照してください。