Enterprise 設定- 認証
![]()
次にのみ利用可能
2 段階認証 (2FA)、シングルサインオン (SSO)、ドメイン検証の構成と管理を行います。
Onshape の認証設定に移動するには、Onshape ウィンドウの右上隅にあるアカウントユーザーアイコン (![]() ) をクリックします。ドロップダウンメニューが開きます。Company/Classroom/Enterprise の [設定] をクリックします。
) をクリックします。ドロップダウンメニューが開きます。Company/Classroom/Enterprise の [設定] をクリックします。
ページ左側のリストの [認証] をクリックします。
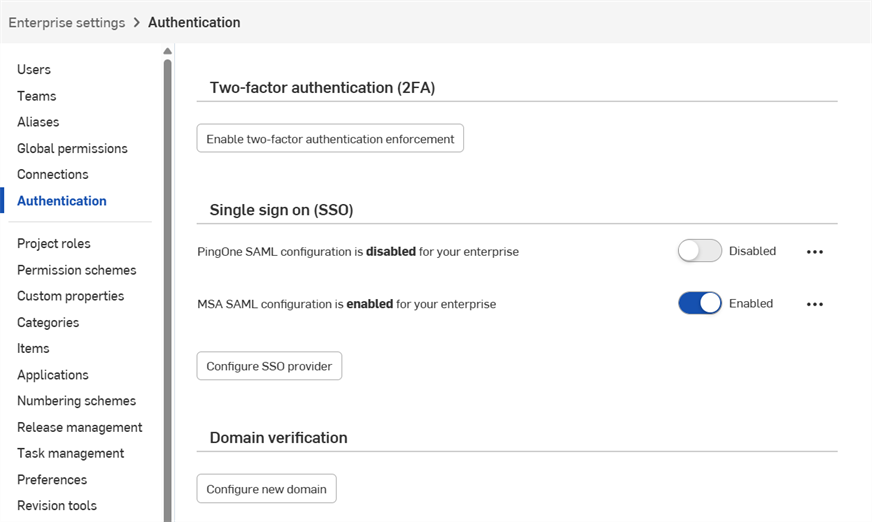
Onshape は、2 要素認証機能の活用を強くお勧めします。2 要素認証 (2FA) を活用すると、サインイン時に複数のパスワードを要求するように Onshape アカウントを構成できます。1 つのパスワードを使用して Web サイトにサインインすると、1 つの静的情報の推測や取得が容易になるため、セキュリティの脅威の影響を受けやすくなります。2FA では、2 番目の情報が必要であり、その 2 番目の情報はサインインプロセス中に動的に生成され、サインインするたびに異なる場合があります。
Onshape と、それをサポートしているすべての Web サイトに 2FA を使用することを強くお勧めします。
2 段階認証アプリ (Google 認証システムなど) をスマートフォンにダウンロードし、Onshape ユーザーインターフェイスを介して Onshape で設定します。これにより、Onshape が認識できるワンタイムコードを生成できます。Onshape で 2 段階認証を有効にすると、パスワードでサインインした後、Onshape から 2 段階認証コードの入力を求められます。
2FA メカニズムでサインインしたデバイスを記憶できるようにすることで、2FA 認証を使用して特定のデバイスから Onshape にサインインすると、30 日間は、そのデバイスからのサインインで 2FA コードが不要になります。
- 2 段階認証アプリをデバイスにダウンロードします。
- Onshape アカウントにサインインします。
- ユーザー名の下にあるメニューで、マイアカウントを選択します。
- ページの左側のリストで、[セキュリティ] をクリックします。
- [2 段階認証] の右にある [有効にする] をクリックします。
- 2 段階認証の設定 をクリックします。
- パスワードを確認します。
- [OK] をクリックします。
Google 認証システム (Google Authenticator) はその一例です。
上記の手順から続けて、
- デバイスの認証アプリを使用して、Onshape ユーザーインターフェイスに表示される QR コードをスキャンします。
- 2FA アプリが生成する 6 桁のコード、または Onshape から提供されたコードを入力します。
- [有効にする] をクリックします。
- 回復コードが表示されたら、安全な場所にコピーしてください。携帯電話や認証アプリを持っていない場合に、それらにアクセスする必要があります。
- [OK] をクリックします。
登録が完了すると、電話アプリには作成した各登録のコードが表示されます。2FA サインインページが表示されたら、これらのコードを Onshape に入力します。
QR コードを使用できない場合は、Onshape インターフェイスにある [このテキストコードを入力] リンクをクリックしてコードを取得してください。
Onshape は一度に 5 つのアクティブなリカバリーコードを提供します。これらのコードは、デバイスや認証アプリとは別のアクセス可能な場所に保管してください。
Onshape は、アプリを削除したり、スマートフォンを紛失したりした場合、お手伝いできません。
これらのリカバリーコードは Onshape インターフェイスからいつでも生成できますが、一度にアクティブになるのは最後に生成されたシリーズだけです。一度使用したコードは無効になります。新しいコードリストを生成すると、それまでのコード (使用済みまたは未使用) はすべて無効になります。
2 段階認証が有効な場合、Onshape はサインイン時にコードの入力を促すメッセージが表示されます。
- Onshape アカウントにパスワードを入力すると、認証コードの入力を求められます。
- デバイス上で 2 要素認証アプリを開いてコードを表示し、Onshape にコードを入力します。
- [確認する] をクリックします。
アプリにアクセスできない場合は、[2 段階回復コード] のリンクをクリックして、現在の回復コードのいずれかを入力します。
2 段階認証はいつでも無効 (および再有効) にできます。
- Onshape のユーザープロファイルページのセキュリティタブで、[管理] 、[無効にする] を順にクリックします。
- パスワードを確認します。
- [OK] をクリックします。
Onshape で 2FA が有効になっているデバイスを交換する必要がある場合は次の手順を実行します。
- デバイスを交換する前に、Onshape インターフェイスを介して 2FA を無効にします。
- 新しいデバイスがオンラインになったら、2FA を有効にします。
Onshape は 2FA の交換オプションに対応していません。ご注意ください。
ID プロバイダーとの統合の構成を参照してください。
セキュリティ上の理由から、Onshape では既存のOnshape アカウントを新しい Enterprise に追加することはできません。
Onshape を使ったことのない新しいユーザーは、すぐに Enterprise に追加されます。
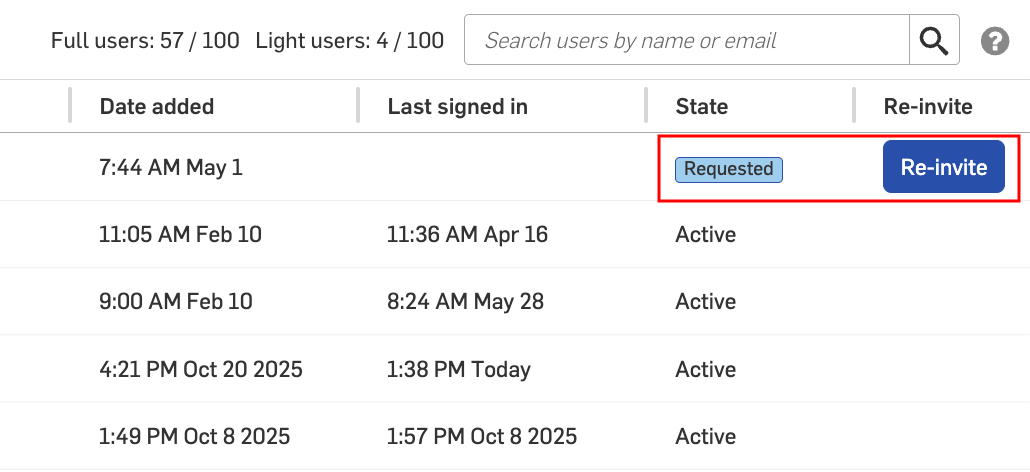
管理者が手動でユーザーを Enterprise に追加した場合、または Onshape を使用したことのあるユーザーがシングルサインオン (SSO) を使用して初めてサインインした場合は、すぐに Enterprise に追加されません。代わりに Enterprise への追加を確定するメールがユーザーに届き、そのメールの [Enterprise に参加] リンクをクリックすると追加されます。ユーザーがこのリンクをクリックするまでは、Enterprise にサインインできません。
管理者は、Enterprise への参加リクエストが送信されたユーザーを [ユーザー] タブで確認できます。ユーザーの状態は、[状態] 列に [リクエスト済み] と示されます。
招待は 48 時間のみ有効です。この時間が過ぎると、管理者は [再招待] ボタンをクリックして新しい招待を送ることができます。
ドメイン検証を行うと、ユーザーは自動的にEnterprise に追加され、アクティブの状態になります。ユーザーは Enterprise に参加する必要はありません。
ドメインのホワイトリストで Google SSO を使用している場合は、ドメイン検証を設定する必要はありません。ユーザーはすぐに追加され、アクティブの状態になります。
ドメイン検証の作成
-
[新しいドメインを構成] ボタンをクリックすると、ドメイン検証を作成ダイアログが開きます。
-
Enterprise ドメインを入力します。
![[ドメイン検証を作成] ダイアログ](../Resources/Images/SSO/domain-verification-05.png)
-
検証タイプを選択します。
-
HTTP - 検証はテキストファイルとウェブサーバーで完了します。
-
DNS - 検証は DNS プロバイダーの TXT レコードで完了します。
-
-
[作成] ボタンをクリックします。
-
ファイルを保存するには、[ファイルをダウンロード] ボタンをクリックします。
![[ドメイン検証を作成] ダイアログ](../Resources/Images/SSO/domain-verification-01.png)
-
[閉じる] ボタンをクリックします。
-
HTTP 検証では、ダウンロードしたテキスト (.txt) ファイルをドメインの .known-hosts、.well-known、または root フォルダに配置します。DNS 検証では、DNS 設定でこのドメインの TXT レコードを作成します。
-
オーバーフローメニューアイコン (
 ) をクリックし、[検証] を選択してドメインを検証します。
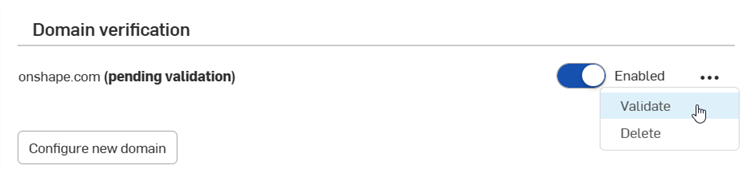
オーバーフローメニューの左側にある切り替えスイッチを使って、ドメインを有効または無効にします。
ドメインを削除するには、オーバーフローメニューアイコン (![]() ) をクリックして、[削除] を選択します。
) をクリックして、[削除] を選択します。
複数のドメインを構成し、有効にすることができます。