Enterprise 設定 - 接続
![]()
![]()
![]()
次にのみ利用可能
外部の Enterprise とデータを共有するための接続を確立してください。Government Enterprise アカウントは、他の Government Enterprise アカウントにのみ接続できます。現在、EDU Enterprise アカウントでは接続できません。
管理者は、異なる Enterprise 間の接続を作成し、その接続に特定のユーザーを追加できます。データは、これらの接続ユーザーとのみ共有されます。確立すると、接続に追加されたユーザーの [接続] タブが共有ダイアログに表示されます。
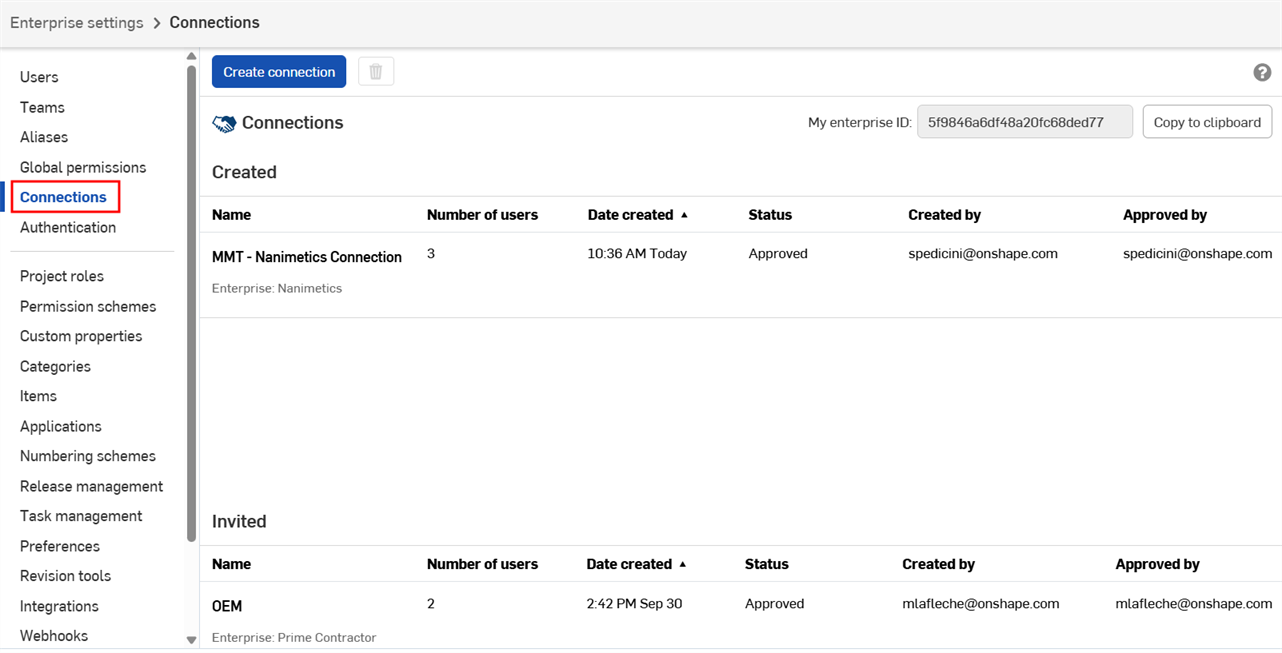
Enterprise の接続を表示するには、Enterprise 設定を開き、画面左側の [接続] をクリックします。作成した接続はウィンドウの上部に表示されます。外部 Enterprise から開始された接続は下部に表示されます。

接続をダブルクリックして開きます。

他の Enterprise の分析、使用場所、リリース管理情報は、接続しているユーザーには表示されません。
- Enterprise 設定で、画面左側の [接続] をクリックします。
- ページ下部に招待が表示されます。招待を承認するには [承認] ボタンをクリックし、招待を拒否するには [拒否] をクリックします。
![保留中の接続の [承認] ボタンと [拒否] ボタン](../Resources/Images/enterprise/connections-external-pending-01.png)
- [承認] (または [拒否]) をクリックして、ダイアログでの選択を確定します。接続の状態が [保留中] から [承認済み] に変わります。
両方の Enterprise 管理者は、どのユーザーがデータを共有できるかを指定する必要があります。接続にユーザーを追加するには、次の手順を行います。
- Enterprise 設定で、画面左側の [接続] をクリックします。
- 接続をダブルクリックして開きます。
- [ユーザーを追加] (
 ) をクリックします。
![接続ウィンドウで強調表示されている [ユーザーを追加] ボタン](../Resources/Images/enterprise/connections-add-user-01.png)
- 追加するユーザーの名前またはメールアドレスを入力して、[追加] をクリックします。
![[追加] ダイアログ](../Resources/Images/enterprise/connections-add-user-dialog-01.png)
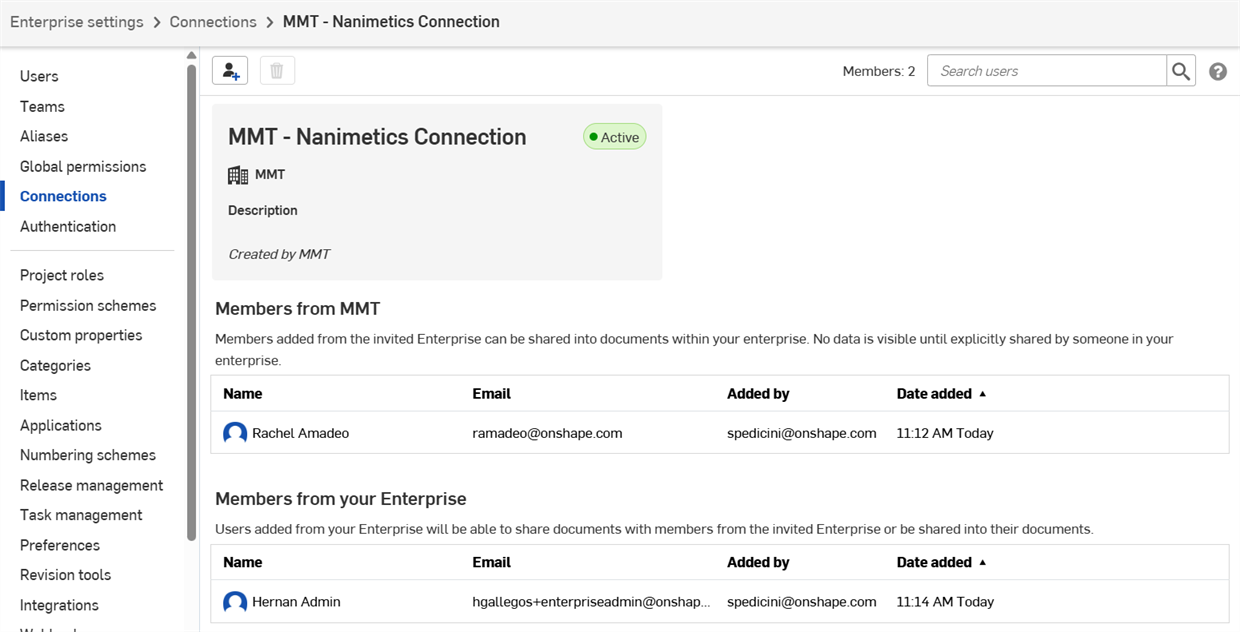
アクティブなユーザーが接続ページに表示されます。
![アクティブなユーザーが一覧表示されている [接続] ページ](../Resources/Images/enterprise/connections-active-users-01.png)
両方の Enterprise の管理者が双方の接続に少なくとも 1 人のユーザーを追加すると、それらのユーザーの共有ダイアログに [接続] タブが表示されます。詳細は、ドキュメントの共有を参照してください。
接続からのユーザーの削除:
- 接続ウィンドウでユーザー名をクリックします。
- [削除] (
 ) をクリックします。
![削除するユーザーを選択し、[削除] ボタンをクリック](../Resources/Images/enterprise/connections-remove-user-01.png)
- もう一度 [削除] をクリックして確定します。
[接続] ウィンドウの [ユーザーを検索] フィールドを使用して、アクティブなユーザーを検索することもできます。
![接続で強調表示されている [ユーザーを検索] フィールド](../Resources/Images/enterprise/connections-search-01.png)
接続を編集できるのは、作成した管理者のみです。
- Enterprise 設定で、画面左側の [接続] をクリックします。
- 接続をダブルクリックして開きます。
- [接続を編集] (
 ) をクリックします。
![接続ウィンドウで強調表示されている [接続を編集] ボタン](../Resources/Images/enterprise/connections-edit-01.png)
- 接続名または説明を変更するか、接続を編集ダイアログで接続の Enterprise ID をコピーします。
![[接続を編集] ダイアログ](../Resources/Images/enterprise/connections-edit-dialog-01.png)
- [保存] をクリックします。
接続を削除できるのは、作成した管理者のみです。
- Enterprise 設定で、画面左側の [接続] をクリックします。
- 選択する接続をクリックします。
- [削除] (
 ) をクリックします。
- [削除] をクリックして確定します。
これらのバッジは、現在の Enterprise 外部との接続を示します:
-
 - ユーザーが外部の Enterprise の接続に属しています。
 -
 - Enterprise は外部接続です。
 -
 - コンテンツが外部の Enterprise と共有されています。
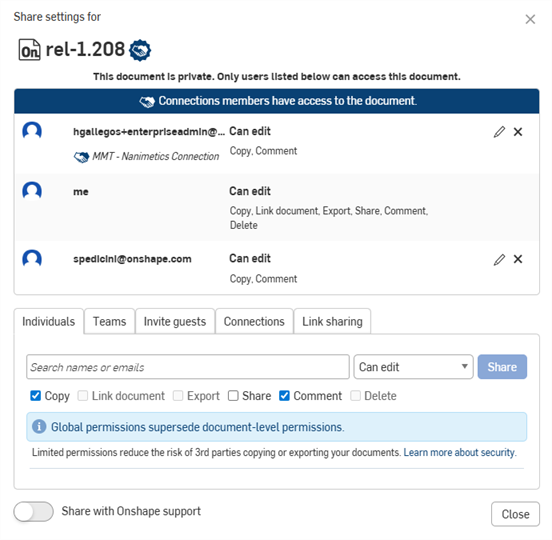
外部接続と共有されているドキュメント、フォルダまたはパブリケーションには、ツールバー、共有ダイアログ、ドキュメントリストページの詳細を共有パネルおよびコメントパネルのバッジまたはバナーが表示されます。

バッジは、ドキュメントが現在の Enterprise によって所有され、外部の Enterprise と共有されていることを示します

バッジと青い水平バーは、ドキュメントが外部の Enterprise によって所有され、現在の Enterprise と共有されていることを示します

共有ダイアログの接続バナーとアイコン
iOS での接続のサポートは、接続に追加されたユーザーによる共有ダイアログの [接続] タブの使用に限定されています。共有ダイアログの使い方について詳しくはドキュメントの共有を、ユーザーの追加について詳しくは接続にユーザーを追加するを参照してください。

![[接続を作成] ダイアログ](../Resources/Images/enterprise/connections-create-01.png)
