 Altium 365 統合
![]()
のみ利用可能。
利用可能: PCB Studio
Altium 365 統合は、ユーザーの Altium アカウントを Onshape アカウントにリンクします。統合すると、ユーザーは Altium のワークスペースを閲覧したり、ファイルを使用せずに Altium ボードを PCB Studio に直接インポートしたりできます。Altium ボードをインポートすると、IDF などのファイル形式からインポートされたボードで既に使用されているツールを使用して Onshape で作成できます。
Altium 365 統合は双方向です。Onshape でボードの外形やコンポーネントの位置を変更し、PCB Studio に再度インポートして Altium に戻すことができます。
IDF ファイルとは異なり、Altium から PCB Studio にインポートされたボードは、ボードの銅、ソルダーマスク、シルクスクリーンが描かれたデカールで作成されます。Altium にある関連の 3D コンポーネントモデルはすべてインポートされ、PCB Studio のコンポーネントマッピングライブラリに追加されます。
Altium 365 を Onshape で使用するには、以下が必要です。
-
Altium のアカウント (サインイン)
-
Altium のワークスペースへのアクセス
-
ボードプロジェクトの編集権限
Altium での共同作業は、Altium の MCAD CoDesigner 拡張を介して行われます。
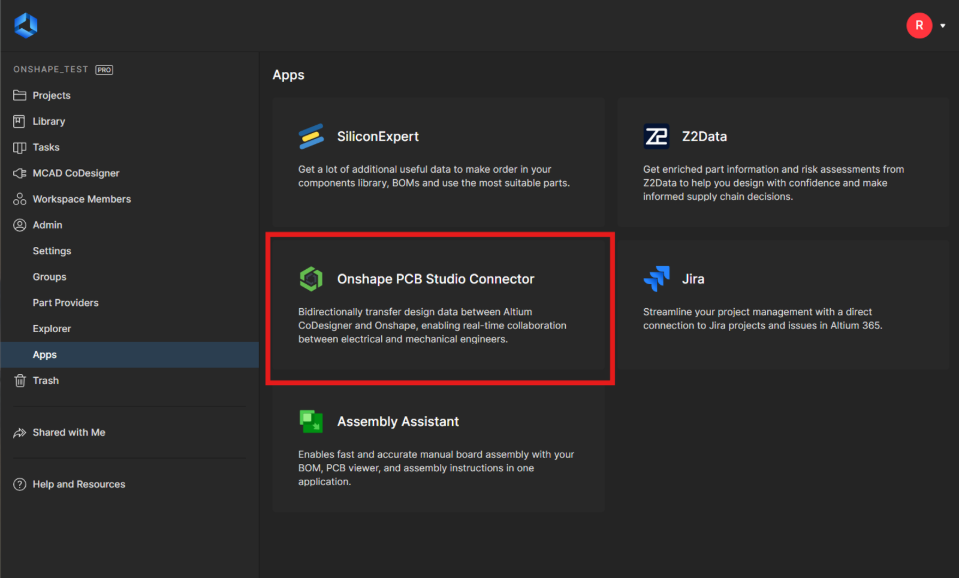
PCB Studio から Altium のワークスペースにアクセスする前に、各ワークスペースで Onshape PCB Studio コネクタアプリを有効にする必要があります。この手順を完了するには、Altium のワークスペースの管理者権限が必要です。
-
Altium にサインインします。
-
左側のメニューから [管理] > [アプリ] を選択します。
-
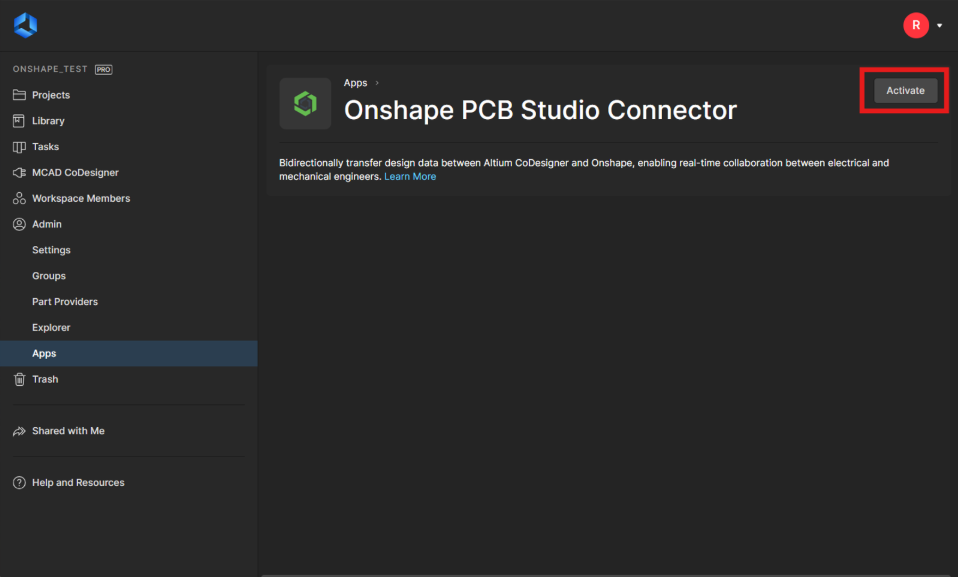
Onshape PCB Studio コネクタアプリを選択します:
-
[有効にする] をクリックします:
-
確認ダイアログで [有効にする] をもう一度クリックして、Altium ワークスペースにアプリを追加します。統合は、必要に応じていつでもワークスペースから削除できます。同じ画面に戻って [無効にする] をクリックします。
Altium 365 統合は、Enterprise または Company の管理者によって管理される場合があります。Enterprise または Company で Altium 365 を管理している場合は、Enterprise 設定 - 統合を参照してください。
現在、Altium 365 統合は Onshape Government サブスクリプションではサポートされていません。
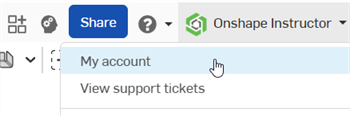
PCB Studio タブで Altium のワークスペースプロジェクトにアクセスするために Altium 365 アカウントを統合するには、次の手順を実行します。
-
Onshape ウィンドウの右上隅にある [アカウントユーザー] > [マイアカウント] をクリックします。
-
ページ左側のリストの [統合] をクリックします。
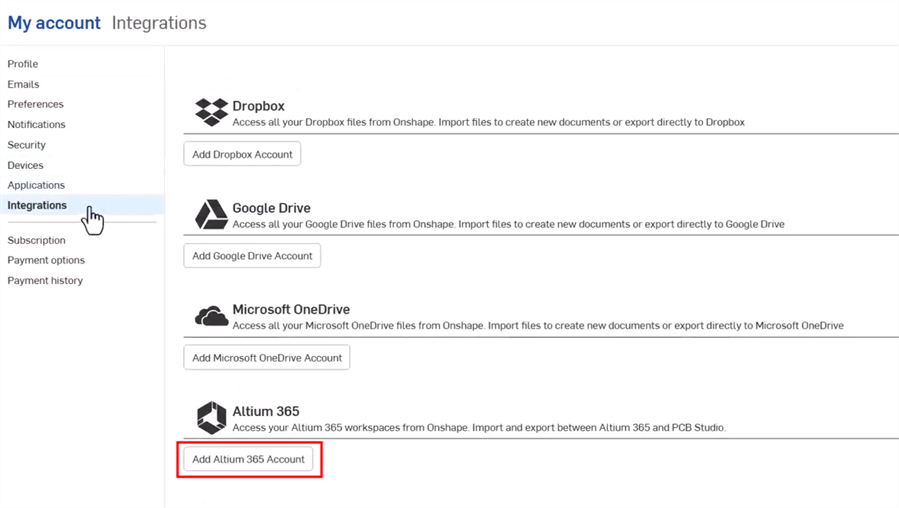
-
[Altium 365 アカウントを追加] ボタンをクリックします。
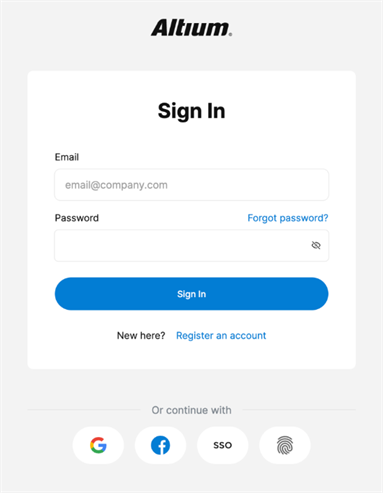
-
まだログインしていない場合は、Altium のサインインページが表示されます。認証情報を入力し、[サインイン] ボタンをクリックします。Altium のメールアドレスは、Onshape のメールアドレスと同じである必要はありません。
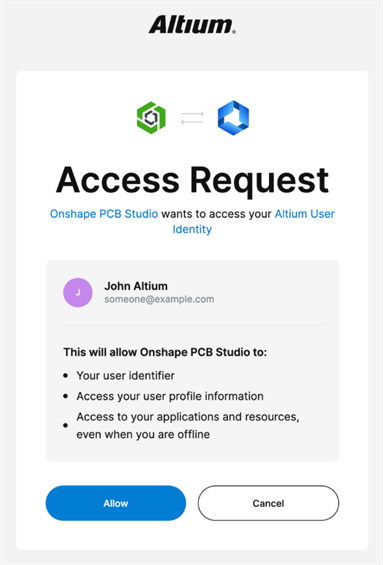
-
アクセスリクエストダイアログが表示されます。Onshape PCB Studio を Altium ユーザー ID に接続するリクエストを承認するには、[許可] ボタンをクリックします。
Altium 統合を追加した Onshape の統合ページにリダイレクトされます。

統合を削除するには [削除] をクリックし、更新するには [更新] をクリックします。
Altium 365 アカウントを Onshape と統合 (上記で説明) したら、次の手順を行います。
-
ドキュメントページで、新しいドキュメントを作成します ([作成] > [ドキュメント])。
-
新しい PCB Studio タブを作成します。Onshape での PCB Studio を作成するを参照してください。
-
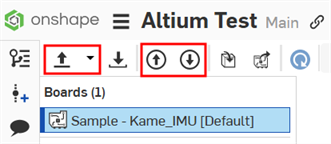
PCB Studio タブの左上には、次の 3 つのアイコンがあります。
-
ECAD ファイルのインポート (
 ) - Altium 365 クラウドサービスからボードをインポートします。ドロップダウンメニューボタン (
 ) を使用し、[Altium 365 からインポート] を選択します。
 -
ボードをクラウドサービスにプッシュ (
 ) - ボードを Altium 365 クラウドサービスにプッシュします。
 -
ボードをクラウドサービスからプル (
 ) - ボードを Altium 365 クラウドサービスからプルします。
ドロップダウンメニューボタン (
) をクリックし、[Altium 365 からインポート] を選択します。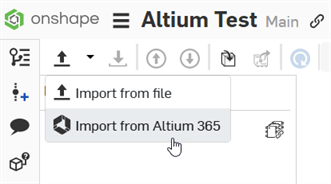
-
-
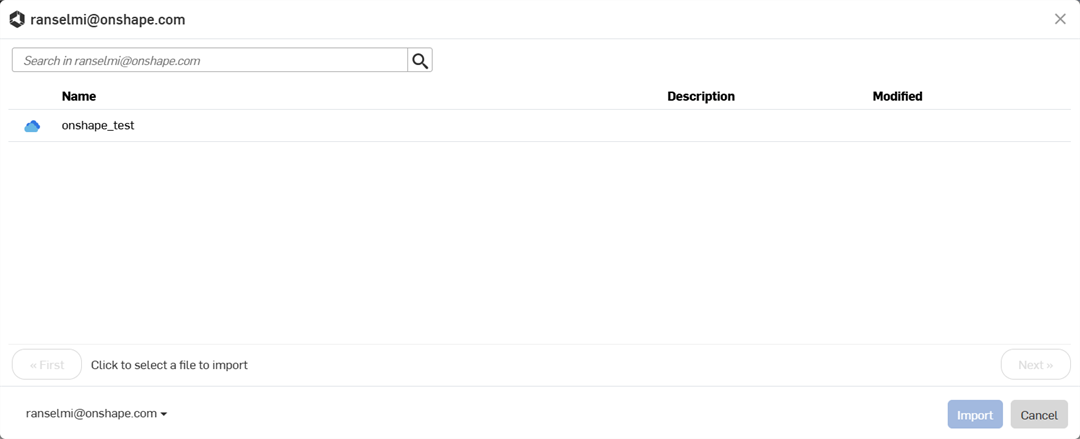
ダイアログが開き、あなたがメンバーになっているすべての Altium ワークスペースが表示されます。必要なワークスペースをクリックします (下の例では onshape_test の 1 つしかありません)。または、ワークスペースを選択せずにダイアログを終了するには、[キャンセル] ボタンをクリックします。
-
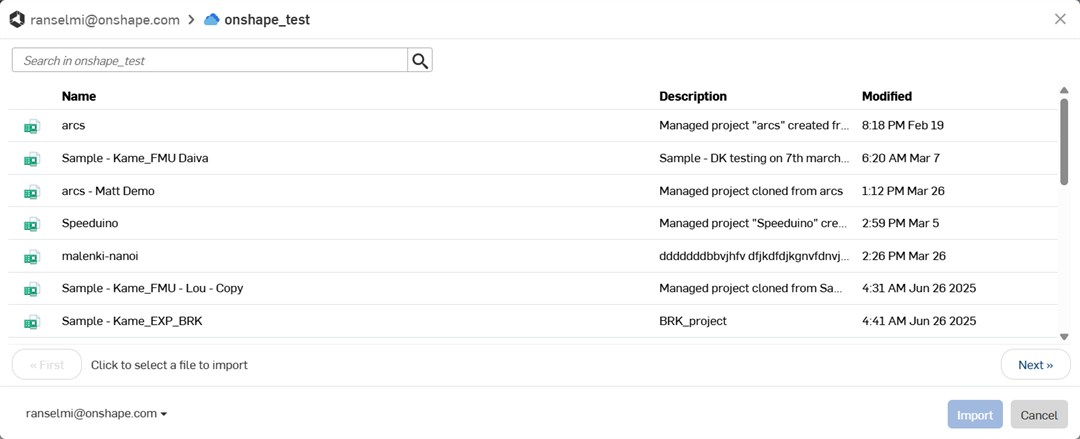
ダイアログが開き、ワークスペースのすべてのプロジェクトが表示されるので、リストからプロジェクトをクリックして選択します。リストの下の [次へ] ボタンをクリックしてワークスペースプロジェクトの次のページに進むか、[最初] ボタンをクリックして最初のページに戻ります。
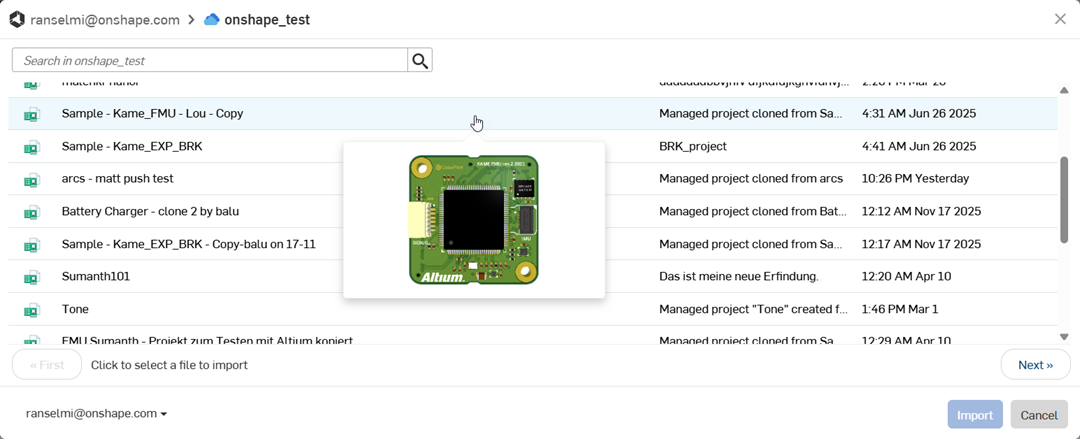
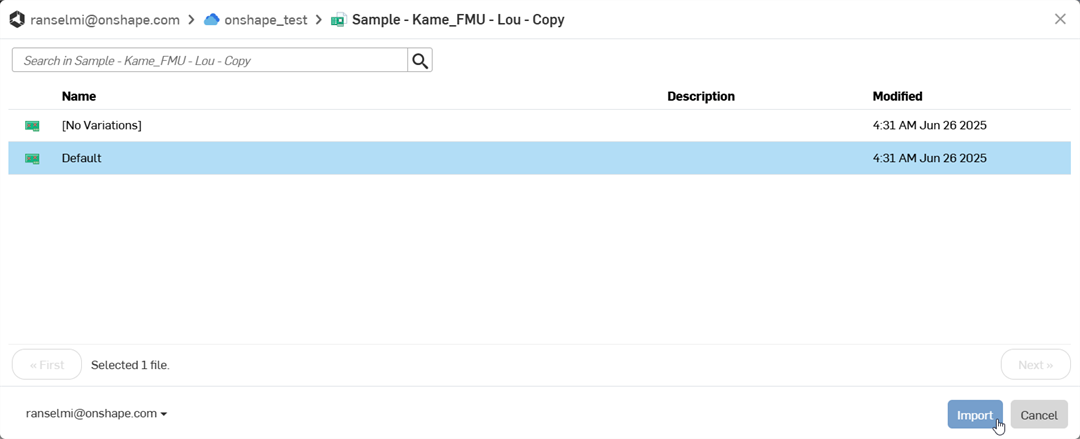
プロジェクトにカーソルを合わせると、カーソルの下にサムネイルが表示され、次のようにプロジェクトを視覚化できます。
プロジェクトを選択すると、ダイアログが開き、すべてのプロジェクトのバリエーションが表示されます。プロジェクトのバリエーションをクリックして選択し、次に [インポート] ボタンをクリックします。または [キャンセル] ボタンをクリックして、プロジェクトのバリエーションを選択せずにダイアログを終了します。
-
詳細なモデルコンポーネントを複数ダウンロードしている場合は、最初のプロジェクトが画面に表示された後、さらに時間がかかる場合があります。これらのコンポーネントはバックグラウンドプロセスでダウンロードされます。すべてのコンポーネントが取り込まれたら、ツールバーの右上にある [更新] アイコン (
 ) をクリックして、ライブラリドキュメントを最新バージョンに更新します。
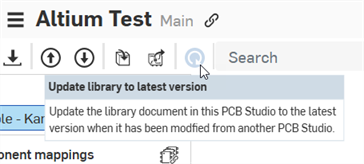
インポート後、プロジェクトは PCB Studio タブにダウンロードされます。
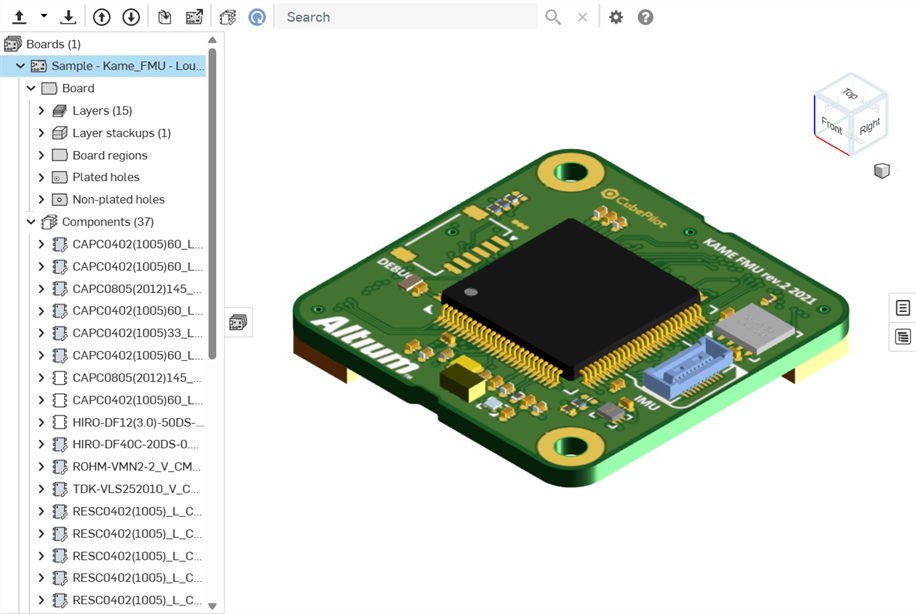
この時点で、この PCB Studio ボードからアセンブリを作成できます。CAD データを ECAD に変換するを参照してください。
Onshape の Part Studio とアセンブリでボードの編集を行い、PCB Studio と同期したら、次のようにそれらの変更を Altium にプッシュバックします。
-
[ボードをクラウドサービスにプッシュ] ボタン (
) をクリックします。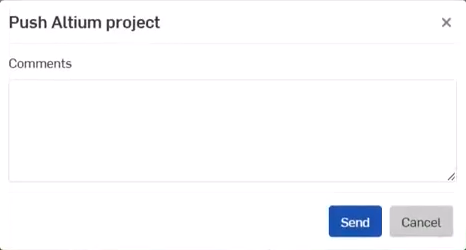
-
Push Altium プロジェクトダイアログが開きます。ECAD ユーザーへのメッセージとして、[コメント] フィールドにコメントを追加します。これは、Onshape でボードを編集している間に加えた変更などに関する情報です。
-
[送信] ボタンをクリックします。または、ボードを Altium にプッシュせずにダイアログを終了するには、[キャンセル] ボタンをクリックします。
-
Altium の ECAD ユーザーは、次の操作を行います。
-
ボードに追加されたメッセージとすべての変更を確認します
-
これらの変更をボードに適用するかどうかを決定します
-
ボードにさらに変更を加えます
-
[MCAD にプッシュ] ボタンをクリックし、次の操作を行います。
-
MCAD ユーザーにメッセージを追加します
-
[送信] ボタンをクリックします。
-
-
-
PCB Studio で MCAD ユーザーが [クラウドサービスからボードをプル] ボタン (
) をクリックすると、ボードが Altium から PCB Studio に取り込まれ、Altium で ECAD ユーザーが行った変更を反映して更新されます。
このプロセスは、MCAD ユーザーと ECAD ユーザーの間でボードが完成するまで、何度でも繰り返すことができます。
-
CAD データを ECAD に変換すると、追加のボードデカールがドキュメントの別のタブに作成されます。これらのデカールはボードモデルのサーフェスにマッピングされます。
-
銅とシルクスクリーンの情報は単方向です。つまり、Altium からOnshape に取り込まれますが、Onshape から Altium に送り返されることはありません。