Microsoft Entra ID との統合 (旧: Azure AD)
![]()
![]()
![]()
統合プロセスを開始する前に、Onshape Enterprise アカウントまたは試用版を要求し、承認され、Onshape Enterprise ドメイン名を持っている必要があります。
Enterprise ドメイン名は、たとえば MyCompanyName.onshape.com のような形になります。
一度に使用できる SSO プロバイダーは 1 つだけであることに注意してください。
このコンフィギュレーションプロセスは、組織用にカスタマイズしたパラメータ値がないと失敗することがあります。カスタム SSO ID プロバイダー (Okta、PingOne、ClassLink など) ダッシュボードを使用して、Onshape をアプリケーションとして追加し、組織に固有の値を記録します。次の手順では、これらの値が必要です。
Onshape は、送信されるすべての SAML 証明書リクエストに署名します。ADFS は受信した SAML リクエストを検証するため、ADFS 統合の場合を除き、証明書 (SAML 署名証明書など) をアップロードする必要はありません。Microsoft では、最新バージョンの ADFS から Microsoft Entra ID への移行も推奨しています。詳細は、ADFS の概要を参照してください。
通常、1 つの Enterprise に 1 つの SSO プロバイダーを設定します。SAML 2.0 を使用してマルチテナントコンフィギュレーション (複数の Enterprise がある SSO プロバイダー) を設定する場合、管理者は com.onshape.saml2.sp.<ドメインプレフィックス> を Onshape エンティティ ID として使用し、[entityId を Company のドメインプレフィックスに使用] チェックボックスをオンにする必要があります。以下の「Onshape での SSO プロバイダーの構成」セクションを参照してください。
Onshape を Entra ID (旧: Azure AD) のシングルサインオンアカウントに追加する
会社のシングルサインオンを有効にするには、まず Entra ID (旧: Azure AD) のシングルサインオンアカウントに Onshape アプリケーションを追加する必要があります。
- Microsoft Entra ID (旧: Azure AD) のポータルにサインインします。ホームページに移動します。
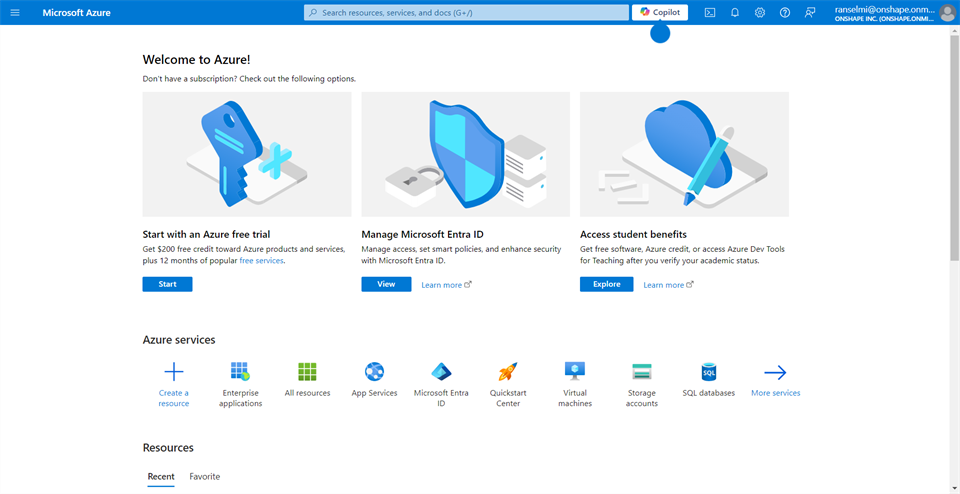
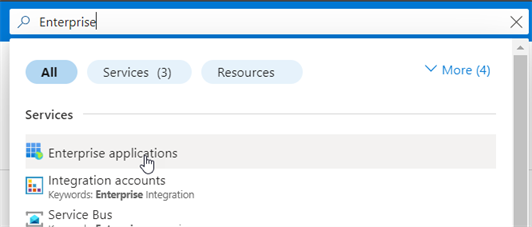
- 検索バーに「Enterprise アプリケーション」と入力し、[Enterprise アプリケーション] を選択します。
- [すべてのアプリケーション] ページの上部で、[新規アプリケーション] をクリックします。
![[Enterprise アプリケーション] ページから [新しいアプリケーション] を選択する例](Resources/Images/SSO/azure-sso-004-02.png)
- Microsoft Entra ギャラリーの参照ページにある [アプリケーションを検索] フィールドで Onshape を検索し、次に [Onshape] ボタンをクリックします。
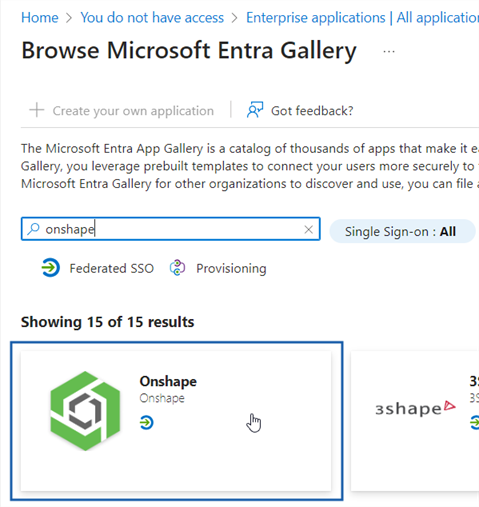
-
Onshape アプリケーションペインが右側に表示されます。ペインの下部にある [作成] ボタンをクリックします。
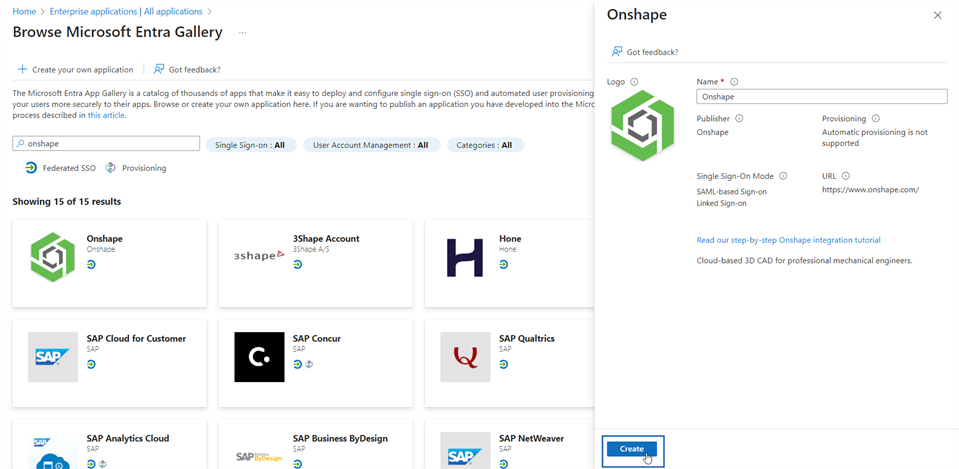
Microsoft Entra が、ユーザーに代わって新しいアプリケーションを作成します。セットアップには数秒かかる場合があることに注意してください。
- アプリが作成されたら、[2. シングルサインオンの設定] ボタンをクリックします。
![[シングルサインオンの設定] オプションを選択する](Resources/Images/SSO/azure-sso-007-03.png)
- Onshape は SAML 認証のみをサポートするため、[SAML]ボックスをクリックします。
![[シングルサインオン] ページで [SAML] オプションをクリックする](Resources/Images/SSO/azure-sso-007-03a.png)
シングルサインオンの保存設定が開いたら、[はい] をクリックします。
![[はい] をクリックしてシングルサインオン設定を保存する](Resources/Images/SSO/azure-sso-036a.png)
SAML ベースのサインオンページが開きます。
SAML コンフィギュレーション
- [ユーザー属性と要求] サブセクションで、ボックスの右上隅にある [編集] をクリックします。
![クリックして、[SAML ベースのサインオン] ページで [ユーザー属性と要求] を編集する](Resources/Images/SSO/azure-sso-037.png)
- 開いている [ユーザー属性と要求] ページで、companyName 要求をダブルクリックします。
![[ユーザー属性と要求] ページで CompanyName 要求を選択する](Resources/Images/SSO/azure-sso-038.png)
-
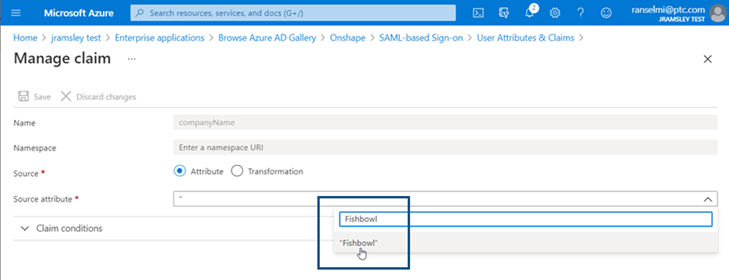
ドメイン名プレフィックスを [ソース属性] フィールドに入力します。たとえば、Onshape Enterprise の名前が fishbowl.onshape.com の場合は、Fishbowl と入力します。入力したら、フィールドの下のエントリをさらにクリックする必要があります (下の画像のカーソルで示した場所)。
- [保存] をクリックします。
![[要求の管理] ページの要求を保存する例](Resources/Images/SSO/azure-sso-040.png)
- ページを閉じるには、右上隅にある X をクリックします。
![[ユーザー属性と要求] ページを閉じる](Resources/Images/SSO/azure-sso-041.png)
-
シングルサインオンをテストするかどうか尋ねられたら、[いいえ、後でテストします] を選択します。
![[SAML ベースのサインオン] ページで [いいえ、後でテストします] ボタンをクリックする](Resources/Images/SSO/azure-sso-042.png)
-
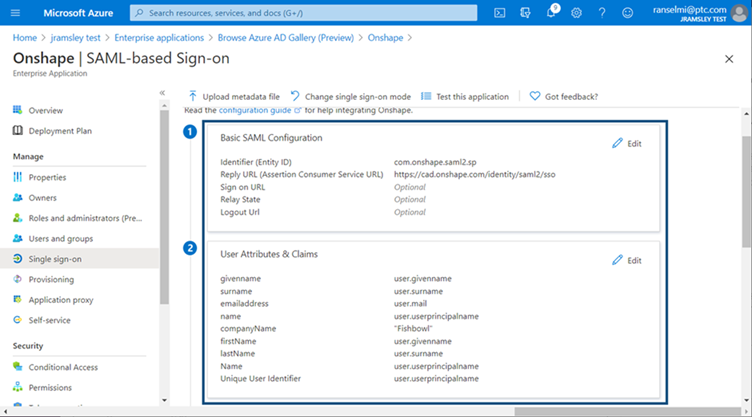
SAML-based サインオンページが再度表示されます。ページは以下の画像のようになります。
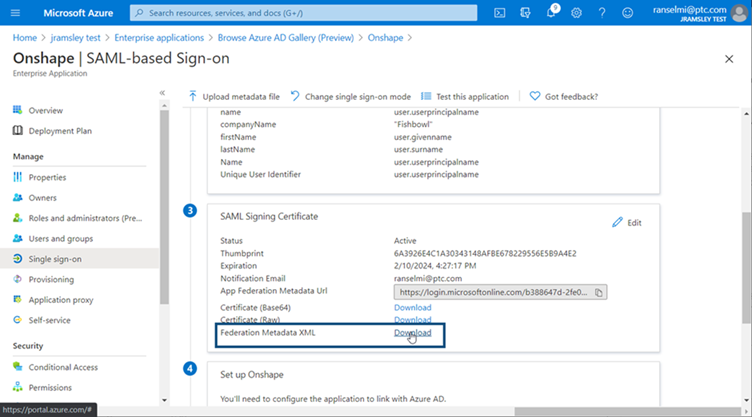
- ページを下にスクロールして、サブセクション 3 SAML 署名証明書に移動します。このサブセクションの下部にある「フェデレーションメタデータ XML」の [ダウンロード] リンクをクリックします。この XML ファイルは、後でシングルサインオンのコンフィギュレーションプロセスで使用します。
-
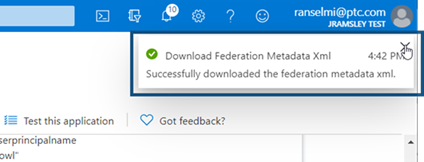
このファイルが正常にダウンロードされると、右上にメッセージが表示されます。メッセージを閉じるには、X をクリックします。
ユーザーとグループを設定する
- 左側のナビゲーションペインで、[ユーザーとグループ] を選択します。
![[SAML ベースのサインオン] ページの左側にあるナビゲーションから [ユーザーとグループ] を選択する](Resources/Images/SSO/azure-sso-020-01.png)
-
[ユーザーとグループ] ページが表示されます。[ユーザー/グループを追加] をクリックします。
![[ユーザーとグループ] ページの [ユーザー / グループの追加] ボタンをクリックする](Resources/Images/SSO/azure-sso-021-02.png)
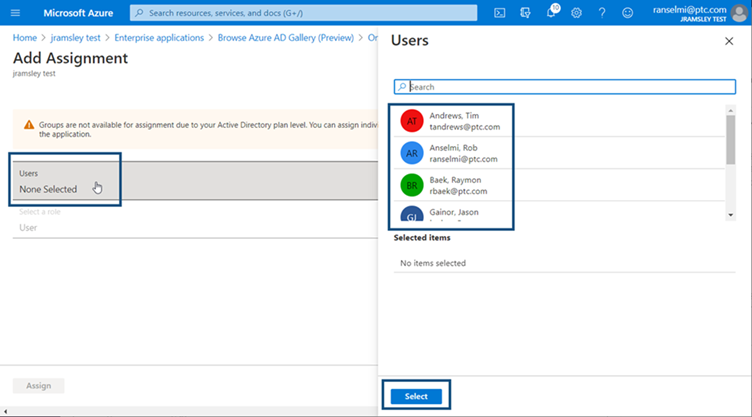
- [割り当ての追加] ページが開きます。左側の [ユーザー - 選択なし] をクリックします。
右側に [ユーザー] ペインが開きます。招待したいユーザーを検索して選択します。選択したユーザーは、下の [選択済みアイテム] ペインのサブセクションに移動します。選択したすべてのメンバーがこのペインに表示されたら、[選択] ボタンをクリックします。
- [割り当て] をクリックします。
![[割り当ての追加] ページで [割り当て] ボタンをクリックする](Resources/Images/SSO/azure-sso-023.png)
- [ユーザーとグループ] ページが開き、新しいユーザーが表示されます。
![[ユーザーとグループ] ページに追加された新しいユーザー](Resources/Images/SSO/azure-sso-024-01.png)
この時点で、Microsoft Entra ポータルを離れて、Microsoft Active Directory アプリケーションダッシュボードを開くことができます。
Onshape での SSO プロバイダーの構成
ID プロバイダーで Onshape を構成し、ID プロバイダーのメタデータファイル (Onshape ではコンフィギュレーションファイルと呼びます) をダウンロードしたら、Onshape で SSO プロバイダーを構成できます。
以下の画像の例は、構成中の汎用 ID プロバイダーを示していますが、手順はすべての ID プロバイダーで同じです。
- 専用のドメイン名を使用して、管理者として Onshape Enterprise アカウントにサインインします。アカウントから Enterprise 設定を選択します。
![[マイアカウント] メニューに移動し、[Enterprise 設定] ボタンをクリックする](Resources/Images/SSO/azure-sso-025-02-01.png)
- 左側のナビゲーションメニューから [認証] を選択します。
-
[シングルサインオン (SSO)] サブセクションで、[SSO プロバイダーを構成] ボタンをクリックします。
![[シングルサインオン (SSO)] 設定の [SSO プロバイダーを構成] をクリックする](Resources/Images/SSO/azure-sso-027-02.png)
-
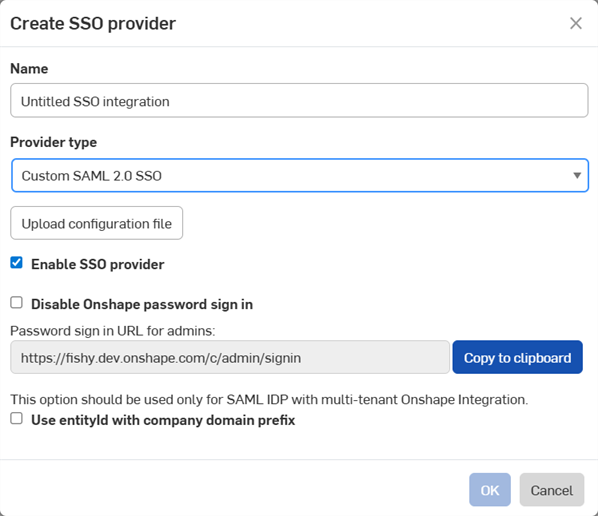
SSO プロバイダーを作成ダイアログが開きます。
-
[名前] フィールドに、カスタム SSO などの名前を入力します。
-
[プロバイダータイプ] ドロップダウンで、一覧から SSO プロバイダーを選択します。
-
[SSO プロバイダーを有効化] はオンのままにします。
-
今のところ、[Onshape パスワードによるサインインを無効にする] チェックはオフのままにしておきます。
-
マルチテナント設定 (複数の Enterprise を持つ SSO プロバイダー) を使用している場合は、[Company ドメインプレフィックス付きのエンティティ ID を使用] をオンにします。
-
[コンフィギュレーションファイルをアップロード] ボタンをクリックします。
[Onshape パスワードによるサインインを無効にする] をオンにすると、自分とユーザーの通常の Onshape パスワードサインインが無効になります。Onshape の URL には SSO プロバイダーのサインインプロンプトのみが表示されます。このオプションをチェックする前に、管理者として Onshape にサインインできることを確認してください。SSO プロバイダーからのサインインが正しく機能することが確認されたら、後でここに戻って有効にできます。
SSO を介した Onshape サインインの強制を選択すると、ユーザーは cad.onshape.com などの Enterprise 以外のドメインに直接サインインできなくなります。
通常、1 つの Enterprise に SSO プロバイダーをセットアップします。SAML 2.0 を使用してマルチテナントコンフィギュレーション (複数の Enterprise がある SSO プロバイダー) をセットアップする場合、管理者は com.onshape.saml2.sp.<ドメインプレフィックス> を Onshape エンティティ ID として使用し、[entityId を Company のドメインプレフィックスに使用] チェックボックスをオンにする必要があります。
-
-
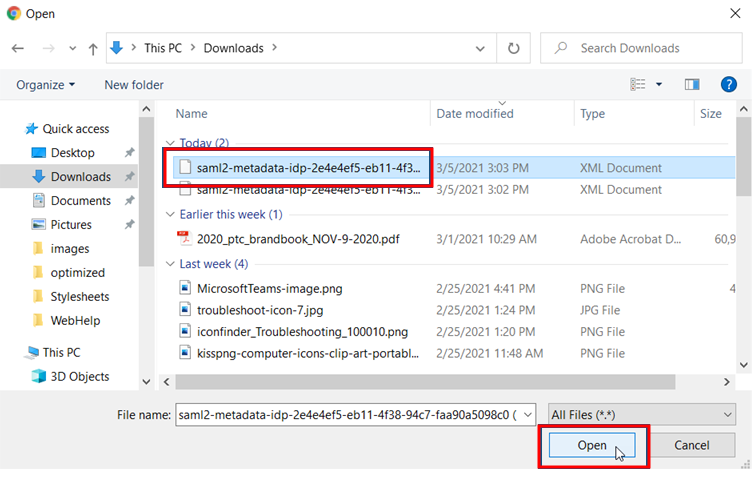
以前にダウンロードしたメタデータコンフィギュレーションファイルを探して選択し、[開く] をクリックします。
-
[OK] をクリックします。
![[OK] をクリックして SSO プロバイダーの作成を完了させる](Resources/Images/SSO/custom-sso-03-02.png)
-
ファイルがアップロードされます。アップロードが完了すると、通知が表示されます。
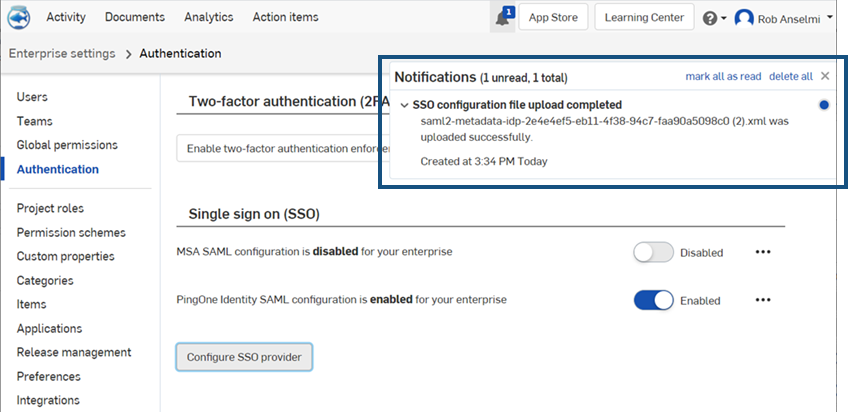
- Onshape アカウントと SSO プロバイダーアカウントの両方からサインアウトします。両方のアカウントを必ず更新してください。Onshape のサインインページに再度アクセスすると、ページの下部に SSO プロバイダー用の新しい [サインイン] リンクが表示されます。
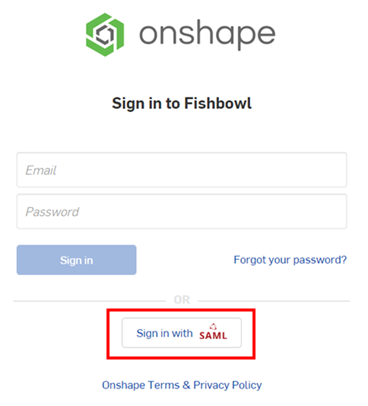
Onshape にサインインするには、管理者は Onshape アプリケーションを使用するために (シングルサインオンアカウントで) ユーザーをプロビジョニングする必要があります。
トラブルシューティング
次のエラーが表示された場合:
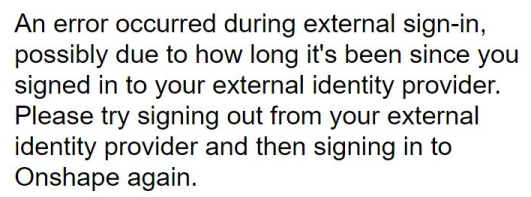
すべてのタブを閉じ、完全にサインアウトして Microsoft にサインインし直します。
Onshape に再度サインインします。
AD 管理パネルの「接続テスト」ボタンは機能しないことに注意してください。