Analyse Dépouille
![]()
Disponible dans : Esquisse, Part Studio
Utilisez l'analyse Dépouille pour rechercher dans le modèle des faces qui ne correspondent pas à une zone minimale de dépouille spécifiée, pour découvrir les zones de contre-dépouille et pour localiser les emplacements potentiels des lignes de séparation des géométries sélectionnées dans un Part Studio.
- Cliquez sur l'icône Afficher les outils d'analyse (
 ) dans le coin inférieur droit de la zone graphique. Dans le menu, sélectionnez analyse de Dépouille pour ouvrir la boîte de dialogue et la légende des couleurs. Dans la boîte de dialogue, indiquez la direction de scission du moule en sélectionnant un plan, une face ou une arête.
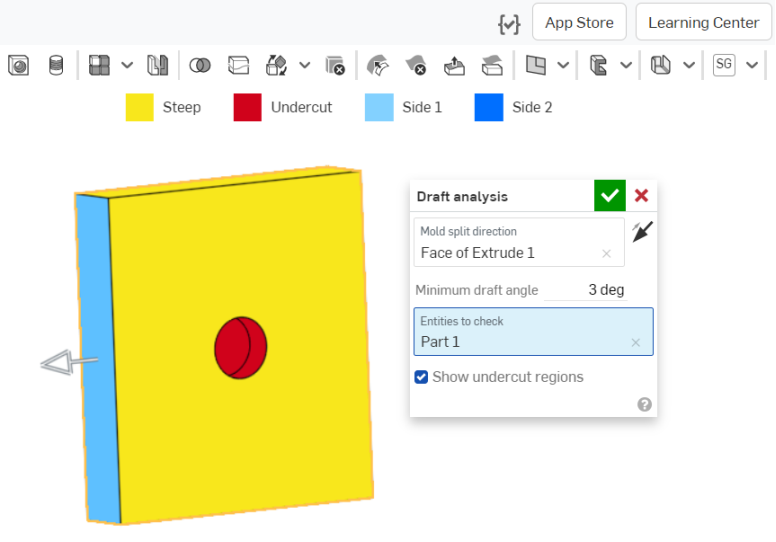
- Spécifiez l'angle de dépouille minimal.
- Sélectionnez les entités à vérifier.
- Désactivez éventuellement l'affichage des faces de contre-dépouille rouges à l'aide de la case à cocher Afficher les régions de contre-dépouille.
Notez la légende des couleurs de l'esquisse d'analyse en haut de l'interface.
- Les faces en bleu indiquent qu'elles atteignent l'angle minimal spécifié pour la dépouille.
- Les faces en jaune indiquent qu'elles sont trop raides (moins que la dépouille minimale spécifiée).
- Les faces en rouge indiquent des faces de contre-dépouille.
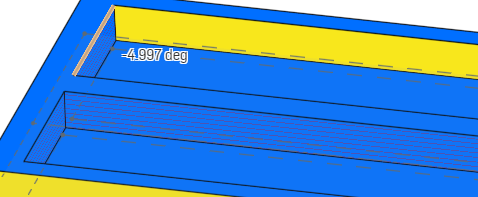
Vous pouvez afficher l'angle exact des dépouilles individuelles en déplaçant le curseur sur le modèle :
Comme pour les autres modes de visualisation, l'analyse de dépouille reste active jusqu'à ce que vous sélectionniez autre chose. Pendant qu'elle est active, vous pouvez modifier la pièce pour corriger les dépouilles et voir le résultat immédiat de vos actions. Vous pouvez également utiliser des vues en coupe pour mieux voir le modèle sous différents angles.
L'analyse de la dépouille fonctionne automatiquement dans les deux sens. Onshape affiche une dépouille acceptable de différentes couleurs pour indiquer la direction : bleu clair pour le côté 1 (direction positive) et bleu foncé pour le côté 2 (direction négative). La flèche du manipulateur pointe sur le côté 1 et vous pouvez la retourner à l'aide de la flèche directionnelle dans la boîte de dialogue, comme indiqué ci-dessus à côté du champ Direction de la division du moule.

L'image ci-dessus montre l'angle de dépouille après avoir cliqué sur la flèche directionnelle pour inverser la direction de l'analyse : le bleu clair montre la direction positive et l'angle est montré comme un angle positif. En revanche, l'image qui précède, le bleu foncé montre la direction négative et l'angle est montré comme un angle négatif.