 Usar
Usar
![]()
![]()
![]()
Proyecte (o convierta) una arista, aristas y siluetas de una pieza o boceto en el plano de boceto activo.
Acceso directo: u
Para proyectar o convertir una arista, aristas y aristas de silueta de una pieza o un boceto en el plano de boceto activo, cree un nuevo boceto, seleccione el plano que desee utilizar y, a continuación, haga clic en la herramienta Usar (proyectar/convertir) de la barra de herramientas de boceto. Ahora puede seleccionar las líneas que aparecen en función del plano. Cuando haya terminado, haga clic en la marca de verificación verde para aceptar el boceto y tendrá un nuevo boceto basado en la pieza.
Pasos
- Cree un boceto o una pieza.
- Empiece otro boceto.
- Haga clic
 y, a continuación, una arista, aristas o silueta aristas del primer boceto o pieza.
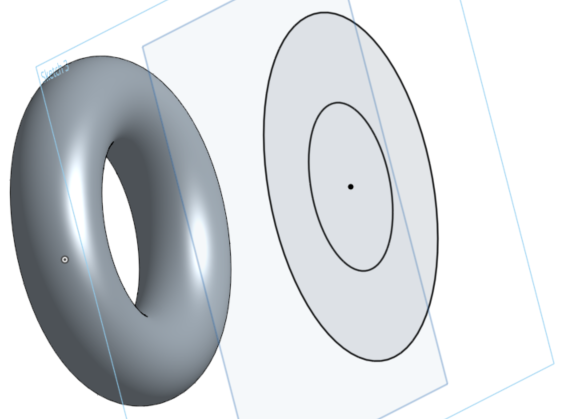
En este ejemplo, se ha seleccionado la arista resaltada de la pieza para utilizarla (proyectar) en el plano de boceto, lo que da como resultado la línea horizontal resaltada.
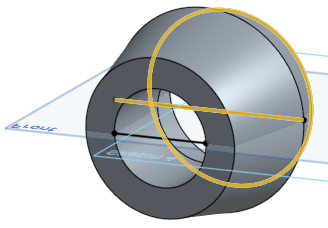
Al pasar el cursor sobre entidades, aparecerá una vista previa de las líneas proyectadas.
Uso de bordes de silueta
Al ver un modelo normal a un boceto, cualquier límite visible que no sea una arista es un borde de silueta, donde la superficie pasa de estar orientada hacia usted a estar orientada en dirección opuesta a usted.
¿Cómo funciona el uso de un borde de silueta?
- Haga clic en .
Tenga en cuenta que NO hay ningún comportamiento de preselección para las siluetas.
- Pase el cursor sobre la cara para la que desea una silueta.
Deberías ver los aspectos destacados. Si la silueta real está fuera del plano de boceto, verá dos. Una que es la silueta «real», una que es la proyección en el plano de boceto. Ambas son seleccionables.
- Sitúa el cursor sobre un resaltado y, a continuación, haz clic en él para proyectar ese borde de silueta. (El resaltado sobre el que se pasa el ratón para seleccionarlo, en la parte superior, aparece resaltado en amarillo).
Ten en cuenta que cuando hay varios bordes de silueta disponibles, puedes hacer clic en una cara para seleccionar todos los bordes de la silueta, o pasar el cursor sobre un borde de silueta individual y hacer clic para seleccionar solo los que deseas usar:
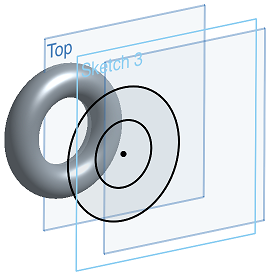
Así es como se ve el resaltado cuando pasa el cursor:
Después de la selección y proyección en otro plano:
Al pasar el cursor sobre entidades, aparecerá una vista previa de las líneas proyectadas.
Si no hay resaltados visibles, es posible que se esté viendo una limitación, consulte Consejos a continuación.
Consejos
- Todas las aristas utilizadas se actualizan cuando cambia la geometría subyacente. Sin embargo, esto no reacciona bien a los cambios de tipo de geometría (círculo a línea, etc.) causados por cambios de modelo.
- Algunas cosas sobre Onshape Use pueden ser diferentes a otros sistemas, incluido lo siguiente:
- Onshape no restringe los extremos del borde de la silueta. Puedes elegir cómo arreglar los extremos.
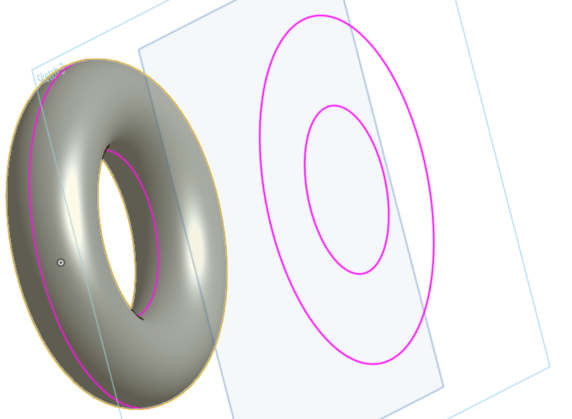
- Onshape no distingue entre «partes» de los bordes de la silueta, como en este ejemplo de un cilindro con un agujero que lo atraviesa:
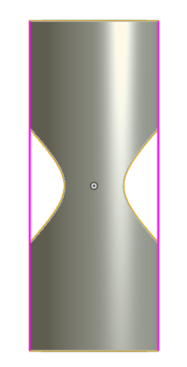
- Onshape no utiliza una cara, como el cilindro de arriba con un agujero que la atraviesa, y extrae automáticamente los bordes o los bordes de la silueta y los cose todos juntos.
- Onshape solo usa bordes de silueta que se pueden rastrear. Esto permite un nivel de certeza de que el borde de la silueta aún se puede actualizar más adelante.
- Los bordes de silueta compatibles incluyen: cilindros, conos, toros, esferas, superficies extruidas y cualquier superficie con un borde de silueta.
- Los bordes de silueta que se intersecan automáticamente después de la proyección no se pueden utilizar.
Project (or convert) an edge, edges, and silhouette edges of a part or sketch onto the active sketch plane.
Steps
- Create a sketch or part.
- Start another sketch.
- Tap , then select an edge, edges, or silhouette edge from the first sketch or part.
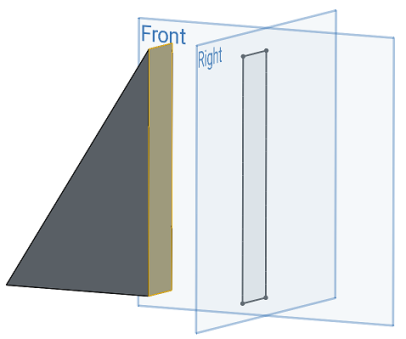
Here, the highlighted face was selected to use (project) onto the Right sketch plane, resulting in the black sketch lines that form a rectangle on the Right sketch plane.
Using silhouette edges
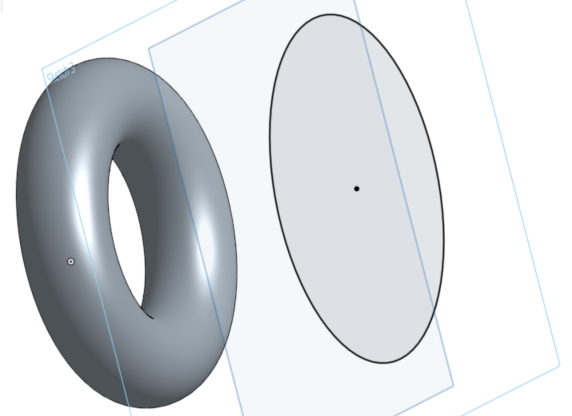
When viewing a model normal to a sketch any visible boundary that isn't an edge is a silhouette edge; where the surface transitions from facing you to facing away from you.
How does using a silhouette edge work?
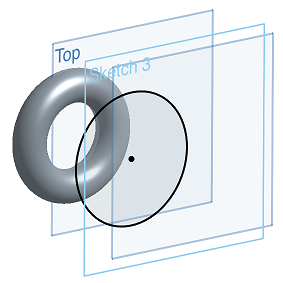
- Tap .
- Use the Precision selector to hover over the face for which you want a silhouette edge. See Selection for more info.
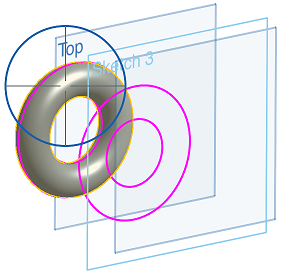
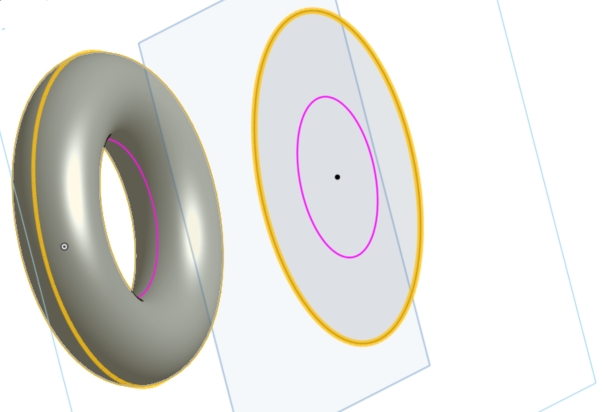
The projection of the silhouette edge appears in pink on the active sketch plane.
- Hover over (line the cross-hairs up with) a specific pink silhouette edge section and it turns yellow to indicate that it is selected. Release to select it and that silhouette edge is now projected onto your current sketch plane.
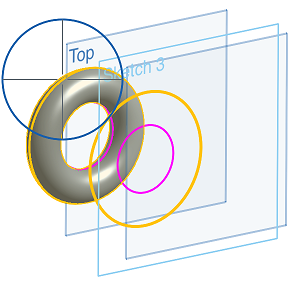
- If you do not specify a selection by hovering over a pink silhouette edge to turn it yellow, then releasing to select will project all of the silhouette edge options.
This may be used as a more efficient way of projecting an entire silhouette edge at once.
There is NO pre-select behavior for silhouette edges.
Tips
- All used edges update when the underlying geometry changes. However, this doesn't react well to changes of geometry type (circle to line, etc.) causes by model changes.
- Some things about Onshape Use may be different from other systems, including:
- Onshape does not constrain the ends of the silhouette edge. You are able to choose how to fix the ends.
- Onshape does not distinguish between "bits" of silhouette edges, like in this example of a cylinder with a hole through it:
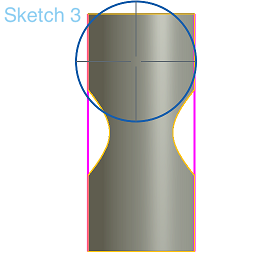
- Onshape does not use a face, like the cylinder above with a hole through it, and automatically extract either edges or silhouette edges and sew them all together.
- Onshape only uses silhouette edges that are trackable. This enables that the silhouette edge can still be updated later.
- Supported silhouette edges include cylinders, cones, tori, spheres, extruded surfaces, and any surface with one silhouette edge.
- Silhouette edges that are self-intersecting after projection are not usable.
Project (or convert) an edge, edges, and silhouette edges of a part or sketch onto the active sketch plane.
Steps
- Create a sketch or part.
- Start another sketch.
- Tap , then select an edge, edges, or silhouette edge from the first sketch or part.
Here, the highlighted face was selected to use (project) onto the Right sketch plane, resulting in the black sketch lines that form a rectangle on the Right sketch plane.
Using silhouette edges
When viewing a model normal to a sketch any visible boundary that isn't an edge is a silhouette edge; where the surface transitions from facing you to facing away from you.
How does using a silhouette edge work?
- Tap .
- Use the Precision selector to hover over the face for which you want a silhouette edge. See Selection for more info.
The projection of the silhouette edge appears in pink on the active sketch plane.
- Hover over (line the cross-hairs up with) a specific pink silhouette edge section and it turns yellow to indicate that it is selected. Release to select it and that silhouette edge is now projected onto your current sketch plane.
- If you do not specify a selection by hovering over a pink silhouette edge to turn it yellow, then releasing to select will project all of the silhouette edge options.
Use this as a more efficient way of projecting an entire silhouette edge at once.
There is NO pre-select behavior for silhouette edges.
Tips
- All used edges update when the underlying geometry changes. However, this doesn't react well to changes of geometry type (circle to line, etc.) causes by model changes.
- Some things about Onshape Use may be different from other systems, including:
- Onshape does not constrain the ends of the silhouette edge. You are able to choose how to fix the ends.
- Onshape does not distinguish between "bits" of silhouette edges, like in this example of a cylinder with a hole through it:
- Onshape does not use a face, like the cylinder above with a hole through it, and automatically extract either edges or silhouette edges and sew them all together.
- Onshape only uses silhouette edges that are trackable. This means that the silhouette edge may still be updated later.
- Supported silhouette edges include cylinders, cones, tori, spheres, extruded surfaces, and any surface with one silhouette edge.
- Silhouette edges that are self-intersecting after projection are not usable.